The Dialog Builder is where you can create your Dialog Tasks, from end-to-end. This is an in-depth article on how to use this tool.
Create a Dialog Task
To create a dialog task, you must have already created an assistant to add a dialog task to. See Create Your First Assistant for more information.
Steps to add a dialog task:
- Open the assistant for which you want to create the dialog task.
- Select the Build tab from the top menu.
- From the left menu, click Conversational Skills > Dialog Tasks.
- On the Dialog Tasks page, click the Create Dialog button.

- The Dialog Builder now displays the root intent component.
- Enter a name for the dialog task in the Intent Name field. As the field label states, the name should reflect the user intent you want to achieve with this Dialog Task. Optionally, you can add a description.
Note: Non utf 8 characters are not supported for intent display name. - You can add user utterances that should trigger this intent, using the Intent Training field. You may add this data later, from the user intent node that is generated within this task.
- If you have not configured any integration for your virtual assistant, you will see the Explore Integrations option. Once you click this option, you will be redirected to the Actions page to configure an integration for your VA. For more information, see Actions Overview.
- Click and expand More Options to set additional options for Intent Settings, Analytics – Containment Type, and Conversation Context.
- Set additional options
- Set the task to be independent or a sub-intent dialog.
- Hide from help requests by the user.
- Specify the context tags as intent preconditions – this will ensure that the intent would be detected only when the context tag is present.
- Set the Context Output and define the context tags to set when this intent is initiated.
- If you are using the legacy Dialog Builder please select Create Using the New Conversation Driven Dialog Builder which was introduced in ve r9.0 of the Platform. This is the default setting and recommended. If you do not select this option, you will be prompted to Upgrade whenever you open the dialog task.
- Click Proceed.


Now, you can add nodes and establish transitions between these nodes for your workflow. Click here to know about Nodes & Connections.

Auto-Generated Dialog Tasks
Introduction
This feature auto-generates dialog flows using the VA’s purpose and intent description provided during task creation. The Platform uses LLM and generative AI to create suitable Dialog Tasks for Conversation Design, Logic Building, and Training by including the required nodes in the flow. This helps simplify and shorten the development process and suggests possible pathways that developers might not think otherwise.
To enable this feature, you must turn on LLM and Generative AI, and Automatic Dialog Task Generation under Buld > Natural Language > Advanced NLU Settings.
The nodes and the flow for the Business Logic are automatically built for your conversation, and you only need to configure the flow transition.
The Platform auto-defines the Entities, Prompts, Error Prompts, Bot Action nodes, Service Tasks, Request Definition, and other parameters.
Auto-Generate Dialog Tasks
If you have enabled LM and Generative AI features and Automatic Dialog Task Generation, you will see a Conversation Preview window right after creating your Dialog Task. In this window, you can create mock conversations and convert them into dialog flows for every intent.
- Start by adding a meaningful description that states the purpose of the Dialog Task and provides example intents.
- Click Generate when ready.
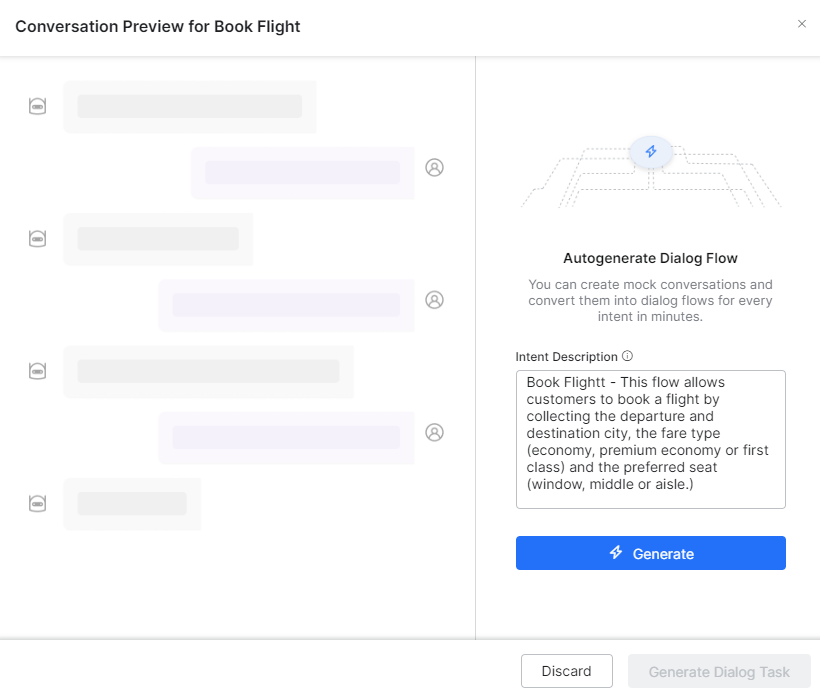
- Wait a few moments until the Platform generates dialog flows for your specified intents. When done, you see a mock conversation based on which dialog flows will be generated afterward. You can preview the conversation flow, view the Bot Actions taken, improvise the intent description, and Regenerate the conversation if needed.
- Click Generate Dialog Task when the mock conversation looks good.

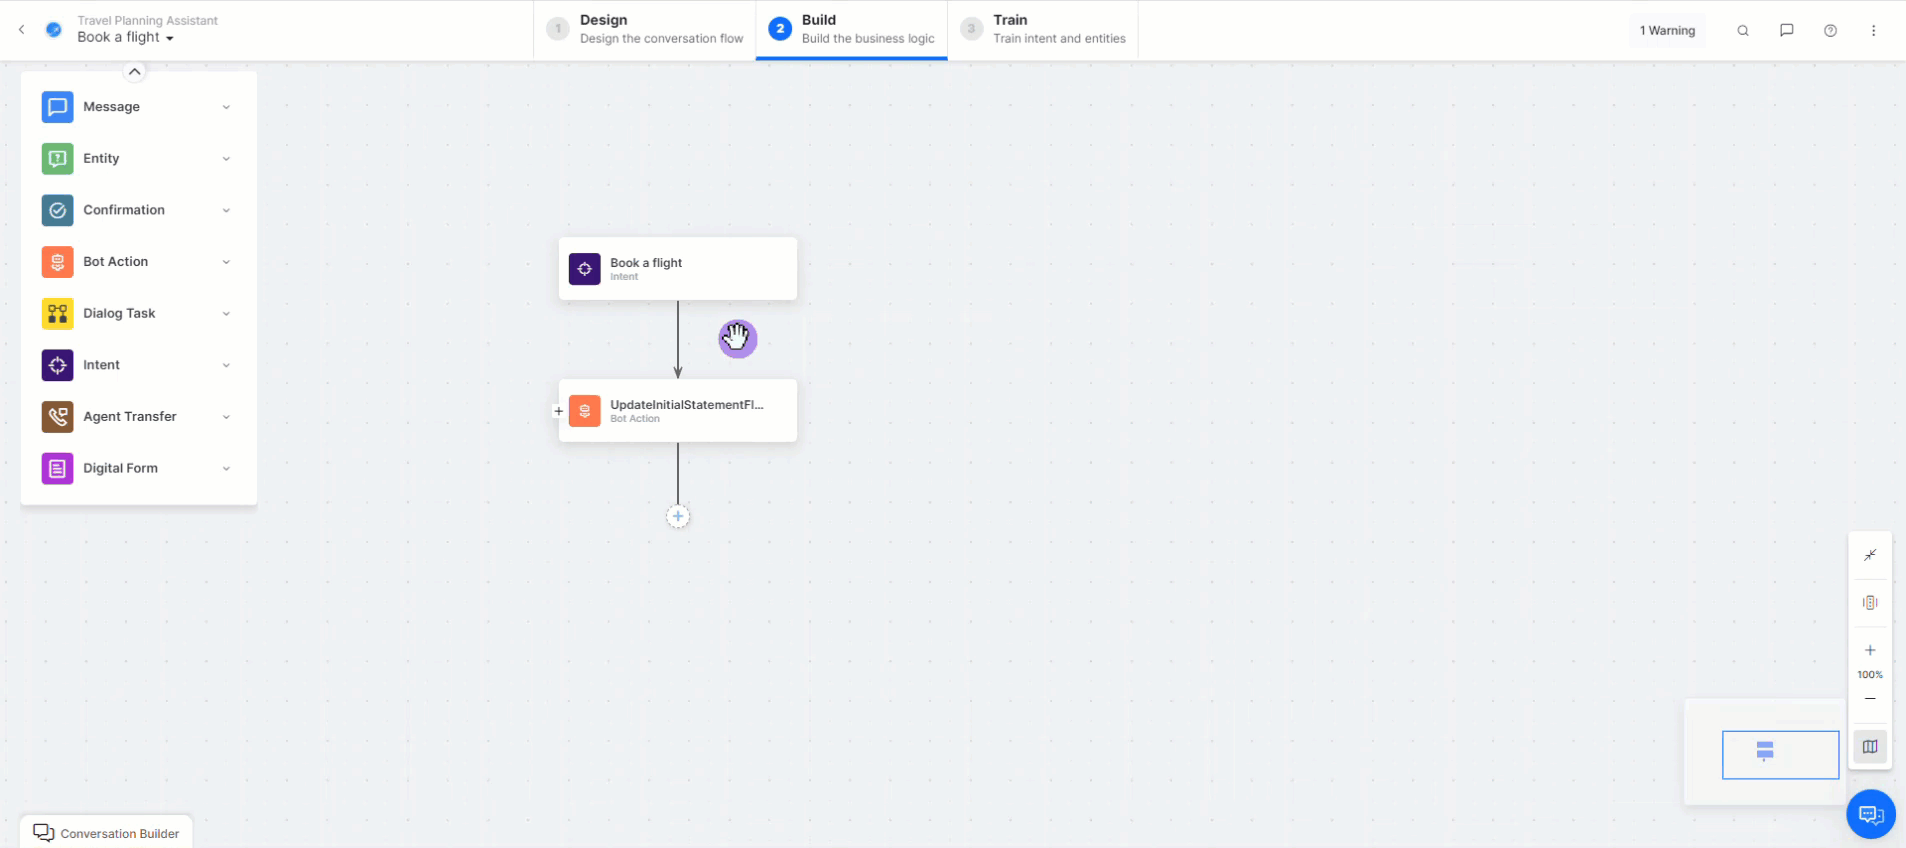
- Once you generate the Dialog Task, the canvas is populated with nodes corresponding to the mock conversation. You can customize the flow per your requirements by editing the generated nodes and adding your own. You can configure the generated Dialog Tasks just like any other dialog task. Keep reading to learn more.

Dialog Task Builder Overview
Before moving on, here is an overview of the Dialog Task Builder. For details, please see Navigating the Dialog Task Builder.

Add Nodes
There are three ways to add a node:
- Using the conversation-first approach, refer here for details.
- Drag and drop nodes from the panel onto the dialog builder, see below.
- Using the options from the Dialog Builder Canvas, see below.
In this article, we will be working with drag and drop, and the Dialog Builder Canvas. For details about the conversation-first approach, please read about the Conversation-Designer
Use Drag and Drop
You can add nodes within the dialog task, by dragging the node from the panel on the left to the designated place in the dialog task, on the canvas.
You can also drag and drop a node from the side panel on the left in-between two existing nodes. A connector comes up on hovering over the connecting line, and you can drop your new node on it.

Use the Dialog Canvas
Use the “+’ button next to the node under which you want to add another node. You can either add a new node or connect an existing node. This existing node can be either from the current task or from a different one.

You can use the Add Node button visible on hover over the connector line, to add nodes between two existing nodes. You can create a new node or pick from the existing node list.
Add If-Else Node Connections
To add If-Else connection conditions, hover over the node and click the blue “+” button on the bottom. Learn more.

Node Properties
Clicking on a node will open its Properties panel, which includes specific features, depending on the type of node you are working with. Please consult the documentation on Node Types to learn more about what is included with each. So, noting that some nodes may not come with some features, here is a general overview of what is available within this panel:
- Component Properties such as name, type, and component-specific properties.
- Instance Properties can be customized for the selected node for the current dialog.
- Connection Properties can be used for configuring transition conditions.
- NLP Properties for intent and entity recognition.
- Voice Call Properties for IVR channels (available for certain nodes only after IVR integration).

Node Options
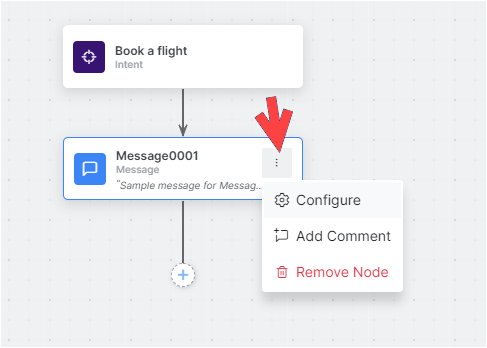
Hovering over a node will reveal the Node Options menu. Here is where you can find the following options:
- Configure – Takes you to Node Properties, where you can configure the node.
- Add Comment – Here is where you can add your comments for the selected node.
- Remove Node – This option deletes the node. <span
Warning: This action cannot be undone.
Node Groups
Node groups are primarily used for defining a group of nodes. When including nodes in a group, they need to be located next to each other on the Dialog Builder Canvas.
Advantages of Grouping Nodes
- Grouping nodes allows for automatic back-to-back transitions between consecutive nodes.
- Complex conversation flows can be broken down into logical groups, each responsible for a specific function, making the design easier to manage and understand.
- Inputs and outputs can be handled at the group level, allowing users to focus on group interfaces without needing to manage every node.
- Groups help maintain a clean and structured flow, which is useful in large or multi-functional bots.
- Node groups support better handling of follow-ups, digressions, and amending entity values.
To create a group of nodes, press and hold the Ctrl / Command key on your keyboard, and simultaneously use your mouse cursor to select the canvas area where you have located the nodes to be grouped. Once grouped, the nodes will be displayed together on a separate, light yellow background. Below is a quick demo of how to do this.

You can rename the group using the Edit option next to the name.

You can delete the group using the Delete icon on the right, that becomes visible once you hover over the group.
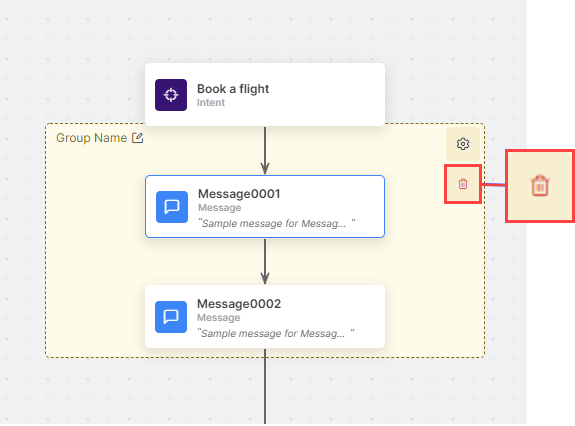
If you are using the group to set up a Subintent, you can also configure it, using the Configure / Gear icon, that becomes visible once you hover over the group. For additional information, please see Grouping Nodes as Subintents.

Bot Action Nodes
| Note: This node was introduced in v9.0 of the Platform as a container for nodes that are relevant to the actions your VA needs to perform. |
Bot Action nodes include the following nodes, that need processing by the VA without user interaction:
- Service Node
- Script Node
- Logic Node
- Webhook Node
- Process
To access these nodes follow the steps below:
- Add a Bot Action node to your dialog task canvas.
- Click the expand (+) button next to the Bot Action node. The primary nodes panel will be replaced with the Bot Action nodes panel.
- The Bot Action Node shows all of its containing nodes as a group. Add any node from here, using either the “+” sign or drag and drop. Bot Action Nodes provide the following options: On the left side of the node there is an Expand (+) button if the node is collapsed, and a Collapse (-) button if the node is expanded. Nodes can also be collapsed using the Close (x) button on the top right.
- Nodes inside the bot action node cannot be connected directly to any node outside the bot action.
- For the nodes inside the bot action node, the following connections can be configured:
- Node Connections – this option can be used to define the connection rules connecting to nodes within the bot action node. This can be configured to:
- Any node within the corresponding bot action node;
- Not Connected;
- End of Bot Action – this would take the bot flow to the node connected to the bot action node;
- Bot Action Connections – this option can be used to define the connection rules connecting to a node outside of the current Bot Action. These rules would be applied to the bot action node as a whole.
- Node Connections – this option can be used to define the connection rules connecting to nodes within the bot action node. This can be configured to:

Dialog Task Training
You can train your VA on a newly created task by going to the Train section of the Dialog Task area.

In the Train section, you can perform the following tasks:
- Auto-Generate Utterances: If you enable LLM and Generative AI and Training Data Suggestions for your VA, you can auto-generate training utterances within this module. Your VA will use these utterances to recognize user intents.
- Add Utterances Manually: You can enter utterances that the VA could use to recognize the intent you are training the VA on.
- Add Patterns: Patterns are word combinations that indicate a particular intent or entity. You can add exact word combinations that the VA will use to precisely detect the selected intent when these combinations are present in an utterance.
- Add Negative Patterns: These are patterns that you don’t want the VA to recognize as relevant to the intent you are training it for.
- Add Rules: Here, you can define intent identification rules to trigger the intent you are working with. You can use traits or context tags to create these rules.
See Manage Patterns and Rules to learn more about these training features.
Automatically Generate Utterance Suggestions
You can use the Suggestions panel on the right side of the Train screen to generate training utterances automatically. This feature leverages LLM and Generative AI to help you virtually eliminate the guesswork regarding the queries your customers might send to your VA.
To generate utterances, click Generate within the Suggestions panel.

When the process completes, you can see a list of generated utterances you can validate or reject. Validated utterances are added to your training data. Rejected suggestions are not considered and removed from your current suggestions list but may be suggested again for reconsideration.

Click Add All to add all suggested utterances to your training data.

Click Generate more to generate another batch of utterances.

You must train your VA for any newly added utterances to be considered during interactions. Click Train on the notification bar to do so.

Switch Tasks
The Builder comes with a dedicated task switcher, which you can use to easily change to working on a different task within your selected Virtual Assistant. This option is located at the top left of your canvas, above the Node Types panel.

Menu Options

The top menu provides access to a variety of options which you can use while working on your Dialog Task. The following options are specific to the Logic-Driven Dialog Builder:
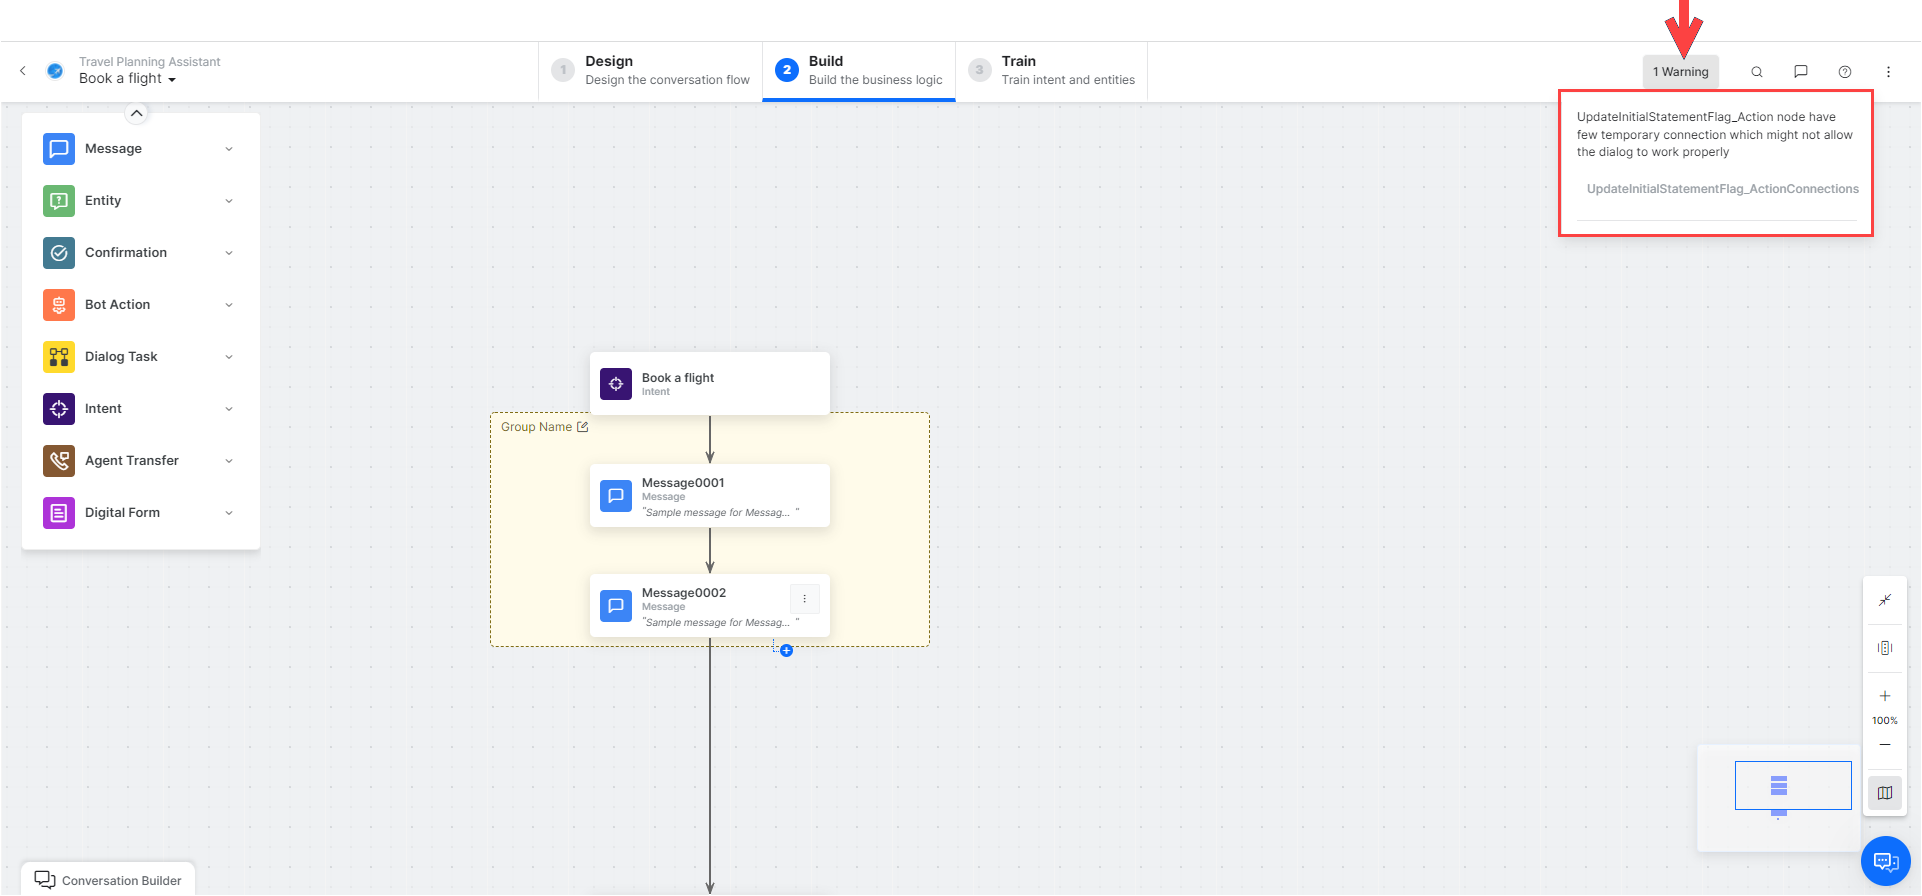
- Errors and Warnings – Any potential errors and warnings in your Dialog Task will be shown here. Click this area to access information about current errors and warnings.
- Find Nodes – This search option will look for tasks containing your keywords and highlight them onto the canvas.

- Help – Get contextual help for your Dialog Task or follow a Setup Guide. Find out more by reading Help and Learning Resources.

The ‘More Options’ Menu
The More options menu, accessible at the top right of the Dialog Builder, is where you can find shortcuts to display and zoom options, where you can auto-arrange nodes access dialog settings, manage interruptions or amend behavior.,

Display Options
You can use Display Options to reduce unnecessary node information and better utilize screen real estate.
You can show or hide some or all node types, node details, or connection details displayed in the Dialog Builder.
- Show All to show all the node information.
- Hide Node Type to remove the node type.
- Hide Node Details to remove node descriptions.
Hide Connection Details to remove information about node connections. .

Zoom Controls
Zoom Options are used to:
- Fit to Page – Resizes Dialog Builder components and connections to fit within the display screen resolution for a single, non-scrolling page.
- Reset Zoom – Resets zoom settings to actual size.

Additional Zoom Controls are available in the panel at the bottom-left of the Dialog Task. These are visible when the Node Properties panel is closed. The available options are:
- Minimize Panel.
- Auto-Arrange Nodes.
- Zoom In.
- Zoom Out.
- Map. You can click on an area of the map to be taken to the corresponding area of your conversation.

Dialog Settings
The Dialog Settings panel allows you to modify the dialog task basic settings, and if desired, set the visibility of a dialog to create a hidden dialog task that is available for use, but not shown as a task. You can access Dialog Settings using the More Options Menu.

Add or modify the following settings for your dialog:
- Name – The name of your dialog task, usually the main user intent. For example, Book Ticket.
- Description – An optional description of your dialog task displayed in the XO Platform.
- Options – Specify the behavior of this dialog task to the end-user:
- Sub intent only dialog – The task is invoked only as a sub-task when another task is in progress. It is not presented as a task when the user requests help.
- Hide from help – The task is not presented as a task when the user requests help. Users can invoke this task anytime while talking to the assistant.
Note that this option is selected automatically when the previous option is selected.
- Follow-up Task – The follow-up task array contains all the intents detected from user utterances from this dialog. You can either:
- Handle the follow-up tasks as part of node connections (default setting), or
- Let the user select the follow-up task.
- Task Execution Failure – Define the assistant’s behavior when there is an error in task execution. It can be set as either:
- Same as the Bot Level behavior
- Specific to this task – initiate a task, run script, or show a message.
Troubleshooting
In the top navigation area, you will see a real-time set of errors and warnings are available as you define your dialog task located on the top-right of the Dialog Builder. Click the information icon to display any errors or warnings as shown in the following illustration.

Toggle the Conversation View
While working with the Logic-Driven Dialog Builder, you can also toggle the Conversation View, to see what the conversation between the assistant and the User could look like, in real time.
To toggle this view. Click Conversation Builder, at the bottom left of your canvas.
