This document helps you create a sample banking bot. This bot is used in various use case scenarios presented in the How-Tos section of the developer documentation.
Prerequisites
The following are the prerequisites:
- You must have signed up with the Kore.ai Bots Platform.
- You must be aware of the basics concepts of bot-building (refer to this link).
- You must have created a simple bot (refer here for an example).
Bot Overview
The bot we build will perform the basic banking transactions. This bot will:
- Get account balance based on the user’s Account Number and Account Type.
- Update accounts with the balance. For more information, click here.
- Transfer a specified amount from the user account to a payee account. For more information, click here.
Let us start building the bot and add Get Balance task to it.
Create a Bot
This document helps you to create a Standard Bot for banking activities. To create a standard bot, follow the below steps:
- Log in to your Kore.ai Bots Platform with valid credentials.
- On the bots landing page, click New Bot on the top-right and select Start from Scratch from the list.
- On the Create New Bot window, enter the bot details:
- Bot Name – Provide a name to your bot. For example, Banking Bot. If the name is already used, provide a different name.
- Set the Default Bot Language to English.
- Select the Bot Type as Standard Bot.
- Click Create.

Get Balance Intent
- The Get Balance task prompts the user to enter an account number and the account type (Savings/Current).
- It makes a service call to fetch the details.
- The balance for the requested account is displayed.

Dialog Task
Successful creation of the bot directs you to the Bot Summary page. We need to add a Dialog Task as the first step in the Bot. Intent Dialog is the first step in the user-bot conversation flow.
- On the Bot Summary page, click + New Task on the Tasks widget.
- Select Dialog Task from the list.

- On the Create Dialog window, enter the following details:
- Enter a name in the Intent Name field. This is the phrase that triggers the dialog. The intent name must be simple and not more than 3-4 words. For example, Get Balance.
- Enter a description in the Description field.
- In the Intent Training field, add unique utterances to improve the user intent recognition.
- Under More Options, you can add other dialog-related details. Let us retain the default settings.
- Select Try Conversation Driven Dialog Builder option.
- Click Proceed.
 Note: For instructions with the older Dialog Builder, refer here
Entity Node
Entity Node is typically used to gather information from the user. Here, it is used to capture the user input for Account Number and Account Type.
- Click the + icon below the User Intent (Get Balance) node.
- Select Entity from the list and click + Entity.

- Click on the newly created Entity node to open the Property window.
- Under the General Settings section, enter the following details:
- Name: AccountNumber
- Display Name: Account Number
- Type: Number
- User Prompts: Enter the following text and press Enter to save:
Enter the account number.

- Close the AccountNumber Entity Property window.
- Repeat the above steps to add another entity with the following details:
- Name: AccountType
- Display Name: Account Type
- User Prompts: Enter the following text and press Enter to save:
Enter the account type. - Display List Of Values: Select Yes, use channel-specific standard formatting for default messages and show the available list of values to the end-user. This presents the list of values in a button template for the supported channels.
- Type: Select List of Items (enumerated) from the drop-down list.

- Provide the list of values that the user can select.
- Click the Settings icon that appears next to the field.
- Under the Account Type section, select the Static List radio button.
- Under the Keys & values to use section, enter
- the Display Name as Savings and Current.
- Value and Synonym columns will auto-populate. Change the Value to savings and current, since our mockapi has the account type saved in lowercase.
- Click Save on the top-right of the page.

- Close the AccountType Entity Property window.
Bot Action – Service Node
Service Node allows you to make a backend API call and is under Bot Action.
Here, the service node is used to call an API to fetch the account balance for the user-entered account number. You can find a dummy API setup for this tutorial. A mock API is created specifically for this purpose with the following fields – FirstName, LastName, Address, City, Country, ZipCode, AccountNumber, AccountType, Balance.
- From the left pane, drag and drop the Bot Action node below the Account Type entity node.

- The newly created Bot Action node would be expanded. If not, click the + icon to expand
- From the left pane, drag and drop the Service node to the Bot Action node layout,
or on the Bot Action node layout, click the + icon and select Service from the list, and click + New Service.

- A Service node is added to the Bot Actions node layout.
- Click the Service node to open its Property window.
- Under the General Settings section, enter the following details:
- Name: GetAccountBalance
- Display Name: Get Account Balance
- Description: Enter a description to describe the service node.
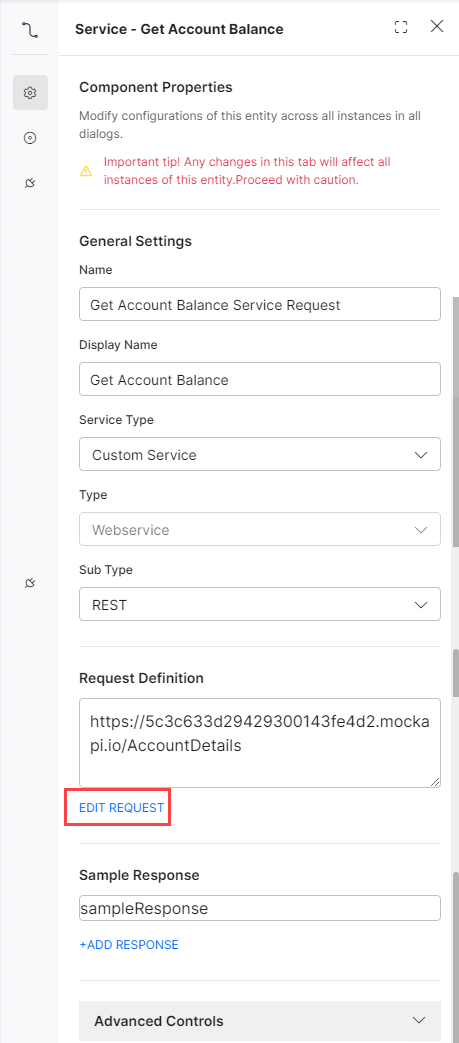
- Click DEFINE REQUEST.
- On the Define Request page, enter the following details:
- Request type – GET
- Request URL –
https://5c3c633d29429300143fe4d2.mockapi.io/AccountDetails?filter={{context.entities.AccountNumber}}
Due to the limitations of the dummy API service, instead of fetching the record for the given account number, the response is filtered for the required account number. - This API does not require any Auth, or Header Parameters.
- Click the Test Request tab.
- Enter an account number in the Sample Context Values section. This is the filter parameter needed by the API, you can use the following account number 02929664.
- Click Test on the top-right of the page. Wait for the test to be completed and you get a Status Code: 200.
- You can see an array of records returned by the API call. In the next step, values are parsed using JavaScript.
- Click Save as Sample Response.
- Click Save on the top-right of the page.

- On the Define Request page, enter the following details:
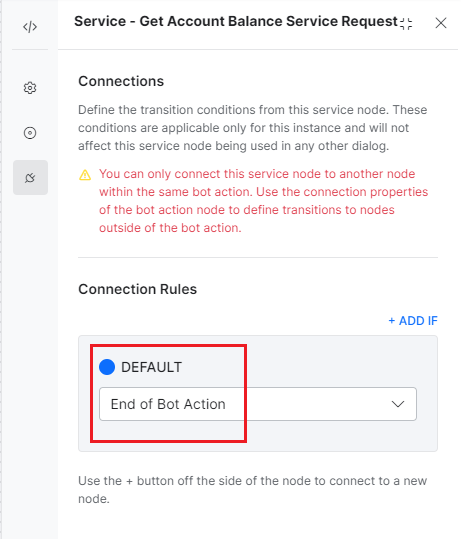
- On the Service node Property window, click the Connections tab.
- Under the Connection Rules section, ensure that the Default connection is set to End of Bot Action.
- Under the Connection Rules section, ensure that the Default connection is set to End of Bot Action.
- Close the Service Property window.
- Click – next to the Bot Action node to collapse the bot action node.
Message Node
A Message node displays a message from the bot to the user. Here, the Message node is used to show the balance.
- From the left pane, drag and drop the Message node below the Bot Action node, or click the + icon below the Bot Action node.
- Select Message from the list and click + New Message.
- Click the Message node to open its Property window.
- Enter the following details:
- Name: BalanceMessage
- Display Name: Balance Message
- Bot Responses: Define a standard message to send to the user.
- Click Manage.

- On the Manage User Prompts page, you can find the user prompt.
- Open the user prompt to define JavaScript to parse the message for all channels.
- Under the Channels section, select All from the drop-down list. Refer to the image below.
- Under the Message section, click the Advanced tab.

- Add the following JavaScript. The JavaScript is written to compare all the records filtered for the AccountType as entered by the user and then display the Balance.
var balance, i; for (i=0; i < context.GetAccountBalance.response.body.length; i++ ) { if (context.GetAccountBalance.response.body[i].AccountType == context.entities.AccountType) { balance = context.GetAccountBalance.response.body[i].Balance; } } if (balance === undefined) { print ('Invalid Account, try again '); } else { print ('The Balance in your account is ' + balance); } - Click Save
- Under the Message section, click the Advanced tab.
- Click Manage.
- Go back to the Dialog Builder.
- On the Message node Property window, click the Connections tab.
- Under the Connection Rules section, change the Default connection from Not Connected to End of Dialog.

- Under the Connection Rules section, change the Default connection from Not Connected to End of Dialog.
- Close the Property window.
Test
To test the dialog task, you can use the Talk to bot option at the bottom-right.
- Enter the following utterance (intent name) Get Balance.
- Follow the bot instructions:
- Enter Account Number – 67846279
- Select Account Type – Savings
- See the Account Balance.

Next Steps
Now that you have added the Get Balance dialog task to the Banking bot, the next step is to add the Update Balance task. For convenience, the steps for Update Balance are split into different documents. Click here to continue.