You can use the Prebuilt Action Templates from your Salesforce integration to auto create dialog tasks and test them using the Talk to Bot option.
Steps to create a dialog task using Salesforce action templates:
- Go to Build > Conversation Skills and then click the Dialog Tasks.
- Click the Create a Dialog Task to create a new task.

- On the Dialog Task pop-up, under the Integration, select the Salesforce option to view the action templates.
 Note:
Note:
If you have not configured any integration for your virtual assistant, you will see the Explore Integrations option. Once you click this option, you will be redirected to the Actions page to configure an integration for your VA. For more information, see Actions Overview.

Salesforce CRM Actions
The following Salesforce CRM actions are supported in this release:
| Supported Actions | Description | Method |
| Create a Lead | Creates a new marketing lead in the CRM. | POST |
| Create an Opportunity | Creates a new opportunity in the CRM. | POST |
| Update a Lead | Updates the lead with changes | PATCH |
| View a Lead By ID | Retrieves the lead details. | GET |
| List All Leads | Retrieves all leads from the CRM | GET |
| Search Leads | Searches all leads that matches with the keyword | GET |
| Delete a Lead | Deletes a lead | DELETE |
Create a Lead
Steps to create a new lead in the Salesforce CRM:
- Refer to the Installing the Salesforce CRM Action Templates section to install this template.
- The Create a Lead dialog task is added with the following components:
- Createlead : A user intent to create a lead.
- firstName, lastName, and companyName – Entity nodes for gathering the required lead details.
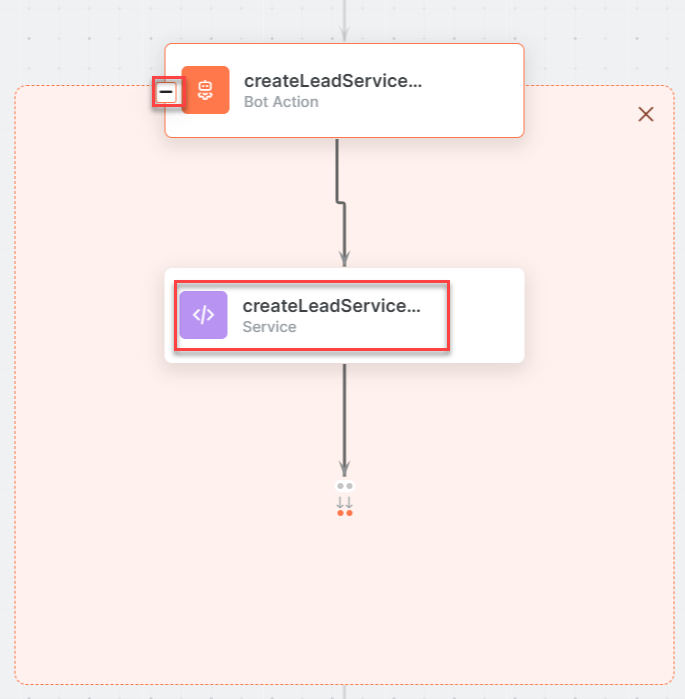
- CreateLeadService – A bot action service to create a lead in an external integration. Click the Plus icon to expand to view the createLeadService bot action component properties.
- In the Component Properties window, click the Edit Request link to edit the request parameters as shown below:

Sample Request:
		{

"attributes": {

"type": "Lead"

},

"LastName": "Doe",

"FirstName": "John",

"Salutation": "Mr.",

"Title": null,

"Company": "ABC",

"Street": null,

"City": null,

"State": null,

"PostalCode": null,

"Country": null,

"Latitude": null,

"Longitude": null,

"GeocodeAccuracy": null,

"Phone": null,

"MobilePhone": "93445667xx",

"Fax": null,

"Email": null,

"Website": null,

"Description": null,

"LeadSource": null,

"Status": "Open - Not Contacted",

"Industry": null,

"Rating": null,

"AnnualRevenue": null,

"NumberOfEmployees": null,

"OwnerId": "0055g00000ECRvPAAX",

"IsConverted": false,

"IsUnreadByOwner": false,

"Jigsaw": null,

"CleanStatus": "Pending",

"CompanyDunsNumber": null,

"IndividualId": null,

"SICCode__c": null,

"ProductInterest__c": null,

"Primary__c": null,

"CurrentGenerators__c": null,

"NumberofLocations__c": null

}
To add one or more responses scroll down and click the +Add Response button:

Sample Response:
		{

"id": "00Q5g00000DZ0d4EAD",

"success": true,

"errors": []
}
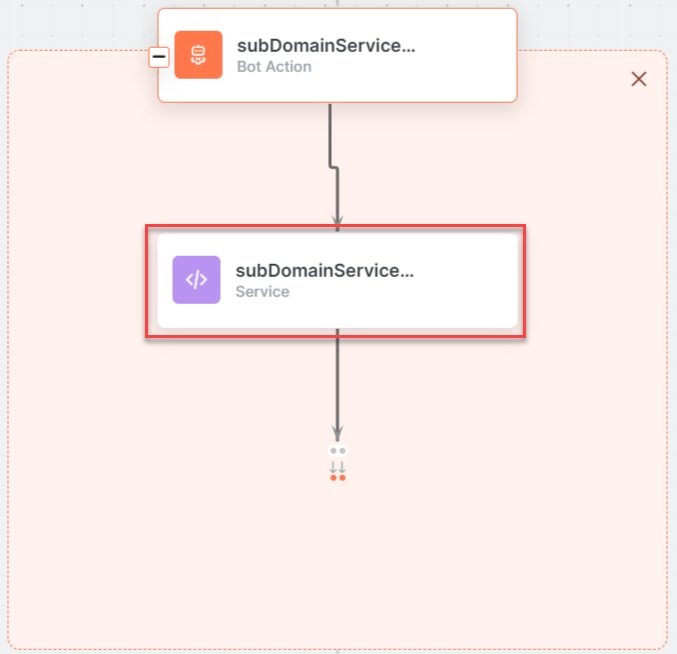
- subDomainService – A bot action service to fetch subdomain in an external integration. Click the Plus icon to expand to view the subDomainService bot action component properties.
- createLeadMessage – A message node with script to display responses for various scenarios.
- Click the Train tab to complete the Dialog task training.
- Click the Talk to Bot icon to test and debug the dialog task
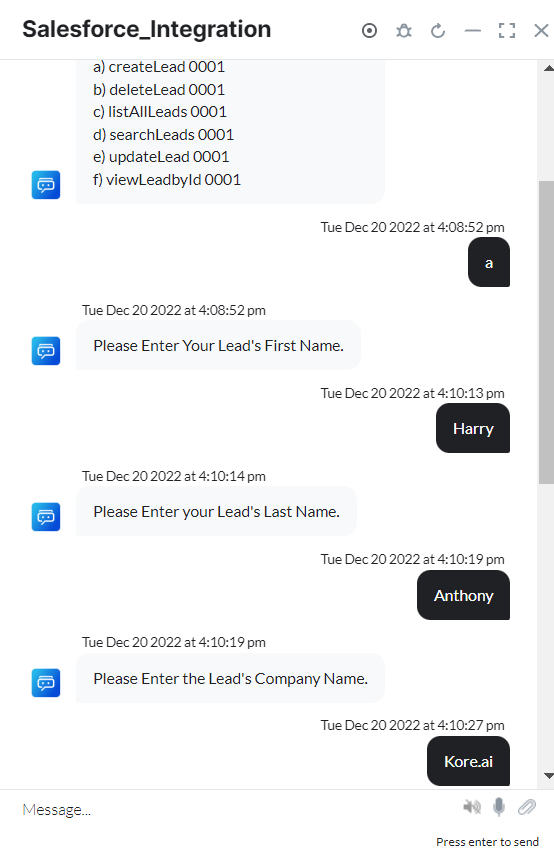
- Follow the prompts in the VA console to create a lead as shown below:

- Enter all lead details when prompted by the VA as shown below:
- The new lead is created in Salesforce CRM.
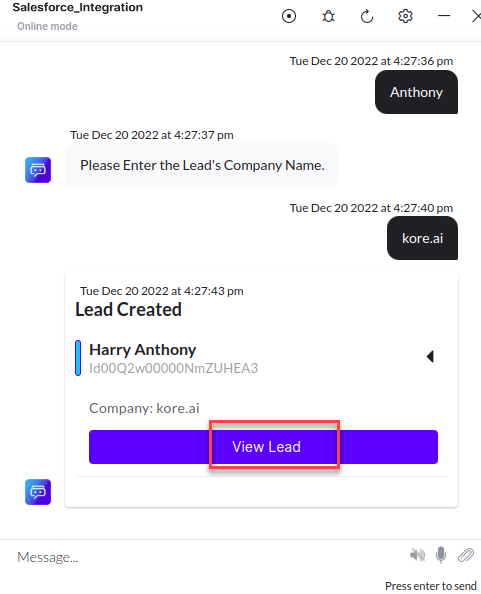
- Click the View Lead button to view the lead details in Salesforce CRM.

Update a Lead
Steps to update an existing lead in Salesforce CRM:
- Refer to the Installing the Salesforce CRM Action Templates section to install this template.
- The Update a Lead dialog task is added with the following components:
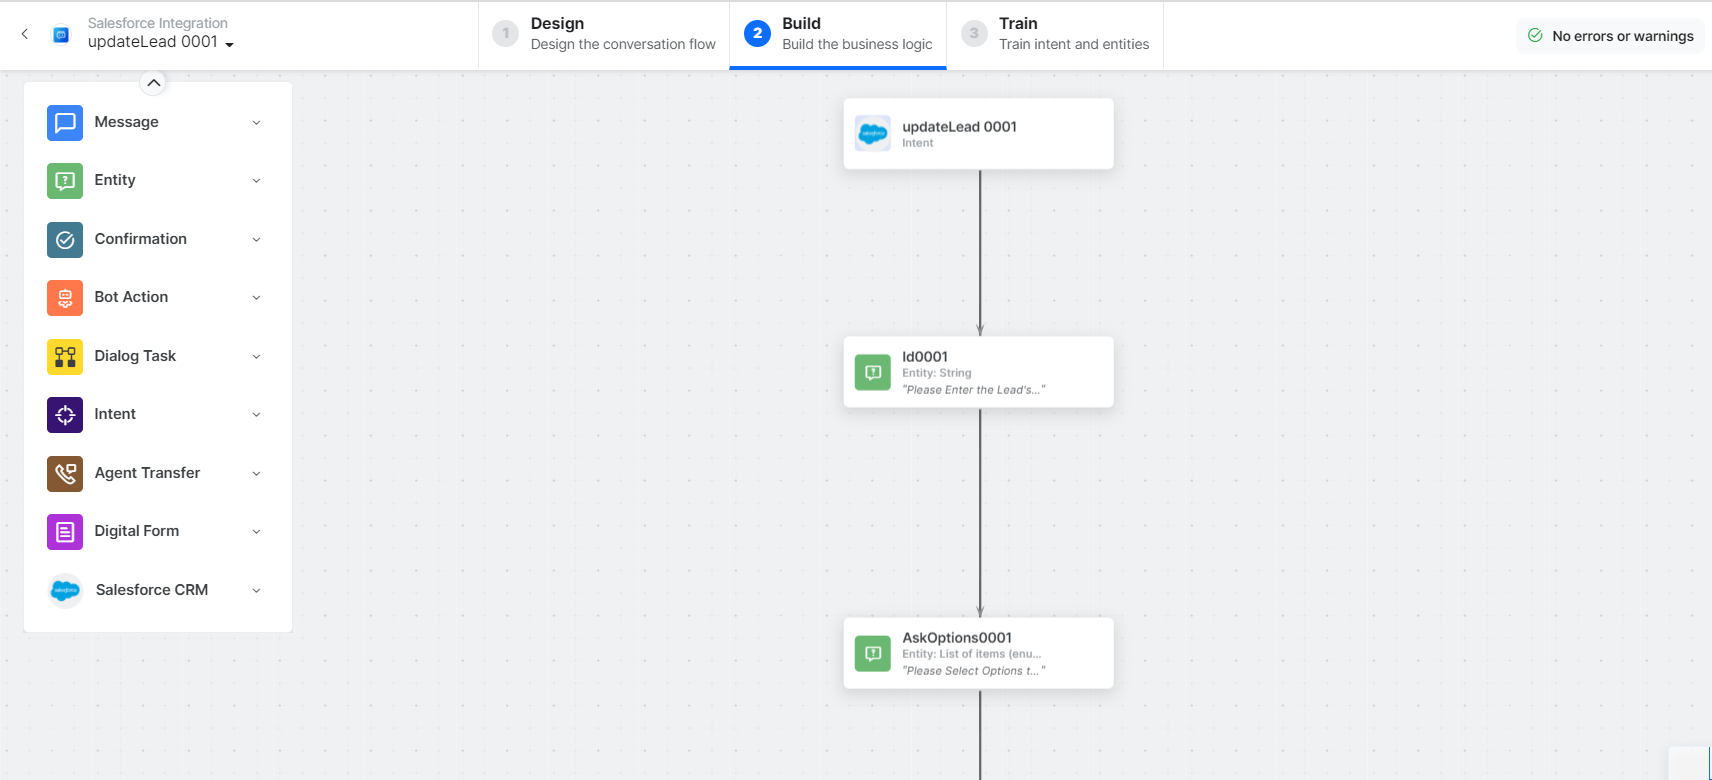
- Update lead : A user intent to update a lead.
- Id, AskOptions, LeadStatus, Title, and MobilePhone– Entity nodes for updating the lead details.
- updateLeadScript – A bot action script to update a lead in an external integration. Click the Plus icon to expand to view the updateLeadScript bot action component properties.

- updateLeadService – A bot action service to update a lead in an external integration. Click the Plus icon to expand to view the updateLeadService bot action component properties.
- subDomainService – A bot action service to fetch subdomain in an external integration. Click the Plus icon to expand to view the subDomainService bot action component properties.
- updateLeadMessage – A message node with script to display responses for various scenarios.
- Click the Train tab to complete the Dialog task training.
- Click the Talk to Bot icon to test and debug the dialog task.
- Follow the prompts in the VA console to update a lead.
- Enter all lead details when prompted by the VA
- The existing lead is updated in Salesforce CRM.
- Click the View Lead button to view the lead details in Salesforce CRM.
Delete a Lead
Steps to delete a lead in Salesforce CRM:
- Refer to the Installing the Salesforce CRM Action Templates section to install this template.
- The Delete Lead dialog task is added for the Salesforce CRM with the following components:
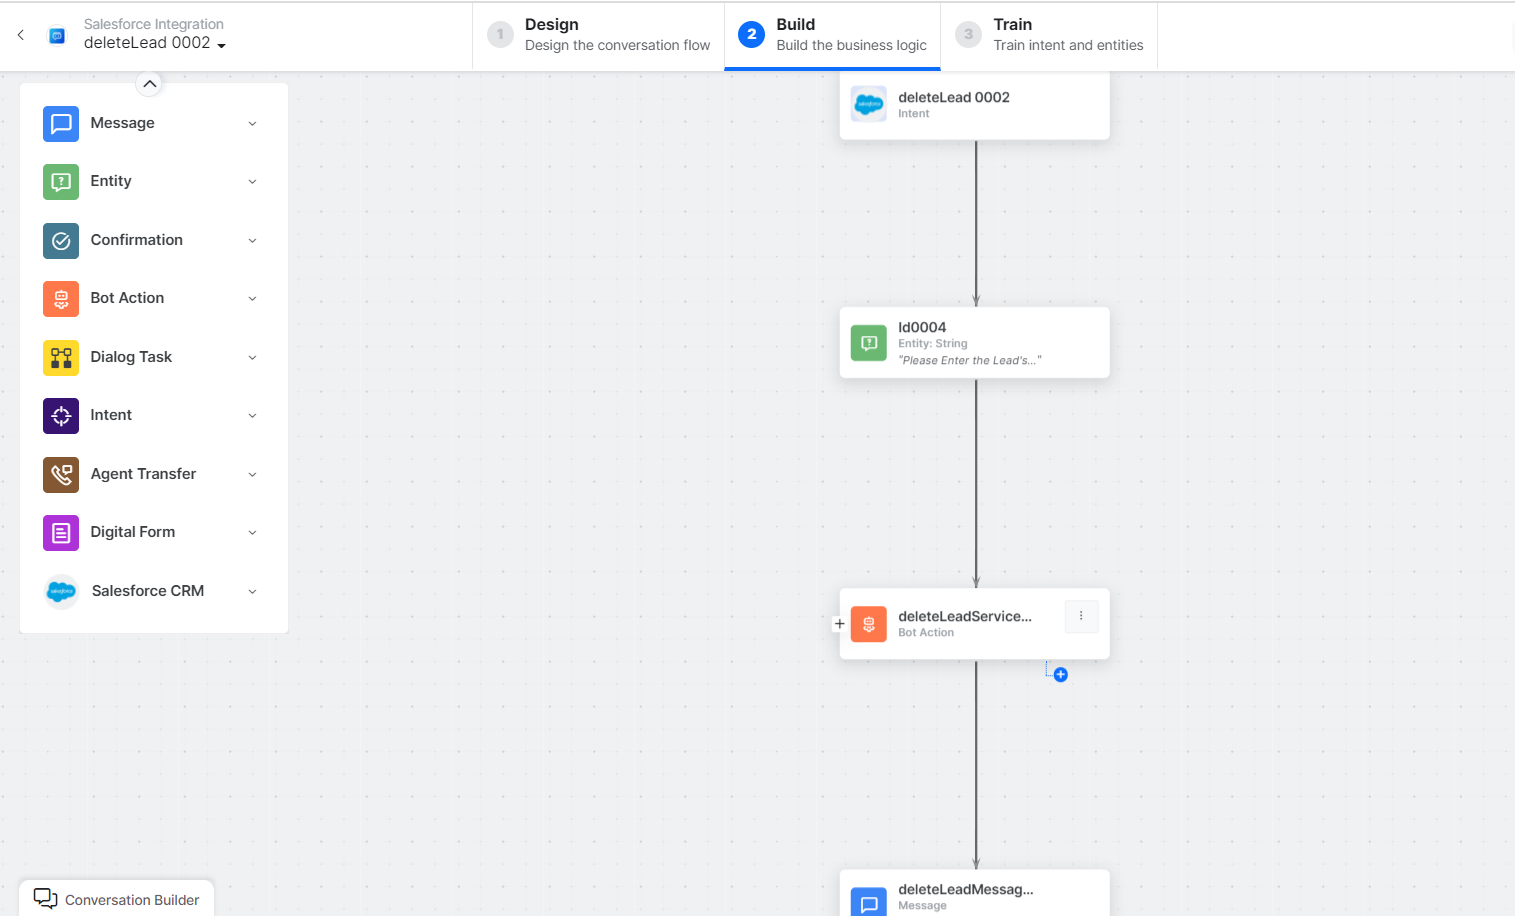
- Delete Lead: A user intent to delete lead.
- ID – Entity nodes for entering the lead ID.
- deleteLeadService – A bot action script to delete a lead in an external integration. Click the Plus icon to expand to view the deleteLeadService bot action component properties.

- deleteLeadMessage – A message node with script to display responses for various scenarios
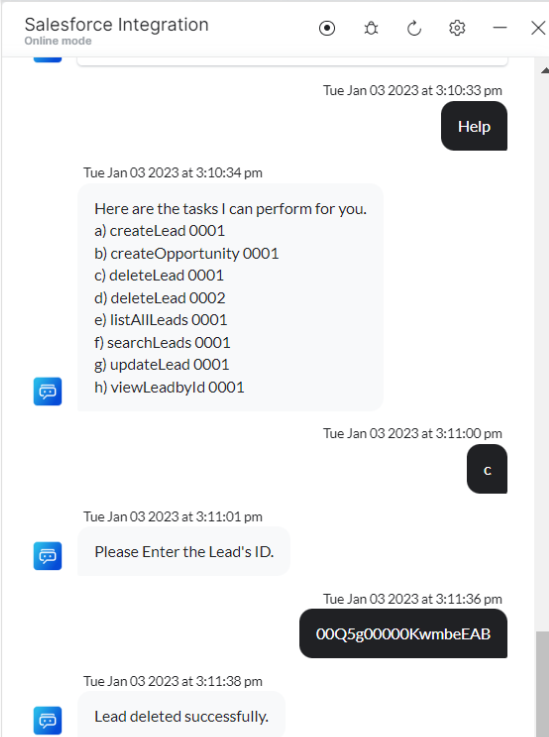
- Click the Train tab to complete the Dialog task training.
- Click the Talk to Bot icon to test and debug the dialog task
- Follow the prompts in the VA console to delete a lead as shown below:
List All Leads
Steps to view all leads in Salesforce CRM:
- Refer to the Installing the Salesforce CRM Action Templates section to install this template.
- The List All Leads dialog task is added for the Salesforce CRM with the following components:

- List All Lead: A user intent to list all leads.
- listAllLeadsService – A bot action script to view all leads in an external integration. Click the Plus icon to expand to view the listAllLeadsService bot action component properties.

Sample Response:
{
"objectDescribe": {
"activateable": false,
"associateEntityType": null,
"associateParentEntity": null,
"createable": true,
"custom": false,
"customSetting": false,
"deepCloneable": false,
"deletable": true,
"deprecatedAndHidden": false,
"feedEnabled": true,
"hasSubtypes": false,
"isInterface": false,
"isSubtype": false,
"keyPrefix": "00Q",
"label": "Lead",
"labelPlural": "Leads",
"layoutable": true,
"mergeable": true,
"mruEnabled": true,
"name": "Lead",
"queryable": true,
"replicateable": true,
"retrieveable": true,
"searchable": true,
"triggerable": true,
"undeletable": true,
"updateable": true,
"urls": {
"compactLayouts": "/services/data/v52.0/sobjects/Lead/describe/compactLayouts",
"rowTemplate": "/services/data/v52.0/sobjects/Lead/{ID}",
"approvalLayouts": "/services/data/v52.0/sobjects/Lead/describe/approvalLayouts",
"listviews": "/services/data/v52.0/sobjects/Lead/listviews",
"describe": "/services/data/v52.0/sobjects/Lead/describe",
"quickActions": "/services/data/v52.0/sobjects/Lead/quickActions",
"layouts": "/services/data/v52.0/sobjects/Lead/describe/layouts",
"sobject": "/services/data/v52.0/sobjects/Lead"
}
},
"recentItems": [
{
"attributes": {
"type": "Lead",
"url": "/services/data/v52.0/sobjects/Lead/00Q5g00000DYz3xxxx"
},
"Id": "00Q5g00000DYz3xxxD",
"Name": "Hogya, Tanmay"
},
{
"attributes": {
"type": "Lead",
"url": "/services/data/v52.0/sobjects/Lead/00Q5g00000ENUBxxxx"
},
"Id": "00Q5g00000ENUBxxxx",
"Name": "Smith, Steve"
},
{
"attributes": {
"type": "Lead",
"url": "/services/data/v52.0/sobjects/Lead/00Q5g00000DZ5xxxT"
},
"Id": "00Q5g00000DZ5xxxxT",
"Name": "Doe, John"
}
] }- subDomainService – A bot action service to fetch subdomain in an external integration. Click the Plus icon to expand to view the subDomainService bot action component properties.
- listAllLeadsMessage – A message node with script to display responses for various scenarios.
- Click the Train tab to complete the Dialog task training.
- Click the Talk to Bot icon to test and debug the dialog task
- Follow the prompts in the VA console to view all leads as shown below:

View a Lead By ID
Steps to view all leads in Salesforce CRM:
- Refer to the Installing the Salesforce CRM Action Templates section to install this template.
- The View Lead by Id dialog task is added for the Salesforce CRM with the following components:

- View Lead by Id: A user intent to view a lead using ID.
- ID – Entity nodes for entering the lead ID.
- viewLeadbyIdService – A bot action script to view a lead using ID in an external integration. Click the Plus icon to expand to view the listAllLeadsService bot action component properties and click the + Add Response link.

Sample Response:
	    {

"attributes": {

"type": "Lead",

"url": "/services/data/v52.0/sobjects/Lead/00Q5g00000DYz3mEAD"

},

"Id": "00Q5g00000DYz3mEAD",

"IsDeleted": false,

"MasterRecordId": null,

"LastName": "Doe",

"FirstName": "John",

"Salutation": "Mr.",

"Name": "John Doe",

"Title": null,

"Company": "Kore",

"Street": null,

"City": null,

"State": null,

"PostalCode": null,

"Country": null,

"Latitude": null,

"Longitude": null,

"GeocodeAccuracy": null,

"Address": null,

"Phone": null,

"MobilePhone": "9344566xxx",

"Fax": null,

"Email": null,

"Website": null,

"PhotoUrl": "/services/images/photo/00Q5g00000DYz3mxxx",

"Description": null,

"LeadSource": null,

"Status": "Open - Not Contacted",

"Industry": null,

"Rating": null,

"AnnualRevenue": null,

"NumberOfEmployees": null,

"OwnerId": "0055g00000ECRvxxxX",

"IsConverted": false,

"ConvertedDate": null,

"ConvertedAccountId": null,

"ConvertedContactId": null,

"ConvertedOpportunityId": null,

"IsUnreadByOwner": false,

"CreatedDate": "2022-08-30T06:49:28.000+0000",

"CreatedById": "0055g00000ECRVXXXX",

"LastModifiedDate": "2022-08-30T11:25:21.000+0000",

"LastModifiedById": "0055g00000ECRvPAAX",

"SystemModstamp": "2022-08-30T11:25:21.000+0000",

"LastActivityDate": null,

"LastViewedDate": "2022-08-30T11:26:32.000+0000",

"LastReferencedDate": "2022-08-30T11:26:32.000+0000",

"Jigsaw": null,

"JigsawContactId": null,

"CleanStatus": "Pending",

"CompanyDunsNumber": null,

"DandbCompanyId": null,

"EmailBouncedReason": null,

"EmailBouncedDate": null,

"IndividualId": null,

"SICCode__c": null,

"ProductInterest__c": null,

"Primary__c": null,

"CurrentGenerators__c": null,

"NumberofLocations__c": null

}- subDomainService – A bot action service to fetch subdomain in an external integration. Click the Plus icon to expand to view the subDomainService bot action component properties.
- viewLeadbyIdMessage – A message node with script to display responses for various scenarios.
- Click the Train tab to complete the Dialog task training.
- Click the Talk to Bot icon to test and debug the dialog task
- Follow the prompts in the VA console to view a lead by ID as shown below:

Search Leads
Steps to search all leads in Salesforce CRM:
- Refer to the Installing the Salesforce CRM Action Templates section to install this template.
- The Search Leads dialog task is added for the Salesforce CRM with the following components:

- Search Leads: A user intent to search leads.
- Keyword – Entity nodes for entering the keywords for the searching leads.
- searchLeadsService – A bot action script to search leads in an external integration. Click the Plus icon to expand to view the searchLeadsService bot action component properties and click the +Add Response link.
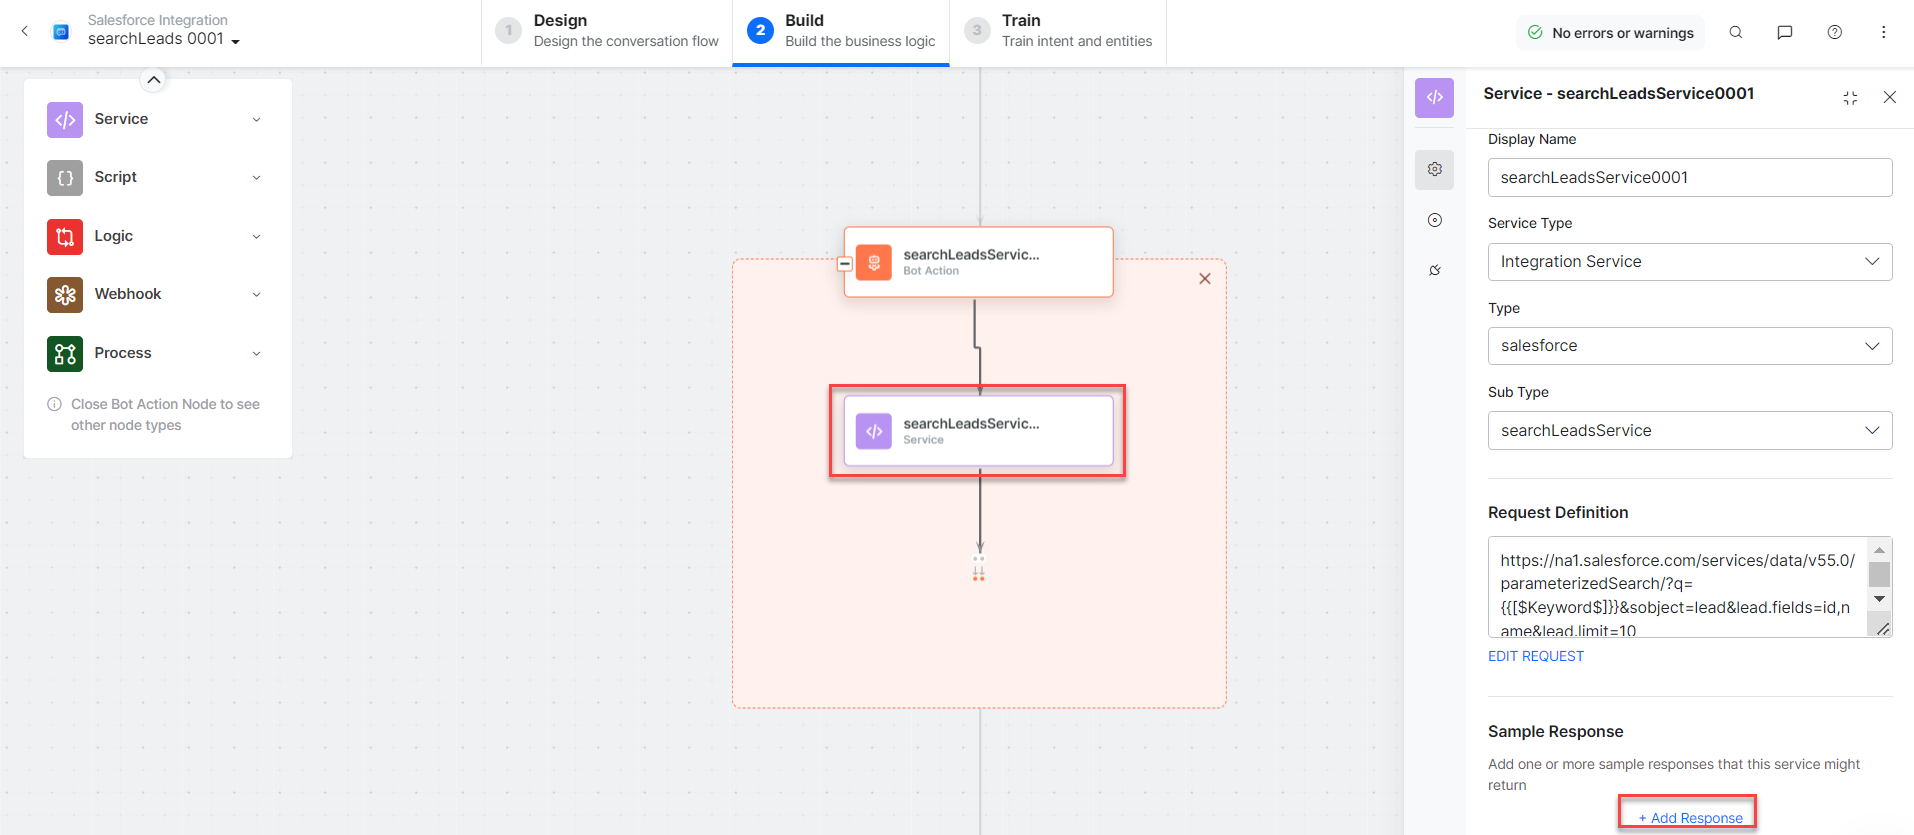
Sample Response:
	      {

"searchRecords": [

{

"attributes": {

"type": "Lead",

"url": "/services/data/v52.0/sobjects/Lead/00Q5g00000ENk9xxxxT"

},

"Id": "00Q5g00000ENk9xxxT"

},

{

"attributes": {

"type": "Lead",

"url": "/services/data/v52.0/sobjects/Lead/00Q5g00000DZ52HEAT"

},

"Id": "00Q5g00000DZ52HEAT"

},

{

"attributes": {

"type": "Lead",

"url": "/services/data/v52.0/sobjects/Lead/00Q5g00000ENnKlEAL"

},

"Id": "00Q5g00000ENnKlEAL"

},

{

"attributes": {

"type": "Lead",

"url": "/services/data/v52.0/sobjects/Lead/00Q5g00000ENnKgEAL"

},

"Id": "00Q5g00000ENnKgEAL"

},

{

"attributes": {

"type": "Lead",

"url": "/services/data/v52.0/sobjects/Lead/00Q5g00000ENcKqEAL"

},

"Id": "00Q5g00000ENcKqEAL"

},

{

"attributes": {

"type": "Lead",

"url": "/services/data/v52.0/sobjects/Lead/00Q5g00000ENcKlEAL"

},

"Id": "00Q5g00000ENcKlEAL"

},

{

"attributes": {

"type": "Lead",

"url": "/services/data/v52.0/sobjects/Lead/00Q5g00000ENcKgEAL"

},

"Id": "00Q5g00000ENcKgEAL"

},

{

"attributes": {

"type": "Lead",

"url": "/services/data/v52.0/sobjects/Lead/00Q5g00000ENcHDEA1"

},

"Id": "00Q5g00000ENcHDEA1"

},

{

"attributes": {

"type": "Lead",

"url": "/services/data/v52.0/sobjects/Lead/00Q5g00000ENXzXEAX"

},

"Id": "00Q5g00000ENXzXEAX"

}

]
}
- subDomainService – A bot action service to fetch subdomain in an external integration. Click the Plus icon to expand to view the subDomainService bot action component properties.
- searchLeadsMessage – A message node with script to display responses for various scenarios.
- Click the Train tab to complete the Dialog task training.
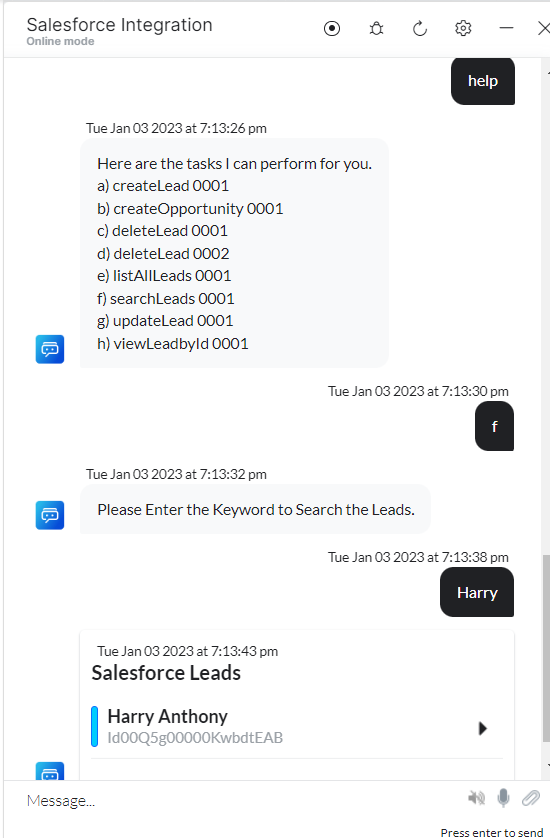
- Click the Talk to Bot icon to test and debug the dialog task
- Follow the prompts in the VA console to view all leads as shown below:
Create an Opportunity
Steps to create a new opportunity in Salesforce CRM:
- Refer to the Installing the Salesforce CRM Action Templates section to install this template.
- The Create Opportunity dialog task is added for the Salesforce CRM with the following components:

- Create Opportunity : A user intent to create an opportunity.
- Opportunity Name, Closed Date, and Stage of Opportunity– Entity nodes for gathering the required opportunity details.
- CreateOpportunityService – A bot action script to create an opportunity in an external integration. Click the Plus icon to expand to view the createOpportunityService bot action component properties.
- In the Component Properties window, click the Edit Request link to edit the request parameters as shown below:

Sample Request:
	   	{

"attributes": {

"type": "Opportunity"

},
“Name”: “Project Charlie”,
“CloseDate”: “2022-08-31”,
“StageName”: “Prospecting”
}To add one or more responses scroll down and click the +Add Response button:

Sample Response:
	 {

"id": "0065g00000O4bgDAAR",

"success": true,

"errors": []
}
- subDomainService – A bot action service to add subdomain in an external integration. Click the Plus icon to expand to view the subDomainService bot action component properties.
- createOpportunityMessage – A message node with script to display responses for various scenarios.
- Click the Train tab to complete the Dialog task training.
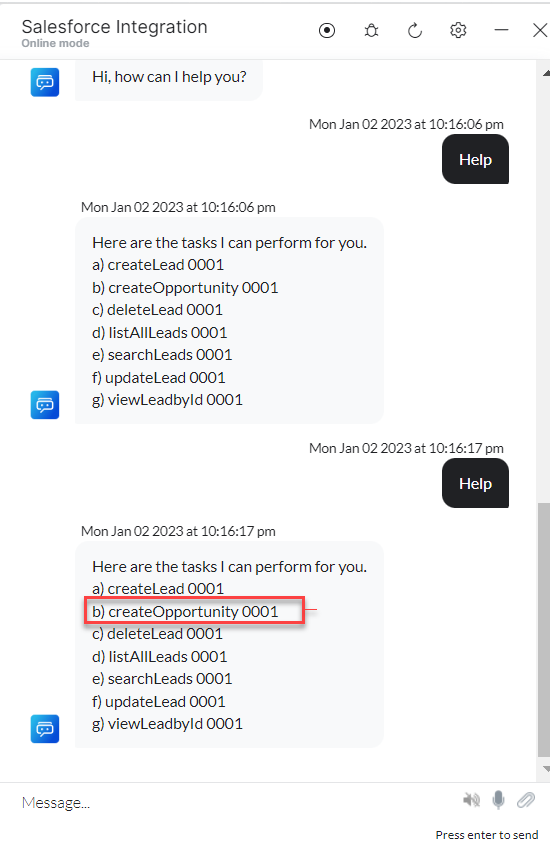
- Click the Talk to Bot icon to test and debug the dialog task
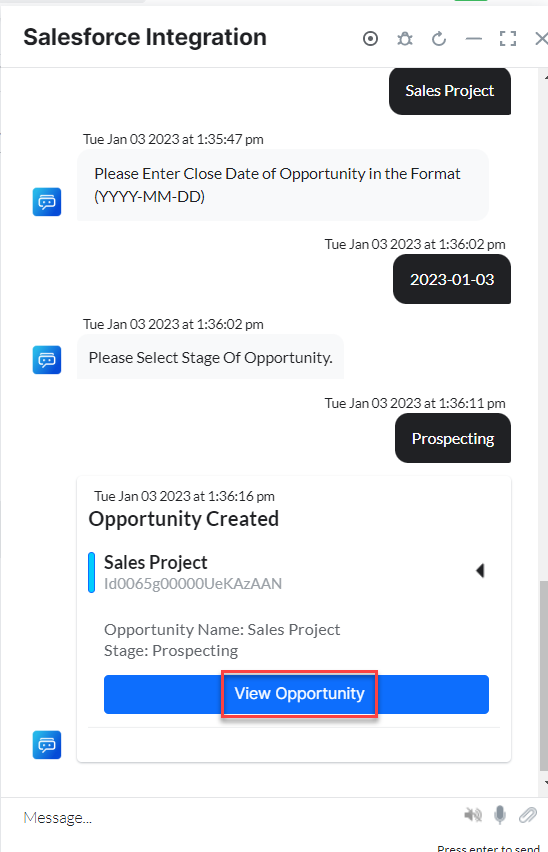
- Follow the prompts in the VA console to create a lead as shown below:
- Enter all opportunity details when prompted by the VA.
- The new opportunity is created in Salesforce CRM. Click the Chevron icon to expand the new opportunity.

- Click the View Opportunity button to view the opportunity details in Salesforce CRM.