In this How-To, we will explore a scenario in a Travel Planning Assistant, where with just one click a user can view upcoming bookings. We will see how this Digital View can be presented using Panels and Widgets. Widgets can be used to trigger Dialog Tasks and display appropriate messages; while Panels can be used as containers to hold these Widgets.
We will also see how the Panel can be hosted on a Web/Mobile Client using the Widget SDK.
For details on what Digital Views are and how they are implemented in the Kore.ai XO Platform, refer here.
Problem Statement
Consider a Travel Planning assistant helping a user retrieve upcoming bookings. Rather than displaying this in text form, the assistant can use Digital Views to provide the information more effectively and in a more visually appealing manner.
Prerequisites
To go through these configurations, you need to know at least the basics of the following XO Platform features:
- Building a Virtual Assistant: This is because your assistant needs to have been already built when you begin working on your Views.
- Working with Digital Views.
You also need a Dialog Task that handles upcoming bookings. Read more about working with the Dialog Builder.
Configurations
Let us consider each of the following scenarios one by one:
- Dialog Task to display Upcoming Bookings, using the Widget SDK Channel.
- Widgets to trigger the above dialog task and a Panel set with the widgets.
- A Panel to hold a widget displaying a static JSON template message.
Message Template
First, the Dialog task which would be triggered from the Widget should have a message definition for the Widget SDK channel.

We are using the following message to display the upcoming bookings.
var lastBooking, dateAfterFifteenDayslastBooking = BotUserSession.get('bookedFlightInfo')if(lastBooking === undefined || lastBooking === null) {lastBooking = {}dateAfterFifteenDays = koreUtil.moment().add(15, 'days').format('D MMM YYYY')lastBooking['travelDate'] = dateAfterFifteenDayslastBooking['passengerCount'] = 1lastBooking['flyingFrom'] = 'Orlando, FL, USA'lastBooking['flyingTo'] = 'New York, NY, USA'}var message = {"templateType": "List","widgetName": "Upcoming Bookings","description": "Shows future bookings","headerOptions": {},"elements": [{"image": {"image_type": "image","image_src": "https://demo.kore.ai/barefoot/sites/default/files/demo_uploads/panelwidgetupcoming.png"},"title": "Date of Journey: " + lastBooking['travelDate'],"subtitle": "Passengers: " + lastBooking['passengerCount'],"value":{"layout":{"align": "centre","colSize": "25%"},"type":"button","text":"","button":{"title": "Web CheckIn","theme": "#3377FF","type": "postback","payload": "I want to do web check-in",//+title,"utterance": "I want to do web check-in"//+title}},"details": [{"image": {"image_type": "image","image_src": "https://demo.kore.ai/barefoot/sites/default/files/demo_uploads/Panelfrom.png"},"description": "Flying from: " + lastBooking['flyingFrom']},{"image": {"image_type": "image","image_src": "https://demo.kore.ai/barefoot/sites/default/files/demo_uploads/Panelto.png"},"description": "Flying to: " + lastBooking['flyingTo']}]}]}print(JSON.stringify(message));
Widget Configuration
We will be creating a Widget that triggers a Dialog Task in order to display upcoming bookings for a user. To do so, let us follow the steps below:
- Ensure that Build is selected from the top menu.
- From under Digital Skills open Digital Views.
- Click the Create Widget button.
- Provide a Widget Name and a Display Name.
- Set the Source, we are triggering Dialog Task, hence select Dialog Task.
- Select Dialog Task as Upcoming Bookings, as per our use case
- Save the widget.
- Edit the widget and click Run & Preview to see the widget output.
- Save as preview will set the output as the thumbnail against the widget.

Once configured, your Widget might look like this:

Panel Configuration
The Widgets thus created need to be attached to a Panel for runtime display and execution.
- Click the Create Panel button to create a Panel. We will be creating a Bookings Panel, within which to integrate the Widget we just created.
- In the New Panel window, enter Panel Name, Display Name and a URL for its Icon.

- Click the Add Widget button to open the Panel Management window.

- Use the Add Widget option to select and add the Widgets that we want to display, in this case the Upcoming Bookings widget. You can use this window to add further widgets to the Bookings panel if you like.

- Use the Test button to see the widget in action. This will open the Talk to Bot feature, where you can ask the VA for Upcoming Bookings. If your setup is successful, you should be shown the widget we just created.
Panel with JSON Widgets
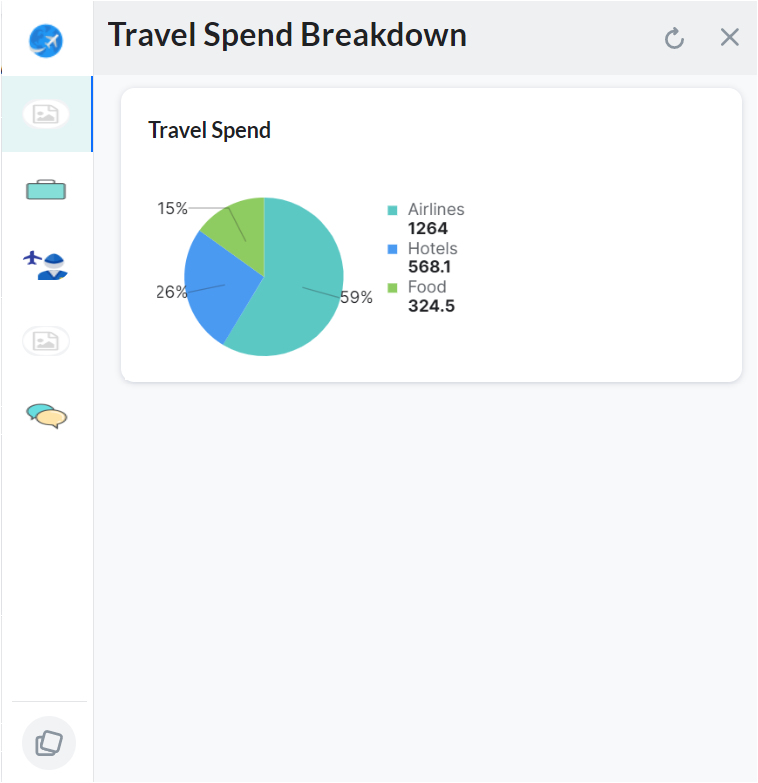
Next, we will see how to create Widgets with static JSON content. We will use a JSON to display a pie chart.
- Create a Widget and call it Travel Spend.
- In the New Widget dialog, enter the Name, and set the source to JSON.

Enter the following in the JavaScript Editor. This is a message template to display a pie chart with a break up for amounts spent under various heads like travel, food, and accommodation. For more on supported message templates, refer here.
var message ={"templateType": "piechart","pie_type": "regular","title": "Summary","description": "monthly report","elements": [{"title": "Airlines","value": "1264.0","displayValue": "$ 1,234"},{"title": "Hotels","value": "568.10","displayValue": "$ 568"},{"title": "Food","value": "324.50","displayValue": "$ 324"}]};print(JSON.stringify(message)); - Create a Panel and name it Travel Spend Breakdown.
- Add the Travel Spend Widget to the Travel Spend Breakdown Panel.

- Test the panel and you will see it in action.
Publishing
To publish the Assistant, first enable channels:
- From the left navigation menu, select Channel for publishing. For our use case we will select both Web/Mobile Client and Widget SDK channels.
- Select the channels and from the Configurations tab, make a note of the Bot Name, Bot Id, Client Id and Client Secret.
- From the left navigation menu, select the Publish option. Under the Tasks & languages section, ensure that the Widget and Panels we developed are selected for publication.
- Proceed with the Publish.
Learn more about publishing your Virtual Assistant.
Hosting
We will be hosting the Panels in the web/mobile client. See here for more details on the Widget SDK usage.
- Download the Kore.ai Widget SDK, go to https://github.com/Koredotcom/web-kore-sdk, and then click Download.
- Extract all files to the …/SDKApp/sdk folder.
- Open the above SDK folder, and traverse to the UI folder.
- Open the
kore-config.js - Configure your
botOptionswith the ‘web/mobile client’ channel configurations copied in the above section.botOptions.botInfobotOptions.clientIdbotOptions.clientSecret
- Make other changes as per your requirements.

- Open the kore-widgets-config.js
- Configure your
botOptionsWizwith the ‘Widget SDK’ channel configurations copied in the above section.botOptionsWiz.botInfobotOptionsWiz.clientIdbotOptionsWiz.clientSecret
- Make other changes as per your requirements.

- Open the
index_widgets_chat.htmlfile in the browser and see the chat window along with the widgets. - If you want to host the Panels individually use the
index_widgets.htmlfile.