When working with Dialog Task nodes, the Kore.ai XO Platform allows you to use If-Else conditions to configure node connections. You may want to use such conditions when you want the conversation to follow specific paths depending on specific information.
For example, if you are working with a travel Virtual Assistant and are setting up a Book a Flight dialog task, you might want to provide a specific offer for group reservations. So, if during the conversation, the VA detects a certain number of passengers, you may want to direct the conversation to one path or another, depending on that number. Say for instance, if the passenger count is greater than 5, present the standard offer; else (otherwise) present a promotional offer.
This is a simple example – you can use the conditions feature to design complex conversation paths based on the criteria that suit your business.
This article, therefore, takes you to the options available within the XO Platform that allow you to configure node connection conditions.
Types of Conditions
There are three types of available conditions:
- If – This condition is used to direct the conversation on a specific path, if specific criteria are met. The If condition lets you configure Entity, Context and Intent criteria.
- Else – This condition allows you to set the node connection that will occur when the criteria configured within the If condition are not met. The Else condition only allows you to configure the next node to connect to.
- Else If – This condition allows you to configure another set of criteria to be met by the conversation path when the criteria in the initial If condition are not met. The If condition lets you configure Entity, Context and Intent criteria.
For example, in the travel VA, you might want to present a group promotion if more than 5 passengers are travelling together, but if not, you may want to show a destination-specific package, based on the arrival city. If neither of these criteria are met, then you may want to continue with the standard flight booking procedure. Here is what such a use case could look like as node connection conditions:
- IF PassengerCount is greater than 5, connect to the Group Promotion node, (So, if there are more than 5 passengers, show the Group Promotion.)
- ELSE IF ArrivalCity equals to London, connect to London Destination Package node. (If there are not more than 5 passengers, but the arrival city is London, then show the London Destination Package.)
- ELSE connect to the next Standard Flight Booking node. (If there are neither more than 5 passengers, nor is London the flight destination, then connect to the next node in the standard flight booking process.)
Node connection conditions are available within the node configuration panel of all node types, under the Connection Properties tab.
Below is an example from the Entity node type.

Add If / Else Connection Conditions
Under the Connection Properties section, click Add IF or Add Else If. You can configure the conditional expression for both of these condition types based on one of the following criteria:
Entity
This criterion allows you to compare an Entity node in the dialog with a specific value:
- Select the Entity. This is based on Entity node type.
- Select an Operator from the drop-down list: exists, does not exist, equal to, greater than or equal to, less than or equal to, not equal to, greater than, less than and contains.
- Type in Value. This field is not displayed if it exists or does not exist and is used as operators.
You can enter a static value or dynamic variable, such as context, environment, or content. To use a variable, enter the variable type (content, context, or env) followed by a dot (.) and then select the variable from the pop-up list. - In the Then go to dropdown, choose the node to connect to if the condition is met.
- Click Add Path Label to enter a label to designate this conversation path.
If these parameters are met, then the condition is successful and the node connected under Then go to is triggered.
For example, PassengerCount (entity) greater than (operator) 5 (specified value).

Context
The Context criterion allows you to compare a context object in the dialog task with a specific value. You can configure the following parameters:
- Select the Context object you want to use. Keep in mind to follow the required syntax – see the Context Object article for details.
- Select an Operator from the drop-down list: exists, does not exist, equal to, greater than or equal to, less than or equal to, not equal to, greater than, less than and contains.
- Type the number in the Value field. This field is not displayed if it exists or does not exist and is used as operators. You can enter a static value or dynamic variable, such as context, environment, or content. To use a variable, enter the variable type (content, context, or env) followed by a dot (.) and then select the variable from the pop-up list.
- In the Then go to dropdown, choose the node to connect to if the condition is met.
- Click Add Path Label to enter a label to designate this conversation path.
If these parameters are met, then the condition is successful and the node connected under Then go to is triggered.
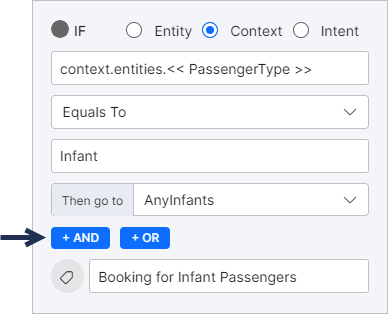
For example, if the Passenger Type (context object – entity) equals to (operator) Infant (value), then trigger a node that manages the booking process that is specific to infant passengers.

Add And/Or Logic
You can configure multiple context-based if conditions using and/or logic. Within the same context-based if condition, can use either one or the other; not both. The and/or parameters work as follows:
- AND – When using AND it means that you want both or all criteria to be met.
- OR – When using OR it means that you want the condition to meet either one or another of the set criteria.
To add either an AND or an OR logical operator, click the corresponding button within the Context condition criterion.
Once you do so, you will be able to add the next criterion that the condition should meet. You can add multiple AND/OR criteria by clicking +AND or +OR.
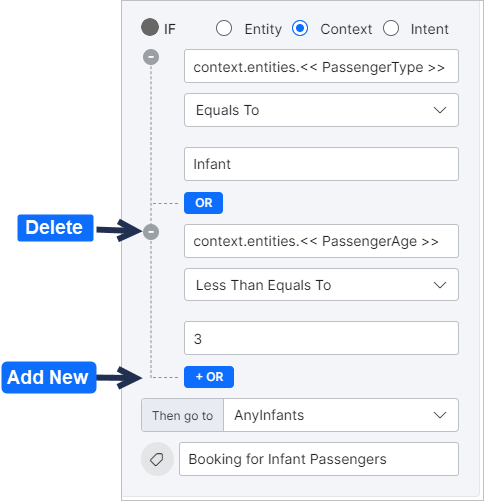
You can delete an existing AND/OR criterion by clicking the “-” sign on its left.
For example: If the Passenger Type (context object – entity) equals to (operator) Infant (value) OR if Passenger Age (context object – entity) is less than or equal to (operator) 5 (value), then trigger the node that manages the booking process for infants.
Intent
For Entity nodes, this criterion allows you to select a follow up intent that matches the user utterance, and based on which to select the next node to connect to.
The context.FollowupIntents parameter is preselected and you can choose to connect to a specific node if a followup intent exists or if it contains a specific value. If any of these is met, then the condition is successful and the connecting node you set in Then go to, is triggered.

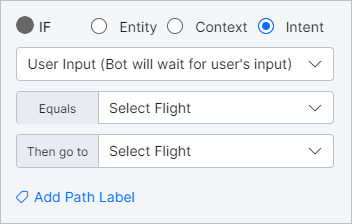
For message nodes, you can either choose context.followupintent as described above, or select to wait for user input. Under the Equals dropdown, you can select which user input the VA should wait for before connecting to the node you set under Then go to.
Delete Conditions
If you no longer require a specific condition, you can hover over it and click the bin icon on the top right.

Node Type Applicability
Depending on the node type you are working with, you may see some differences in functionality. Some of the features presented in this article will apply to all node types, while others will only apply to some. Here is what to keep in mind:
- For all node types except for the Message, and Agent Transfer node types, the only available Intent condition criterion is context.FollowupIntents which lets you configure the connection based on the user utterance. The same applies to Primary Intent nodes.
- For Message Nodes, the Intent condition criterion provides two options: context.followupintent and User Input, as explained above.
- Primary Intent nodes do not allow connection conditions at all. You can only choose the next node to connect to. Intent nodes that follow other nodes within the Dialog Task do allow connection conditions, keeping in mind that the Intent criterion only allows you to set a follow up intent using the context object.
- Agent Transfer nodes provide no options to connect to a subsequent node, so no conditions can apply. This node means the end of the VAs process and the intervention of a human agent, which sets the End of Dialog after the Agent Transfer node.