노드 설정
다음 섹션에서는 플랫폼 v9.0에 도입된 새 대화 빌더에서 이 노드의 속성을 자세히 설명합니다. 이전 빌더와 관련된 자세한 사항은 여기를 참조하세요.
구성 요소 속성
- 구성 요소 속성 탭의 일반 설정 섹션에서 이름, 표시 이름 및 설명을 수정할 수 있습니다.
연결 속성
노드의 연결 탭에서 대화 작업에서 어떤 노드를 다음에 실행할지 결정할 수 있습니다. 대화 작업에서 엔티티 또는 컨텍스트 개체의 값을 기반으로 조건문을 작성하거나 전환을 위해 의도를 사용할 수 있습니다. 구성 요소 전환을 설정하려면 다음 단계를 수행하세요.
- 논리 창에서 연결 탭을 클릭합니다.
- 연결 규칙 섹션의 기본값 드롭다운 목록에서 노드를 선택할 수 있습니다.
- 조건부 흐름을 설정하려면 IF 추가를 클릭합니다.
- 다음 조건 중 하나를 기준으로 조건식을 설정합니다.
- 엔티티: 다음 연산자 중 하나를 사용하여 대화의 엔티티 노드와 지정된 값을 비교합니다. Exists, equals to, greater than equals to, less than equals to, not equal to, greater than, less than. 엔티티, 각 드롭다운 목록을 사용한 연산자를 선택하고 값 상자에 숫자를 입력합니다. 예: PassengerCount (엔티티) greater than (연산자) 5 (지정된 값)
- 컨텍스트: 다음 연산자 중 하나를 사용하여 대화의 컨텍스트 개체와 지정된 값을 비교합니다. Exists, equals to, greater than equals to, less than equals to, not equal to, greater than, less than. 예: Context.entity.PassengerCount (컨텍스트 개체) greater than (연산자) 5 (지정된 값)
- 의도: 다음 사용자 발화와 일치하는 의도를 선택합니다.
- Then go to 드롭다운 목록에서 조건식이 성공할 경우 대화 흐름에서 실행할 다음 노드를 선택합니다. 예: PassengerCount (엔티티) greater than (연산자) 5 (지정된 값), Then go to Offers (하위 대화).
- Else 드롭다운 목록 조건이 실패할 경우 실행할 노드를 선택합니다.
- 저장을 클릭합니다.
참고: 여러 If 조건을 작성하려면 마지막 If 조건식 아래에 있는 Else If 추가를 클릭합니다.
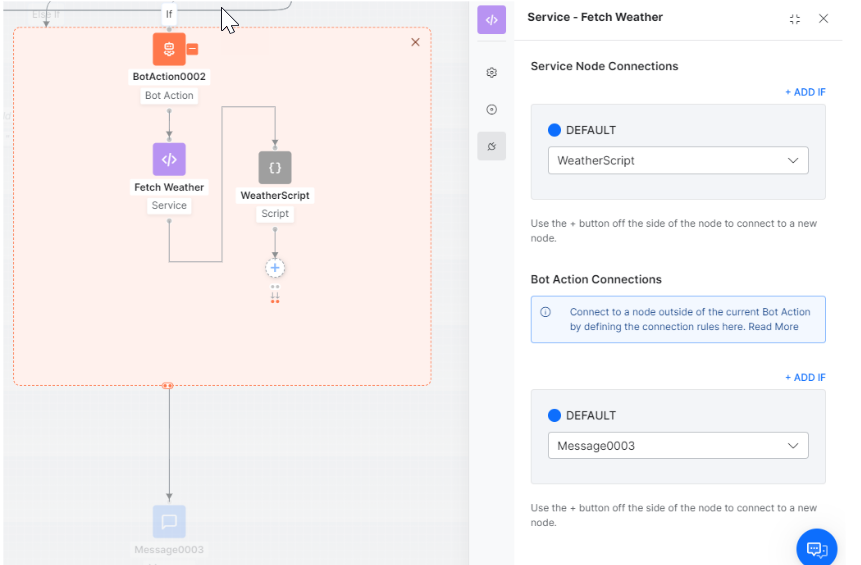
조치 노드 연결
서비스, 스크립트와 같은 조치 노드가 봇 작업에 추가되면 다음 연결을 설정할 수 있습니다.
- 노드 연결 – 이 옵션은 봇 조치 노드의 노드에 연결하는 연결 규칙을 정의하는 데 사용할 수 있습니다. 다음과 같이 설정할 수 있습니다.
- 해당 봇 조치 노드의 모든 노드;
- 연결되지 않음;
- 봇 조치의 끝 – 봇 조치 노드에 연결된 노드로 봇 흐름을 가져옵니다.
- 봇 조치 연결 – 이 옵션은 현재 봇 조치 외부의 노드에 연결하는 연결 규칙을 정의하는 데 사용할 수 있습니다. 이러한 규칙은 봇 조치 노드 전체에 적용됩니다.