Dialog Tasks are the infrastructure that the Kore.ai XO Platform provides for building conversation-based interactions between Virtual Assistants and Users, and integrating these interactions with business systems and processes.
Dialog Tasks are available within the XO Platform as follows:
- As part of the Storyboard, where the focus is on the Conversation Designer.
- As a standalone module, under Conversation Skills > Dialog Tasks, where the focus is on integrating the Conversation Designer and Dialog Builder to create interactions between Virtual Assistants, Users and business systems and processes.
The Structure of a Dialog Task
The Dialog Task development process consists in three main stages, built into the structure made available to you by the XO Platform:
- Design your conversation flow using natural language.
- Build business logic into your conversation.
- Train: Once you are done creating your conversation flow, you can train your VA on it.
The Design and Build stages work in sync, so that you can generate logical flows and integrate business processes while simultaneously working based on conversational elements. Essentially, this allows you to see what the conversation looks like to a human user and to the VA. This is achieved using two important features, called the Conversation Designer and the Dialog Builder, respectively.
This Train section is where you can train your Virtual Assistant using a variety of parameters that will help it fulfill the Dialog Task that you are working on. Using this feature, you are engaging with Kore.ai’s NLP engines to allow your VA to maximize its potential for reaching your users’ goals. This article will not be focusing on training related aspects, therefore please see Navigating Dialog Tasks to learn more about the Train section.
The Conversation Designer and the Dialog Builder
When creating Dialog Tasks, teams can work with dedicated views. In the XO Platform, these views are referred to as the Conversation Designer and the Dialog Builder.
-
- From under Conversation Skills > Storyboard > Dialog Tasks. When creating or opening a Dialog Task, you will be presented with the Design View, called the Conversation Designer. Conversation Designers and Business Analysts can use the Design View to work on the natural language side of the interaction, The Design View looks similar to Storyboard Mock Scenes, providing a chat-like interface. However, unlike Mock Scenes, this view is meant to be used for implementation, rather than prototyping. Therefore, in the Design View, all features are available.This is why, throughout this documentation, we refer to this view as the Conversation Designer or the Conversation Builder, interchangeably. Please continue reading to learn more about this view.
- From under Conversation Skills > Dialog Tasks. When creating or opening a Dialog Task, you will be first presented with the Dialog Builder. If you want to work with the Conversation Designer from here, please select the Design View. Engineers can use the Build View to add logic and integrate systems into Dialog Tasks that become functionalities of the VA being built. This view is based on logic rather than natural language and provides a flow visualization that uses nodes to manage and view the flow of the conversation. This is where the full extent of the Dialog Task is being built, which is why, throughout this documentation, we refer to this view as the Dialog Builder. Within the Dialog Builder, there is also an integrated Conversation Builder, which engineers can use to see what the VA looks like in each view. Please read our article about the Dialog Builder to learn more.

Create a Dialog Task using the Conversation Designer
Moving forward, this article demonstrates how to create a Dialog Task, using the Conversation Designer. For information on creating a Dialog Task using the Dialog Builder, please see. Using the Dialog Builder.
To create a new Dialog Task:
-
- Select the Virtual Assistant that you want to work on.
- Go to the Build Tab.
- Select Conversation Skills > Storyboard.
- Select Dialog Tasks.
- Click Create Dialog.

-
- Enter a name for the dialog task in the Intent Name field. As the field label states, the name should reflect the user intent you want to achieve with this Dialog Task. Optionally, you can add a Description.
- You can add user utterances that should trigger this intent, using the Intent Training field. You may add this data later, from the user intent node that is generated within this task.
- Set additional options:
- Set the task to be independent or a sub-intent dialog.
- Hide from help requests by the user.
- Specify the context tags as intent preconditions – this will ensure that the intent would be detected only when the context tag is present.
- Set Context Output and define the context tags to set when this intent is initiated.
- If you are using the legacy Dialog Builder please select Create Using the New Conversation Driven Dialog Builder which was introduced in ve r9.0 of the platform. This is the default setting and recommended. If you do not select this option, you will be prompted to Upgrade whenever you open the dialog task.
- Click Proceed.

You will now be presented with the Conversation Designer (The Design View), where you can begin creating your new Dialog Task. The first element you will see in the new conversation is the intent, which you have provided as the name for the Dialog Task. This represents the initial message within the conversation, which should belong to the User. To continue developing the conversation, you may want to switch to the Bot tab.
![]()
Now, let us look at the features you can use to develop conversations using the Conversation Designer, all approached based on a recommended workflow.
Configure the Intent Node
Once you create the Dialog Task, a Primary Intent is created by default. This is taken as the User Utterance that triggers this dialog. To configure this node, click the More Options button next to the Intent and select Configure Properties.

Here are the configurations you can make:
-
-
- Change Display Name and Node Name if needed.
- Add/change Description.
- Add utterances that would trigger this intent. You can add multiple utterances. These would be in addition to the primary intent utterance.
- You also have the option to Manage Training which will enable you to train the intent by adding Utterances, Patterns, and Rules. Refer here for more on utterance training.
-

Entity Node
The Entity Node is created whenever Bot > Ask a Question is selected for the Bot in the Design section.
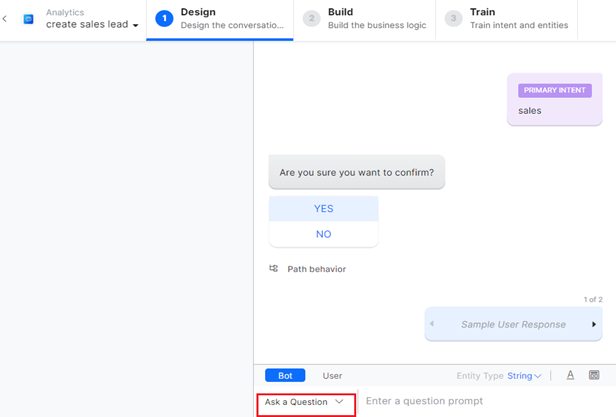
For each question you can do the following:
-
-
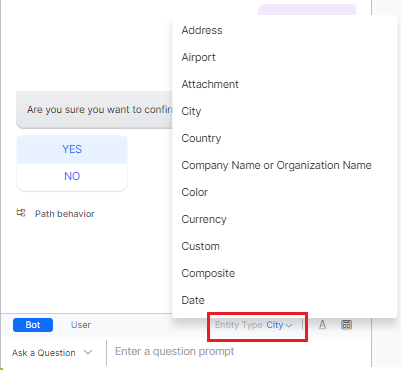
- Define Entity Type – Select from the drop-down list. This list includes the entity types supported by the Kore.ai XO Platform.
-
-
-
- Apply Formatting Options like bold, italics, etc.
- Use the following Templates to present the query:
- Attachment
- Text
- Quick Reply
- Carousel
- Button
- List
- Image
-
For the Button Template of the Entity Node, the Platform now provides the ability to customize the path behavior on the storyboard designer by removing/reassigning the buttons from/to the path.
To customize the path behavior, follow the steps below:
-
-
- Click the Design tab for the selected Dialog Task’s storyboard screen.
- Click the Templates icon and select Button.
- Click Path Behavior.
-

-
-
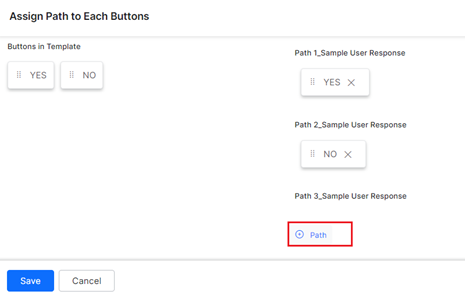
- On the Assign Path to Each Button window, map the buttons to their respective path boxes, delete, or switch the buttons as required.
-
The system allows the user to do the following when designing a Button Template:
-
-
- Select one of the following Path Behaviors for the button template:
-

-
-
- When Common for all is selected, a single path flow is mapped to all the buttons in the template on the Dialog Builder as shown below:
-

-
-
- When Individual Paths is selected, individual path flows are mapped to all the paths of all the buttons in the template as shown below:
-

-
-
- Drag and drop the buttons in their respective path boxes when assigning the Path to each created button.
-

-
-
- Delete a button from the path by clicking the X icon.
-

-
-
- Add a Path to the storyboard preview screen by clicking the Add Path icon.
-
-
-
- Delete a Path by clicking the delete icon.
-
-
-
- Swap the buttons between paths or reassign paths.
-

-
-
- Be notified if there are duplicate buttons in the same path with the message “Button already exists in the path.”
-

-
-
- Be prompted when a button is not associated with any path to associate the button to any of the existing paths when Individual Paths is selected.

Note:- The user can ignore the prompt and skip associating the buttons with a path.
- The user can have paths without any associated buttons on the storyboard.
- Be prompted when a button is not associated with any path to associate the button to any of the existing paths when Individual Paths is selected.
-
- Delete the button from the path.When a new path is added, and no buttons are associated with it, the system treats the path flow for the Entity Node as an Else transition in the Build section.
 Once you add an Entity Node, the following properties can be configured:
- Display name
- Node name
- Type
- Is Multi-Item
- User Prompts
- Error Prompts
- Delete the button from the path.When a new path is added, and no buttons are associated with it, the system treats the path flow for the Entity Node as an Else transition in the Build section.
-
For details on Entity component properties, please refer to this link.
Set up Bot Messages
Since the user has started the conversation through the intent, it is recommended to continue with a message from the VA to the user. This would serve as a guide to the user on the conversation flow.
Bot Messages can serve one of the following purposes:
-
-
- Ask a Question with the intention of gathering information from the user. This gets converted to an Entity node in the dialog task.
- You can further specify the type of user input expected like string, number, date, etc. It gets translated to an entity type in the dialog task.
- You can format the message using simple formatting options or by selecting a template for presenting the bot message.
- Ask Confirmation with the intention to decide the path of the conversation. This gets converted to a Confirmation node in the dialog task.
- Inform the User like a help message, welcome message, or as a response to the user query. These get converted to a Message node in the dialog task.
- Ask a Question with the intention of gathering information from the user. This gets converted to an Entity node in the dialog task.
-
For each of the above selections, you can either use an existing node by selecting from the list or create a new node. Please see the documentation relevant to each node type for detailed information.
Here is a quick demo on how to work with Bot Messages in the Conversation Designer.

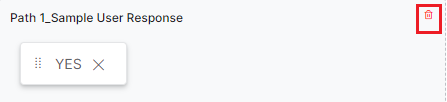
Set Up User Responses
Every bot message is ideally followed by a user response. User Responses can be used to define the conversation flow by predicting the user’s reply. For example, the VA might have asked the user to confirm an input, then based on the response there would be two paths – one for affirmation and one for negation.
| Note If not specified, the platform adds a Sample User Response placeholder to maintain the conversational flow. |

Work with Other Nodes
Apart from Bot and User Messages, you can
-
-
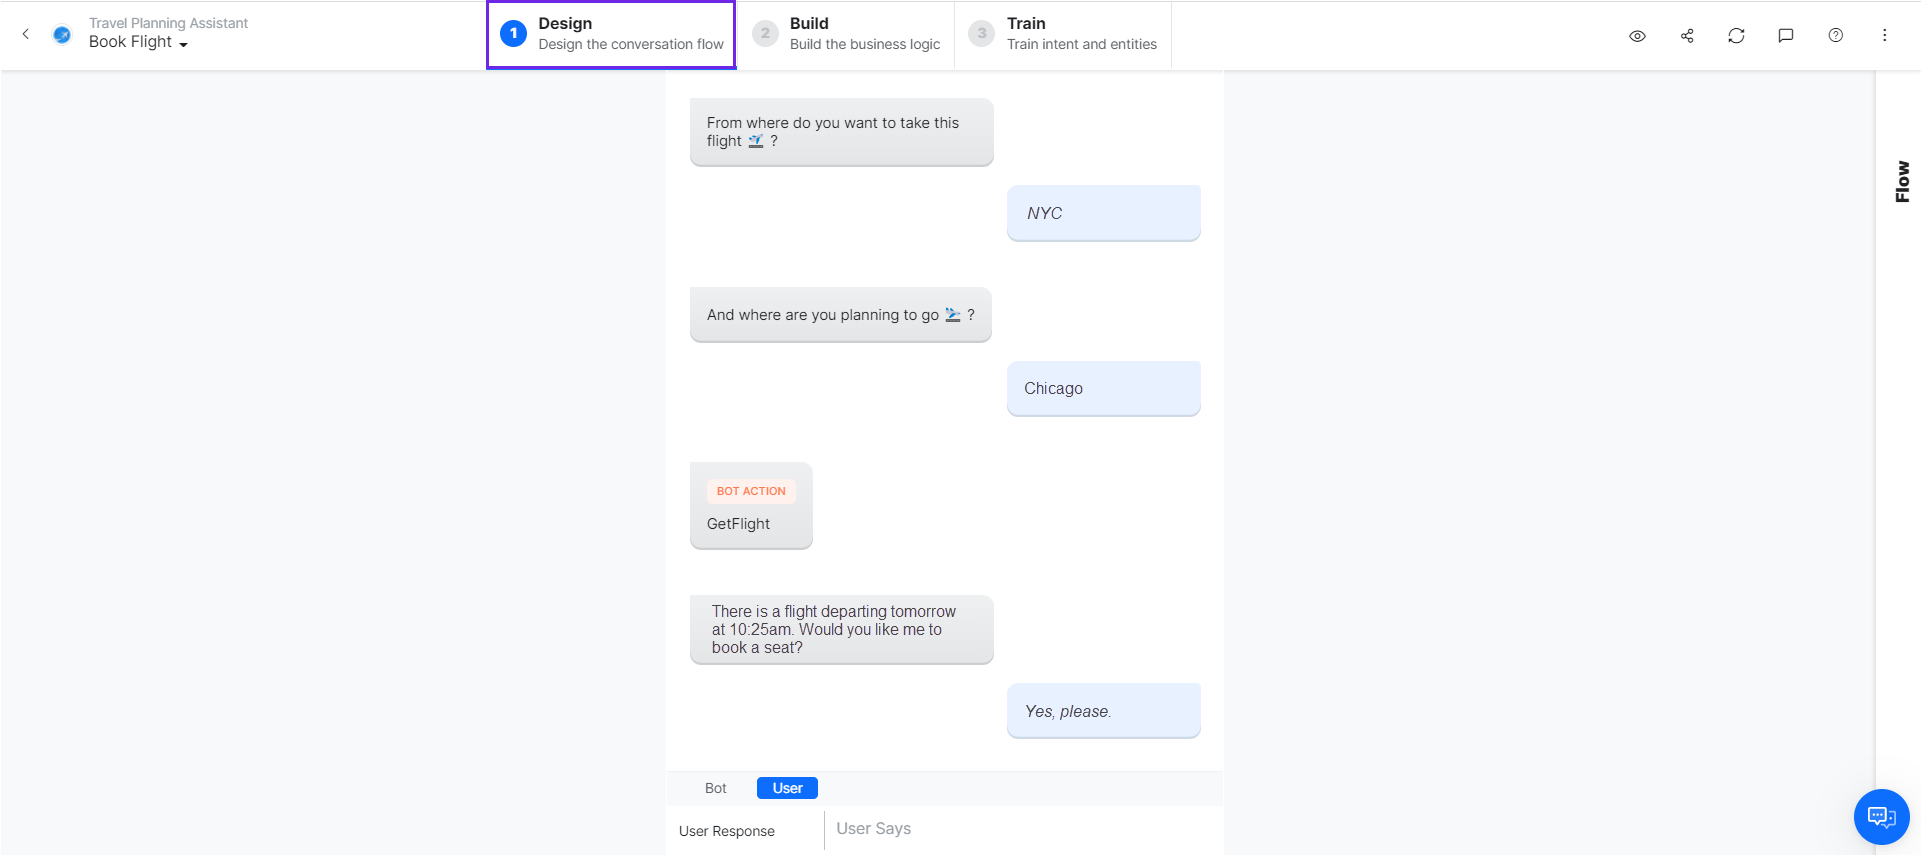
- Add placeholders for Bot Actions like service calls, scripts, logic, webhook and process to define the flow, and more. The actual functionality needs to be added from the dialog builder. You can leave comments for the developer elaborating the purpose of such a Bot action node. For example, for the Book Flight task, you want to connect to your backend servers for the actual booking process.
- Trigger Dialog Tasks for subtasks or related/follow-up tasks. For example, after booking a flight you might want to trigger the Web Checkin dialog.
- Agent Transfer nodes (only at the end of the conversation). For example, for a Flight Transfer task, you might want to authenticate the user credentials via a live agent.
- Add Digital Forms for capturing a series of user inputs. For example, for a Web Check In task, you might want to present a form to capture the user details like name, address, phone number, etc.
-

Node Configurations
While building the conversation, the nodes are generated with default settings. You can customize these configurations from the Conversation Designer itself or do it at a later time from the Dialog Builder.
In the following section, we see the various configurations available from the Conversation Designer for each available node type.
Entity Node
The entity node is created whenever Bot -> Ask Question is selected.
For each question you can:
-
-
- Define Entity Type – select from the drop-down list. This list includes the entity types supported by the Kore.ai XO Platform.
- Apply Formatting Options like bold, italics, etc.
- Use Templates like buttons, carousel, etc to present the query
-

Once added you can configure properties:
-
-
- Display name,
- Node name,
- Type,
- Is Multi-Item,
- User Prompts, and
- Error Prompts.
-
Refer here for details on Entity component properties.
Confirmation Node
The confirmation node is created whenever Bot -> Ask Confirmation is selected, along with a Yes, No, and two other user response paths. You can delete or add more options.
For each confirmation you can:
-
-
- Apply Formatting Options like bold, italics, etc.
- Use Templates like buttons, carousel, etc to present the confirmation options.
- You can set configuration properties like
- Display name,
- Node name,
- User prompts,
- Display options, and
- Synonyms for yes/no.
- Select the concerned user response options to continue with the appropriate path.
-
Refer here for confirmation node component properties.
Advanced Features for User Responses
Apart from the linear flow, you can add exceptional flows to the conversation. For example, while in the Book Flight task, the user might request the Weather Report at the destination city, or while in the Web Check In task, the user might have entered the wrong flight number three times in a row. These exceptional cases can be taken into consideration as a part of the conversation..
For each user response you can:
-
-
- Set up alternative user responses,
- Configure user retries and the VA’s behavior when this limit is exceeded.
- Ask for an intent when there is an interruption or a sub-intent.
-

Alternative User Response
This allows you to trigger a different conversation flow. For example, at the prompt for the City entity within the Weather Report task, if the user says “Not now” then the conversation should end. This denotes that the user’s response is unrelated to the VAs initial question, therefore the behavior should not be the same as if the response would be the expected one.

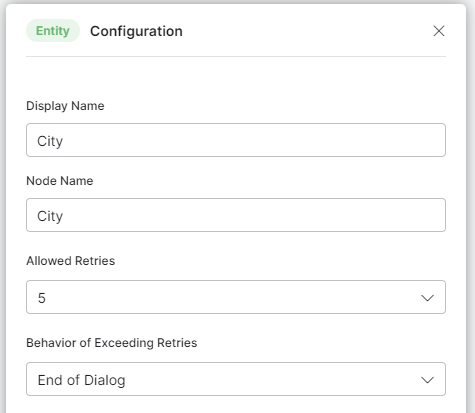
Retry Limits
You can set a number of wrong responses that the user can provide, then define the VAs behavior when a user exceeds the set number. A standard response is set by default.

Use Configure Properties to define settings like the number of Allowed Retries and the Behavior on exceeding retries – end of dialog or transition to a node
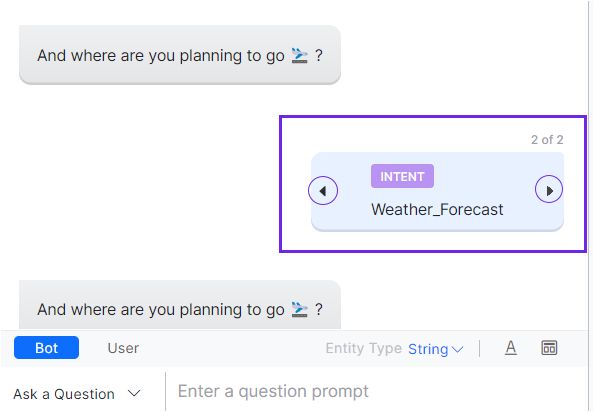
Ask Another Intent
Configure the VA behavior with an interruption or a sub-intent, indicated using Ask Another Intent. For example, within the Book Flight task, the user asks for the Weather Report at the destination city using the specific intent. This option, therefore, lets you define the VAs behavior when a user utterance deviates from the task at hand. To manage this:
-
-
- Enter the user response that is likely to ask for another intent.
- You can choose the intent from the available list or create a new one.
- You can set the transition to the new intent:
-
