GETTING STARTED
Kore.ai XO Platform
Virtual Assistants Overview
Natural Language Processing (NLP)
Concepts and Terminology
Quick Start Guide
Accessing the Platform
Navigating the Kore.ai XO Platform
Building a Virtual Assistant
Help & Learning Resources
Release Notes
Current Version
Recent Updates
Previous Versions
Deprecations
Request a Feature
CONCEPTS
Design
Storyboard
Overview
FAQs
Conversation Designer
Overview
Dialog Tasks
Mock Scenes
Dialog Tasks
Overview
Navigate Dialog Tasks
Build Dialog Tasks
Node Types
Overview
Intent Node
Dialog Node
Dynamic Intent Node
GenAI Node v2
Configure GenAI Node v2
GenAI Node
GenAI Prompt
Entity Node
Form Node
Confirmation Node
Message Nodes
Logic Node
Bot Action Node
Service Node
Webhook Node
Script Node
Process Node
Agent Transfer
Node Connections
Node Connections Setup
Sub-Intent Scoping
Entity Types
Entity Rules
User Prompts or Messages
Voice Call Properties
Knowledge AI
Introduction
Knowledge Graph
Introduction
Terminology
Build a Knowledge Graph
Manage FAQs
Knowledge Extraction
Import or Export Knowledge Graph
Prepare Data for Import
Importing Knowledge Graph
Exporting Knowledge Graph
Auto-Generate Knowledge Graph
Knowledge Graph Analysis
Answer from Documents
Alert Tasks
Small Talk
Digital Skills
Overview
Digital Forms
Digital Views
Introduction
Widgets
Panels
Session and Context Variables
Context Object
Intent Discovery
Train
NLP Optimization
ML Engine
Overview
Model Validation
FM Engine
KG Engine
Traits Engine
Ranking and Resolver
Training Validations
NLP Configurations
NLP Guidelines
LLM and Generative AI
Introduction
LLM Integration
Kore.ai XO GPT Module
Prompts & Requests Library
Co-Pilot Features
Dynamic Conversations Features
PII and Sensitive Data Anonymization
Guardrails
Intelligence
Introduction
Event Handlers
Contextual Memory
Contextual Intents
Interruption Management
Multi-intent Detection
Amending Entities
Default Conversations
Conversation Driven Dialog Builder
Sentiment Management
Tone Analysis
Default Standard Responses
Ignore Words & Field Memory
Test & Debug
Overview
Talk to Bot
Utterance Testing
Batch Testing
Conversation Testing
Conversation Testing Overview
Create a Test Suite
Test Editor
Test Case Assertion
Test Case Execution Summary
Glossary
Health and Monitoring
NLP Health
Flow Health
Integrations
Actions
Actions Overview
Asana
Configure
Templates
Azure OpenAI
Configure
Templates
BambooHR
Configure
Templates
Bitly
Configure
Templates
Confluence
Configure
Templates
DHL
Configure
Templates
Freshdesk
Configure
Templates
Freshservice
Configure
Templates
Google Maps
Configure
Templates
Here
Configure
Templates
HubSpot
Configure
Templates
JIRA
Configure
Templates
Microsoft Graph
Configure
Templates
Open AI
Configure
Templates
Salesforce
Configure
Templates
ServiceNow
Configure
Templates
Stripe
Configure
Templates
Shopify
Configure
Templates
Twilio
Configure
Templates
Zendesk
Configure
Templates
Agents
Agent Transfer Overview
Custom (BotKit)
Drift
Genesys
Intercom
NiceInContact
NiceInContact(User Hub)
Salesforce
ServiceNow
Configure Tokyo and Lower versions
Configure Utah and Higher versions
Unblu
External NLU Adapters
Overview
Dialogflow Engine
Test and Debug
Deploy
Channels
Publishing
Versioning
Analyze
Introduction
Dashboard Filters
Overview Dashboard
Conversations Dashboard
Users Dashboard
Performance Dashboard
Custom Dashboards
Introduction
Custom Meta Tags
Create Custom Dashboard
Create Custom Dashboard Filters
LLM and Generative AI Logs
NLP Insights
Task Execution Logs
Conversations History
Conversation Flows
Conversation Insights
Feedback Analytics
Usage Metrics
Containment Metrics
Universal Bots
Introduction
Universal Bot Definition
Universal Bot Creation
Training a Universal Bot
Universal Bot Customizations
Enabling Languages
Store
Manage Assistant
Team Collaboration
Plan & Usage
Overview
Usage Plans
Templates
Support Plans
Invoices
Authorization
Conversation Sessions
Manage URLs
Multilingual Virtual Assistants
Get Started
Supported Components & Features
Manage Languages
Manage Translation Services
Multiingual Virtual Assistant Behavior
Feedback Survey
Masking PII Details
Variables
Collections
IVR Settings
General Settings
Assistant Management
Manage Namespace
Data
Overview
Guidelines
Data Table
Table Views
App Definitions
Data as Service
HOW TOs
Build a Travel Planning Assistant
Travel Assistant Overview
Create a Travel Virtual Assistant
Design Conversation Skills
Create an ‘Update Booking’ Task
Create a Change Flight Task
Build a Knowledge Graph
Schedule a Smart Alert
Design Digital Skills
Configure Digital Forms
Configure Digital Views
Train the Assistant
Use Traits
Use Patterns
Manage Context Switching
Deploy the Assistant
Use Bot Functions
Use Content Variables
Use Global Variables
Use Web SDK
Build a Banking Assistant
Design Conversation Skills
Create a Sample Banking Assistant
Create a Transfer Funds Task
Create a Update Balance Task
Create a Knowledge Graph
Set Up a Smart Alert
Design Digital Skills
Configure Digital Forms
Configure Digital Views
Add Data to Data Tables
Update Data in Data Tables
Add Data from Digital Forms
Train the Assistant
Composite Entities
Use Traits
Use Patterns for Intents & Entities
Manage Context Switching
Deploy the Assistant
Configure an Agent Transfer
Use Assistant Functions
Use Content Variables
Use Global Variables
Intent Scoping using Group Node
Analyze the Assistant
Create a Custom Dashboard
Use Custom Meta Tags in Filters
APIs & SDKs
API Reference
API Introduction
Rate Limits
API List
koreUtil Libraries
SDK Reference
SDK Introduction
Web SDK
How the Web SDK Works
SDK Security
SDK Registration
Web Socket Connect and RTM
Tutorials
Widget SDK Tutorial
Web SDK Tutorial
BotKit SDK
BotKit SDK Deployment Guide
Installing the BotKit SDK
Using the BotKit SDK
SDK Events
SDK Functions
Installing Botkit in AWS
Tutorials
BotKit - Blue Prism
BotKit - Flight Search Sample VA
BotKit - Agent Transfer

ADMINISTRATION
Intro to Bots Admin Console
Administration Dashboard
User Management
Managing Your Users
Managing Your Groups
Role Management
Manage Data Tables and Views
Bot Management
Enrollment
Inviting Users
Sending Bulk Invites to Enroll Users
Importing Users and User Data
Synchronizing Users from Active Directory
Security & Compliance
Using Single Sign-On
Two-Factor Authentication for Platform Access
Security Settings
Enterprise Key Management
BYOK for AWS
Analytics for Bots Admin
Billing
  1. ホーム
  2. Docs
  3. Virtual Assistants
  4. How Tos
  5. データテーブルのデータの更新方法

データテーブルのデータの更新方法

このハウツーでは、顧客の口座関連データが保存されるデータテーブルのバンキングBotのシナリオを調査します。ユーザーからの要求でデータを更新できる方法を確認します。データテーブルおよびKore.ai Botプラットフォームでどのように導入されているかの詳細については、こちらを参照してください。

例題

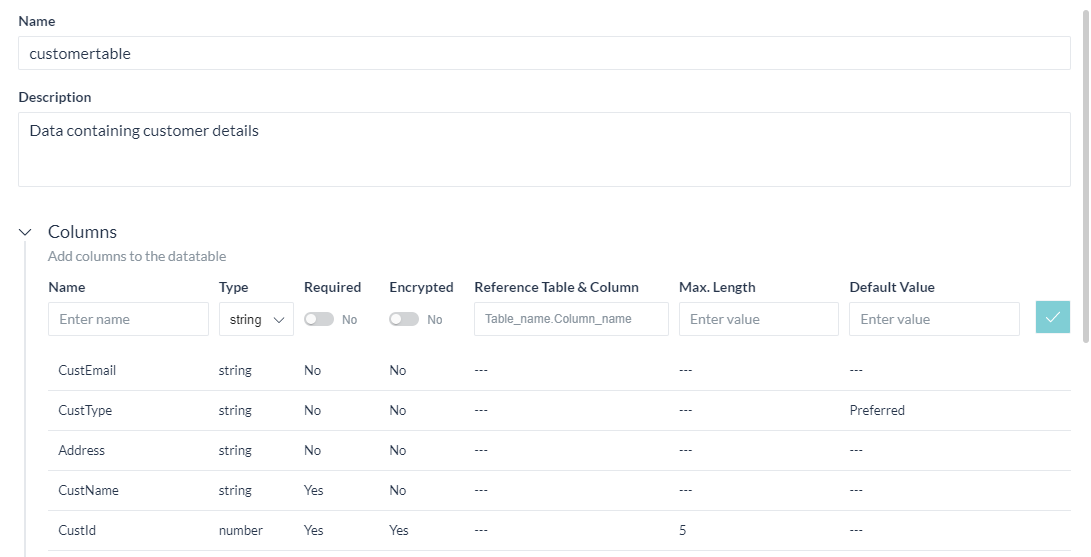
以下のデータが保存される指定顧客のバンキングBotを考えてください。このデータは顧客の要求により更新する必要があります。顧客はメールIDおよびアドレス詳細のみを更新できます。

  1. ID
  2. 名前
  3. メールID
  4. アドレス、および
  5. タイプ

Pre-requisites

  • Botビルドナレッジ
  • 上記テーブルへのアクセス権付きバンキングBot、そのテーブルにあるデータ(データを作成および追加するユースケースは、こちらを参照してください)。

設定

次の各シナリオを1つずつ考えてみましょう。

  1. ダイアログタスク:
    1. 必須情報の収集、および
    2. サービスを呼び出し、顧客情報を更新

ダイアログタスクの設定

必須情報を収集するダイアログタスクを作成し、サービスノードを使用して収集した値でデータテーブルを更新します。

ダイアログタスクの作成

  1. 左のナビゲーションメニューからBotタスク -> ダイアログタスクを選択します。
  2. ダイアログタスクに対して+をクリックして、新しいタスクを作成します。
    • IntentName、たとえばUpdateCustomerを入力します。
    • 作成および続行して、ダイアログビルダーページを開きます。
  3. インテントノードのデフォルト設定を保持し、インテントノードを閉じます。
  4. インテントノードの隣の+をクリックし、エンティティを追加して顧客IDを取得します。
    エンティティ名 タイプ ユーザープロンプト
    CustId 文字列 顧客IDの入力
  5. 最初に、指定した顧客IDのテーブルからデータを取得し、ロジックノードを使用してプロセスフローを制御します。

データの取得

サービスコールを使用して、テーブルからデータを取得できます。

  1. エンティティノードに対して、+をクリックします。
  2. サービス -> 新しいサービスノード オプションを選択します。
  3. 基本設定セクションから、以下を設定します。
    • 名前、たとえばGetCustomerData
    • 表示名、たとえば顧客データ取得
    • サービスタイプで、データサービスを選択
    • タイプで、テーブルを選択
  4. 要求定義で、要求を追加をクリックして要求を定義し、テーブルからデータを取得します。
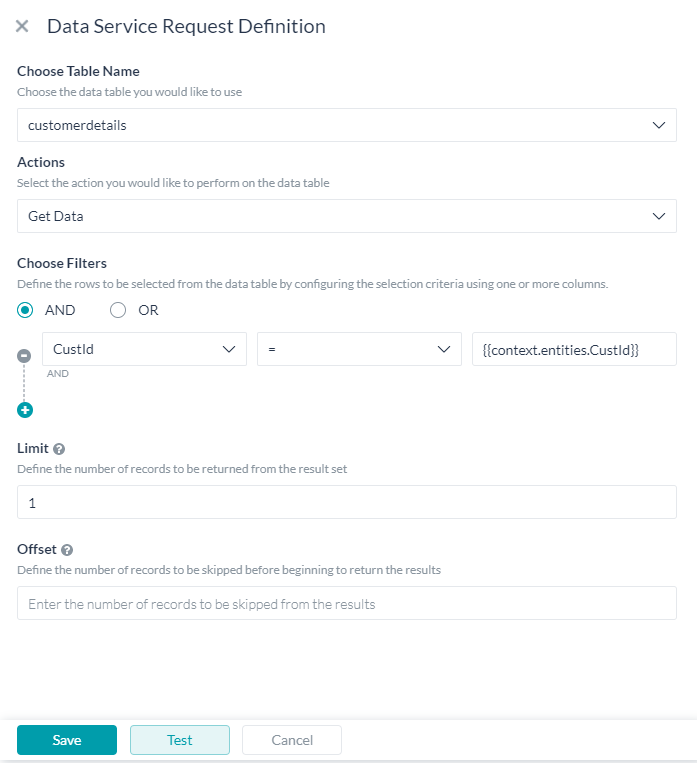
  5. データサービス要求定義ページに、以下を入力します。
    • 顧客テーブルとしての テーブル名の選択
    • データ取得としてのアクション
    • フィルタを選択して CustId = {{context.entities.CustId}}を選択
  6. 定義を保存し、サービスノードを 閉じます。
  7. 1つのレコードのみをフェッチし、行に対する静的 [0] 参照を使用しているため、メッセージノードを追加し、 以下のコンテキスト変数を使用してレコードの取得を表示します。 'For the customer number entered, we have the following details: {{context.GetCustomerData.response.body.queryResult[0].CustName}}, {{context.GetCustomerData.response.body.queryResult[0].CustEmail}}, {{context.GetCustomerData.response.body.queryResult[0].Address}}, {{context.GetCustomerData.response.body.queryResult[0].CustType}}'

データの更新

エンティティノードとロジックノードを使用して、顧客からの入力を取得し、プロセスフローを制御します。

  1. 上で追加した最後のメッセージに対して、+ をクリックします。
  2. エンティティノードを選択し、以下が設定された項目リスト(列挙) 型エンティティを追加します。
    表示名 値
    メールID メールID
    アドレス アドレス
  3. ロジックノードを追加し、上のエンティティノードからの値に基づき、顧客からメールIDまたはアドレスのいずれかを取得します。このCustEmail および CustAddressは、顧客のメールIDおよび顧客のアドレスを取得するエンティティです。
  4. コンテキスト変数も現在の詳細で入力し、これらの変数はデータテーブルを更新するために使用されます。
  5. メールIDおよびアドレスから、エンティティはスクリプトノードをトリガーし、以下のスクリプトを使用して適切にコンテキスト変数を変更します。
    if (context.entities.CustUpdateChoice == 'Address') { context.custAdd = context.entities.CustAddress; } else { context.custEmail = context.entities.CustEmail; }
  6. サービス -> 新しいサービスノード オプションを選択します。
  7. 基本設定セクションから、以下を設定します。
    • 名前、たとえばUpdateCust
    • 表示名、たとえばUpdate Customer Data
    • サービスタイプで、データサービスを選択
    • タイプで、テーブルを選択
  8. 要求定義で、要求を追加をクリックして要求を定義し、テーブルへデータを追加します。
  9. データサービス要求定義ページに、以下を入力します。
    • 前に定義した顧客テーブルとしての テーブル名の選択
    • データ更新としてのアクション
    • 以下のように定義されたエンティティからの値の割り当て。 すべてのフィールドとその値を含める必要があることを覚えておいてくださいい。そうしないと、フィールドはnul値に設定されます。
      列 エンティティコンテキスト
      CustName {{context.CustName}}
      CustEmail {{context.CustEmail}}
      アドレス {{context.CustAddress}}
      CustType {{context.CustType}}
      CustId {{context.CustId}}

  10. メッセージノードを追加して、成功メッセージを表示します。
  11. Botとの会話オプションを使用して、プロンプト表示されたら値を入力し、表示されるメッセージを確認します。

結論

この投稿では、以下を確認しました。

  • サービスノードを使用してテーブルからのデータの取得方法、およびそれを使用して追加処理する方法
  • サービスノードを使用してダイアログタスクからテーブルへデータを更新する方法

データテーブルのデータの更新方法

このハウツーでは、顧客の口座関連データが保存されるデータテーブルのバンキングBotのシナリオを調査します。ユーザーからの要求でデータを更新できる方法を確認します。データテーブルおよびKore.ai Botプラットフォームでどのように導入されているかの詳細については、こちらを参照してください。

例題

以下のデータが保存される指定顧客のバンキングBotを考えてください。このデータは顧客の要求により更新する必要があります。顧客はメールIDおよびアドレス詳細のみを更新できます。

  1. ID
  2. 名前
  3. メールID
  4. アドレス、および
  5. タイプ

Pre-requisites

  • Botビルドナレッジ
  • 上記テーブルへのアクセス権付きバンキングBot、そのテーブルにあるデータ(データを作成および追加するユースケースは、こちらを参照してください)。

設定

次の各シナリオを1つずつ考えてみましょう。

  1. ダイアログタスク:
    1. 必須情報の収集、および
    2. サービスを呼び出し、顧客情報を更新

ダイアログタスクの設定

必須情報を収集するダイアログタスクを作成し、サービスノードを使用して収集した値でデータテーブルを更新します。

ダイアログタスクの作成

  1. 左のナビゲーションメニューからBotタスク -> ダイアログタスクを選択します。
  2. ダイアログタスクに対して+をクリックして、新しいタスクを作成します。
    • IntentName、たとえばUpdateCustomerを入力します。
    • 作成および続行して、ダイアログビルダーページを開きます。
  3. インテントノードのデフォルト設定を保持し、インテントノードを閉じます。
  4. インテントノードの隣の+をクリックし、エンティティを追加して顧客IDを取得します。
    エンティティ名 タイプ ユーザープロンプト
    CustId 文字列 顧客IDの入力
  5. 最初に、指定した顧客IDのテーブルからデータを取得し、ロジックノードを使用してプロセスフローを制御します。

データの取得

サービスコールを使用して、テーブルからデータを取得できます。

  1. エンティティノードに対して、+をクリックします。
  2. サービス -> 新しいサービスノード オプションを選択します。
  3. 基本設定セクションから、以下を設定します。
    • 名前、たとえばGetCustomerData
    • 表示名、たとえば顧客データ取得
    • サービスタイプで、データサービスを選択
    • タイプで、テーブルを選択
  4. 要求定義で、要求を追加をクリックして要求を定義し、テーブルからデータを取得します。
  5. データサービス要求定義ページに、以下を入力します。
    • 顧客テーブルとしての テーブル名の選択
    • データ取得としてのアクション
    • フィルタを選択して CustId = {{context.entities.CustId}}を選択

  6. 定義を保存し、サービスノードを 閉じます。
  7. 1つのレコードのみをフェッチし、行に対する静的 [0] 参照を使用しているため、メッセージノードを追加し、 以下のコンテキスト変数を使用してレコードの取得を表示します。 'For the customer number entered, we have the following details: {{context.GetCustomerData.response.body.queryResult[0].CustName}}, {{context.GetCustomerData.response.body.queryResult[0].CustEmail}}, {{context.GetCustomerData.response.body.queryResult[0].Address}}, {{context.GetCustomerData.response.body.queryResult[0].CustType}}'

データの更新

エンティティノードとロジックノードを使用して、顧客からの入力を取得し、プロセスフローを制御します。

  1. 上で追加した最後のメッセージに対して、+ をクリックします。
  2. エンティティノードを選択し、以下が設定された項目リスト(列挙) 型エンティティを追加します。
    表示名 値
    メールID メールID
    アドレス アドレス
  3. ロジックノードを追加し、上のエンティティノードからの値に基づき、顧客からメールIDまたはアドレスのいずれかを取得します。このCustEmail および CustAddressは、顧客のメールIDおよび顧客のアドレスを取得するエンティティです。
  4. コンテキスト変数も現在の詳細で入力し、これらの変数はデータテーブルを更新するために使用されます。
  5. メールIDおよびアドレスから、エンティティはスクリプトノードをトリガーし、以下のスクリプトを使用して適切にコンテキスト変数を変更します。
    if (context.entities.CustUpdateChoice == 'Address') { context.custAdd = context.entities.CustAddress; } else { context.custEmail = context.entities.CustEmail; }
  6. サービス -> 新しいサービスノード オプションを選択します。
  7. 基本設定セクションから、以下を設定します。
    • 名前、たとえばUpdateCust
    • 表示名、たとえばUpdate Customer Data
    • サービスタイプで、データサービスを選択
    • タイプで、テーブルを選択
  8. 要求定義で、要求を追加をクリックして要求を定義し、テーブルへデータを追加します。
  9. データサービス要求定義ページに、以下を入力します。
    • 前に定義した顧客テーブルとしての テーブル名の選択
    • データ更新としてのアクション
    • 以下のように定義されたエンティティからの値の割り当て。 すべてのフィールドとその値を含める必要があることを覚えておいてくださいい。そうしないと、フィールドはnul値に設定されます。
      列 エンティティコンテキスト
      CustName {{context.CustName}}
      CustEmail {{context.CustEmail}}
      アドレス {{context.CustAddress}}
      CustType {{context.CustType}}
      CustId {{context.CustId}}

  10. メッセージノードを追加して、成功メッセージを表示します。
  11. Botとの会話オプションを使用して、プロンプト表示されたら値を入力し、表示されるメッセージを確認します。

結論

この投稿では、以下を確認しました。

  • サービスノードを使用してテーブルからのデータの取得方法、およびそれを使用して追加処理する方法
  • サービスノードを使用してダイアログタスクからテーブルへデータを更新する方法
メニュー