봇에 Skype 채널을 추가하려면, Skype와 Kore.ai 간 연결을 설정하기 위한 개발자 Microsoft Bot Framework 계정이 필요합니다. Kore.ai에 Skype 채널을 추가하는 것은 봇과 최종 사용자 간 상호작용 할 수 있도록 하는 3단계 과정으로 이루어집니다. 봇에 Skype 채널을 추가하려면, 다음 단계를 따르세요.
- Register the Bot – Microsoft Bot Framework 개발자 계정에서, 모든 봇 세부 정보를 추가하고 App ID 및 Password를 추가하여 봇을 등록해야 합니다. 봇을 등록하려면, Microsoft Bot Framework 개발자 포털에서 무료 계정을 생성하고 등록해야 합니다.
- Enable Channel – 봇을 등록한 후, 채널을 활성화해야 합니다.
- Publish Channel – 채널이 활성화되고 모든 설정이 검증된 후, 봇을 게시하여 개발자가 사용할 수 있도록 해야 합니다.
Skype 채널 추가
이 과정을 완료하려면, Microsoft Bot Framework 개발자 포털의 새 개발자 계정이 있거나 계정을 등록해야 합니다.
- Bots 섹션 아래의 봇 빌더에서, Skype 채널을 추가하려는 봇을 클릭하세요.
- Channels 탭에서, Skype 섹션의 Expand
 아이콘을 클릭합니다. Skype Channel 페이지가 표시됩니다.
 - Microsoft Bot Framework 포털에 로그인한 후 Register a bot을 클릭합니다.
- Register a bot 탭에서, Bot profile섹션에 Bot Name, 봇 핸들Bot handle, Description을 입력합니다.
- Configuration 섹션에서, 봇 빌더의 Webhook URL을 Messaging endpoint 필드에 붙여넣습니다. 예: https://bots.kore.ai/hooks/skype/st-2724c525-484b-55ca-a844-8d7dfa6b6b23
- 다음 일러스트에 보이는대로 Create Microsoft App ID and password을 클릭합니다.

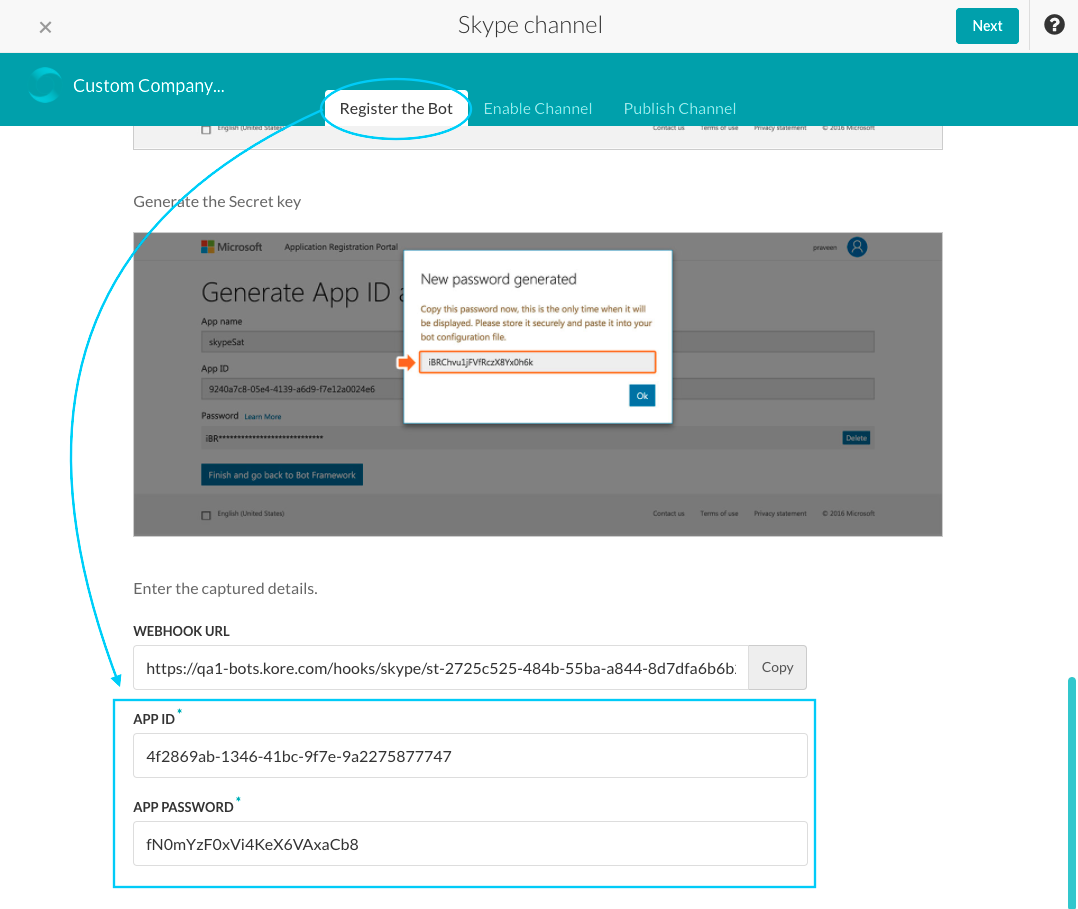
- Generate App ID and password 페이지에서, Generate an app password to continue을 클릭합니다.
- 생성된 Password 및 App ID를 나중에 Skype Channel 페이지에 대한 봇 빌더의 Register the Bot 탭에서 사용하기 위해 저장합니다.
참고 사항: 암호가 생성된 경우에만 전체 암호가 Generate Password 대화창에 표시됩니다. 봇 빌더의 Skype Channel 페이지에 저장할 때까지 암호를 안전한 위치에 복사하고 저장합니다.

- Finish and go back to Bot Framework를 클릭합니다. Register a bot 탭이 표시됩니다.
- 설정을 저장하려면, Privacy statement, Terms of Use, Code of Conduct에 동의합니다.
- Register를 클릭합니다.
- Bot created 대화창에서, OK를 클릭합니다. My bots 탭이 표시됩니다.
- 선택적으로, Test를 클릭하여 봇과의 통신을 확인합니다. Endpoint authorization succeeded 메시지가 표시됩니다.
- 봇 빌더의 봇 등록 탭에서 Microsoft Bot Framework 개발자 포털에서 저장한 APP ID 및 PASSWORD 를 App ID 및 APP PASSWORD 필드에 붙여넣습니다.
- 다음 일러스트에 보이는 대로 Next을 클릭합니다.
- Enable Channel 탭에서, 필요한 경우 Microsoft Bot Framework에서 Skype 채널 설정을 편집하는 방법을 검토한 후 Next을 클릭합니다. Publish Channel 탭이 표시됩니다.
- Enable Channel 섹션 에서, Yes를 클릭하여 Kore.ai에 대한 Skype 채널을 사용할 수 있도록 설정합니다.
- Save를 클릭합니다.
채널 설정이 저장되고 Skype Channel 페이지가 닫힙니다.
Skype 채널 편집
Skype 채널을 편집하려면 다음 단계를 따르세요.
- 수정하려면 채널로 마우스를 이동한 후 Settings
 아이콘을 클릭하여 다음 일러스트에 표시된 명령 메뉴를 표시합니다.
 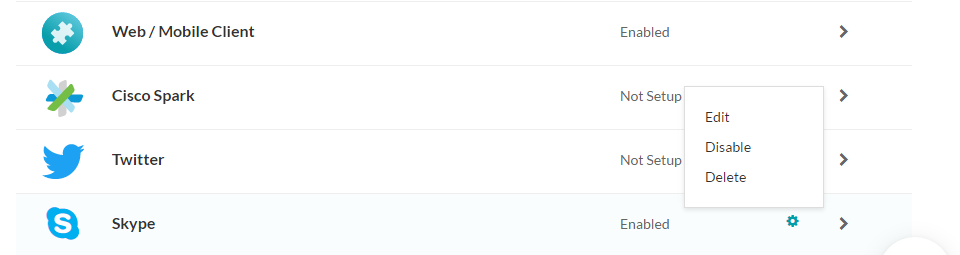 채널을 수정하려면 다음과 같은 명령 중 하나를 선택하세요.
- Edit– 클릭하여 Skype Channel 페이지를 엽니다.
- Disable/Enable– Disable을 클릭하여 봇의 Skype 채널 사용을 일시적으로 비활성화하세요 채널이 사용 안 함으로 설정된 경우, Skype 채널 사용을 활성화하려면, Enable을 클릭하세요.
- Delete– Delete를 클릭하세요. Delete Confirmation 대화 상자에서, OK를 클릭하여 봇 채널 설정을 영구적으로 삭제합니다.
경고: 이 작업은 영구적이므로, 취소할 수 없습니다.