본 방법에서는 봇 기능을 사용하여 기능 일부를 재사용할 수 있는 뱅킹 봇 내 시나리오를 살펴보겠습니다. 지출 보고서를 기능으로 프로그래밍하고 예금 계좌 및 신용 카드 모두에 사용할 수 있는 방법을 살펴보겠습니다.
Kore.ai 봇 플랫폼에서 봇 기능의 정의 및 구현 방법에 대한 자세한 내용은 여기를 참조하세요.
문제 설명
뱅킹 봇에는 다음과 같은 보고 작업이 있습니다:
- 월별 명세서는 지정된 계좌 번호에 대한 월별 잔액을 제공합니다.
- 신용 카드 명세서는 지정된 신용 카드의 지출에 대한 개요를 제공합니다.
- 두 보고서는 모두 원형 차트로 표시되며 두 경우 모두 입력값은 월, 금액 값이 있는 배열입니다.
본 문서에서는 코딩 작업의 중복을 방지하고 일관된 프레젠테이션을 보장하기 위해 봇 기능을 사용하는 방법을 알아봅니다.
전제 조건
- 봇 구축 지식
- 작동하는 봇. 여기에서의 뱅킹 봇을 사용합니다.
- 다음은 데이터를 표시하기 위해 메시지 템플릿을 사용하는 두 가지 기능이 있는 스크립트 파일입니다(메시지 템플릿에 대한 자세한 내용은 여기를 참조하세요).
- tableTemplate – 2차원 배열을 가져와 내용을 표 형식으로 표시
- pieTemplate – 2차원 배열을 가져와 파이 형식으로 표시
다음 내용을 복사하고 .js 파일(예: functionEX.js)로 저장합니다.
function tableTemplate(data){
 var message = {
   "type": "template",
   "payload": {
   "template_type": "mini_table",
   "layout": "vertical",
   "text":"Monthly Balance Statement",
   "elements": []
  }
 };
 for (i=0; i < data.length; i++) {
   var j=0;
   var element = {
     "primary":[[data[i][j]],[data[i][j+1],"right"]],
     "additional":[[data[i][j+2],data[i][j+3]],[data[i][j+4],data[i][j+5]]]
   };
 message.payload.elements.push(element);
 }
 return JSON.stringify(message);
};

function pieTemplate(data){
  var message = {
   "type": "template",
   "payload": {
   "template_type": "piechart",
   "pie_type": "regular",
   "text": "Monthly Expense Report",
   "elements": []
   }
  };
 for (i=0; i < data.length; i++) {
  var element = {
   "title": data[i][0],
   "value": data[i][1]
   };
  message.payload.elements.push(element);
 }
 return JSON.stringify(message);
};
구현
- 뱅킹 봇을 엽니다
- 상단 메뉴에서 구축 탭 선택
- 설정에서 봇 기능 섹션을 선택합니다.
- 가져오기(또는 새로 가져오기)를 클릭하여 사용자 정의 스크립트 가져오기 창을 엽니다
- 전제 조건 섹션에서 저장한 스크립트 파일을 드래그 앤 드롭 또는 불러오기를 하고 가져오기를 클릭합니다.
- 성공 메시지가 표시되면 완료를 클릭합니다.
- 스크립트 파일이 사용할 준비가 되었습니다.

- 대화 작업 페이지를 열고 "월별 명세서"라는 새 대화 상자 작업을 생성합니다.
- 계좌 번호 및 계좌 유형을 캡처할 엔티티를 추가합니다.
- 이상적으로, 월별 잔액 세부 정보를 가져오기 위한 서비스 호출이 있을 것입니다. 여기서는 시연 목적을 위해 스태틱 값을 사용합니다.
- 봇 조치를 사용하여 스크립트 노드를 추가하고 다음을 입력합니다. 즉, 1월, 2월, 3월의 잔액을 가진 배열을 선언합니다.
context.monthlyBal = [["Jan",100],["Feb",200],["Mar", 300]]; - 메시지 노드를 추가하여 이 데이터를 이전에 선언된 봇 기능에 보내고 보고서를 가져옵니다.
- 봇 응답 섹션에서 응답 관리 클릭
- 봇 응답을 추가하고, 웹/모바일 클라이언트를 채널로 선택하고 JavaScript 탭으로 전환한 후 다음 코드를 입력하여 값을 표 형식으로 표시합니다:
var info = context.monthlyBal;

print(tableTemplate(info));
- 다른 메시지 노드를 추가하여 이 데이터를 이전에 선언된 봇 기능에 보내고 보고서를 가져옵니다.
- 봇 응답 섹션에서 응답 관리 클릭
- 봇 응답을 추가하고, 웹/모바일 클라이언트를 채널로 선택하고 JavaScript 탭으로 전환한 후 다음 코드를 입력하여 값을 파이 차트로 표시합니다:
var info = context.monthlyBal;

print(pieTemplate(info));
- 대화 작업을 닫고 대화 작업 페이지로 돌아갑니다.
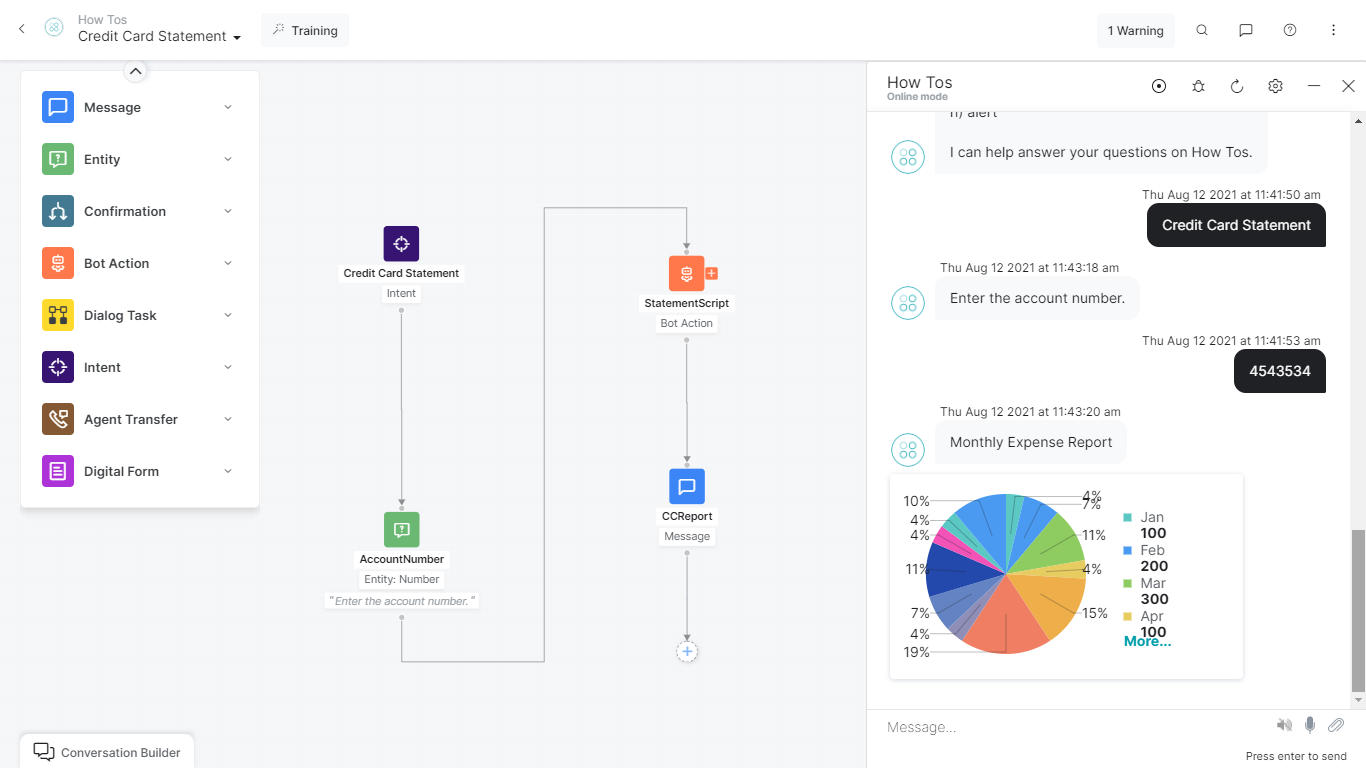
- "신용 카드 명세서"라는 새 대화 작업을 만듭니다.
- 계좌 번호를 캡처할 엔티티를 추가합니다.
- 이상적으로, 월별 지출 값을 가져오기 위한 서비스 호출이 있을 것입니다. 여기서는 시연 목적을 위해 스태틱 값을 사용합니다.
- 봇 조치 노드 내에 스크립트 노드를 추가하고 다음을 입력합니다. 즉, 모든 월에 대한 지출 값을 가진 배열을 선언합니다.
context.monthlyExpenses = [["Jan",100],["Feb",200],["Mar", 300],["Apr",100],["May",400],["June", 500],["Jul",100],["Aug",200],["Sept", 300],["Oct",100],["Nov",100],["Dec", 300]]; - 메시지 노드를 추가하여 이 데이터를 이전에 선언된 봇 기능에 보내고 보고서를 가져옵니다.
- 봇 응답 섹션에서 응답 관리 클릭
- 봇 응답을 추가하고, 웹/모바일 클라이언트를 채널로 선택하고 JavaScript 탭으로 전환한 후 다음 코드를 입력하여 값을 파이 차트로 표시합니다. 보다시피 이전 대화 작업에서 호출한 것과 같은 기능을 사용하고 있습니다.
var info = context.monthlyExpenses;

print(pieTemplate(info));
- 대화 작업을 닫습니다
- 봇과 대화하고 두 대화를 모두 시도해 보세요. 이렇게 같은 기능을 사용하여 여러 위치에 보고서를 표시했습니다.