문제 설명
뱅킹 봇이 다음과 같은 시나리오를 해결하려고 한다고 생각해 보세요.
- 이미 등록된 사용자가 추가 계좌를 개설하려고 합니다.
- 사용할 수 있는 계좌 유형에는 세 가지가 있으며, 각 유형에는 다음과 같은 추가 옵션이 있습니다:
- 저축 계좌,
- 현금 카드를 선택하고 최소 잔액을 설정할 수 있는 옵션이 있는 당좌 예금 계좌,
- 카드 유형을 플래티넘, 골드, 실버 또는 베이직으로 선택할 수 있는 옵션이 있는 신용 카드
- 위의 데이터는 UI 양식을 사용하는 사용자에게서 수집됩니다.
- 이 데이터를 데이터 테이블로 업데이트해야 합니다.
전제 조건
- 봇 구축 지식
- 다음에 액세스할 수 있는 뱅킹 봇
- 여기에서 생성된 것과 같은 고객 세부 정보 테이블
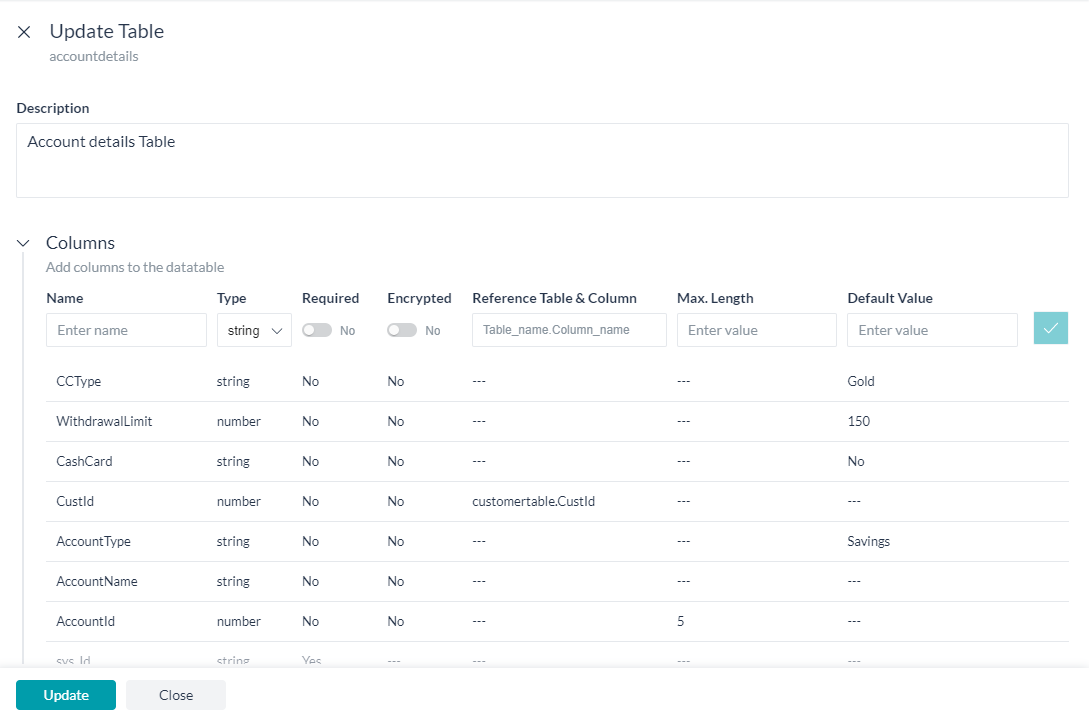
- 계좌 세부 정보 테이블, 위의 링크에 표시된 것과 같은 단계를 사용하여 다음 데이터 테이블을 생성합니다.
- 이름(예: accountdetails)
- 설명(예: 계좌 세부 정보 테이블)
- 열 섹션에서 다음 세부 정보를 추가합니다:
열 이름 유형 필수 추가 설정 AccountId 숫자 예 암호화됨 및 최대 길이 5 AccountName 문자열 예 – AccountType 문자열 아니요 – CustId 숫자 예 참조 테이블 및 열을 customertable.CustId로 CashCard 문자열 아니요 – WithdrawalLimit 숫자 아니요 – CCType 문자열 아니요 –
- UI Form, 여기에 보여지는 대로 설정된 UI Form을 사용하겠습니다.
설정
다음 시나리오를 각각 하나씩 살펴보겠습니다.
- 다음을 위한 대화 작업:
- 고객 ID 캡처,
- UI 양식을 트리거 하여 계좌 세부 정보 수집,
- 서비스 노드를 호출하여 계좌 데이터를 추가합니다.
대화 작업 설정
대화 작업을 만들고 양식 노드를 추가하여 위 단계에서 생성한 UI 양식을 트리거하고 서비스 노드를 사용하여 양식 데이터에서 새 계좌를 추가하기 위해 서비스 노드를 사용할 것입니다. 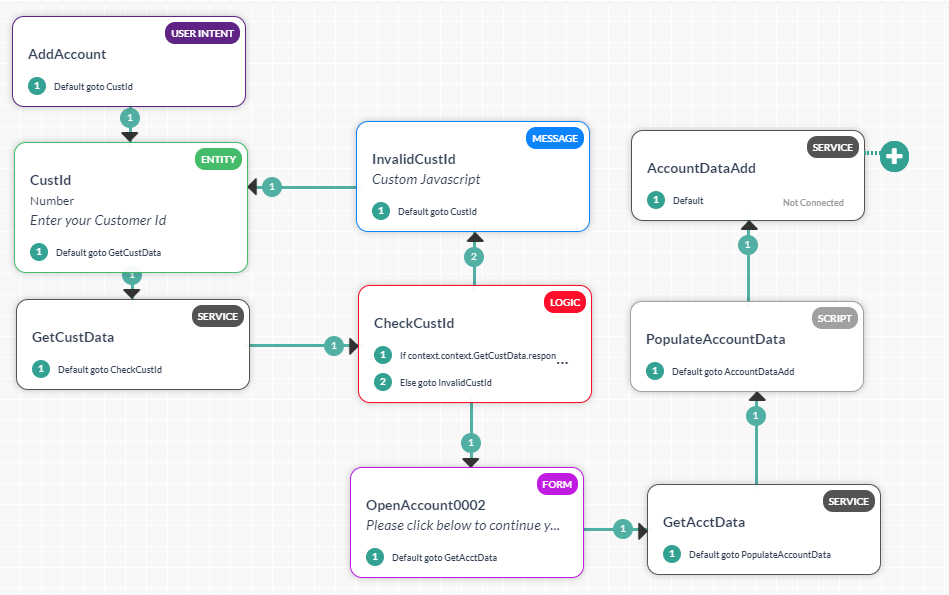
대화 작업 생성
- 왼쪽 탐색 메뉴에서 봇 작업 -> 대화 작업을 선택합니다.
- 대화 작업에서 +를 클릭하여 새 작업 생성
- IntentName 입력(예: AddAccount)
- 생성 및 진행하여 대화 빌더 페이지를 엽니다
- 의도 노드 기본 설정을 유지하고 의도 노드를 닫습니다.
- 의도 노드 옆의 +를 클릭하고 엔티티 노드를 선택합니다. 이것은 고객 ID를 캡처하는 데 사용됩니다
- 이름 입력(예: CustId)
- 유형을 숫자로 선택
- 사용자 프롬프트(고객 ID 입력)
- 엔티티 노드를 닫습니다.
- 서비스 노드를 추가하여 입력한 고객 ID의 유효성을 확인합니다.

- 고객 ID가 유효하다면 논리 노드를 추가하여 양식을 진행하고 그렇지 않으면 고객 ID를 묻는 메시지를 표시합니다.

- InvalidCustId는 다음 JavaScript를 포함한 메시지 노드입니다.
context.entities.CustId = null; print('You have entered an invalid customer id, try again'); - 그런 다음 양식 노드를 추가하고 드롭다운 목록에서 양식(OpenAccount)을 선택합니다.
- 양식 경험을 선택하라는 메시지가 표시됩니다. Kore.ai 봇 플랫폼을 사용하면 양식과 채널에 따른 대화를 통해 사용자 입력값을 수집할 수 있습니다.
- 이 활용 사례에서는 UI 양식만 경험을 선택하겠습니다.
- 양식 노드가 추가되면 양식 이름 등을 사용자 커스터마이징 할 수 있습니다.
- 이름을 OpenAccountForm으로, 표시 이름 을 계좌 개설을 위한 양식으로 변경합니다.
- 서비스 노드를 사용하여 고객 ID에 대한 기존 계좌 세부 정보를 가져옵니다
- 다음으로 스크립트 노드를 사용하여 양식 노드에서 반환된 값을 캡처하고 같은 프로세스를 처리하여 다음 계좌 ID 값을 얻고 원하지 않는 필드를 null로 설정하는 방법을 살펴보겠습니다.
- 다음 스크립트를 사용합니다:
//get the next account id
var resultSet = context.GetAcctData.response.body.queryResult;
var id = 0;

if (!resultSet.length) {
    id=1;
} else {
    for (var i=0; i<resultSet.length; i++) {
        if (id < resultSet[i].AccountId) {
            id = resultSet[i].AccountId;
         }
        }
    id++;
    }
context.accountid = id;
context.name=context.GetCustData.response.body.queryResult[0].CustName;

//set unwanted fields to null
if (context.forms.OpenAccount.accounttype == 'Savings')
	{ context.cashcard = null;
	  context.withdrawallimit = null;
	  context.cardtype = null;
	  context.type=context.forms.OpenAccount.accounttype;
	  }

if (context.forms.OpenAccount.accounttype == 'Checkings')
	{ context.cardtype = null;
      context.cashcard = context.forms.OpenAccount.cashcard;
	  context.withdrawallimit = context.forms.OpenAccount.withdrawallimit;
	  context.type=context.forms.OpenAccount.accounttype;
	  }

if (context.forms.OpenAccount.accounttype == 'Credit Card')
	{ context.cashcard = null;
	  context.withdrawallimit = null;
	  context.cardtype = context.forms.OpenAccount.cardtype;
	  context.type=context.forms.OpenAccount.accounttype;
	  }
- 다음 스크립트를 사용합니다:
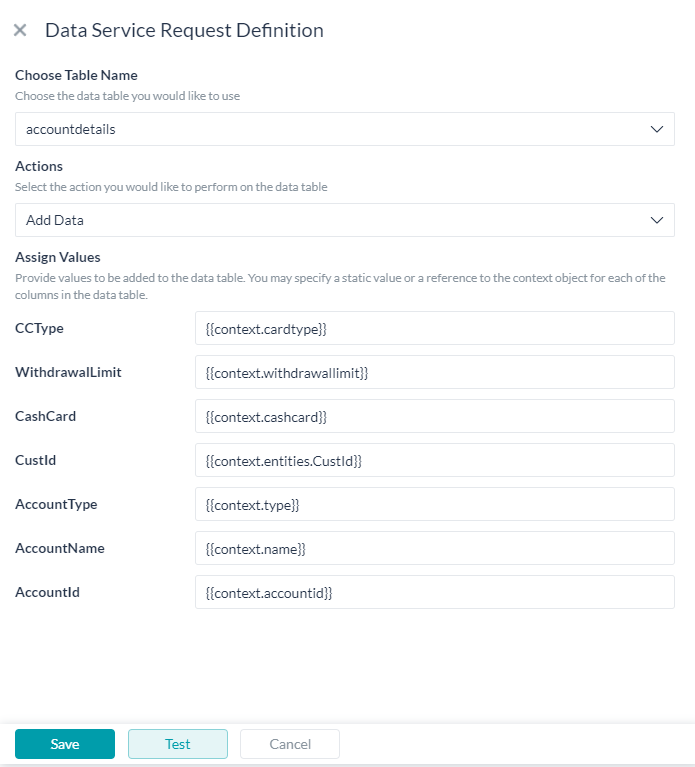
- 서비스 노드를 사용하여 이전 스크립트 노드에 입력된 컨텍스트 변수를 사용하여 계좌 세부 정보를 추가합니다.
- 데이터 테이블 업데이트를 위한 양식 및 서비스 노드 대화가 준비되었습니다.
- 봇과 대화하고 단계를 따라 주어진 고객 ID에 계좌를 추가합니다.
결론
이 게시물에서 다음을 살펴보았습니다:
- 데이터 테이블에서 데이터 가져오는 방법,
- 대화에서 양식을 트리거 하는 방법,
- 양식에서 캡처한 데이터를 데이터 테이블에 추가하는 방법