In this How-To, we will explore a scenario in a Banking Bot, where the user can create an additional account.
We will see how data collected from the UI Forms can be used to create the account in a Data Table.
For details on what UI Forms are and how it is implemented in the Kore.ai Bots platform, refer here.
For details on what Data Tables are and how it is implemented in the Kore.ai Bots platform, refer here.
Problem Statement
Consider a Banking Bot trying to address the following scenarios:
- An already registered user wants to open an additional account.
- There are three types of accounts that are available, each with further options:
- Savings Account;
- Checking Account with an option to opt for a Cash Card and set a Minumum Balance;
- Credit Card with an option to choose the type of card to be Platinum, Gold, Silver or Basic
- The above data is collected from the user using a UI form.
- This data needs to be updated to the data table.
Pre-requisites
- Bot building knowledge
- A Banking Bot with access to
- Customer details table as created here
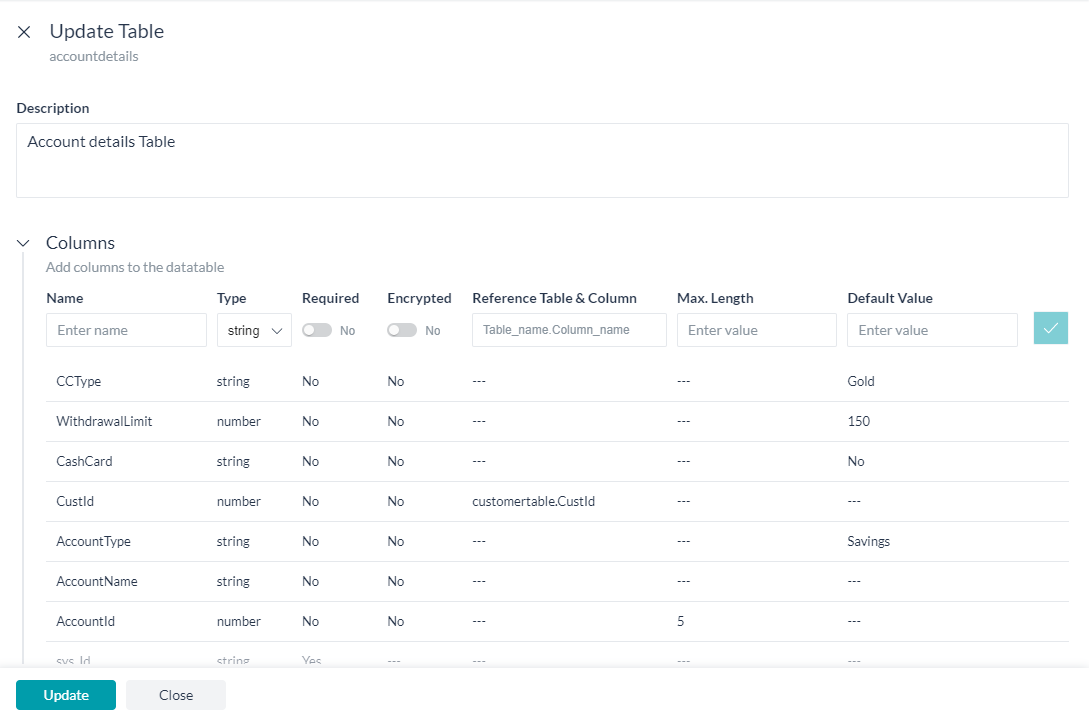
- Account details table, using the same steps shown in the above link create the following data table:
- Name, say accountdetails;
- Description, say Account details Table;
- Under the Column section add the following details:
Column Name Type Required Additional Settings AccountId number Yes Encrypted & Max Length of 5 AccountName string Yes – AccountType string No – CustId number Yes Reference table & column as
customertable.CustIdCashCard string No – WithdrawalLimit number No – CCType string No –
- UI Form, we will be using the UI Form configured as shown here.
Configurations
Let us consider each of the following scenarios one by one:
- Dialog Task to:
- capture the customer id;
- trigger the UI Form to gather account details; and
- invoke the service node to add the account data.
Dialog Task Configuration
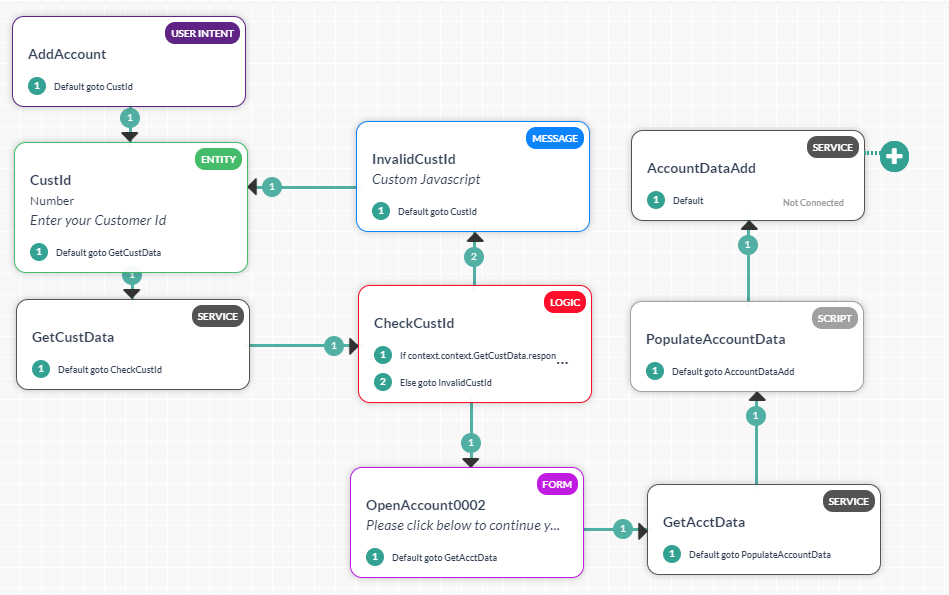
We will be creating a dialog task and adding a form node to trigger the UI Form created in the above step and use a service node to make a service call to add the new account from the form data.
Create Dialog Task
- From the left navigation menu, select Bot Tasks -> Dialog Tasks.
- Click the + against the Dialog Tasks to create a new Task
- Enter IntentName, say, AddAccount
- Create & Proceed to open the dialog builder page.
- Retain the Intent Node default settings, and close the Intent Node.
- Click the + next to the intent node and select the Entity node. This will be used to capture the customer id
- Enter Name, say, CustId
- Select Type, as Number
- User Prompt, as Enter your Customer Id
- Close the entity node.
- Add a Service node to check for the validity of the customer id entered.

- Add a Logic node to proceed with the Form if the customer id is valid else prompt for the customer id.

- The InvalidCustId is a Message node with the following JavaScript:
context.entities.CustId = null; print('You have entered an invalid customer id, try again'); - Next, add a Form node and from the dropdown list select the form (OpenAccount).
- You will be prompted to select the Form Experience. Kore.ai Bots platform allows you to gather user input both from the form and through conversation based on the channel.
- For this use case, let us select Only Form UI experience.
- A Form Node would be added, you can customize the form name, etc.
- We are changing the Name to OpenAccountForm and Display Name to Form to open account.
- Using a Service node, fetch any existing account details for the customer id.
- Next, we will see how to capture the values returned by the Form Node using a Script node and process the same to get the next account id value and set to null the unwanted fields.
- Use the following script:
//get the next account id
var resultSet = context.GetAcctData.response.body.queryResult;
var id = 0;

if (!resultSet.length) {
    id=1;
} else {
    for (var i=0; i<resultSet.length; i++) {
        if (id < resultSet[i].AccountId) {
            id = resultSet[i].AccountId;
         }
        }
    id++;
    }
context.accountid = id;
context.name=context.GetCustData.response.body.queryResult[0].CustName;

//set unwanted fields to null
if (context.forms.OpenAccount.accounttype == 'Savings')
	{ context.cashcard = null;
	  context.withdrawallimit = null;
	  context.cardtype = null;
	  context.type=context.forms.OpenAccount.accounttype;
	  }

if (context.forms.OpenAccount.accounttype == 'Checkings')
	{ context.cardtype = null;
      context.cashcard = context.forms.OpenAccount.cashcard;
	  context.withdrawallimit = context.forms.OpenAccount.withdrawallimit;
	  context.type=context.forms.OpenAccount.accounttype;
	  }

if (context.forms.OpenAccount.accounttype == 'Credit Card')
	{ context.cashcard = null;
	  context.withdrawallimit = null;
	  context.cardtype = context.forms.OpenAccount.cardtype;
	  context.type=context.forms.OpenAccount.accounttype;
	  }
- Use the following script:
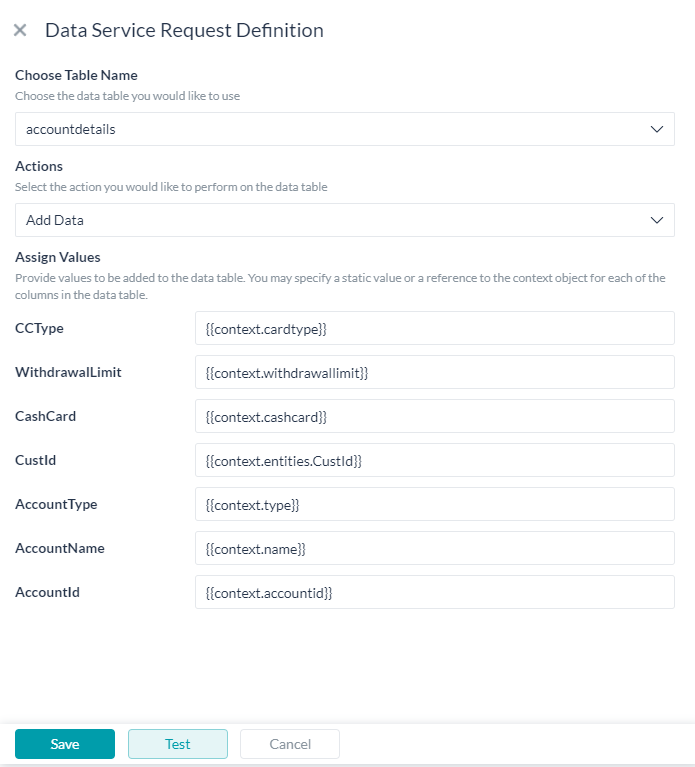
- Use a Service node to add the account details using the context variables populated in the previous Script node.
- Your dialog with form and service nodes to update the data table is ready.
- Talk to bot and follow the steps to add an account to a given customer id.
Conclusion
In this post, we have seen:
- How to fetch data from data tables;
- How to trigger the From from a Dialog;
- How to add the data captured from the form to a data table.