The Kore.ai XO Platform allows you to design and create feedback surveys for products, services, and overall experiences using out-of-the-box templates on the web and mobile channels. You can configure a Virtual Assistant to launch these surveys at a certain point in a conversation or at the end of a conversation (when the end of conversation event is triggered). The NPS, CSAT, and Like/Dislike survey types are currently supported.
To navigate to the Feedback Survey feature, follow the steps below:
-
- On the Bot Builder, click the Build tab.
- Navigate to Configurations > Feedback Survey on the left navigation menu.

Feedback Template Types
The Platform provides the following in-built feedback template types, to create and define a feedback survey:
NPS Scale Categorization
Known as New Promoter Score, this is a standard customer experience metric that measures the experience and loyalty of customers based on their feedback response. For a single-question survey, respondents give a rating between 0 (not at all likely) and 10 (extremely likely), and based on their response, they fall into one of the following NPS score categories:
Customer CategoryNPS ScoreDescription
| Promoters | 9 & 10 | This score indicates a loyal customer who is satisfied with the conversation and is highly likely to return. |
| Passives | 6,7, & 8 | This score represents a satisfied customer who may or may not be willing to continue the conversation and return for a service. |
| Detractors | 0,1,2,3,4, & 5 | This score indicates that the customer is unsatisfied with the conversation and has given negative feedback. As a result, the customer will mostly not return to the platform and may detract other customers by sharing their experiences. |
CSAT Score Categorization
CSAT or Customer SATisfaction is a customer experience metric that measures or quantifies how happy the customer is with a Virtual Assistant interaction. The customer is asked to rate on a five-point scale, 1 meaning very satisfied and 5 meaning very unsatisfied, for a survey question like “How satisfied were you with the conversation?” The response score is mapped to the relevant category as shown below:
CategoryScore
| Very Satisfied | 1 |
| Satisfied | 2 |
| Neutral | 3 |
| Unsatisfied | 4 |
| Very Unsatisfied | 5 |
Like/Dislike
The customer is asked to respond to the feedback survey by clicking a Like or Dislike icon. Like or Extremely Likely denotes the customer’s positive experience and is allocated a score of 1 internally. Dislike or Extremely Unlikely indicates a negative customer experience, and is allocated a score of 0 internally.
Feedback Survey Creation and Definition
To create a Feedback Survey on the Bot Builder, follow the steps below:
-
- Navigate to Build > Configurations > Feedback Survey.
- If this is your first feedback survey, click Add Feedback on the Feedback Survey screen.

Otherwise, click New Survey.

- In the Add Feedback Survey window, define the survey details and design, and launch the survey to be visible to customers.
The Feedback Survey definition and design flow steps are given below:
Step 1: Define the Survey Details
In this section, you can define a survey name and the type you want to use. To define the survey details, follow the steps below:
-
- Enter the Survey Name in the relevant text area.
- Select the Survey Type as either NPS, CSAT, or Like/Dislike. Based on your selection, the survey definition changes.
- Click Next to move to the next step.

Step 2: Define the Survey Design
You can define how to present the survey in the Survey Design stage which includes the following:
- Gathering the customer’s feedback using one of the out-of-the-box default templates.
- Defining the primary question that will be posed to the customer when the system triggers the feedback survey.
- Setting the follow-up questions based on the feedback conditionally.
To define the survey design, follow the steps below:
- Select the relevant option in the Add Feedback Survey window based on how you want to create the survey.
- If you want to create a new Feedback Survey along with a Dialog Task (customizable) which will have the flow required to collect the feedback and capture the analytics, select Create a survey with a New Dialog and follow the steps below:
-
- Enter the Dialog Name in the text area.

-
- Set the default Primary Question to be posed to the customer for the selected survey type when it’s triggered.

- Alternatively, modify/change the Primary Question in the text area.
- The Primary Question response options the customer will see are displayed below based on the selected survey type:
NPS

CSAT

Like/Dislike

Note: The default response names provided for CSAT and the Like/Dislike types are editable; however, the scores set in the system cannot be changed for any survey type.
-
- To create your flow, select Create survey without Dialog and click Next

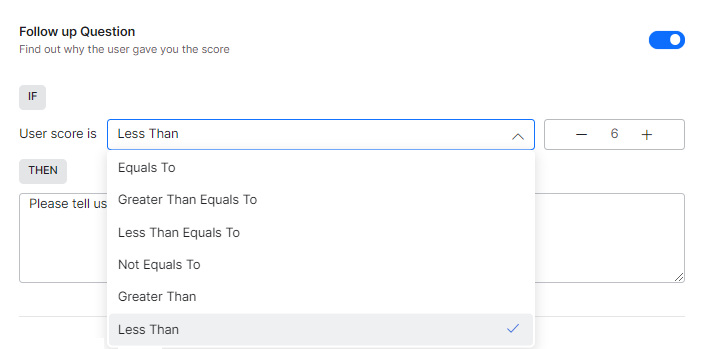
- Optional Step: To capture additional details from the customer for a negative feedback, configure the follow-up question with the steps below:
-
- Enable the Follow-up Question option (default setting).

-
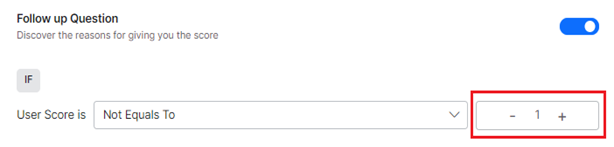
- Define when to post the follow-up question by configuring the IF condition, where you must select the conditional option from the list for User Score.
-
- Next, increment or decrement the feedback score counter for the selected condition to set the validation criterion.
-
- Either edit the default follow-up question in the text area provided for the THEN clause or keep it unchanged.

-
- Modify the Acknowledgement Message in the text area or retain the default message to acknowledge the customer’s effort in taking the survey.

- Click Next to move to survey launch configuration.
Step 3: Define Launch Configuration
After defining the survey, you can choose how and when to launch the survey in one of the following ways with the Launch Configuration:
- Associate the survey with the end-of-task (conversation) event.
- Add the survey task as a sub-dialog to other primary tasks.
To configure the feedback survey launch, follow the steps below:
- Select one of the following options:
-
- Launch after End of Task: The dialog task is considered as the ‘End of Task‘ event, and the survey is triggered at the end of every conversation. When selected, End of Task (End of Conversation Event) under Intelligence > Events > End Of Task will be overridden and the feedback survey is launched. Through the survey dialog you’ve created in the previous step.
- I will decide how to launch the Survey: You can manually initiate the feedback survey at any time by using the associated dialog task in the Kore.ai XO platform. A dialog task will be made available under Build → Conversational Skills. This allows you to control when the survey is launched and gather feedback at your own convenience.

- Click Create to launch the feedback survey.
A success confirmation message, as shown below, is displayed with your survey details.

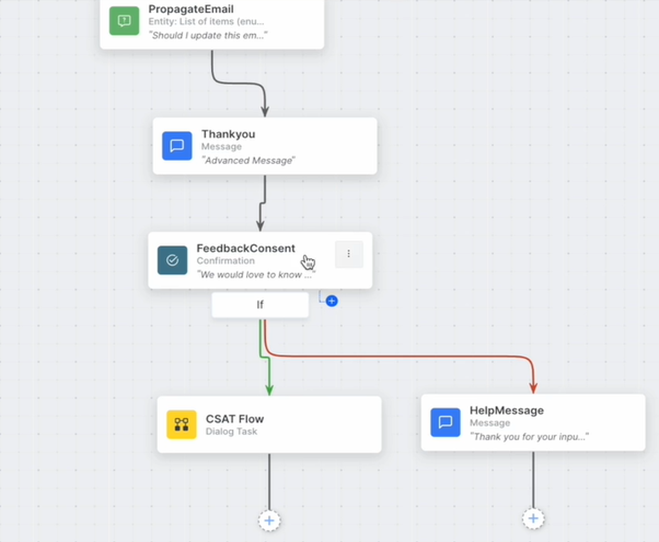
Feedback Survey Dialog Flow
After you’ve created the survey, you can view the built-in survey flow as a dialog task under Build > Conversational Skills > Dialog Tasks on the left menu.
The Task Flow will include a combination of Entity, Message, and Service nodes to represent the survey flow.
You can customize the dialog flow as per your need by changing the dialog flow definition fields.
Important
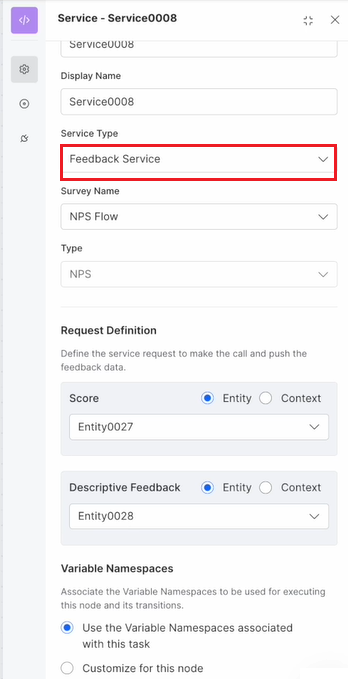
-
- Feedback Service is introduced as the new Service Type option under General Settings. You can use this service to submit feedback on the surveys you may have captured using your custom flows.
-
- You can invoke feedback as a sub-dialog from any other point in the conversation where you would like to capture the feedback.