Intercom is a Customer Communications Platform. It shows you who is using your product or website and makes it easy to communicate . Kore.ai XO Platform’s Intercom Agent integration allows you to seamlessly hand-off the virtual assistant conversations to your live agents on Intercom.
This post provides the configuration steps to be followed to enable the Intercom Agent integration. Use the configurations provided below as general guidelines as there could be some differences based on the version of the Intercom that you are using.
Overview
Kore.ai’s virtual assistant (VA) serves as the central point of interaction for the users. In addition to its regular capabilities, the VA acts as a proxy or intermediary between the users and the Intercom agents to handover conversations seamlessly. The VA also allows you to integrate with the Intercom platform. The VA facilitates the communication and interaction between the user and the Intercom agent using the chat module.
Configuration
To configure the Intercom agent follow the instructions in the sections below.
Step1: Create an App
To set up Intercom to receive messages, you will first need to create an app in Intercom.
- Log in to the https://app.intercom.com/a/apps/_/developer-hub with your intercom credentials.
- Go to the App Store and click the Build your own app.

- In the App Store page, click the Your Apps menu on the top right corner.
- Click New App and enter the following details to build an app:
- Enter the App name.
- Select the Kore.ai Workspace.

- Click Create App.
Step2: Retrieve Access Token
- Once you create the App, click on authentication and copy the AccessToken value.
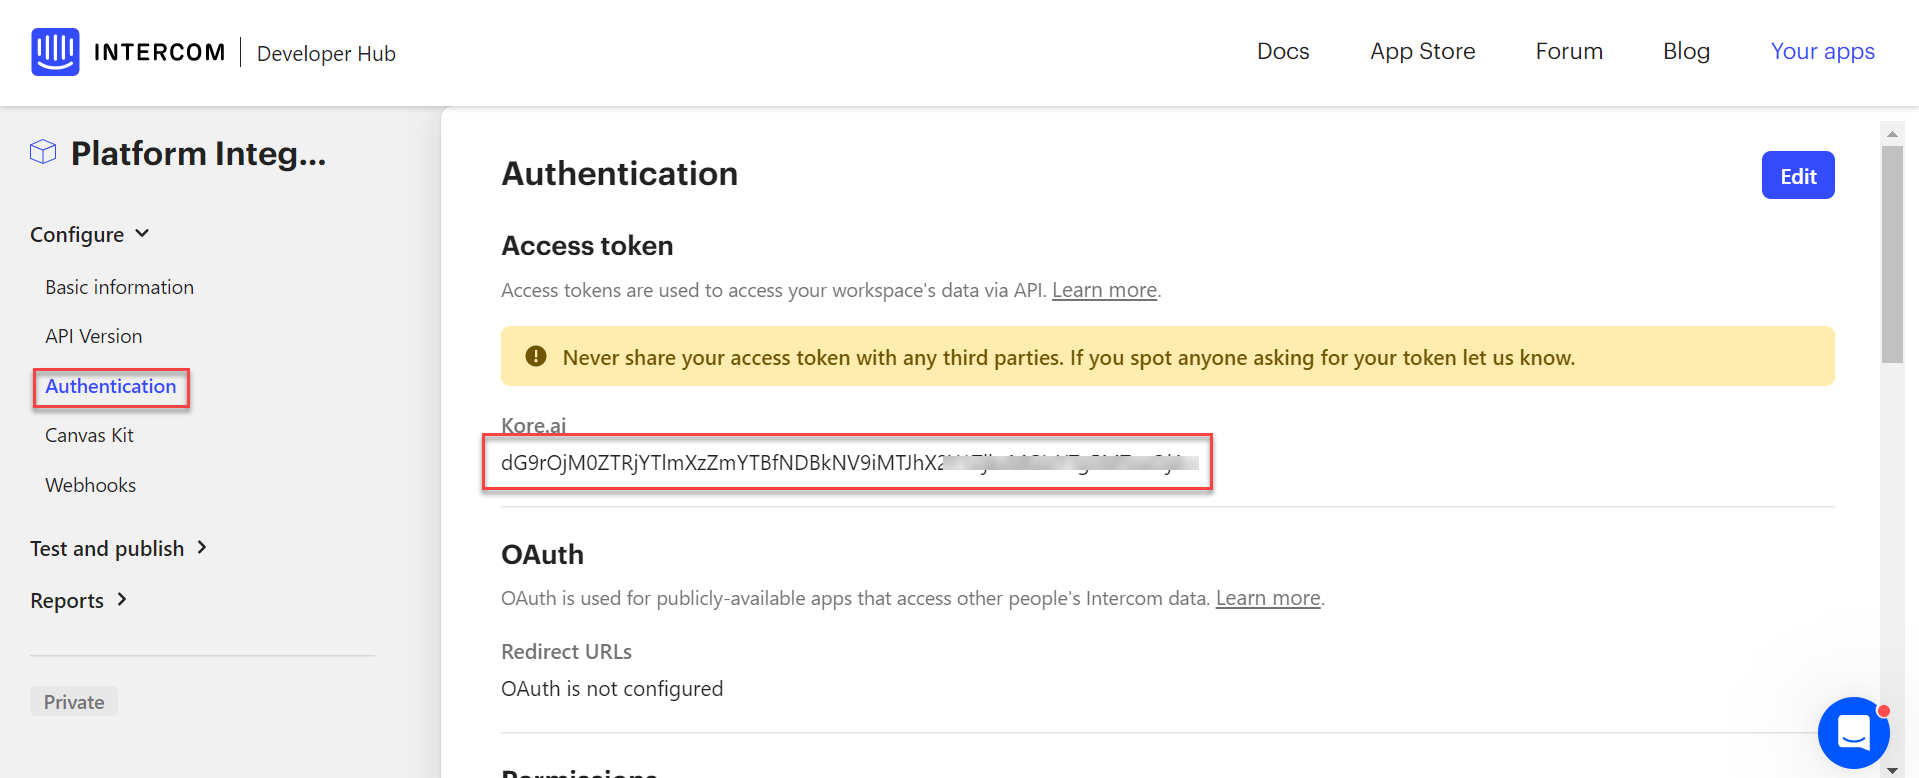
Note: This token will be used to access your Intercom data via API. - Copy the Access Token and keep it for future use.
Step 3: Configure a Webhook
- To set up the webhook, Log in to your Intercom account.
- From the main menu on the left, navigate to Configure > Webhooks.
- Navigate back to Intercom Developer Hub, and
- To add a new webhook, click on the Add Webhook button.
- In the New Webhook form, you can enter the details for the new webhook.
- Copy the webhook URL listed under Integrations → Agent Transfer → Intercom → Configuration.
- Navigate back to Intercom and paste the copied Webhook URL in the WebHook field.
- Under Webhook topics, navigate to Select a Topic and select the following topics:
- conversation.admin.closed
- conversation.admin.replied
- conversation.admin.assigned
- conversation.admin.single.created
- Click on Save to preserve these settings
- Click Save.
Step4: Enable the Intercom Agent
- Log in to the Kore.ai XO Platform https://bots.kore.ai/botbuilder
- Select a Virtual Assistant for which you want to configure the Intercom agent.
- Navigate to Build > Integrations > Agent Transfer and click the Intercom button.

- Click the Configurations tab and enter the following credentials for the Intercom Agent:
- Access Token: The access token ID for the Intercom, which was copied step 2.
- Webhook URL: The WebHook URL found in the Kore.ai’s Intercom Agent Configuration page.
- If you want to make Intercom as the default agent, enable the Default Agent System for all bot channels option.
Note: This option will be available only when you have multiple agents configured for your VA. - You can also customize the channel mapping by clicking the Manage link as shown below:

- Once you click Manage, you can map the channels which you want to use Intercom agent for handovering the conversations. To learn more about channel enablement, read the Adding channels to your bot article.

- After mapping channels, click Done.
- Click Save to enable the Intercom agent.
- Publish the VA. For more information, see Publishing Bot.
Execution
This section helps you verify how the conversations from the Kore.ai XO Platform are being handed over to the Intercom agent after enabling it.
To verify the data exchange between the Kore.ai’s VA and Intercom agent, follow these steps:
- Open a virtual assistant for which you have enabled the Intercom agent.
- Create a new Agent Transfer Node task. For example, create a PlatformAgent task with the UserChats node and configure it to use the Intercom agent. For more information, read the Agent Transfer Node article.

- Click the Talk to Bot icon to launch the VA and enter Help.
- Once you invoke the agent transfer dialog, the Intercom Developer Hub receives a notification alert.
- When a user initiates the chat from the VA, it transfers the conversation to the Intercom agent and sends a message to the user. Agent receives a notification about this on the Intercom.
- Now the connection between Intercom agent and the user has been established and the conversation continues.
