A Test Suite contains a collection of test cases grouped to simulate a specific conversation between the user and the bot and can be used anytime for test execution. In a test suite, you can know the execution status and determine and analyze the results.
In Conversation testing, you can create the test suites in the following two different ways:
Record Conversation to Create a Test Suite
The option to record the test suite captures the metadata in the background, which helps to test the flow sequence and transitions and track the test coverage. The following step-by-step process explains how to record a conversation as a test suite and validate and create the test cases.
Record Test Suite
- On the Conversation Testing page, click New Test Suite.
- Click the Record option to start recording the new test.

- In the pop-up displayed, select the desired Channel from the dropdown options (Webchat or IVR) to begin recording the test suite and simulating the channel’s behavior.
Note: Conversation testing for IVR simulates the workflow using voice call properties and includes only Initial Prompts, Error Prompts, Timeout Prompts, and No Match Prompts. It does not support ASR/TTS configurations, Grammar, Barge-in, or DTMF settings. - Choose whether to start the recording with the On Connect event included.
Note: “On-Connect” is the message you receive as soon as you open the chat window, even before you enter any message. The option is displayed for VAs with an On-Connect message. If you select No, the On-connect message will not be added as a test case. If you select Yes, then the On-connect message is created as a separate test case. - Define the Pre-processor Script to control preconditions during conversation testing. Learn more.
- Click Proceed to start the test recording.

- The Chat window is displayed. The chat transcript is recorded, and the recording status is displayed at the top. You can click Stop to stop the recording

| Note: If there is an error while recording due to any limitation set on the platform, it is displayed on the page. |
Pre-processor Script
The Pre-Processor Script allows users to manipulate session context data and inject custom data before and during test execution. Session context data is preset during conversation recording, which can sometimes lead to unintended workflow paths during validation and cause false negatives. Additionally, users may need to test scenarios requiring custom data from external systems.
To address these needs, users can run custom scripts at the recording, validation, and execution phases of conversation testing, enabling them to:
- Modify Existing Session Context Data: Adjust or reset session context data to ensure intended workflow paths.
- Set Custom Context Data: Define new session context data for specific scenarios, enhancing test accuracy and coverage.
- Inject External Custom Data: Simulate inputs from external systems for real-world test cases.
Here are the key session variables that can be set:
- EnterpriseContext
- BotContext
- UserContext
- UserSession
- BotUserSession
- Opts
Use Case: Managing New vs. Returning Users in Conversation Testing
In conversation testing, the Pre-Processor Script is crucial for handling scenarios where user status (new vs. returning) affects session behavior, leading to potential validation issues.
When recording a test case, the user is treated as a new user with no session data. During validation, however, the user may be recognized as a returning user, introducing session variables that change the conversation flow and potentially cause validation failures.
The Pre-Processor Script allows users to:
- Reset or Set Session Variables: Adjust session data as needed to ensure consistent “new user” or “returning user” states.
- Simulate Different User Conditions: Accurately test new and returning user flows by managing session variables to reflect the correct state.
Generated User Response Suggestions
If you have enabled LLM and Generative AI for your Virtual Assistant, you will see User Response suggestions while recording a Conversation Test Case.
This feature provides a regression tool that creates a conversation test suite for each intent (new and old) to evaluate the impact of a change on the conversation execution. It helps check if the task or intent is robust enough to handle random user utterances.
It also helps you predict and simulate the end user’s behavior and check if the VA can execute all the defined flows by generating user responses and presenting any digressions from the specified intent.
Click any suggestion to send it to your VA and test the response.

You can refresh the suggestions list or minimize the suggestions panel. You can also talk to your VA by typing in your responses.

Validate Test Suite
The conversation is recorded, and all the metadata for each test case is captured. Once the recording is completed, the Platform provides you an option to validate the test suite as follows:
-
- Upon successful completion of recording, click Validate Test Suite.

- The ongoing validation is displayed. You may click Cancel if you want to cancel the step or click Continue in Background to continue the validation as a background task.
- Upon successful completion of recording, click Validate Test Suite.

- If you click Continue in Background, you can see the status in the top right corner of the landing page by clicking the Draft icon.
Note: You can draft up to five validations on the platform. The red indicator denotes that there are pending validations. Clicking the blue arrow takes you to the Validate Test Suite page. If a Draft contains five validations, you cannot create a new test suite. You need to approve or discard at least one validation from the list to create a new test suite.

- Once the validation is complete, the platform displays the Recorded and Validated Chat transcripts in the Validate Test Suite pop-up with the following details for each VA response:
– Metadata – Details like Intent and Node Name, Transitions, etc.
– Assertions – Default assertions (Flow and Text) added based on the VA response.
- The following options are displayed on the Validate Test Suite pop-up:
– Approve – When you approve the validation, the platform triggers the Test Suite creation step.
– Discard – When you discard the validation, the data is deleted from the system.
| Note: A test suite cannot contain more than 500 test cases, and a test input cannot have more than 8000 characters. |
Capture Test Suite Metadata
Using Conversation Testing, you can test the sequence of nodes executed by the VA for user input(s) and capture the following metadata at the time of test suite creation to verify if the VA is executing the conversation flows as expected:
- Intent ID, Intent Name
- Node ID, Node Name
- Transition flow
The metadata are captured in both Record and Upload scenarios for all the VA responses of all the test suites. The details to be captured vary based on the intent type of the VA response. For more information on the details captured here, see Test Editor.
Create Test Suite
- Upon approval, a Create Test Suite pop-up is displayed in which you can enter the following details:
-
-
- Test Suite Name
- Description
- Tags

-
2. You can either click Create to create the test suite or discard this step.
3. On clicking Create, the new test suite is created. You can click the Run Test Suite button to execute the test suite.

4. The dialog Before you execute the test Suite is displayed. Select the version of your VA to be executed. If any authorization profiles are available, they are displayed here.

5. Click Continue to continue the execution. The test case execution progress is displayed on the top right corner of the page.
If the test cases are passed, the Result is displayed as Passed, as shown in the screenshot below.

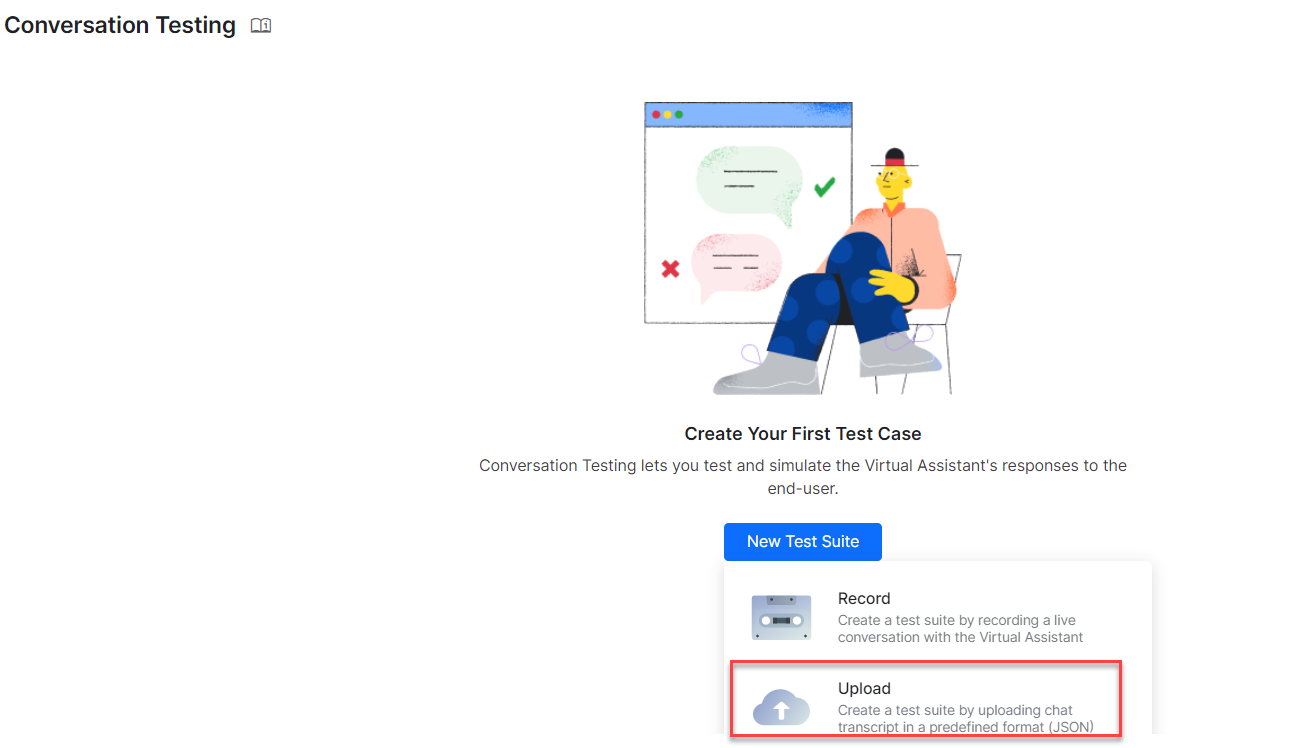
Upload File to Create a Test Suite
Using this option, you can create test suites by uploading chat transcripts in a pre-defined JSON file. This alternative way of creating test suites is quick and scalable, as compared to recording the flow every time. The following step-by-step process explains how to upload a JSON file, validate it, and create the test suites.
Upload a JSON File
- Click New Test Suite.
- Click the Upload option to upload a chat transcript in JSON format.
3. You can drag and drop a predefined JSON file in the Upload pop-up or select the file in the local directory using the browse option.
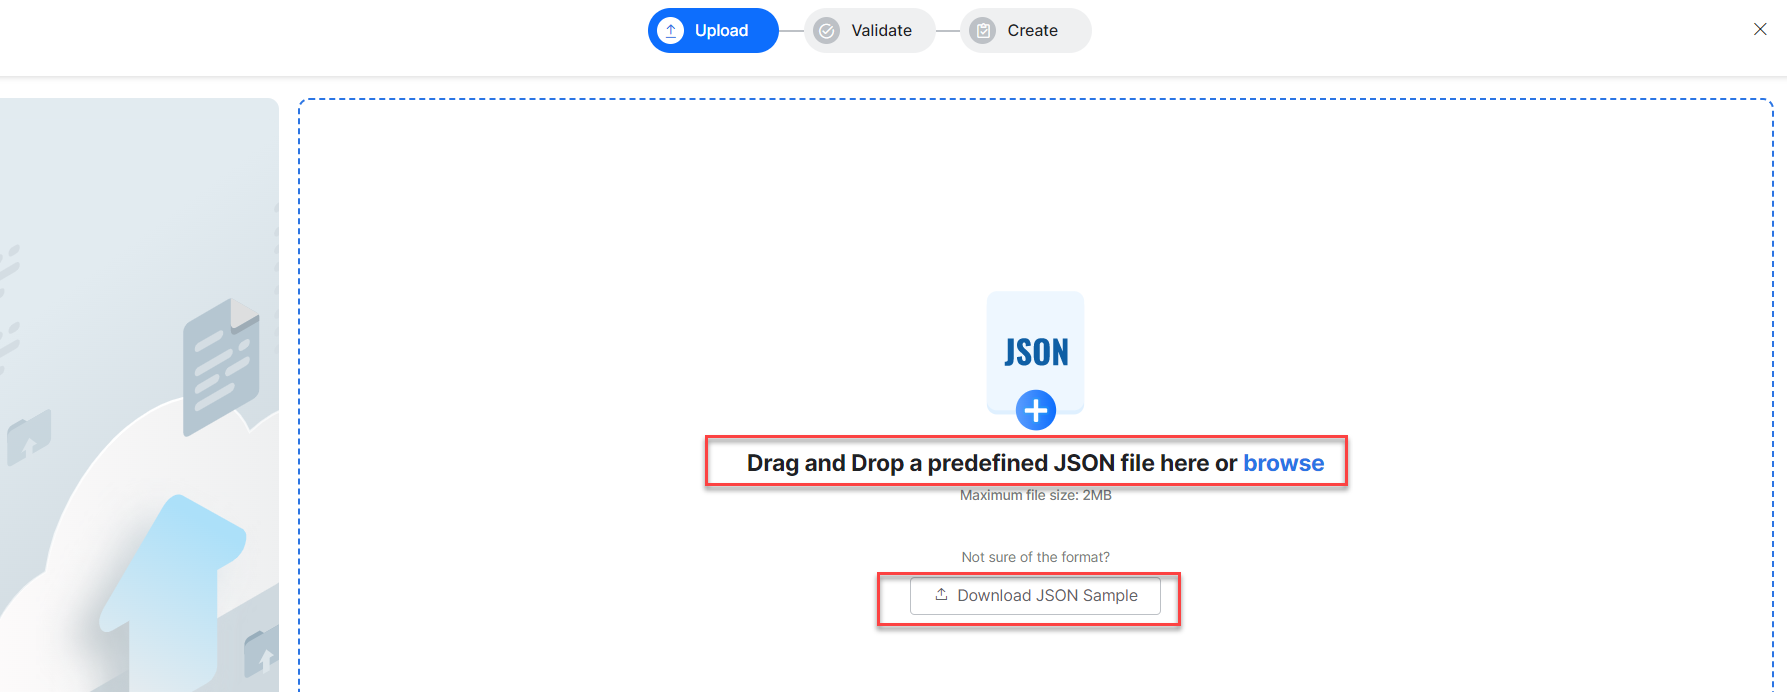
| Note: Only JSON files can be uploaded. The maximum file size allowed for upload is 2MB. You can also download a sample JSON file by clicking the Download JSON Sample button. |
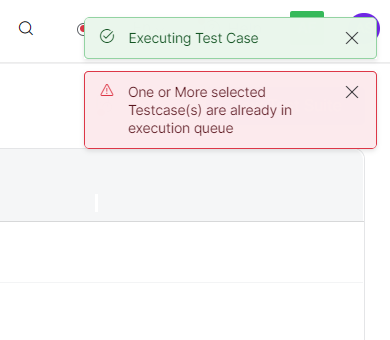
If there is an error during upload due to any limitation set on the platform, an error is displayed as follows.

If an uploaded JSON file exceeds the configured size limit of 2 MB, an error is displayed as shown below.

Validate and Create Test Suite
The platform processes the uploaded file to simulate the conversation flow and capture all the metadata at each test case. When validating the test suite, there is an option to go back to Conversation testing while the test suite is being validated in the background.
The steps to validate test suites are the same as in the Record Test Suite Flow. See Validate Test Suite for more information. To understand more about testing the sequence of nodes and capturing metadata, see Capture Test Suite Metadata under Validate Test Suite.
The steps to create a test suite are the same as in Record Test Suite Flow. See Create Test Suite to know more.