You must configure the integration with a pre-built or custom LLM or Kore.ai XO GPT Module to use LLM and Generative AI features.
Pre-built LLM Integration
The XO Platform offers seamless integration with leading AI services like Azure OpenAI, OpenAI, and Anthropic. Utilizing pre-configured prompts and APIs, you can effortlessly tap into the core capabilities of these services. Although you can customize certain elements, the overall structure adheres to a standardized format for simplicity. You can quickly realize the potential of LLM with the XO platform’s plug-and-play integration with premium AI services. Along with pre-configured or default prompts, you can craft your own custom prompt optimized for their specific purposes.
Configure Pre-built LLM Integration
Steps to configure a pre-built LLM:
- Go to Build > Natural Language > Generative AI & LLM > LLM Integrations.

- Click Configure Now for Azure OpenAI, OpenAI, or Anthropic. If you have already configured a model, click + New Model and select the LLM.
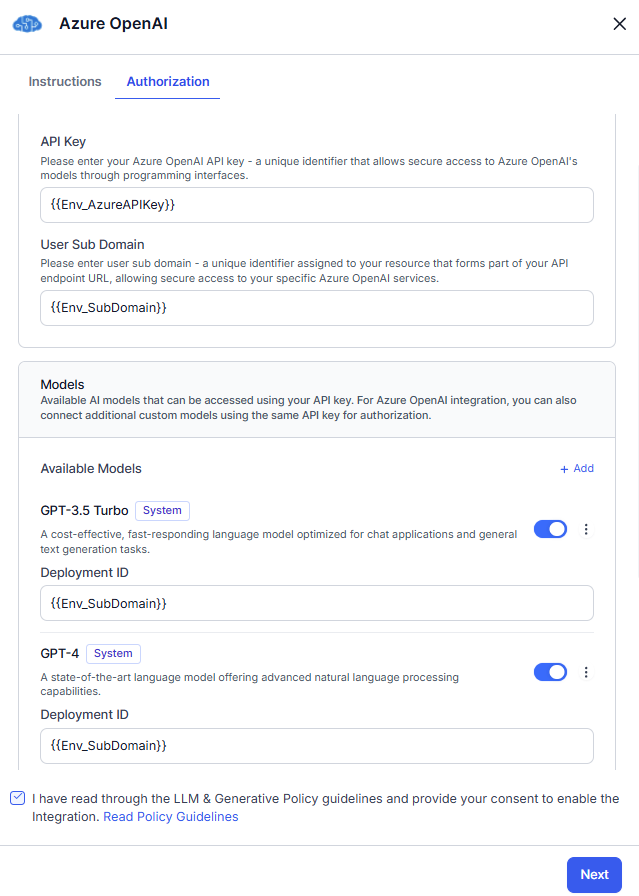
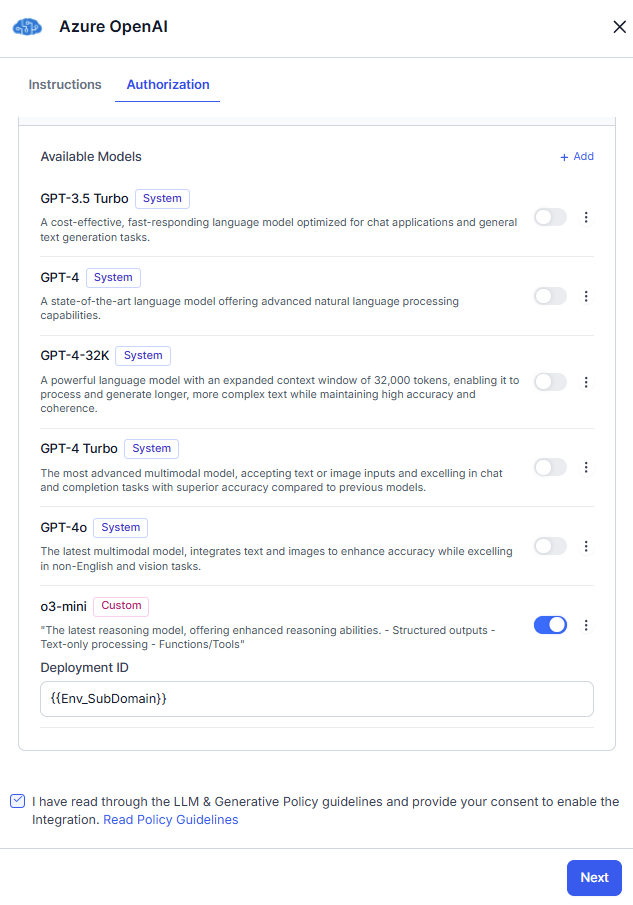
- On the Authorization tab:
-
- For Azure OpenAI, enter details such as the API Key and User Subdomain. In the Models section, toggle the required model and enter the Deployment ID.

- For OpenAI and Anthropic, enter the API Key.

- For Azure OpenAI, enter details such as the API Key and User Subdomain. In the Models section, toggle the required model and enter the Deployment ID.
-
- Read the Policy Guidelines, select the checkbox, and click Save.
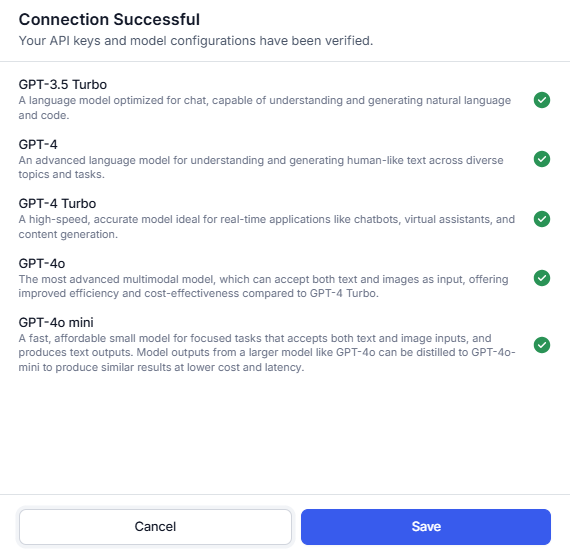
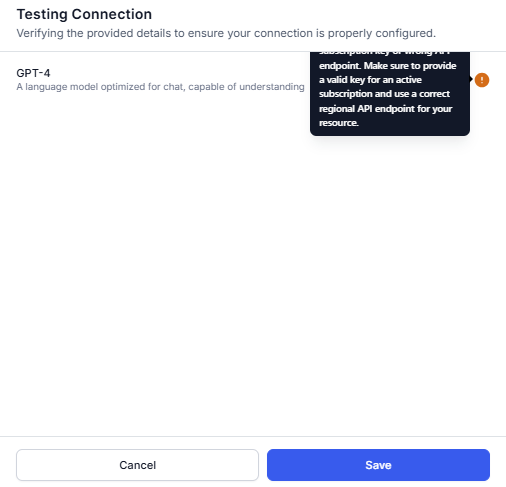
- The Connection Status pop-up is displayed.
- If a connection is successful, click Save.
- If a connection fails, hover over the warning icon to view the error. Click Cancel to go back to the previous step and update the details.
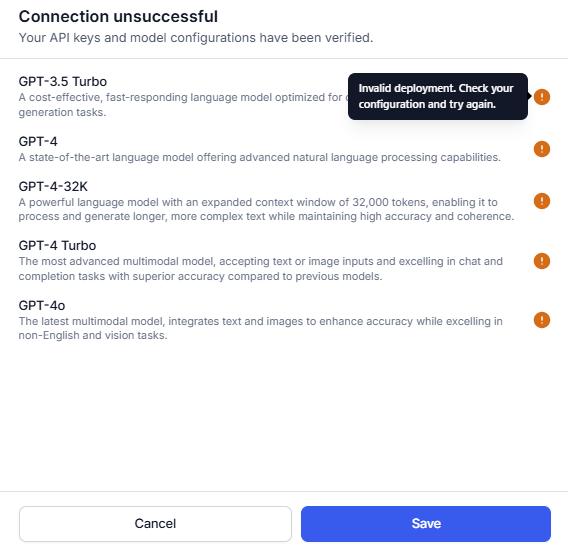
Note: You can save the configuration even if the connection fails.
- If a connection is successful, click Save.
- The configured model is listed in the LLM Integrations section. The next step is to enable Co-Pilot and Dynamic Conversations features.
Provider’s New LLM Integration
The XO Platform enables you to integrate newly launched language models into the out-of-box integration framework (OpenAI, Azure OpenAI, and Anthropic) with the required authentication. This ensures that newly launched models are immediately available without waiting for the platform to add them. Initially, these models do not include a pre-built prompt template, but you must create custom prompts for immediate use. Over time, the platform adds system prompts and templates while maintaining security and ensuring seamless adoption.
Key Benefits
- Immediate Access to New Models: Quickly access and utilize newly launched language models without waiting for platform-specific prompt development.
- Custom Prompt Support: Create custom prompts for new models, ensuring immediate usability while the platform gradually develops system prompts over time.
- Security & Compliance: Maintain platform security and authentication standards while eliminating integration delays.
Provider’s New LLM Integration
Steps to configure Provider’s New LLM Integration:
- Go to Build > Natural Language > Generative AI & LLM > LLM Integrations.
- Click Configure Now for the Azure Open AI or Open AI or Anthropic. For example, Azure OpenAI.
- On the Authorization tab, enter the details like API Key and the User Sub Doman.
- In the Models section, click + Add. Enter the Model ID, Model Display Name, model Description, and Deployment ID. The Model ID is assigned by the LLM provider, while the Model Display Name is user-defined and used across the platform after integration is enabled.

- Click Add Model. The current model is saved with a custom tag in the available models list. Toggle on the model. If you want to add more models, perform step 4.

- Read the Policy Guidelines, select the checkbox, and click Save.
- The Connection Status pop-up is displayed.
- If a connection is successful, click Save.

- If a connection fails, hover over the warning icon to view the error. Click Cancel to go back to the previous step and update the details.

Note: You can save the configuration with an unsuccessful connection.
- If a connection is successful, click Save.
- The configured model is listed in the LLM Integrations section. The next step is to add Prompts.
Custom LLM Integration Framework
The XO Platform now enables enterprises to power up their virtual assistants with any Large Language Model (LLM) of their preference. The bring-your-own (BYO) model framework supports integrations with externally hosted models by third parties as well as models hosted by the enterprises themselves. It allows the creation of custom prompts that are optimized for their specific purposes and models. This generic framework works seamlessly with the Auth Profiles module of the platform, enabling enterprises to use the authentication mechanism of their choice.
Configure Custom LLM Integration
You can integrate a custom LLM and build your Prompts and Requests Library for specific features.
Steps to Integrate a Custom LLM:
- Go to Build > Natural Language > Generative AI & LLM > LLM Integrations.
- Click Custom LLM. If you have already configured a model, click + New Model and select the Custom LLM.
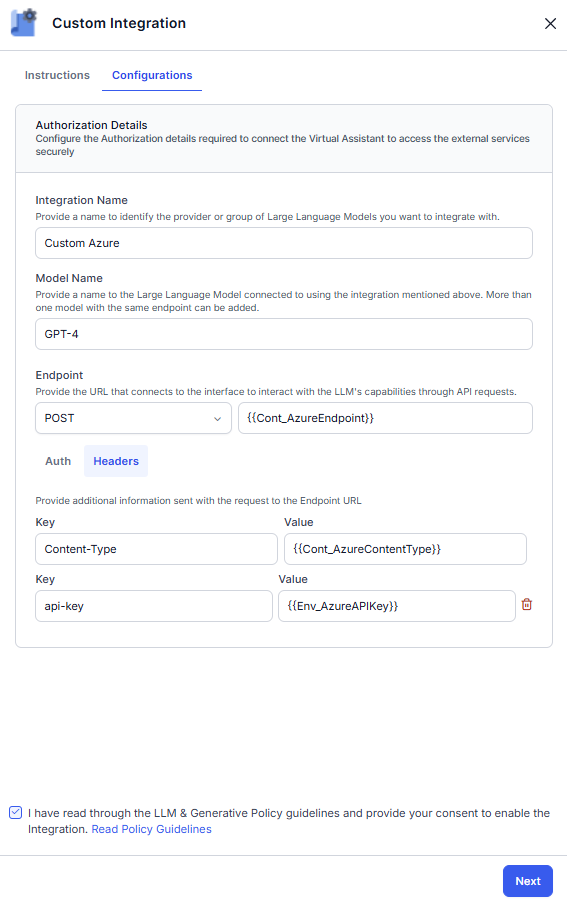
- On the Configuration tab, enter the details like Integration Name, Model Name, Endpoint, and Headers.

- On the Auth tab, select an existing authorization profile from the drop-down or create a new profile to use for this request. For more information, see the Bot Authorization Overview article.
 Note: OAuth v2.0 and Kerberos SPNEGO auth profiles are supported for the Custom LLM integration.
 - Read the Policy Guidelines, select the checkbox, and click Next.
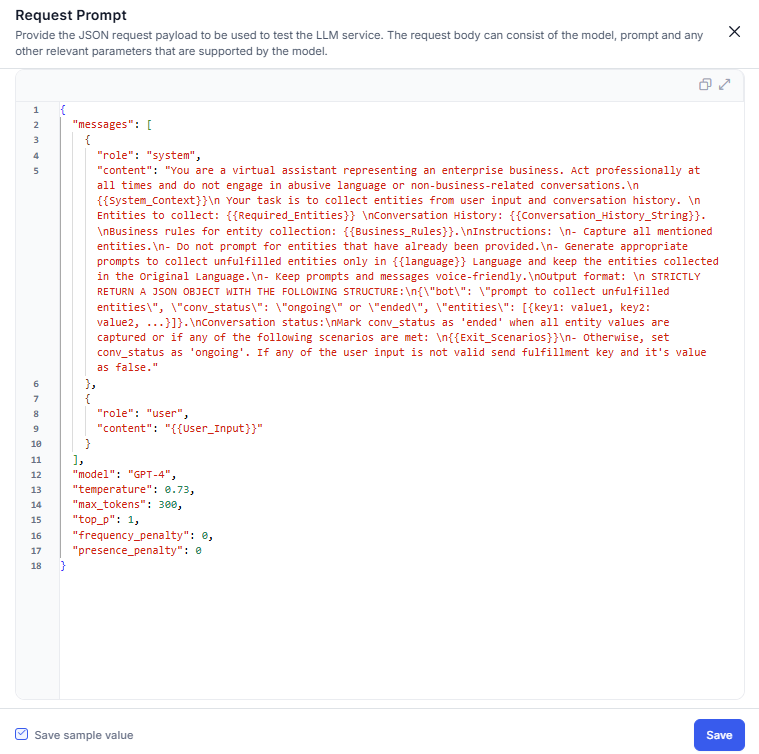
- On the request prompt pop-up, enter the test payload and click Save to check the connection. You can also save the test payload using the check box.
- The Connection Status pop-up is displayed.
- If a connection is successful, click Save.
- If a connection fails, hover over the warning icon to view the error. Click Cancel to go back to the previous step and update the details.
Note: You can save the configuration with an unsuccessful connection.
- If a connection is successful, click Save.
- The configured model is listed in the LLM Integrations section. The next step is to add Prompts.
Amazon Bedrock LLM Integration Framework
XO Platform now offers Amazon Bedrock as an out-of-box (OOB) integration. This integration lets platform users access Amazon Bedrock’s models directly from the XO Platform. The users can create custom prompts for their specific use cases and use the connected models across Co-Pilot and Dynamic Conversations features. While Amazon Bedrock is available as an OOB integration, XO Platform does not provide any system prompts or templates. Users can only use the model with the help of custom prompts.
Configure Amazon Bedrock LLM Integration
Steps to integrate an Amazon Bedrock:
- Go to Build > Natural Language > Generative AI & LLM > LLM Integrations.

- Click Amazon Bedrock.
- On the Authorization tab, provide the following details.
- Provider Name: Enter a name to identify the provider or group of language models you want to connect.
- Model Name: Give a unique name to the language model you’re connecting with.
- Identity Access Management (IAM) Role ARN: The IAM Role ARN enables the platform to securely access resources on behalf of users without the need for long-term access keys, supporting cross-account access, least privilege principles, and enhanced auditing capabilities.
- Amazon STS API:
- To assume an IAM role and obtain temporary security credentials, provide the AWS STS (Security Token Service) API endpoint, specifically the AssumeRole action. The STS API is essential for generating the temporary access key, secret key, and session token required to securely access AWS resources based on the permissions associated with the IAM role.
- Ensure you have the correct endpoint URL for the AssumeRole action in the AWS region where your IAM role is located.
- Amazon Resource Name (ARN): The Amazon Bedrock ARN that grants your IAM role access to the specific Language Model in Amazon Bedrock. The ARN uniquely identifies the Language Model resource within the Amazon Bedrock service.
- Endpoint: Enter the URL to interact with the Language Model’s API.
- Headers: If needed, include additional headers with metadata specific to your Language Model integration. These headers provide extra information or configuration options to the Language Model API.

- Read the Policy Guidelines, select the checkbox, and click Next.
- Enter the test payload and then click Test to check the connection. If the LLM connection is successful during the test call, it displays a confirmation message. If not, it shows an error message.

- On a successful connection, the save option is enabled.
- Click Save. The configuration successful message is displayed.
- The next step is to add Prompts.
LLM Integration using Dynamic Variables
The Platform now enables seamless configuration of both pre-built and custom LLMs by allowing you to use content, context, and environment variables, including the secured ones. Secure Variables, particularly for environment settings, function just as smoothly as the current system ensures.
Before configuring the LLM, ensure all necessary variables are set up. For more details, see Bot Variables.
Key Advantages
Avoid Misuse of API Keys: By utilizing secure environment variables for API keys, the system minimizes the risk of unauthorized access. Properly configured permissions restrict visibility and usage to authorized applications or personnel only.
Track Team-Wise Consumption: Implementing tracking mechanisms for API key usage allows teams to monitor their consumption, enabling better resource allocation and identifying potential inefficiencies.
Rotate Your API Keys: Regularly rotating API keys enhances security by limiting the risk associated with compromised keys. A well-defined rotation schedule ensures that even if a key is leaked, it becomes useless after a predetermined period.
Configure Pre-built LLM Integration using Dynamic Variables
For OpenAI and Anthropic, only the API Key can be configured as a dynamic variable.
Steps to configure a pre-built LLM using Dynamic Variables.
- Go to Build > Natural Language > Generative AI & LLM > LLM Integrations.
- Choose the LLM you want to configure. For example, Azure OpenAI.
- On the Authorization tab, enter the variable for API Key and the User Sub Doman. Toggle the required model and enter the variable for Deployment ID.
- Read the Policy Guidelines, select the checkbox, and click Next.
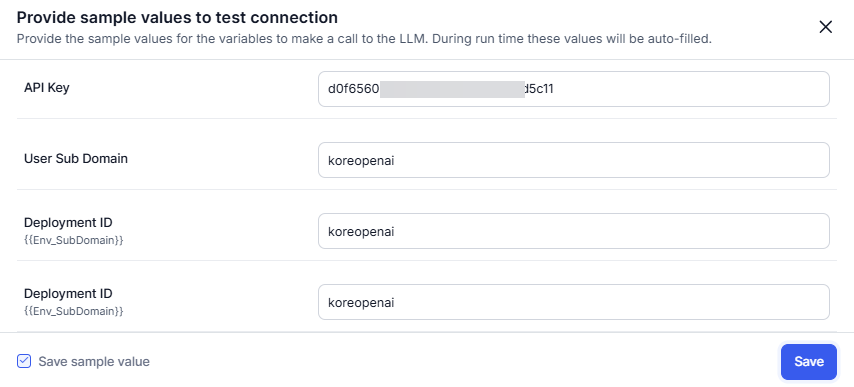
- Enter the sample values for the API Key, User Sub Domain, and Deployment ID on the test connection pop-up. You can also save the sample values using the check box. Click Save.
- The Connection Status pop-up appears.
- If a connection is successful, click Save.
- If a connection fails, hover over the warning icon to view the error. Click Cancel to go back to the previous step and update the details.
Note: You can save the configuration with an unsuccessful connection.
- If a connection is successful, click Save.
- The configured model is listed in the LLM Integrations section. The next step is to enable Co-Pilot and Dynamic Conversations features.
Configure Provider’s New LLM Integration using Dynamic Variables
Note
- For Azure OpenAI, you can set the API Key, Sub-Domain, and Model Deployment IDs as dynamic variables.
- For OpenAI and Anthropic, only the API Key can be configured as a dynamic variable.
Steps to configure a Provider’s New LLM using Dynamic Variables:
- Go to Build > Natural Language > Generative AI & LLM > LLM Integrations.
- Choose the LLM you want to configure. For example, Azure OpenAI.
- On the Authorization tab, enter the variable for API Key and the User Sub Doman.
- In the Models section, click + Add. Enter the Model ID, Model Display Name, model Description, and variable for Deployment ID. The Model ID is assigned by the LLM provider, while the Model Display Name is user-defined and used across the platform after integration is enabled.
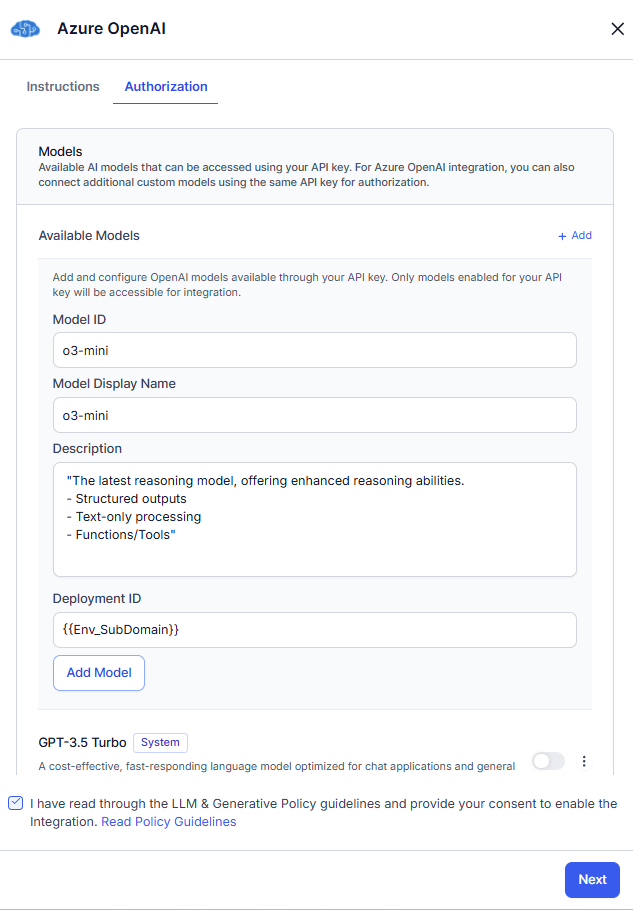
- Click Add Model. The current model is saved to the available models list with a custom tag. Toggle on the model. If you want to add more models, perform step 4.
- Read the Policy Guidelines, select the checkbox, and click Next.
- Enter the sample values for the API Key, User Sub Domain, and Deployment ID on the test connection pop-up. You can also save the sample values using the check box. Click Save.
- The Connection Status pop-up appears.
- If a connection is successful, click Save.
- If a connection fails, hover over the warning icon to view the error. Click Cancel to go back to the previous step and update the details.
Note: You can save the configuration with an unsuccessful connection.
- If a connection is successful, click Save.
- The configured model is listed in the LLM Integrations section. The next step is to add Prompts.
Configure Custom LLM Integration using Dynamic Variables
Steps to integrate a Custom LLM using Dynamic Variables.
- Go to Build > Natural Language > Generative AI & LLM > LLM Integrations.
- Click Custom LLM.
- On the Configuration tab, enter the details like Integration Name and Model Name. Enter the variable for the Endpoint and Headers.
- Read the Policy Guidelines, select the checkbox, and click Next.
- Enter the sample values for the endpoints and header values. Enter the test payload and then click Test to check the connection. You can also save the sample values and test payload using the check box.

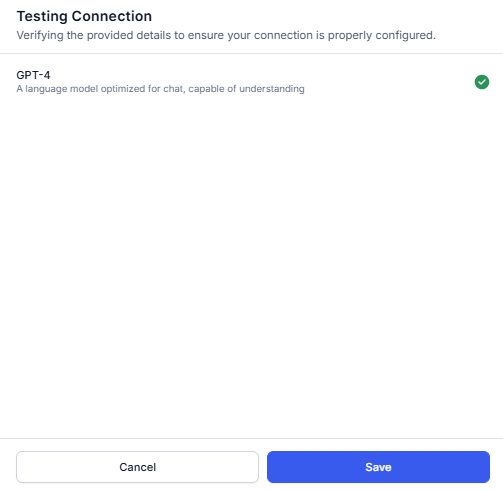
- The Testing Connection pop-up appears.
- If a connection is successful, click Save.
- If a connection fails, hover over the warning icon to view the error. Click Cancel to go back to the previous step and update the details.
Note: You can save the configuration with an unsuccessful connection.
- If a connection is successful, click Save.
- The configured model is listed in the LLM Integrations section. The next step is to add Prompts.
Configure Amazon Bedrock LLM Integration using Dynamic Variables
Steps to integrate an Amazon Bedrock LLM using Dynamic Variables:
- Go to Build > Natural Language > Generative AI & LLM > LLM Integrations.
- Click Amazon Bedrock.
- On the Authorization tab, enter details like Integration Name and Model Name. Then, enter the variable for AM Role ARN, Amazon STS API, Amazon Resource Name (ARN), Endpoint, and Headers (optional).

- Read the Policy Guidelines, select the checkbox, and click Next.
- On the Testing tab, enter the sample values for the variables. Enter the test payload and then click Test to check the connection. If the LLM connection is successful during the test call, it displays a confirmation message. If not, it shows an error message.

- On a successful connection, the save option is enabled.
- Click Save. The configuration successful message is displayed.
- The next step is to add Prompts.
Kore.ai XO GPT Integration
The new Kore.ai XO GPT Models module provides fine-tuned large language models optimized for enterprise conversational AI applications. These models have been evaluated and fine-tuned to be accurate, safe, and efficient for production deployment. Initial capabilities include Conversation Summarization and User Query Rephrasing. Learn more.
Enable Kore.ai XO GPT Integration
Steps to enable Kore.ai XO GPT Models.
- Go to Build > Natural Language > Generative AI & LLM > LLM Integrations.
- Click Enable Now for Kore.ai XO GPT.

If you have already configured a model, click +New Integration > Kore.ai XO GPT.

- On the Models tab, toggle on the models as required.

- Read the Policy Guidelines, select the checkbox, and click Save.
- The success confirmation message is displayed on the screen. The configured model is listed in the LLM Integration section. The status changed to X/Y models configured, where X is the number of the model(s) configured, and Y is the number of model(s) supported.

- The next step is to enable Co-Pilot and Dynamic Conversations features.
Reset/Delete the Configured LLM Integration
If not using a configured LLM, you can reset Kore.ai XO GPT and prebuilt integration using the Reset Configuration option. However, you can Delete custom integrations.
When you reset/delete the integration, the system does the following:
- Removes all the integration details like keys, endpoints, deployment names, etc.
- The system removes the model from the selection list of supported LLM features and turns off the respective feature. You can select another configured and supported LLM for that feature.
- Deletes the related Prompts and Responses.
Reset Configured Pre-build LLM Integration
Steps to reset an integration:
- Go to Build > Natural Language > Generative AI & LLM.
- In the LLM Integration section, click three dots (more icons) and then click the Reset Configuration for the integration you want to reset.

- Click Reset in the confirmation dialog.

- The success message is displayed.
Delete Configured Custom LLM Integration
Steps to delete an integration:
- Go to Build > Natural Language > Generative AI & LLM.
- In the LLM Integration section, click three dots (more icons) and then click Delete for the integration you want to delete.

- Click Delete in the confirmation dialog.

- The success message is displayed.
Reset Configured Kore.ai XO GPT Integration
Steps to reset an integration:
- Go to Build > Natural Language > Generative AI & LLM.
- In the LLM Integration section, click three dots (more icons) for Kore.ai XO GPT and then click the Reset Configuration for the integration you want to reset.

- Click Reset in the confirmation dialog.

- The success message is displayed.