Widget SDK 채널을 사용하면 봇의 정보를 보여주고 봇과의 상호 작용을 활성화하는 위젯을 호스팅할 수 있습니다.
봇에 Widget SDK 채널을 추가하려면, 우선 봇 빌더에서 앱을 등록하거나 생성해야 합니다. 앱을 생성하는 경우, 애플리케이션에 인증 정보를 프로비저닝하여 Kore.ai 서버와 안전하게 통신합니다. 앱 생성 후, 설정에서 앱 등록을 사용하여 Widget SDK 채널을 봇에 추가할 수 있습니다. Widget SDK 채널을 추가하려면
- Widget SDK 채널을 추가하고 싶은 봇을 엽니다.
- 봇 메뉴에서, Channel > Widget SDK을 클릭합니다.
- Configurations 탭으로 이동합니다.
- Select App 드롭다운 목록에서, 기존 앱 등록을 선택하거나 Create App을 클릭하여 새 앱을 생성합니다.
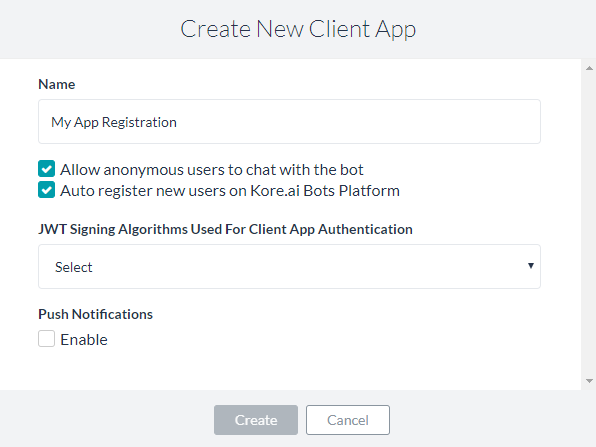
- Name 필드에서, 봇 빌더에서 사용한 앱 등록에 대한 이름을 입력합니다(예:My App Registration).
- 앱에 대해 다음과 같은 범위 중 하나를 선택합니다.
- Allow anonymous users to chat with the bot: 익명 사용자가 봇과 상호작용 할 수 있도록 활성화합니다.
- Kore.ai 봇 플랫폼에 새 사용자를 Auto register: 사용자 어설션을 알 수 없는 경우 Kore.ai에서 자동 유저 등록을 제어하려면 선택하세요.
- Algorithms Used For Client App Authentication 드롭다운 목록에서, 다음과 같은 보안 알고리즘 중 하나를 선택합니다.
- RS256: Public Key 필드를 활성화하려면 선택합니다. Public Key는 Kore.ai 봇 플랫폼에서 클라이언트 애플리케이션을 인증하기 위해 사용됩니다.
- HS256: Secret Key 및 Client ID를 생성하려면 선택합니다. Client ID는SDK 초기화를 위해 필요하며, Secret Key는 Kore.ai 플랫폼에서 클라이언트 애플리케이션을 인증하기 위해 사용됩니다.
- 선택적으로, Push Notifications 섹션에서, Enable을 클릭한 후 알림을 보낼 URL을 지정합니다.
- Create를 클릭합니다. 앱 등록 세부정보가 나타납니다.

- 애플리케이션의 클립보드에 앱 등록 세부정보를 복사하려면, Bot Name, Bot ID, Client ID에대해 Copy를 클릭할 수 있습니다. Client Secret의 경우, View를 클릭한 후 Copy를 클릭합니다.
- Enable Channel 섹션 에서, Yes를 선택하여 채널을 저장 후 즉시 사용합니다.
- Save을 클릭하여 설정을 저장하고 Widget SDK Channel 페이지를 닫습니다.
Channel Information updated successfully 메시지가 페이지의 오른쪽 상단에 표시됩니다. 사용 가능으로 일단 설정되면 웹 애플리케이션에서 봇을 통합하기 위한 단계는 see here하세요.
채널 편집
Widget SDK 채널을 편집하려면, 채널 카드를 클릭하기면 하면 됩니다. 더 많은 편집 옵션을 위해서는, 수정하기 위해 채널 위로 마우스를 이동한 후 Settings ![]() 아이콘을 클릭하여 명령 메뉴를 표시합니다. 채널을 수정하려면 다음과 같은 명령 중 하나를 선택하세요.
아이콘을 클릭하여 명령 메뉴를 표시합니다. 채널을 수정하려면 다음과 같은 명령 중 하나를 선택하세요.
- Disable/Enable – Disable을 클릭하여 봇의 웹/모바일 클라이언트 채널 사용을 일시적으로 비활성화합니다. 채널이 사용하지 않음으로 설정된 경우, Enable을 클릭하여 Widget SDK 채널 사용을 사용함으로 설정합니다.
- Delete – Delete를 클릭한 후 Delete Confirmation 대화창의 OK를 클릭하여 봇 채널 설정을 영구적으로 삭제합니다.
경고: 이 작업은 영구적이므로 취소할 수 없습니다.