봇에 Whatsapp 비즈니스 메시징 채널을 추가하려면, Infobip(클라이언트와 Whatsapp 비즈니스 메시징 간에 메시지를 교환하기 위한 단일 API를 제공하여 채널을 활성화하는 메시징 공급자)에 계정을 생성해야 하며, Kore.ai가 생성한대로 번호를 수집하고 Whatsapp URL을 제공해야 합니다.
To add the WhatsApp Business Messaging channel to a bot 참고: 이 절차를 완료하려면, Infobip 계정이 이미 있어야 합니다. 이것은 Whatsapp 비즈니스 메시징 활성화를 위한 메시징 공급자 중 하나입니다. 진행하기 전 다음을 수행합니다.
- Infobip 개발자 포털에 Login 합니다.
- 왼쪽 탐색 창의 User Profile 아래 Settings 섹션으로 이동합니다.

- View Assigned Numbers 링크를 클릭하고 assigned number를 기록합니다.

봇 플랫폼에서 다음을 수행합니다.
-
- 봇 빌더의 Bots 섹션에서, Slack 채널을 추가하려는 봇을 클릭하세요.
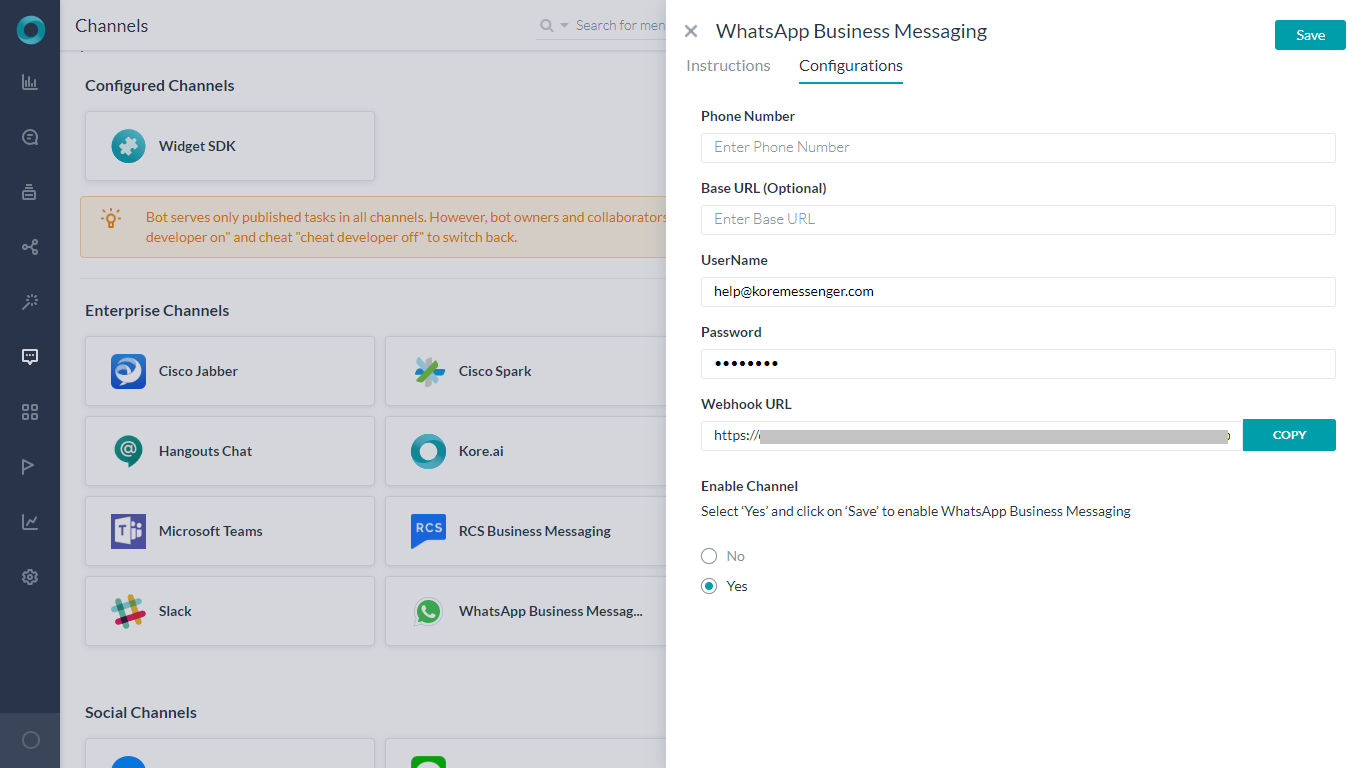
- Channels 탭에서, Whatsapp Business Messaging 아이콘을 클릭하세요. Whatsapp Business Messaging Channel 페이지가 표시됩니다.
- Configurations 탭으로 이동하여 다음 필드 정보를 입력합니다.
- Phone Number – Infobip 계정에서 Assigned Number를 사용합니다.
- Base URL: Whatsapp 비즈니스 메시징 채널이 활성화 된 경우 Kore.ai가 메시지를 보낼 Base URL을 Infobip의 here에서 얻습니다.
- Username and Password: Infobip의 API는 인증이 필요하며 API를 통한 메시지 송수신 시 기본 인증을 사용합니다. Infobip 계정 소유자의 ‘사용자 이름’ 및 ‘암호’를 기록하고 이 페이지의 설정 탭에 입력합니다.
- Webhook URL: 설정 탭에 있는 Webhook URL을 복사하고 Infobip 개발자 포털에서 동일한 정보로 업데이트하여 Infobip이 구독자로부터 수신한 메시지를 전송하도록 합니다(Whatsapp 비즈니스 메시징).

- Enable Channel 및 채널 설정을 완료합니다.
 참고: Infobip에서 개발 샌드박스를 사용하는 경우 채널이 활성화되고 게시되면 “<Keyword on infobip> <User input>” Ex Kore Hi", 형식으로 메시지를 보내야 합니다. 예: Kore Hi
채널 편집
채널을 편집하려면, 마우스를 채널로 이동하고 클릭하여 수정합니다. 채널 설정에서 필요한 업데이트와 저장을 할 수 있습니다. 또한 Settings 아이콘을 클릭하여 채널 정보를 사용하지 않거나 삭제할 수 있습니다. 채널을 수정하려면 다음과 같은 명령 중 하나를 선택하세요.
- Disable/Enable – Disable을 클릭하여 봇의 Slack 채널에 사용을 일시적으로 비활성화합니다. Slack 사용을 활성화하려면, Enable을 클릭하세요.
- Delete – Delete를 클릭한 후 Delete Confirmation 대화창의 OK를 클릭하여 봇 채널 설정을 영구적으로 삭제합니다.
Warning: 이 작업은 영구적이므로 , 취소할 수 없습니다.