WeChat을 채널로 설정하려면, WeChat 공식 계정에 등록해야 합니다. 또한 메시지를 주고받으려면 봇 플랫폼의 Webhook 통합을 사용해야 합니다. 자세한 내용은 WeChat 공식 계정 Registration Process을 참조하세요.
To add the weChat Messaging channel to a bot 개발 목적으로 Wechat Sandbox 환경을 사용하여 봇을 통합하고 봇 기능을 테스트할 수도 있습니다. 다음 섹션에서는 Sandbox 설정 및 계정 사용에 대해 자세히 설명합니다. 1단계: Sandbox계정 설정
- here for English 및 here for Chinese 버전에서 WeChat Sandbox 환경에 등록하고 로그인합니다.
- 로그인을 계속하려면 'Log In' 버튼을 클릭하세요.
- 화면에 표시된 QR을 사용하여 로그인하려면 WeChat 모바일 앱을 설치해야 합니다.
- QR code를 스캔하고 로그인을 확인하여 계속 진행하세요.
- 로그인에 성공하면 Sandbox 포털로 리디렉션됩니다.
- Sandbox 포털에서는 WeChat Sandbox 앱 ID 및 앱 시크릿에 대한 정보를 제공합니다.
- App ID 및 App Secret을 기록합니다.
- Webhook URL과 Token을 입력해야 하며, 이러한 값들은 아래 설명된 것과 같이 봇 플랫폼의 채널 활성화 페이지에서 얻을 수 있습니다.
2단계: 다음과 같이 봇에서 Setup Webhook을 합니다.
- 봇 빌더의 Bots 섹션에서, WeChat 채널을 추가하려는 봇을 클릭하세요.
- Channels 탭에서, WeChat 아이콘을 클릭하세요. WeChat Channels 페이지가 표시됩니다.
- Configurations 탭으로 이동하여 다음 세부 정보를 입력합니다.
-
- App ID -WeChat Sandbox 포털 페이지에서 App ID
- App Password -WeChat Sandbox 포털 페이지에서 App Secret
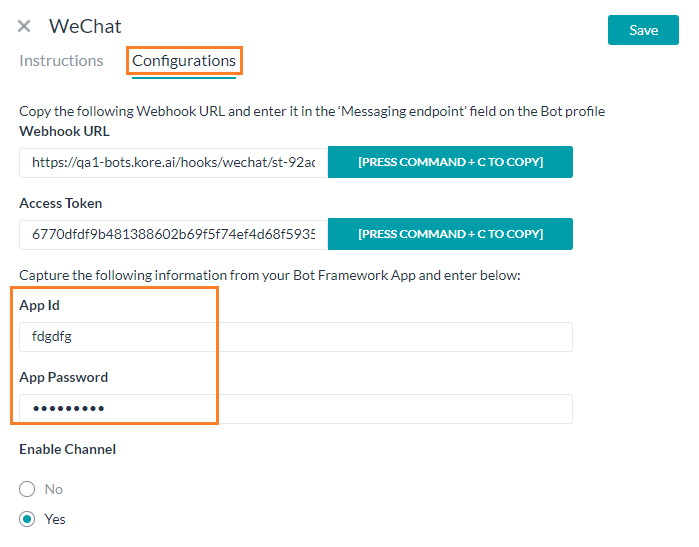
-
- 다음 세부 사항을 기록합니다.
-
- Webhook URL, 및
- 액세스 토큰
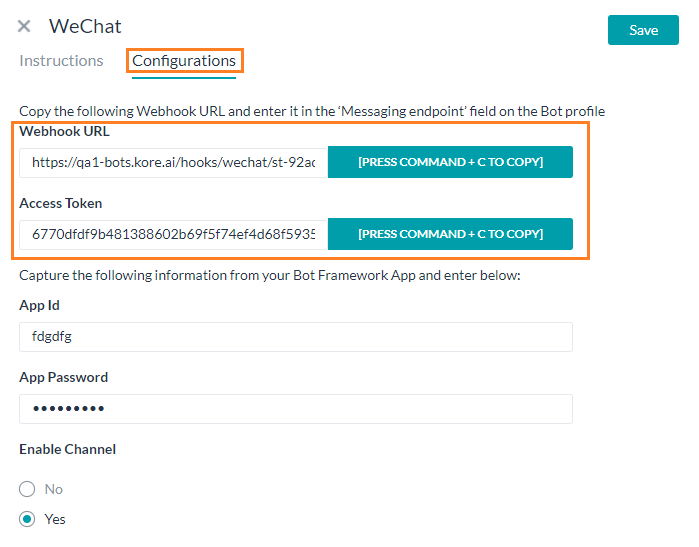
-
- 위의 URL과 액세스 토큰으로 WeChat Sandbox portal page를 업데이트하고 세부 정보를 Save합니다.
- 봇 플랫폼에서 WeChat 채널을 Save합니다.
채널 편집
채널을 편집하려면, 마우스를 채널로 이동하고 클릭하여 수정합니다. 채널 설정에서 필요한 업데이트와 저장을 할 수 있습니다. 또한 Settings 아이콘을 클릭하여 채널 정보를 사용하지 않거나 삭제할 수 있습니다. 채널을 수정하려면 다음과 같은 명령 중 하나를 선택하세요.
- Disable/Enable – Disable을 클릭하여 봇의 Slack 채널에 사용을 일시적으로 비활성화합니다. Slack 사용을 활성화하려면, Enable을 클릭하세요.
- Delete – Delete를 클릭한 후 Delete Confirmation 대화창의 OK을 클릭하여 봇 채널 설정을 영구적으로 삭제합니다.
Warning: 이 작업은 영구적이므로, 취소할 수 없습니다.