The Kore.ai XO Platform supports the migration of an existing Google Dialogflow bot into your XO Platform account using the External NLU Adapter.
This easy migration reduces the manual efforts in creating the dialog flow on the XO Platform while allowing you to implement the inbuilt features of Kore.ai on the imported bot. You can integrate lifelike conversational AI with state-of-the-art virtual assistants on the Platform. You can leverage the key features of Google Dialogflow, like Visual flow builder, Omnichannel implementation, Advanced AI, State-based data models, and end-to-end management for your XO Platform projects.
Benefits of the Google Dialogflow Bot-Kore Platform Migration
- Natural and accurate interactions for multi-turn conversations with feedback support.
- Integrates seamlessly with your visual builder and pre-built virtual agents.
- Easy to manage and scale.
The following are the results of completing the Bot Migration from Google Dialogflow to Kore.ai:
- All the intents nodes are created in the Kore.ai Virtual Assistant.
- All the entities within an intent are created as entity nodes.
- Any entity type not in Kore Platform is mapped to a string entity.
- Intent Training is imported as ML training utterances.
- NER tags (if any) are imported for utterances.
Migration Flow
The migration is a simple 3-steps process:
1. Export the Google Dialogflow Bot Project.
2. Import the Dialogflow Project to the Kore.AI XO Platform.
3. Import the Virtual Assistant.
Step 1: Export the Google Dialogflow Bot Project
The first step in the migration process is to copy and export your Google Dialogflow bot project from the Bot-export-import folder.
Prerequisites
Install the Dialogflow API development suite- google-cloud-dialogflow here.
To export your Google Dialogflow project, follow the steps below:
- Navigate to the DialogFlow Essentials page here.
- Select the Dialogflow bot project you want to export.
- Click the Export and Import tab on the bot configuration page.
- Click the Export as ZIP button.
- Once you download and extract the Dialogflow bot project folder, the intents, entities, agent, and package are saved to Downloads > Bot-export-import > Bot-export-import > src > dialogflow > exportData.
Output Files
- The downloaded Dialogflow folder export copy is stored in the path
Bot-export-import/tree/master/src/dialogflow/exportData. - The converted Kore Dialogflow project import copy will be stored in the path
Bot-export-import/tree/master/src/ImportData.
Step 2: Import the Dialogflow Project
After the Bot-export-import folder is exported, you should import the project to the ImportData folder with the steps below:
-
- On the command prompt screen in your system, navigate to Bot-export-import > Bot-export-import > src and run the
python -m maincommand.
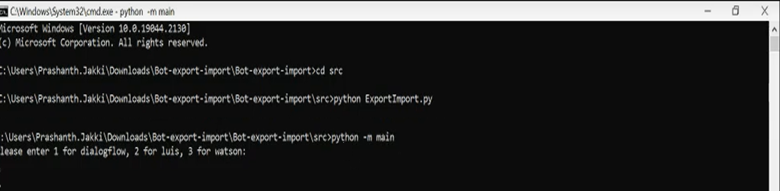
- Enter 1 for Dialogflow when prompted.

- The bot project folder is created at Bot-export-import > Bot-export-import > src > ImportData.

- In the downloaded folder, navigate to Bot-export-import > Bot-export-import > src > ImportData to view the botDefinition and config JSON source files.

- On the command prompt screen in your system, navigate to Bot-export-import > Bot-export-import > src and run the
Step 3: Import the Bot
On the Kore.ai XO Platform, you can import the migrated bot with the steps mentioned here.
Note: In the Import Bot window, select the relevant Bot definition and config files from the ImportData folder.
