This document describes the process of implementing a Virtual Assistant using the Kore.ai XO Platform.
If you are new to the Kore.ai XO Platform and want to familiarize yourself with the terms and concepts we use, please refer to Concepts and Terminology
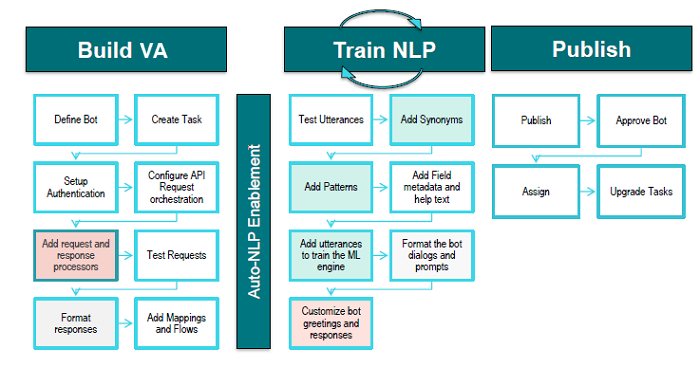
Steps for Building your Virtual Assistant
Once you get access to the Kore.ai XO Platform, you can build your first VA by following the steps below.
- Define / Design: This is the step during which you clarify the necessary details, before you begin to actually build your VA.
- Build / Develop: At this stage, your VA takes shape within the Kore.ai XO Platform; you begin making the necessary configurations and developing it to continuously fit your organization’s needs.
Define / Design the VA
Every VA must be built to solve a well-defined use case.
The first step to create a well-defined use case involves gathering market requirements and assessing internal needs. Typically, you want to include all relevant stakeholders, such as business sponsors, product owners, business analysts, and VA developers in this process.
Next, get a good idea of what the VA needs to do. A clear description of each step and a flow chart of the various conversation flows will go a long way in easing the process of building the VA.
Below, we present our recommendations when it comes to the design process and the questions you should ask when defining your VA.
Recommended Design Process
We recommend that you follow the steps below while designing your VA:
- Understand your Users’ Needs: To set the scope of the VA, the business sponsors, business analysts, and product owners play an important role in identifying the users’ needs by gathering market requirements and assessing internal needs.
- Set the Virtual Assistant Goals: This involves converting the above-identified scope to a use case. It is advisable to involve the VA developer in this phase.
- Design a Virtual Assistant Conversation: This helps define chatbot behavior in every possible scenario in its interaction with the user. Simulating conversations go a long way in identifying such scenarios.
Once the VA capabilities and ideal use cases are well-defined, the developer can begin the process of configuring the tasks, define intents and entities, and build the conversational dialog.
Questions to Ask during the Design Process
Try to answer the following questions (some if not all):
- Who is the target audience? Technical help VAs targeted for a tech-savvy customer need a different design when compared to VAs for a layperson, such as an airline’s customer. Hence assessing the target audience is always important.
- What VA persona will resonate the most with this group? This will help define how the VA talks and acts in every situation.
- What is the purpose of the VA? The goal i.e. the customer query that the VA needs to address defines the endpoint of any conversation.
- What pain points will the VA solve? The purpose and scope of VAs are set to identify what the VA addresses and when the human agent needs to take over.
- What benefits will the VA provide for us or our customers? The main benefit of using a VA is time-saving. Users need not waste their time waiting for a human agent to be available for answering their query. You, as the business owner, don’t worry about not being there to cater to all customer needs.
- What tasks do I want my VA to perform? Simulation of user conversation helps identify the tasks that need to be catered to by the VA.
- What channels will the VA communicate through? This will to some extent drive the way the VA is presented, the various options available for the VA are limited by the channel/medium it is used in.
- What languages should the VA speak? When catering to a multilingual community the language support is imperative and building the dictionary simultaneously is useful.
Build / Develop the VA
Once the VA’s capabilities and ideal use case are well-defined, the developer begins the process of configuring tasks, defining intents, entities, and building the conversational dialog.
The general development process in the Kore.ai XO Platform involves the following steps:
- Choose the type of VA to build;
- Add your first VA;
- Define the VAs tasks;
- Train the VA;
- Enable communication channels;
- Test your VA configuration;
- Publish your VA;
- Analyze and improve;
Select the Virtual Assistant Type
Based on the requirements, select the type of Virtual Assistant you want to create The Kore.ai XO Platform allows you to create the following types of VAs:
- Standard VA – Standard VAs are the most common type of virtual assistant. Using these, you can create dialogs, alerts, actions, information tasks, and knowledge graphs, as well as flows that map one task to another. For more information, refer to Defining a Standard Bot.
- Universal VA – Universal VAs facilitate a scalable, modular approach to VA building by helping you link several Standard VAs into one. The universal VA executes the tasks and functions of the linked VAs by routing relevant utterances to them. Once you publish a universal virtual assistant, changes made in the linked VAs automatically reflect in the universal VA. As a creator or developer of a virtual assistant, you can add any VAs (published and configured) to a universal VA and access their underlying tasks and functions. When you publish a universal virtual assistant, the end users can only access the tasks that are published in the linked VAs. For more information, refer to Defining Universal Virtual Assistants.
- Template VA – You can install one or more fully functional, end-to-end Kore.ai template VAs from the Template Store, then customize and publish to understand how to configure virtual assistants. For more information, refer to Store.
Within this document we will use a Standard VA as a working example.
Create a Standard Virtual Assistant
Below are the steps to follow to create your first Standard VA within the Kore.ai XO Platform:
On the landing page, click New Bot.

In the Create New Bot window, start by configuring the basic details of your new VA:
- Select Start from Scratch.
- Enter a Name.
- Select an icon or click the + icon to upload your own. Images should be in PNG format and should not exceed 40×40 pixels. The file size is limited to 80kb.
- Select the Purpose of your VA. See VA Purposes for a complete list.
- Choose Standard Bot as the Bot Type.
- Select the Default Language.
- Click Proceed when ready.

Next, decide how to create your VA – with or without generated use cases.
Create a VA with Generated Use Cases
Generating Use Cases while creating your VA simplifies the development process by automatically creating up to 30 customizable Dialog Tasks. After proceeding to the next steps of the VA creation process, follow these steps:
- Add a meaningful description that clearly states the VA’s purpose and mentions some intent examples. See VA Purposes for a few sample descriptions.
- Click Get Use Cases to generate intents that will be automatically added to the VA. (You can update the Bot Name and Purpose and remove use cases.)
- Click Create to create your VA with generated use cases.
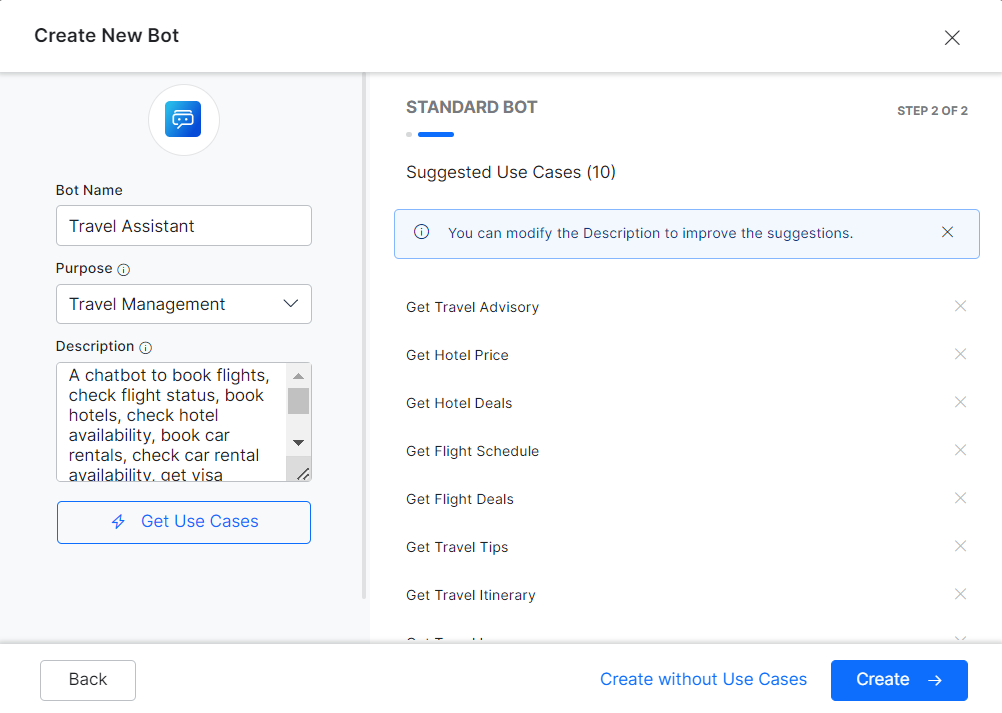
- Wait a few moments for your VA to be configured. Once done, you can continue developing it.
Create a VA without Generating Use Cases
By creating a VA without generating use cases, you will not have any Dialog Tasks except for the default ones in the XO Platform: the Welcome and Fallback tasks.
After configuring the basics of your VA, you can adjust the Bot Name, Purpose, and Description if required. Click Create without Use Cases to create your VA without any generated use cases.

Wait a few moments for your VA to be configured. Once done, you can continue developing it.
VA Purposes
You can choose any of the following purposes when creating a Virtual Assistant:
- Retail Banking – Help customers with retail banking needs, such as checking bank balances, transferring funds, ATM cards, credit cards, or loans.
- Retail Shopping – Help customers check product availability, find product details, place orders, get order status, track delivery, return/exchange items, and more.
- Travel Management – An assistant to book flights, check flight status, book hotels, check hotel availability, book car rentals, check car rental availability, get visa requirements, currency exchange rates, and more.
- Restaurant Inquiry and Food Ordering – Help customers find restaurant locations, search menus, order/track food, get discounts, etc.
- Financial Planning and Advice – This assistant provides financial planning and advice, enabling users to get advice, calculate savings, invest, find tax solutions, manage credit, compare investments, and more.
- Insurance Management – An assistant that helps manage insurance policies and quotes, buy insurance, file and check claims, add/remove coverage, and more.
- Healthcare – Assist customers to get personalized medical advice, finding specialists, scheduling appointments, refilling prescriptions, and more.
- Education – An assistant to get personalized guidance to explore course options, degree requirements, financial aid, etc.
- Customer Service and Support – A VA that provides 24/7 customer service and support for product info, orders, returns, refunds, complaints, and more.
- Website Engagement – Help visitors quickly and easily find product information, compare features, request a demo or quote, purchase a product, connect with the sales team, and get support.
- HR Support – Support employees with fast, reliable answers to employee queries on leave, overtime, expenses, salary, pension, tax, jobs, policies, and more.
- ITSM Support – Get ticket status, raise a new ticket, check ticket history, reopen closed tickets, request software installation, and more.
- Inventory and Supply Chain Management – Automating inventory and supply chain management with the intent to check inventory levels, place orders, track order status, manage customer accounts, and more.
- Marketing & Sales – Automate lead acquisition and optimize lead management for marketing and sales.
- Procurement Management – Automating procurement tasks such as viewing RFQs, creating requisitions, reviewing purchase orders, and checking supplier status.
- Others – Use this option when none of the predefined purposes match your bot’s purpose.
Define Virtual Assistant Tasks
After creating the Standard VA, you are ready to define how your VA works, by starting with tasks.
VA capabilities and dialogs should flow naturally from the specifications you defined in the previous step. It is always valuable to take time to review the list of tasks you want the VA to perform. Ensure that it delivers on the benefits you want the VA to provide and the pain points you want it to solve, before starting actual development. This will certainly save you time in the long run.
Define one or more tasks or flows for your VA using one of the following methods:
-
- On the Bot Summary page, click + New Task on the Tasks widget. This would allow you to add a Dialog or an Alert task.
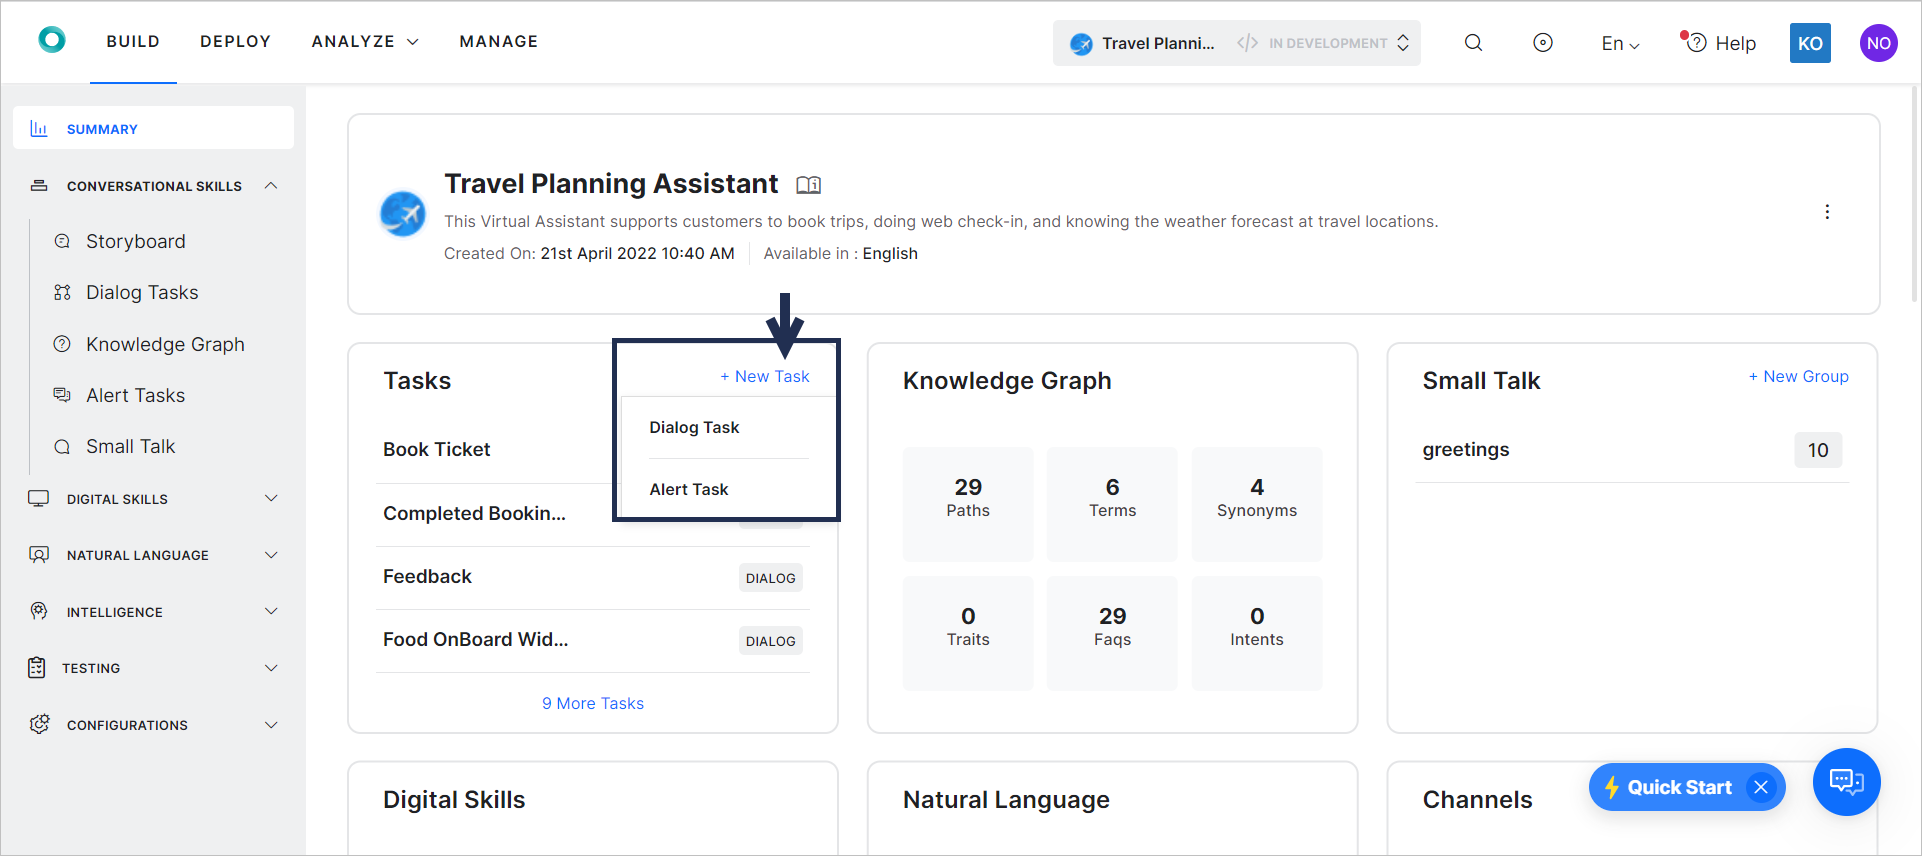
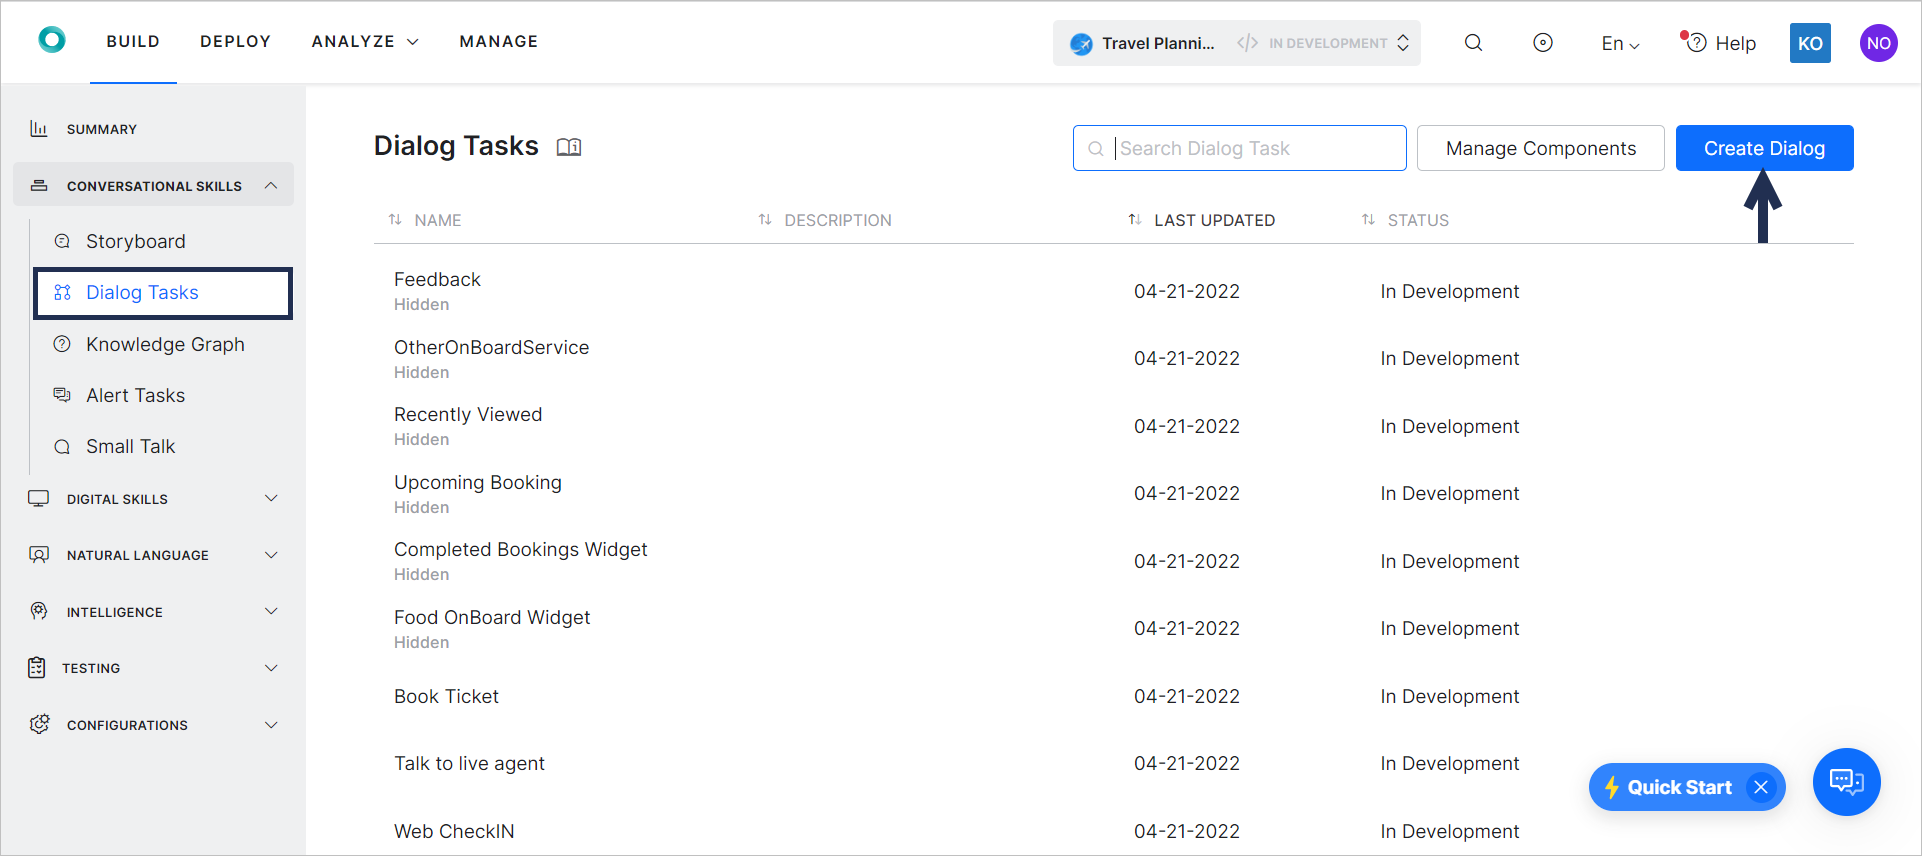
-
- In addition to the above-mentioned tasks, from the Conversational Skills menu on the left navigation, you can select a task to be added by clicking the Create button on the corresponding task page. The example screenshot below shows you how to create a new Dialog Task.
Skills are VA capabilities that help achieve the end-user’s needs. These include dialog and alert tasks such as booking a flight, getting weather alerts, responding to user queries (Knowledge Graph) or even engaging the user in Small Talk.
The Kore.ai XO Platform allows you to define the following skills:
- Storyboard – Design engaging conversations and simplify the communication between business users, conversation designers, language experts, and developers.
- Dialog Tasks – Consist in multiple intents, sub-intents, and component nodes to conduct a complex conversational flow between a user and the VA.
- Alert Tasks – Monitors a web service for events and sends a notification message to the user when the event occurs. You can use this task type for scheduled polling or near real-time notification using webhooks.
- Knowledge Graph – Turns static FAQ pages into an intelligent, personalized conversational experience. Build a hierarchy of crucial terms, add questions to the right nodes in the hierarchy, and leave the task of responding to users to the VA, thus enabling your support staff to engage with more complex tasks.
- Small Talk – Engage the end-users in casual conversations that help socialize your VA and improve the recall rates.
- Digital Skills – Leverage forms and views and enhance the user’s experience while interacting with your VA.
Train your VA for NLP
The best Virtual Assistants are well trained using an iterative process. After developing the tasks and conversation flow, you can train your VA. Doing so allows your VA to better understand user utterances and the engine to better prioritize one VA task or intent over another, based on the user input.
Both developers and business analysts work together to provide sample utterances and patterns that are used to complete the initial training. It can be further augmented by internal testing and field data once you deploy the VA.
We recommend that you train the VA using Machine Learning to improve utterance recognition.
- You can fine-tune the FM Engine and the VAt’s configuration by adding additional utterances, synonyms, and patterns for a task or intent.
- Additionally, you can enhance your VA Intelligence by defining interruption handling, multi-intent detection, and more.
For more information, refer to Optimizing Virtual Assistants for Natural Language Processing.
Enable Channels
This step refers to adding channels to your VA that end users can use to access and interact with it after it is published. End users can only interact with your VA, and by extension VA tasks, after the VAs are published and deployed to enabled channels.
Channels refer to various communication platforms where a VA can live such as SMS, email, mobile apps, websites, messaging apps, and more. With the XO Platform, you can design VA tasks once and deploy across 20+ channels simply by selecting a checkbox.
For more information, refer to Adding Channels to your Virtual Assistants.
Test your Virtual Assistant
After you have built and trained your VA, the most important question that arises is how good is your VA’s NLP model? This is what testing is all about. You must consider testing your VA across all planned messaging channels for a better end-user experience.
Testing helps determine whether or not more training is needed before deploying your VA. After every round of training or retraining, you must review the model to determine whether the changes made are appropriate and whether they have enhanced or deteriorated the NLP model.
The Talk to Bot option, Utterance Testing, and Batch Testing helps test and improve your VAs performance.
For more information, please refer to Test your Virtual Assistant.
Publish
Once your VA is built and sufficiently tested, it is time to deploy it in the environment of your choice; and to the communication channels where users engage.
It is recommended that you work with the key business stakeholders to review and approve all VAs and their functionality before moving forward with the deployment.
You can then publish your VA tasks to your account, a Kore.ai space, or your company account. When publishing tasks, a request is initiated to the VAsAdmin who can review and approve/disapprove their deployment. Once your VA is approved by all relevant parties, you can deploy to end-users through previously enabled channels.
For more information, please see Publishing Tasks.
Analyze and Improve
Once your VA is deployed, it is important that you continually monitor how users use it and take an active role in managing and refining it, using an iterative process. Your VA’s should be monitored from an engagement, performance, and functional standpoint and the results analyzed, including monitoring conversations and other variables like messages per session, retention, location, user demographics, sentiment, etc..
Furthermore, developers and analysts should work together to identify drop-off points, uncover task or language failures, determine why conversations are abandoned, and monitor service and script performance to improve the NLP and functional performance of your VAs.
The data collected must be used to improve the NLP and functional performance of your VAs. For example, take a look at all the utterances that your VA was not able to map to an intent or FAQ and retrain the VA to identify them in the future. For task failures, you can troubleshoot where the process went wrong and come up with solutions.
Building great virtual assistants is not easy, but the right platform, a little bit of structure, and a willingness to test and iterate some more goes a long way in achieving success.
For more information, please refer to Analyze your Virtual Assistant.