You can define filters for end-users to limit the results of an alert task to the results an end-user needs. For example, you can define a filter for the name, or account, or business. When the alert is set up by the end-user, and the filter applied, only alert messages that meet the filter specifications are displayed to the end-user. Learn more about Alert Tasks.
Defining Filters
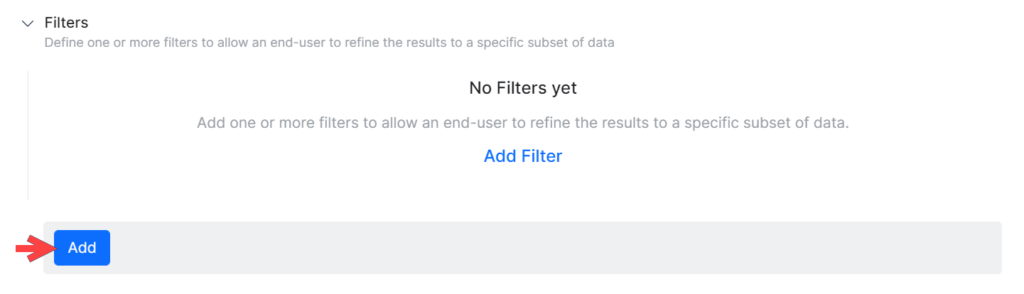
To get started with defining filters for a task, on the Settings tab, click the Expand icon in the Filters section, and then click Add as shown in the following illustration.
When you click Add, the Alert Task Filter dialog is displayed as shown in the following illustration.
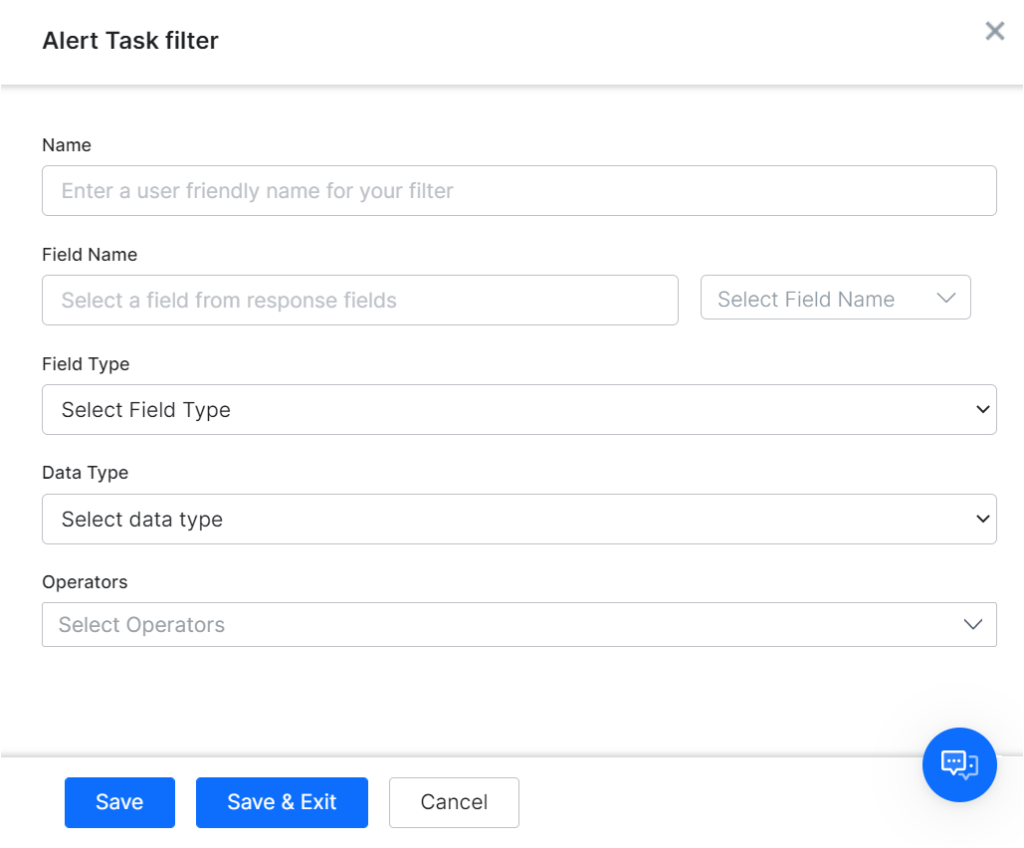
Define the fields described in the following table to create a new filter for a task.
|
PARAMETER NAME
|
DESCRIPTION
|
|
Name
|
Specify the name of the Filter displayed to the end-user in the Filters section when configuring the task, for example, Notify me only when the below user tweets.
|
|
Field Name
|
Enter the name of the field to filter the task on, or click Select Field to display a drop-down list of field names parsed from the Response Sample defined on the task API Request tab.
|
|
Field Type
|
Select the type of input field to collect the user input.
- Textbox – Displays a text box to the user. In the Placeholder field, enter a description for the field.
- Textarea – Displays a text area box to the user, typically allowing them to enter several sentences. In the Placeholder field, enter a description for the text area.
- Static Dropdown – Displays a drop-down list of choices to the user. Click Add Option to begin adding the list of items, with the following parameters:
- Option Name – The name of the option displayed to the user.
- Option Value – The value associated with the option.
- Click Save. To add additional items, click Add Option again. Edit or remove options in the Actions column for options.
- Dynamic Dropdown – Displays a drop-down list dynamically populated at runtime based on the response from a URL for your Bot, for example, a list of projects for a JIRA task notification. Define the following properties for a dynamically populated drop-down.
- Endpoint URL – The VA’s endpoint URL, for example, https://app.asana.com/api/1.0/workspaces.
- Endpoint Content Type – One of these content types expected from the specified endpoint URL: JSON, RSS, XML, Encoded JSON, CSV, or Text.
- Endpoint Method – Select one of the following:
- GET – Specifies an HTTP Request GET method for the task field.
- POST – Specifies an HTTP Request POST method for the task field.
- Response Path – The path in the response that contains the desired drop-down list values, for example, data.
- Label Key – The key for the label of the drop-down option, for example, name.
- Optional Value Key – The key for the value of the drop-down option, for example, id.
- Checkbox – Displays a list of choices that the user can select from – one or more. Click Add Option to begin adding the list of items to display, with the following parameters:
- Option Name – The name of the option displayed to the end-user.
- Option Value – The corresponding value for the option name.
- Type Ahead – Displays a dynamically populated drop-down list of choices to the user at runtime when the user enters three or more characters that match the search results based on the response from the URL defined for the task. For example, a list of projects for a JIRA task notification message. Define the following properties for a dynamically populated drop-down.
- Endpoint URL – The Va’s endpoint URL, for example, https://app.asana.com/api/1.0/workspaces.
- Endpoint Content Type – The content type expected from the specified endpoint URL. One of: JSON, RSS, XML, URL Encoded JSON, CCV, Text, Twitter Encoded JSON, Multipart/Form-data, or Multipart/Related.
- Endpoint Method – Select one of the following:
- GET – Specifies an HTTP Request GET method for the task field.
- POST – Specifies an HTTP Request POST method for the task field.
- Response Path – The path in the response that contains the desired drop-down list values, for example, data.
- Option Label Key – The key for the label of the drop-down option, for example, name.
- Option Value Key – The key for the value of the drop-down option, for example, id.
- Dynamic Checkbox – Displays a list of choices that the end-user can select one or more from, which are dynamically populated at runtime based on the response from a URL for your VA , for example, a list of projects for a JIRA task notification. Define the following properties for a dynamically populated list of choices as checkboxes.
- Endpoint URL – The VA’s endpoint URL, for example, https://app.asana.com/api/1.0/workspaces.
- Endpoint Content Type – The content type expected from the specified endpoint URL. One of: JSON, RSS, XML, Encoded JSON, CSV, or Text.
- Endpoint Method – Select one of the following:
- GET – Specifies an HTTP Request GET method for the task field.
- POST – Specifies an HTTP Request POST method for the task field.
- Response Path – The path in the response that contains the desired drop-down list values, for example, data.
- Label Key – The key for the label of the drop-down option, for example, name.
- Box Value Key – The key for the value of the drop-down option, for example, id.
|
|
Data Type
|
The data type for the content received from the endpoint URL. One of:
- Text – The user input for this filter is expected as text.
- Number – The user input for this filter is expected as an integer.
- Date – The user input for this filter is a date.
- List – The user input for this filter is a comma-separated list.
|
|
Operators
|
Select one or more filter operations that the end-user can select to apply to the filter. Depending on the Data Type selected, one or more of the following options are available to select to display to the end-user in the filter.
- Contains – The response object filtered text contains all of the specified values.
- Doesn’t Contain – The response object filtered text does not contain all of the specified values.
- Exact Match – The response object filtered text only contains the specified values.
- Not an exact match – The response filtered text object does not contain the specified value.
- Included – The response object filtered text contains any of the specified values.
- Not Included – The response object filtered text does not contain any of the specified values.
- Starts with – The response object filtered text begins with the specified value.
- Doesn’t start with – The response object filtered text does not begin with the specified value.
- Ends with – The response object filtered text ends with the specified value.
- Doesn’t end with – The response object filtered text does not end with the specified value.
- Equal to – The response object filtered numbers or dates are equal to the specified value.
- Greater than – The response object filtered numbers or dates are greater than the specified value.
- Less than – The response object filtered numbers or dates are less than the specified value.
- Exists – The response object filtered list contains the specified value.
- Doesn’t exist – The response object filter list does not contain the specified value.
|
For multiple filters, you can order the filters in an order the end-user expects, shown in numerical order in the following illustration.
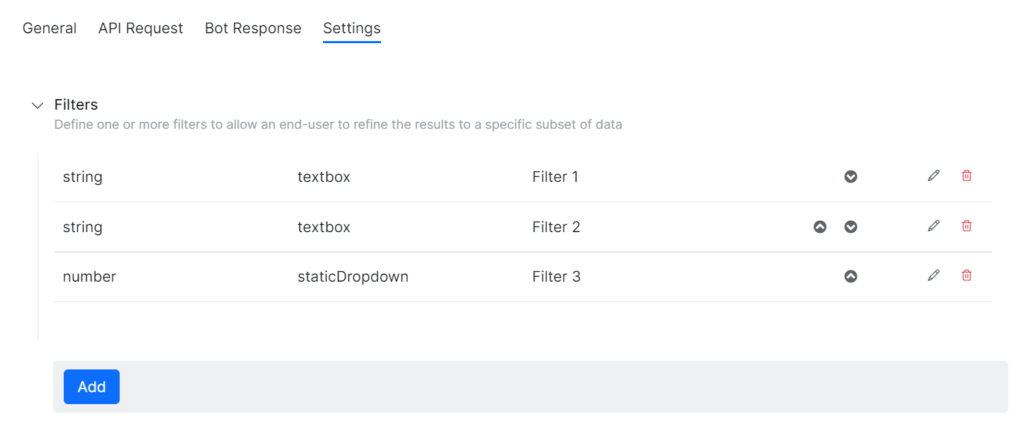
Use the Move Up icon and the Move Down icon in the Actions column in the Filters section to reorder the filters if needed.
Click the Edit icon to modify the settings for an existing filter.
Click the Delete icon to delete an existing filter.
|
Warning: This operation is permanent and cannot be undone.
|


