This document is for creating Universal Bots using an older version (pre-ver7.3 of the platform) This version is deprecated and will soon be discontinued, you are advised to upgrade to the latest version.
The older version has the following limitations:
- There are performance issues if the number of linked bots exceeds 5 or the total number of intents exceeds 100.
- You cannot train the universal bot and need to depend upon the training of the linked bots for proper functioning.
- Variable Management is not possible in the Univeral bot.
For more details click here.
Creating a Universal Bot involves the following major steps:
- Create the Basic Universal Bot
- Add Linked Bots
- Configure the Channels
- Test the Universal Bot
- Publish the Universal Bot
Step 1: Create the Basic Universal Bot
Open the Bot Builder and start creating the universal bot by entering basic bot details such as its name, default language, etc.
- Open the Bot Builder.
- At the top right side of the list of bots, click + New Bot.
- In the Bot Name field, enter a name for the bot.
- Set the Default Bot Language.
- Select the Bot Type as Universal Bot.

After these steps, the universal bot gets created and is listed in your Bot Listing page. The next steps help you add the desired functionality to the bot.
Step 2: Add Linked Bots
After you create a universal bot, link one or more existing bots to it. Since a universal bot comprises of other bots, you must have already created at least one standard bot.
Important Notes:
- Linking a standard Bot does not give the owner or the developers of the universal Bot access to the linked Bot’s tasks and functions.
- The universal Bot does not clone the tasks in the linked Bots but performs them via the linked Bot. So, any changes made to the linked Bot reflect the universal Bot’s functionality.
Follow these steps to add linked bots to the Universal Bot:
- Open the universal bot to which you want to link other bots.
- Select Linked Bots from the left navigation menu.
- Click the Link a Bot link to open the Select a Bot dialog.
Note: On the Select a Bot dialog, you can only see the bots for which you are either the owner or a co-developer. If you cannot see a bot in this window, make sure the bot is shared with you by its owner. - Select the bots that you want to link to the bot and click Finish.

- Once you have linked Bots to the Universal Bot, the Linked Bots page will list all the Linked Bots. You can use the Manage Linked Bot to link another Bot.
Unlink a Bot
If you want to unlink a linked bot, follow these steps:
- On the Linked Bots page, hover over the bot you want to unlink.
- Click the gear icon, and then click Un-Link.
Step 3: Configure the Channels
The universal Bot requires channel configurations separate from its underlying linked Bots, so the channels must be set up or enabled again. You can set up channels for the universal Bot regardless of the linked Bot channels and the published tasks of the linked Bots will execute from the universal Bot channels.
Before you Begin
This article assumes that you understand the fundamentals of configuring channels in Kore.ai and therefore focuses on the configuration aspects specific to the universal bots. For fundamentals of configuring channels in the Bot Builder, refer to Adding Channels to your Bot.
Important Notes:
- The Universal Bot is available only on the channels enabled for it, regardless of the enabled channels for the linked Bots.
- If a channel is configured for both linked and universal Bots, the message delivered to the user follows the channel-specific messages and formatting configured at the linked Bot.
- If a channel enabled for the universal Bot is not enabled for the linked Bot, the universal Bot responds with the default messages defined for the linked Bot’s functionality.
- If you do not set up any channel-specific formatting at either the universal or the linked Bot’s settings, the default message with standard formatting gets applied.
- Alerts configured from universal Bot will be delivered via the universal Bot.
Configuring the Channels
Follow these steps to enable channels for the Universal Bot:
- Open the universal bot for which you want to configure new channels.
- Hover over the left navigation panel and click Channels.
- From the list of supported channels on the Channels page, click a channel to configure it.
- The configuration settings for each channel vary according to the channel. When you click a channel to configure it, the configuration instructions are displayed. Follow them for channel configuration.
- Configure and save the channel settings.
Step 4: Test the Universal Bot
Since the universal Bot links together many standard Bots, the natural language processing settings may have to be optimized for several user utterances to accurately recognize the relevant bot and intent.
Testing the universal bot is similar to testing a standard bot where you type a user utterance and analyze the results. However, in case of the universal bots, you see not just the shortlisted intents for the utterance but also the bots to which they belong. The name of the bot is prefixed to the intent in the following syntax: Bot Name: Task Name.
Before you begin
This article assumes that you understand the fundamentals of testing bots in Kore.ai Bots platform and therefore focuses on the testing aspects specific to the universal bots. To refer to the fundamentals of testing bots in the Bots Builder, read Testing your bot.
Testing a User Utterance
Follow these steps to test user utterances for universal bots:
- Open the universal bot for which you want to test the user utterances.
- Hover over the left navigation panel and click Testing -> Utterance Testing.
- In the Type a user utterance field, enter the utterance that you want to test. For example Book Flight.
- The results show up below with single, multiple, or no matching intents. For example, below is a multiple match result for the Book Flight utterance.
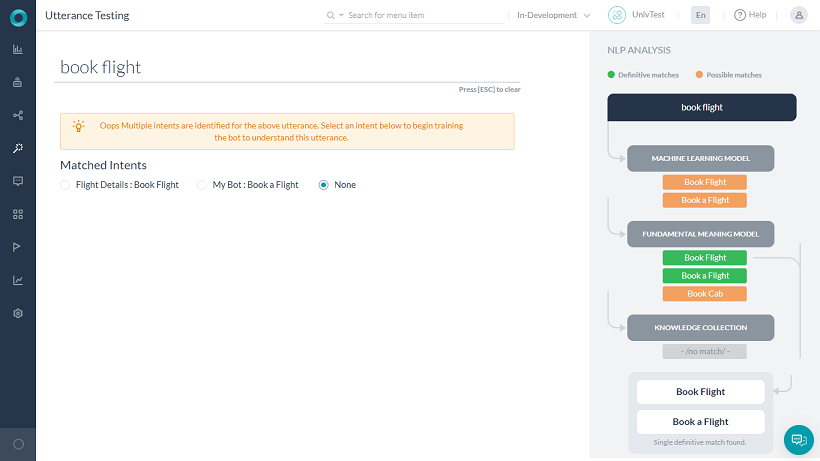
Understanding the Test Results
The result for test utterances fall into one of these three categories:
- Single Matched Intent: A task or user intent of one of the linked bots matched the input.
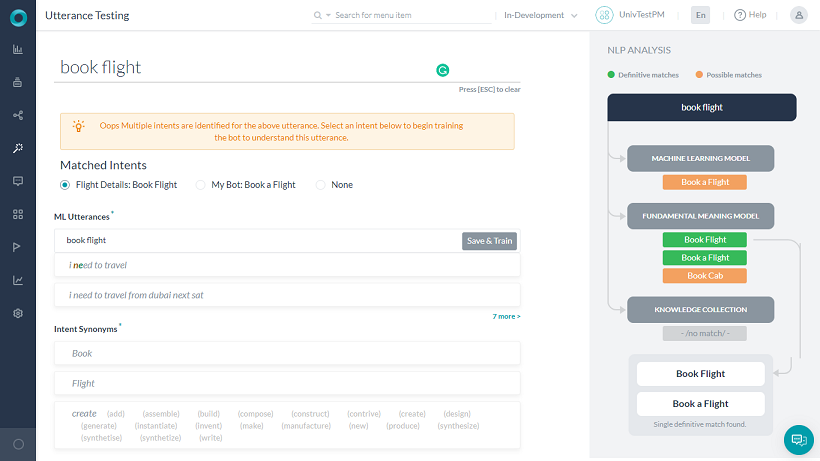
- If it is a correct match, you can provide additional training for the same task in the same bot to enhance its score, or you can also train a different task from another bot to recognize the utterance.
- If it is an incorrect match, click the Mark as Incorrect Match link next to the matched intent. Clicking the link allows you to select the task or intent from the same or another bot that should match.
- Multiple Matches with Same Scores: More than one task with the same recognition score matched the intent. These tasks can belong to one or more than one linked bots. Select the radio button next to the task that you want to match for the utterance.
- Unidentified Intent: The user input did not match any task in any of the linked bots. Train the bot as explained below to match the right bot and linked task.
Improving the Universal Bot Performance
You can train the universal bot to match with the correct linked bot and the correct task within the linked bot. Though you train the linked bot from the universal bot windows, the training is saved directly at the linked bot.
Follow these steps to train the linked bots in a universal bot:
- On the Utterance Testing window for the universal bot, select an intent.
- It opens the following fields that enable you to train the task using machine learning utterances, synonyms, and patterns.
Step 5: Publish the Universal Bot
After you have defined, trained and saved a new configuration for a Universal Bot, it becomes visible on the Bot Builder home page. It is not available to users other than the developers on the bot until it is published and approved by the Bots Admin.
Universal Bot Statuses
The following are different statuses related to the universal bots, these will be displayed in the Linked Bots page against the linked Bots selected for publishing:
| Universal Bot Status | Description |
|---|---|
| Linked | Bot configuration is complete and the standard bots are linked. |
| Awaiting Approval | The Bot is published for enterprise use but has not been approved by the Bots Admin. |
| Published | The Universal Bot is published for personal, enterprise, or public use. |
| Rejected | The Bots Admin did not deploy the bot to the enterprise. An email is sent to the developer with comments from the Bots Admin. |
| Suspended | The Bots Admin suspended the use of a deployed bot. An email is sent to the developer with comments from the Bots Admin. |
Publish the Bot
Follow these steps to publish a universal bot:
- Open the universal bot that you want to publish.
- Hover over the left navigation panel and click Publish.
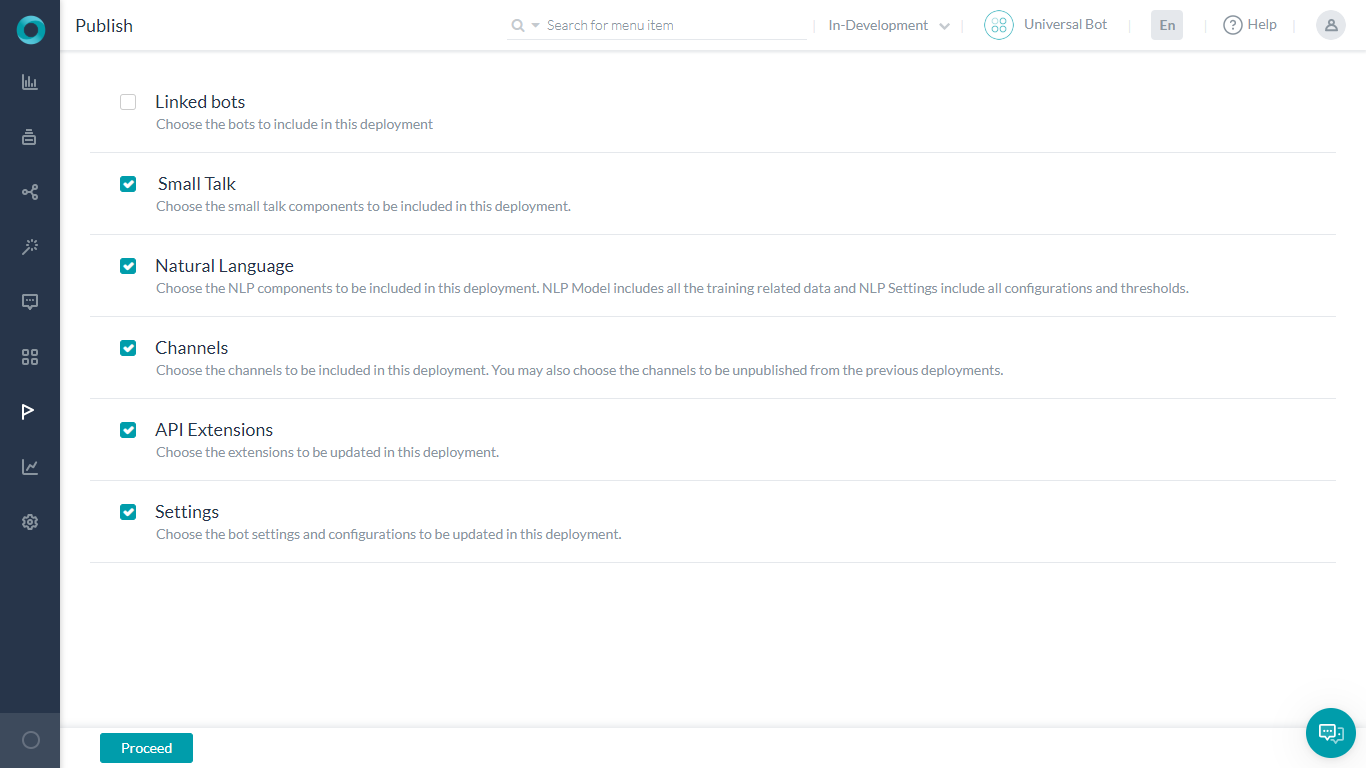
- On the Publish page, select the linked bots you want to publish.
Note: Default dialog is automatically selected and as it is mandatory to publish it you cannot de-select it.
- Select from the list of enabled languages to publish the bot and then click Proceed.
- Enter appropriate Comments and click Publish