This article discusses the main features that allow you to manage your assistant at a high level. These include Importing, Exporting, and Deleting assistants, as well as viewing change logs.
To learn more about Variables and how to use them, see Using Bot Variables.
Importing and Exporting Assistants
Kore.ai allows you to export and import assistant tasks and associated configurations into another assistant. This feature helps you in the migration of bot definitions, cloning of assistants, or maintaining a periodic backup of bot definitions.
This feature is particularly helpful to test various versions of your assistant at different stages of the development process before it is released for end users. The articles in this section help you understand how the Export and Import features work and how to perform them.
NOTE: Post v8.0 release, the enableNegativePatterns flag will be included in ‘NLP Settings’ under ‘NLP Data’ in the exported and imported bot definitions. This flag is used to check if the Negative Patterns are enabled/disabled in the assistant.
Prior to this patch, this flag was part of ‘NLP Settings’ under ‘NLP Data’ in the imported bot definitions and ‘Bot Setting’ under ‘Setting’ in the exported bot definitions. This change is aimed at streamlining the functionality and might result in the failure to the incremental import of a bot from an export file generated before v8.0.
Importing an Assistant
You can import tasks and configurations of a specific assistant into a new or existing assistant using one of these import types:
- Full import: Replaces the existing assistant with the imported configurations. Any additional configurations in the target assistant that are not present in the import definition will be deleted. An exception to this rule is the webhook channel, which will be retained even if not present in the import bot definition.
Note: We strongly recommend you exercise caution and take a backup of the target assistant before importing using this option.
- Incremental import: Upgrades the current assistant with the configurations available in the import file. Any additional configurations available in the target or imported bot are retained. You can select specific bot components to import from the bot tasks, NLP data, and bot settings. Refer to the Bot Items in the Incremental Import table at the end of the article to learn how the imported bot items replace the target bot’s items in incremental import.
Before you Begin The config.json file consists of bot variables that need values for the target assistant. Share the file with the relevant developers or enter suitable values yourself for the variables before importing the bot definition into a new bot.
Steps in Importing to an Existing Assistant
To import a Virtual Assistant, follow these steps:
- Open the assistant you want to export
- Select the Deploy tab from the top menu
- From the left menu select Bot Management -> Import & Export
- On the Import & Export page select the Import tab
- Click the CHOOSE FILE buttons next to the BOT DEFINITION FILE field and BOT CONFIG FILE field, and upload the botDefinition.json and config.json files respectively.
- Optionally, upload the custom script file from the imported assistant if any. The file size is limited to 500kb.

- Select one of these import options: Full Import or Incremental Import.
- If you select Full import, the bot definition in the in-development copy will be overwritten with the definition present in the import file.
- If the assistant contains one or more additional tasks or languages in the assistant, and if these are not present in the import definition, then these tasks will be marked as deleted and will be removed when the bot is published.
- For Generative AI and LLM features, Full import
- Deletes existing models and prompts in the target app.
- Overwrites with models, prompts, and GenAI features from the import file.
- Retains model configurations if a model exists in both source and target
- Replaces all feature mappings and custom instructions.
- Preserve existing integrations.
- Import XO-GPT integration as-is.
- Enable imported features with warnings.
- Handle Azure Open AI by Kore.ai integration based on token status.
- You can choose to auto-publish the assistant post-import.

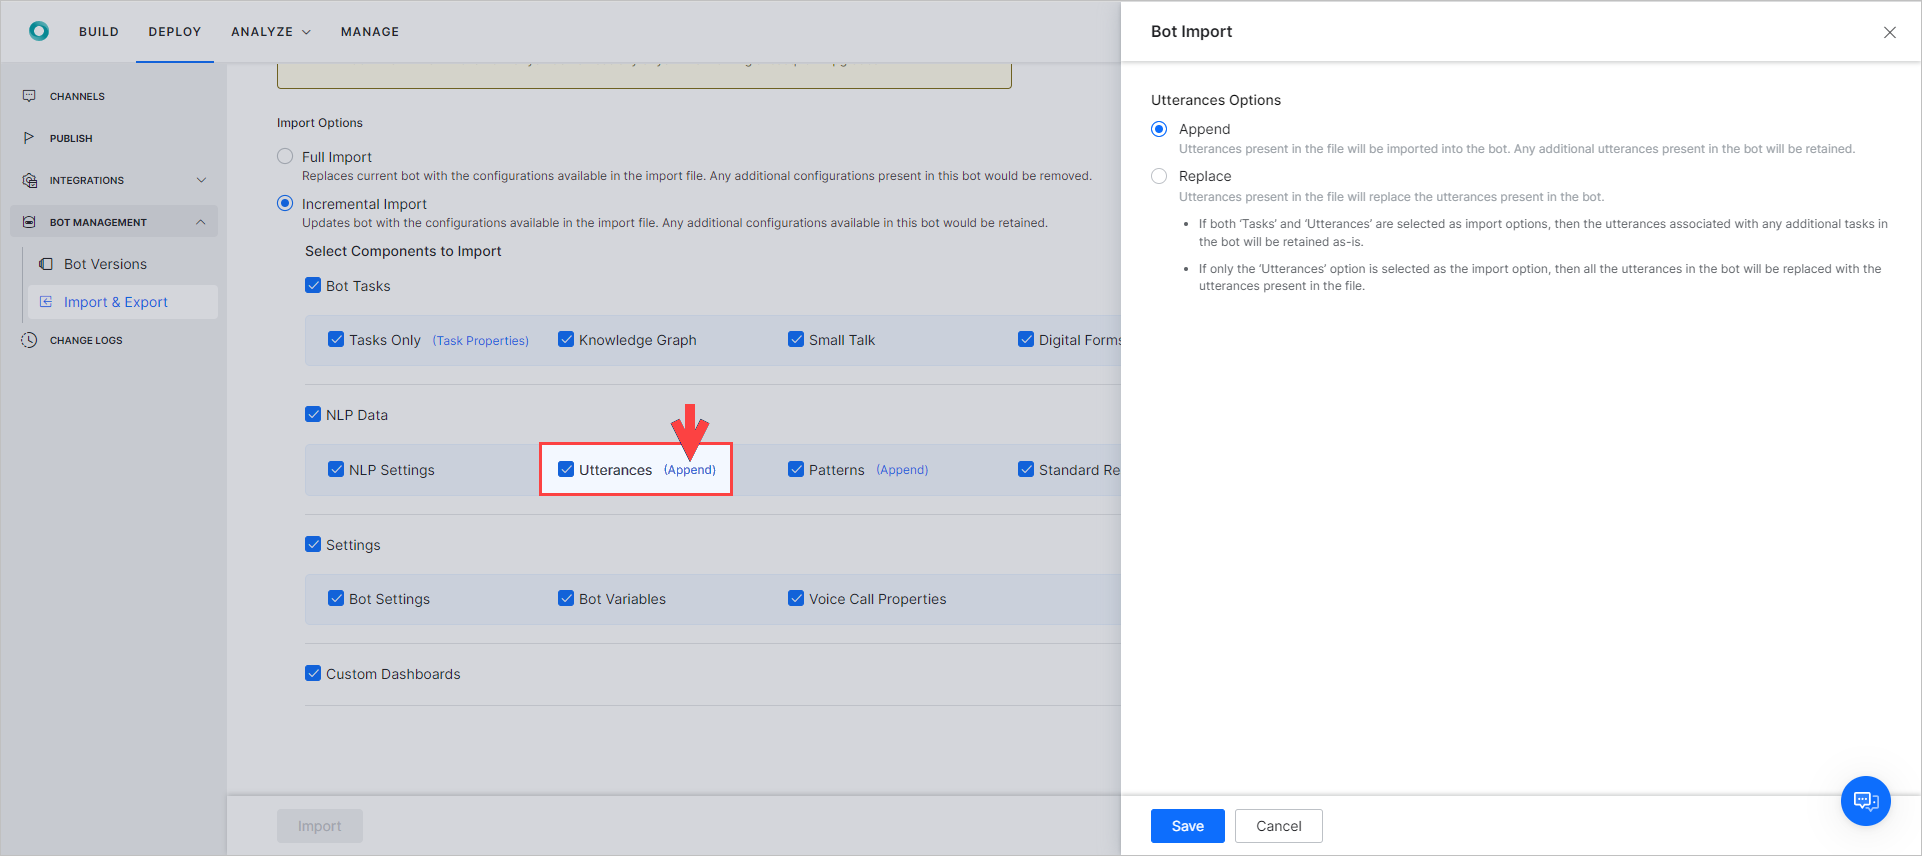
- If you select Incremental import, you can also choose which components to import.

- Bot Tasks: Here is where you can select to import Tasks only (with or without comments), Knowledge Graph, Small Talk or Digital Forms.
Note: If you want to import one or more Bot Tasks, also select the NLP Data settings, as they are linked. For example, the utterances assigned to dialog tasks are not imported if you don’t select the NLP Data settings, causing problems in identifying the dialog properly. - NLP Data: This is where you can import NLP Settings, Utterances, Patterns and Standard Responses. ML Utterances and Patterns can either be Appended or Replaced.
- Append can be used when the utterances present in the file should be imported into the assistant and any additional utterances in the bot should be retained (this is the default behavior)
- Replace can be used when the utterances present in the file should be imported into the assistant. Any additional utterances will be removed.
- In case you are importing Tasks too, the additional utterances related to tasks being imported will be removed.

- In case you are importing Tasks too, the additional utterances related to tasks being imported will be removed.
-
The imported Traits, Synonyms and Concepts will replace those in the target bot. Rules can be imported along with their tagged dialog tasks.
- Settings: Bot Settings, Bot Variables and Voice Call Properties, Generative AI and LLM. The Generative AI and LLM setting includes:
- Integrations
- Prompts and Requests Library
- Feature Mappings
- Custom Dashboards – This is useful in case you have created custom dashboards under the Analyze section and you want to import these to the new VA as well.
- On the confirmation dialog that opens, click Backup to download the existing assistant configuration.
Note: While backing up is an optional choice, we strongly recommend you do so, especially when choosing Full Import, as you cannot recover the configurations after the imported assistant replaces them.

- Bot Tasks: Here is where you can select to import Tasks only (with or without comments), Knowledge Graph, Small Talk or Digital Forms.
- Click Proceed to start the import.
- After the import is completed, the following success message appears. Click Done.
Note: Bot import would fail if the assistant has been restored but not published after the restore.

Creating a New Assistant Using the Import Option
To import a VA while creating it, follow these steps:
- On the landing page, click New Bot.

- In the Create New Bot window, select Import a Bot.
- Enter a Name.
- Select an icon or click the + icon to upload your own. Images should be in PNG format and should not exceed 40×40 pixels. The file size is limited to 80kb.
- Upload the Bot Definition File.
- Upload the Bot Config File.
- Upload the Custom Script File. The file size is limited to 500kb.
- Click Import when ready.

Components in the Incremental Import
| COMPONENT | DESCRIPTION |
|---|---|
| Tasks with the same Reference ID | Imported tasks replace the tasks in the target assistant and their status changes to Configured, regardless of their current status (including Suspended and Rejected tasks). |
| Tasks in the source assistant with a different Reference ID | These tasks are created in the target assistant with the same Reference ID. |
| Tasks in the target assistant with a different Reference ID | These tasks stay intact. |
| Utterances, Patterns, and Task-level Synonyms | Imported utterances, patterns, and task-level synonyms replace the ones in the target assistant and apply them to the imported tasks. Published models in the target assistant stay intact. |
| Knowledge Graph, Bot Synonyms and Standard Responses | Existing knowledge graph, bot synonyms, and standard responses in the target assistant are replaced with the imported ones. |
| Synonyms, Concepts, and Traits | They are imported from the source bot along with all their underlying terms, and replace the ones in the target bot. |
| Rules | Rules will be imported only if their tagged dialog tasks are imported.
Note: On-Prem customers can import the NLP components (Synonyms, Concepts, Rules, Traits) from a source bot of a higher version to a target bot of a lower version by checking the NLP Settings checkbox. However, Rules won’t import unless the tagged dialog tasks are also imported. |
| Generative AI and LLM |
|
Exporting an Assistant
You can export a bot’s definition and configuration using the Export option.
When you export a assistant, it downloads a zipped file with the following parameters:
- botDefinition.json: Includes metadata, tasks, bot and task-level synonyms, utterances, patterns, knowledge graph, standard responses, flows, and IDPs. You can select specific items to export from tasks, NLP data – NLP settings, utterances, standard responses – and Settings – bot settings, variables, IVR settings- while exporting the assistant.
- config.json: Includes bot settings, bot variables, and IVR settings.
- Icon.png: Includes the assistant icon.
- <Custom ScriptFile Name.js> (if available): Includes a script file with JavaScript functions. When you upload this file, you can access the functions in the file from anywhere in the assistant.
Export Modes
You can export assistants in two modes: Published and Latest Version. Depending on the mode that is selected, the corresponding versions of the tasks are exported. You can select specific components to export from the tasks, NLP data, and bot settings in both the modes. Further individual Tasks can also be selected.
Published Mode
When you export a VA in the Published mode, only the published versions of the tasks are exported, regardless of any other existing versions. For example, if a VA consists of a published version of a task and also version in Upgrade in Progress, only the published version gets exported. Refer to the table below to understand which versions of the tasks are exported in the Published mode:
| Task | Status |
|---|---|
| In Progress | Not exported If a task is in progress for development, it isn’t exported in the Published mode. |
| Configured | Not exported If the task configuration is complete but not published for use, it doesn’t get exported in the Published mode. |
| Published | Exported All published tasks get exported |
| Upgrade in Progress | Not exported Task upgrade configurations that are in progress do not get exported. Only the published configurations get exported. |
| Rejected | Not exported Task configurations rejected by admins do not get exported. |
| Suspended | Not exported Suspended tasks do not get exported. |
Latest Version
When you export a VA in the Latest mode, the latest versions of the tasks get exported, regardless of their publishing status. For example, if a VA consists of a published version of a task and also the version in Upgrade in Progress, the Upgrade in Progress version gets exported, whereas if it just has a Configured version, the configured version is exported. Refer to the table below to understand which versions of the tasks are exported in the Latest mode:
| Task | Status |
|---|---|
| In Progress | Exported if it is the only available version Not Exported if a later version exists |
| Configured | Exported if it is the only available version Not Exported if a later version exists |
| Published | Exported if it is the only available version Not Exported if a later version exists |
| Upgrade in Progress | Exported regardless of any other task version in the assistant |
| Rejected | Not exported Task configurations rejected by admins do not get exported |
| Suspended | Not exported Suspended tasks do not get exported |
Steps in Exporting the Assistant
- Open the assistant you want to export
- Select Deploy tab from the top menu
- From the left menu select Bot Management -> Import & Export
- On the Import & Export page, select the Export tab
- In the Export tab, select either Published or Latest Version exporting mode.
- By default, all the components are selected for export. Deselect the items that you do not want to export.
 Note: If your bot has events linked to specific Dialog tasks and those Tasks are not included in the export, the associated bot events will be disabled by default in the exported copy. To avoid this, include all Tasks referenced in bot events during export.
 - For Tasks, you can further choose to export only select tasks. By default All Tasks are selected. Click the All Tasks link to open Select Tasks dialog to choose the tasks you want to export.
- You can also choose to Include dependent tasks or not for export. The existence of these will be checked before import and the import will fail if the dependent tasks are missing. These dependent tasks include the following:
- Linked Dialogs i.e. dialog nodes present in the definition of another dialog;
- Dialogs linked in defining ‘Behavior on Exceeding Retries’ for IVR Properties of any node of the dialog;
- Dialog linked as part of sub-intent / interruption settings;
- Any other scenario where a dialog execution could fail if a dependent task is not included;

-
-
- Click Export. The export happens in the background and the Download button gets activated after it is complete. Click Download to download the file to your local computer.
-
Exported Bot Components
When you export a VA, the following components get exported, depending on your Latest or Published Mode selection:
| Tasks | |
|---|---|
| Tasks Only |
|
| Knowledge Graph | Knowledge Graph definition along with the associated synonyms and classes. |
| NLP Data | |
| NLP Settings | The Advanced NLP Settings and Ignore words and Field memory. The Advanced NLP Settings ( Natural Language > Advanced Settings) include the following:
|
| Utterances | All the utterances of all the enabled languages |
| Standard Responses | All the standard responses of the assistant in all enabled languages |
| Settings | |
| Bot Settings | The following information from Bot Settings page:
|
| Bot Variables | All the global and content variables present in the assistant along with their values. |
| IVR settings | All the IVR settings for the assistant (Bot Settings > IVR settings). |
| Generative AI and LLM |
|
Universal and Child Bot Scenarios
When exporting and importing universal and child VAs from a source environment to a destination environment, you should ensure the following:
- All the child bots are imported before the universal bot.
- When creating child bots, they propagate from the same source environment.
Deleting an Assistant
You cannot delete a VA if any of the tasks are Published. Once you publish a task, the Bots Admin must approve and assign it to users. The developer cannot delete assigned tasks. To delete a published task, the Bots Admin needs to suspend the task. Also, you cannot delete a VA if it is part of a published flow. You must delete the flow or remove the assistant from the flow before attempting to delete it.
To delete a Virtual Assistant:
- Open the assistant you want to delete
- Select the Deploy tab from the top menu
- From the left navigation under the Bot Management menu, click Delete Bot.


| WARNING: All the configurations will be lost and there is no way to restore your assistant after deletion. Please exercise caution when using this feature. |
Viewing the Change Log
After creating a VA, you may need to edit it for various reasons such as changing its settings, adding tasks, enabling channels, and add flows. To track all the changes made to a VA, you can view the Change Logs, which show a chronological list of modifications to your assistant. It consists of all the changes from the initial save of your assistant to the last update. To view the changelog for a VA, follow these steps:
- Select Deploy tab from the top menu
- From the left menu click Change Logs.

- On the Change Logs page, you will notice the following;

- The list is sorted in reverse chronological order.
- Each page displays the ten most recent changes and the name of the user that made the change, followed by the change synopsis, and the timestamp of the applied change.
- Logs of the Publish Event are consolidated for all selected tasks, with the tasks listed in case all tasks are not selected for publishing along with the Publish Comments.
Following actions can be performed on the logs:
- Using the search text box, you can enter any text and the platform will search for that text in the change description and the logs fulfilling the search criteria would be displayed.
- The filter option can be used to filter based on:
- Developer Name collaborating on the assistant;
- Date Range either past 24 hrs, past 7 days, or custom date by specifying the start and end date. By default, changes from all developers in the past 24 hours would be displayed.
- The export icon can be used to Export the changelog in CSV format. The logs displayed after applying the search and filter criteria would be downloaded.