Fundamental Meaning is a computational linguistics approach that is built on ChatScript. The model analyzes the structure of a user’s utterance to identify each word by meaning, position, conjugation, capitalization, plurality, and other factors.
FM Engine Overview
The Fundamental Meaning model is a deterministic model that uses semantic rules and language context to determine the intent match. This engine can be trained using synonyms, built-in and custom concepts, and patterns.
The FM model scores user utterances using various semantic rules, which include:
- Grammar;
- Parts of speech;
- Word Match, Word Coverage across the sentence, Word Position;
- Sentence structure.
The FM Process
The FM model uses the following processes in training.
Tokenization
Also known as word segmentation, this process breaks up the given text into units called tokens. The hyphenated words are retained (might be subjected to spell correction later); digits with a hyphen are split. For example, 2-3 becomes 2 – 3. Tokenization is not done for known concepts like Dates, Currency, etc.
Substitution
This process expands interjections, abbreviations, misspellings, texting shorthand, and contractions using system concepts. Like ~emohello for all greeting-related expressions, ~yes for confirmation, ~no for rejection, and more. A Bot Substitution or replacement of words happens immediately after tokenization.
This feature allows bot developers to add substitutions specific to their domain and vocabulary. For example, Chevy is replaced by Chevrolet by a car serving bot,
Another use of this feature is on voice channels where ideally, mis-transcriptions should be corrected by the ASR software, but that isn’t always possible. In these cases, the substitution functionality allows bot developers to correct transcription errors. For example, our d is corrected to Audi by a car serving bot. Learn more.
Merging
This process combines a sequence of single words, numbers, or dates. For example, “credit card” or “twenty five” or “twenty-five” merged into a single word.
Spell Check
This process replaces unknown words with known words (if any) which involves case conversion. The Platform refers to WordNet and VA Defined Terms for spell check. E.g. “I wantt to pai for my booking” becomes “I want to pay for my booking”
Lemmatization
The XO Platform uses the WordNet database to look up word lemmas in a given text.
Gleaning
This process helps identify sections of utterances and mark them as special. This includes the following:
- Marking polite phrases and treating them as noise, like “can you please….”.
- Language constructs that indicate multiple intents, like “and then”, “and after that”, “but first” cause the sentence to be split into two and do multiple intent detection.
- Identifying and normalizing numbers and from other related entities: e.g. “seven one three triple five double zero eighty four” => 7135550084, which is probably a phone number.
- Identifying System entities like Percentages – “sixty six percent”; Units of measurement – “five sq km”, “12 stone 7 pounds”; Currencies – “twenty bucks”, “six lakh rupees”; Dates and times – “last day of next month”, “10 o’clock tonight”.
Parts of Speech (POS) tagging
This process marks up a word in a corpus to the corresponding part-of-speech tag based on the context and definition. Part-of-speech tags are useful in building parse trees which are used to extract the relationship between words. POS Tagging is also essential for building lemmatizers to reduce a word to its root form. Each word is assigned a part of the speech tag, and possibly a role (subject/verb/object) from VA definition data.
Marking
This process of assigns a concept to each word. POS tagging and Parsing are abstract and deal with nouns and verbs. Alternatively, Marking applies a meaning to the word. For example, for the utterance “book a flight” – book can be a noun or verb. However, in this context, it is marked as a verb.
Key Components
Synonyms, Concepts & Patterns are the cornerstones of the FM engine. These are used in intent detection and also by Ranking & Resolver when trying to choose among the multiple possible intents.
- Synonyms need to be used when the words used to identify an intent/entity can be used interchangeably like. The Platform comes with a built-in library, it can be augmented by adding domain words that will be used to build a dictionary for your assistant.
- Concepts are a predefined set of choices that are defined once and used in multiple places. The Platform has a large set of inbuilt concepts that developers can use to define a pattern like ~world_country, ~asian_country. You can create your own custom concepts which are applicable to your use case, you can also create hierarchical concepts.
- Patterns used mainly for intent detection in the FM engine. Can be used to define metaphors or other idiomatic expressions for task names. Concepts can be used in defining patterns.
FM Output
The FM Engine collects information on a word in a given user input depending on:
- Position of the matching word in the sentence,
- Whether the matching word is a Noun or verb,
- Role of the matching word – Main Subject, Main Verb, Main Object,
- Exact word match or Synonym,
- Tense of the matching word – present/future/past.
A series of individual scores are calculated from the set of matched words.
- The goal is to prefer tasks that match the most likely words in the earliest sentence in the input.
- Preference is given to words when they are close together, towards the start of the sentence, and in the same order as the task label.
- It is undesirable to have several phrases before the task name or a conjunction in the middle of the task label.
Preference is given to tasks in phrases in the present or future tense.
Training the FM Engine
Training the FM Engine involves the following:
- Synonyms and Concepts management,
- Managing Patterns and Rules,
- Negative Patterns.
- Thresholds configuration,
Let us discuss these topics in detail, below.
Manage Synonyms
How Synonyms Work
Users utter the same request in varied ways.
For example, an intent like Make a Booking could be expressed with alternatives such as Create a Booking or Make a Reservation. .
As a developer, you must limit the name of a task to only two or three words, yet accommodate the alternative ways in which it could be asked.
Synonyms are defined for both the task name and a task field name. To optimize the NLP interpreter accuracy in recognizing the correct task and task field provided by the user, you can add synonyms for words used in the names of your tasks and task fields.
Make – add, create, generate, etc.
Booking – reservation, ticket, trip, etc.
Also consider misspellings, such as:
- Create – crate, creeate, etc.
- Booking – boking, bookin, etc.
When you add synonyms for a word, those synonyms are also used for other tasks or task fields. In other terms, synonyms for a word defined for a task are also applicable to the same word in another task name. For example, synonyms defined for the word make in the Make a Booking task are also used for the Make a Payment task.
For more information about best practices and tips for naming tasks and task fields, see the Natural Language Processing Guide.
Add Synonyms
The Platform provides a set of default synonyms, pre-listed within the dedicated section (Training > Synonyms). These are only available in English, German, Spanish, French; Traditional and Simplified Chinese.
Adding Synonyms involves using the Natural Language Training section of the XO Platform, where you can add synonyms for VA, task and entity node names.
The following sections show you how to add these synonyms.
Navigate to Synonyms
- Open the VA for which you want to add synonyms and select the Build tab from the top menu.
- From the left navigation menu and click Natural Language -> Training.
- On the Training page, click one of the following tabs:
- Bot Synonyms – Add and edit synonyms for the words in the bot or task names.
- Entities – Add and edit synonyms for any words in your dialog task Entity node names.
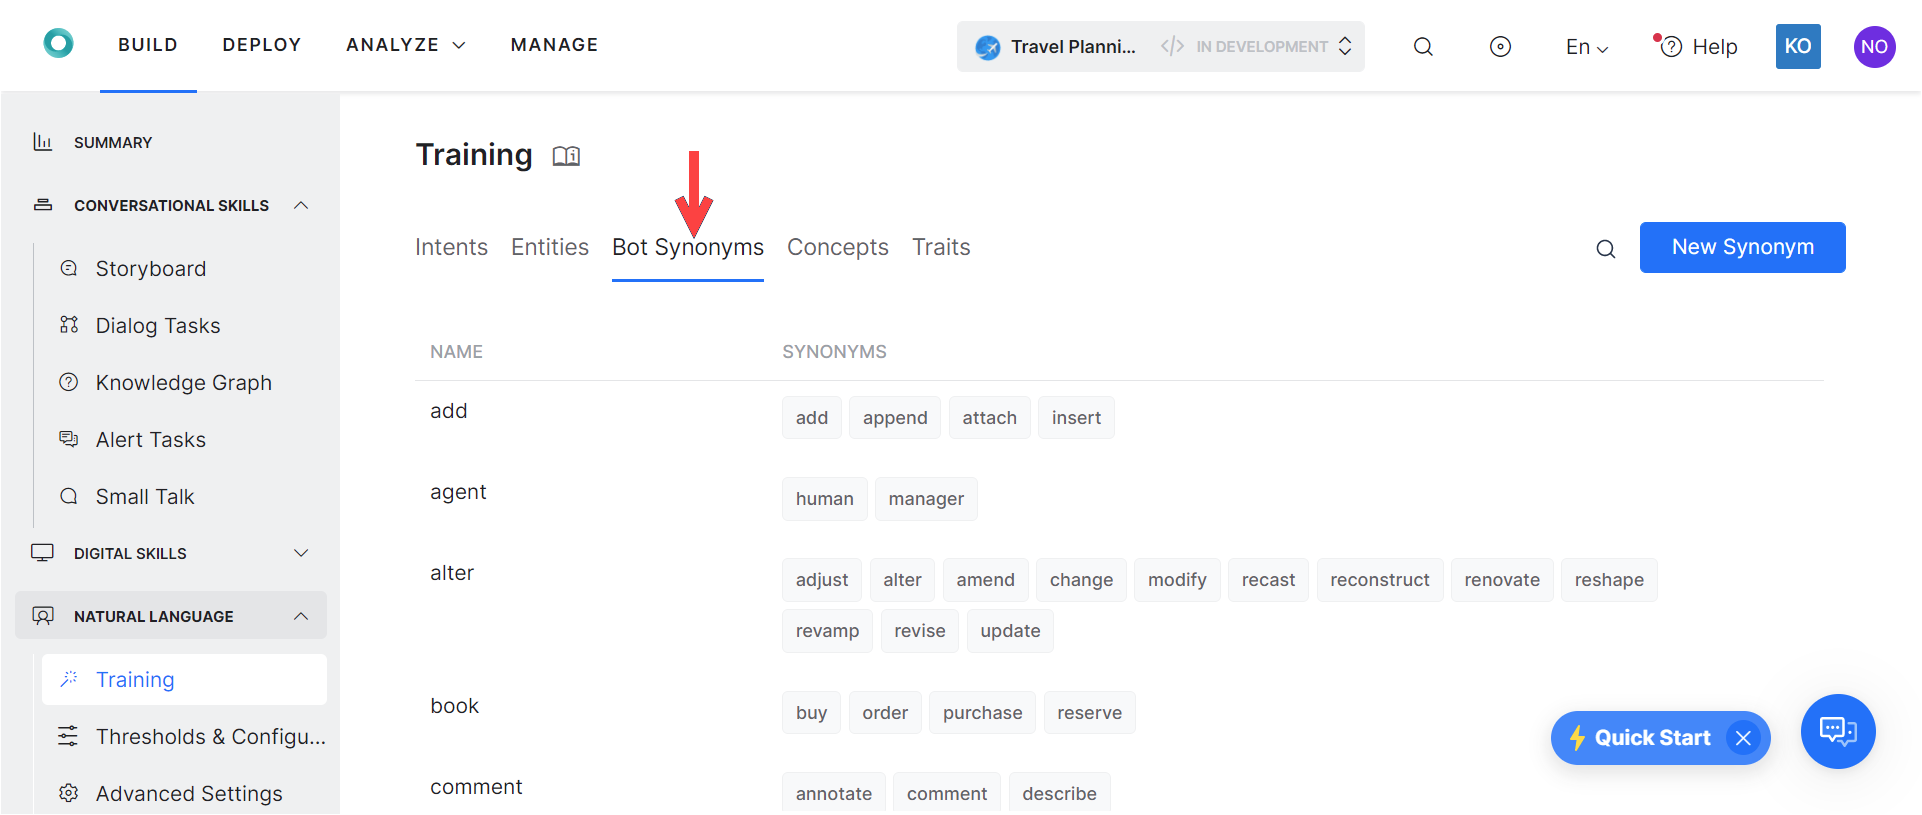
Add Bot Synonyms
On the Training page under the Bot Synonyms tab, you can view and add synonyms for words in task names. Synonyms defined on the Bot Synonym tab apply bot-wide to all task names, field names, and so forth.
To add a bot synonym, follow the below steps:
- On the Training page, select the Bot Synonyms tab.

- Click New Synonym or use the edit icon against an existing synonym, to open the synonym page.
- In the Name field, enter the name of the word (keyword) for which you want to create synonyms.
- In the Synonyms field, enter one or more synonyms for the keyword. Press Enter/Return after entering each synonym.
- Added Synonyms are automatically saved once you press Enter/Return.


Add Entity Synonyms
On the Training page, on the Entities tab, each dialog task entity is listed with any defined synonyms for that entity name.

To add synonyms for a dialog task entity, follow the below steps:
- On the Training page, select the Entities tab.
- Click the Edit icon against the entity for which you want to add synonyms.
- Enter one or more synonyms for the entity and then press Enter after entering each synonym. They will be saved automatically.


Use Patterns Instead of Synonyms
Adding synonyms can help the NLP interpreter select the intended task. But what if the user input does not contain any of the words we used as synonyms?
For example, for a Make a Booking task in a Travel Assistant , if the user inputs Get me a ticket , which means the same as Make a Booking , but does not match any of the words or synonyms for the task name. In this case, you can create patterns for a group of words that have the same meaning.
Parallel Editing for Synonyms
In the previous versions of the XO Platform, whenever a user added and saved a new bot synonym, the server added it to the database and updated the entire synonym list. Concurrent usage caused data conflicts when multiple users worked parallelly on the same bot. This also prevented team members from collaborating during bot training.
Let’s consider the following scenario as an example:
- Two users are trying to add synonyms to the same bot.
- User 1 adds Synonym 1 and hits save.
- User 2 adds Synonym 2 and hits save.
- User 1 refreshes the page and looks for Synonym 1, which is overwritten by User 2’s changes in the database.
Similarly, when User 1 and User 2 simultaneously delete their synonyms, respectively, the system deletes User 2’s synonym from the list but retains User 1’s synonym when they refresh the page.
We’ve introduced a workaround for this issue discussed below. This design flow provides a mutually exclusive way of retaining the relevant synonyms list for all the users.
Workaround with Parallel Editing
The XO Platform now supports Parallel Editing, where more than one user can add or delete a synonym for the same bot without losing or overwriting data during bot training. When a user updates an existing synonyms list, the system tracks whether it’s an add or delete operation and does the following:
Add a Synonym
Whenever a user adds and saves a new synonym, the system only updates the database with the new synonym and does not overwrite the existing synonym list.
Delete a Synonym
Whenever a user deletes an existing synonym, the system removes only the concerned synonym from the existing synonyms list without overwriting the complete list. During concurrent usage, the system prompts the user to refresh the page to make the latest information available.
Manage Concepts
Concepts are clusters of related and synonymous terms that can be considered as a group identified by a single term.
For example, yes can be expressed as ok, I agree or all right etc.
In addition, Concepts can be very useful when you want to categorize terms. For example, you might have fruit as a concept, under which you can classify terms such as apple, orange, banana, etc.
Concept Types
There are two types of Concepts within the XO Platform:
- System Concepts The Kore.ai platform provides a list of default concepts that cover the most common scenarios like yes, no, help etc.
- Custom Concepts: You might want to define concepts catering to your business requirements. For example, you might want to use the term fruit to imply either apple or orange or banana. If you want to add to the list of default words, you are advised to create a new concept and add words there before mapping the pattern, instead of adding more words to the default concepts like ~emogoodbye or ~emohello.
Define Custom Concepts
You can define a new concept the same way as you would define a Bot Synonym, but you need to start the word with a ~. For more details on the naming convention, refer here.
You can also define custom concepts using emojis.
Concepts are used to define patterns. For example, the pattern buy ~fruit is used to capture buy orange or buy banana.

Note: Add the ~disable_help concept key and train the VA to disable the system help. You can train the virtual assistant (VA) to use the custom_help group in Smalltalk to trigger the customized help messages. Learn more.

Parallel Editing for Concepts
Parallel Editing works the same for Concepts and Synonyms. Please click here to learn more.
Bot Substitutions
The NLP engine can recognize Bot substitutions present in the user utterance using a custom concept definition called ~bot_substitutions for bot substitution.
You can define this concept based on the following syntax:
- Each item in the concept consists of two parts separated by a
|symbol. - The part before the
|symbol is the text in the original utterance to replace. It is case insensitive. - The part after the
|symbol is the replacement text. It is case-sensitive.
To define this concept, follow the steps below:
- On the left menu of the Bot Builder, navigate to Natural Language > Training.
- Click the Concepts tab.
- Click the New Concept button.
- In the New Concept panel, enter the value for Concept Name.
- Enter the Concept Name as
~bot_substitutions. - Enter the word in the utterance to be replaced, followed by the
|symbol and the substitution word.

| Note: When there is no replacement text after the | symbol, the text to be replaced is removed from the utterance. |
Other Replacement Syntaxes
Bot substitution is used to support the following patterns for user utterances:
-
?_wordmatches a number followed by the word, e.g.?_km|kilometerswill change 5 km to 5 kilometers.
| Note: The substitution happens even if there is no space between the number and the measurement unit. Thus, 5 km is replaced by 5 kilometers. |
< wordwill match the first word in a sentence, e.g.,< new Chevy|Chevroletwill change new Chevy car to Chevrolet car, but it will not change I want to know about the new Chevy car.
Bot word Aliases
The Bots on the Kore.ai XO Platform can now be trained during the NL process to identify aliases or alternative spellings in utterances (during Speech-to-Text (STT) transcriptions).
Alias is based on Marking, the chat script-specific process of linking concepts to words to match patterns based on those concepts.
For example, a user might say Alfa Romeo on a voice channel, but the STT transcribes that as Alpha Romeo (a known and valid word). This is because the Bot uses the custom concept defined for Bot Word Aliases, matches the custom entity, and returns Alfa Romeo.
The Bot Word Aliases scheme uses a technique where Individual words like alpha_romeo are members of a word/concept like Alfa_Romeo, and concepts are members of other concepts like ~car_brands.
Bot word Aliases are used for entities like City and Company on the Platform. For example, Big Apple is identified as the alias of New York and mapped to the City entity. However, the actual city name is set to New York internally.
Synonym words with a + prefix are treated as aliases to train word synonyms in ML and as task label synonyms for FM.
Define a Bot Alias
To treat a Bot Synonym word as an Alias in an utterance, you must define a custom concept with the steps below:
- On the left menu of the Bot Builder, navigate to Natural Language > Training.
- Click the Bot Synonyms tab.
- Click the New Synonym button.
- In the New Synonym panel, enter the value for Synonym Name.
- Enter the value(s) for Synonyms by prefixing the name with a
+icon as shown below:

Note: Aliases do not change the original utterance like Substitutions or influence POS tagging like Homophones. However, they do the following:
- Return the normalized value for the Custom Concept entity.
- Link concepts to new words (Marking). Learn more.
Alias Patterns
The Custom Concept Entity on the Platform allows the selective marking of aliases using patterns.
In the example below, the system marks Aston as an alias for Aston Martin only if it is not followed by the word Martin according to the Synonyms pattern.

Similarly, in the example below, the system marks Kelly as the alias for TeleHealth only if it is followed by the word health (the underscore limits the marking to one word) according to the Synonyms pattern.

Bot Homophones
The Kore.ai XO Platform now supports Bot Homophones or Homonyms to identify the relevant word when two or more words are pronounced the same but have different spellings. Homonyms are a challenge on voice channels because while processing and adjusting an utterance on the Natural Language (NL) Pipeline, the Speech-to-Text (STT) engine can easily transcribe the wrong word. For example, Write an email can be wrongly transcribed to Right an email.
With Bot Homophones, the system considers all the alternative homophones to check for a better, or equally valid, word choice during the NL pipeline and POS tagging processes.
How it Works
- The final POS tagging depends on the potential POS tags for each word in the utterance.
- That processing can be influenced by including the potential POS tags for any homonyms.
- If the homophone is a better choice for being a more suitable POS tag, it gets replaced in the utterance, and the original word is left as a mark. For example, the homophone
higher(an adjective/adverb) is replaced with the wordhire(verb) in the utterancehigher a carbecause a verb is a better and more logical POS choice. - If the homophone is an equally good choice for the potential POS tag, the system marks the current word as the homophone. For example, in the utterance
clear the cash, the wordcacheis also an ideal word choice since it is a noun. However, the system markscashas the homophone.
Define a Bot Homophone
To treat a Bot Synonym word as a Homophone/Homonym in an utterance, you must define a custom concept with the steps below:
- On the left menu of the Bot Builder, navigate to Natural Language > Training.
- Click the Concepts tab.
- Click the New Concept button.
- In the New Concept panel, enter the value for Concept Name.
- Enter the value(s) for Synonyms in the following syntax, where the concept members are homophones separated by a
|icon.original word in the utterance | homonym1 | homonym2 | homonymN
Note: Both homonyms do not change the original utterance like Substitutions or return the normalized value for the Custom Concept entity. However, they do the following:
- Influence POS Tagging.
- Link concepts to new words (marking). Learn more.
Emoji Support
The NLP engine can recognize emojis present in the user utterance. You can include these in the concept definition and give a better user experience. For example, a thumbs-up emoticon (:thumbs up:) from the user can be considered as an affirmative, and a frown emoticon (:frowning2:) can be considered as an anger sentiment and appropriate action can be taken.
You can import emojis into your VA’s system concepts so that it can conduct the conversations when emojis are present in the user’s utterances. For this, follow the below steps:
- Under the Build top menu option, from the left menu, click Natural Language -> Training
- On the Intents tab, click the more/ellipses icon and select Import Emojis into Concepts.
- This adds all the default emojis to the system concepts for the current language. As you can see emojis are updated for the system concepts like this: ~emohappy, ~emohello, etc.

- After importing, you may choose to review and remove any emojis that you may not want to support.
- If you are trying to re-import the emojis, then the current emojis are retained and any additional emojis are added.

Manage Patterns and Rules
To optimize the accuracy and recognition of the NLP interpreter, you can create patterns for task names and task fields.
Using synonyms is great for words used in the name. Sometimes; however, users may refer to a task using slang, metaphors, or other idiomatic expressions.
For example, a task name is Get Current Weather, but the user inputs, what’s happening with today’s rain situation. In this case, none of the words used in the task name are used, yet the input has the same meaning as Get Current Weather.
In these cases, using patterns can help to improve NLP interpreter accuracy.
When the NLP interpreter matches a synonym to one task or field, and a pattern to a different task or field, the pattern match is prioritized and used for positive recognition over the synonym match.
To learn more about best practices and tips for optimizing NLP, refer to Natural Language Processing Guide.
For a quick guide towards the usage of patterns, refer to How to use Patterns.
- Open the VA for which you want to add patterns and select the Build tab from the top menu.
- From the left menu click Natural Language -> Training.
- On the Training page, click one of the following tabs:
- Intents – Add or edit patterns or rules for dialog task User Intent nodes.
- Entities – Add or edit patterns for dialog task Entity nodes.
Add Patterns for Intents
You can define a pattern as a sentence that represents the task but does not actually contain any of the words in the name of the task.
Also, you can define where words must be ignored by the NLP interpreter to improve accuracy for recognizing the correct task.
For example, you can build a pattern like find *testable* value to recognize in the user input a sequence of words in order, where the word find is followed by any number of words, followed by the word testable, and again followed by any number of words, which are finally followed by the word value. For this pattern, the user input can be Find me any testable integers corresponding to the value, which can match the pattern.
You can also use concepts to build patterns. For example, the pattern is defined as buy ~fruit and the user input that matches this pattern can be buy orange.
In the Intents section, you can view, add, and delete patterns for dialog tasks.

To add an intent pattern, follow the below steps:
- On the Training page, click the Patterns/+Pattern against the intent name you want to enter the patterns for.
- In the Intent pane, enter one or more sentence patterns, and press Enter between patterns.
- You can reorder, edit or delete patterns using the appropriate icons.


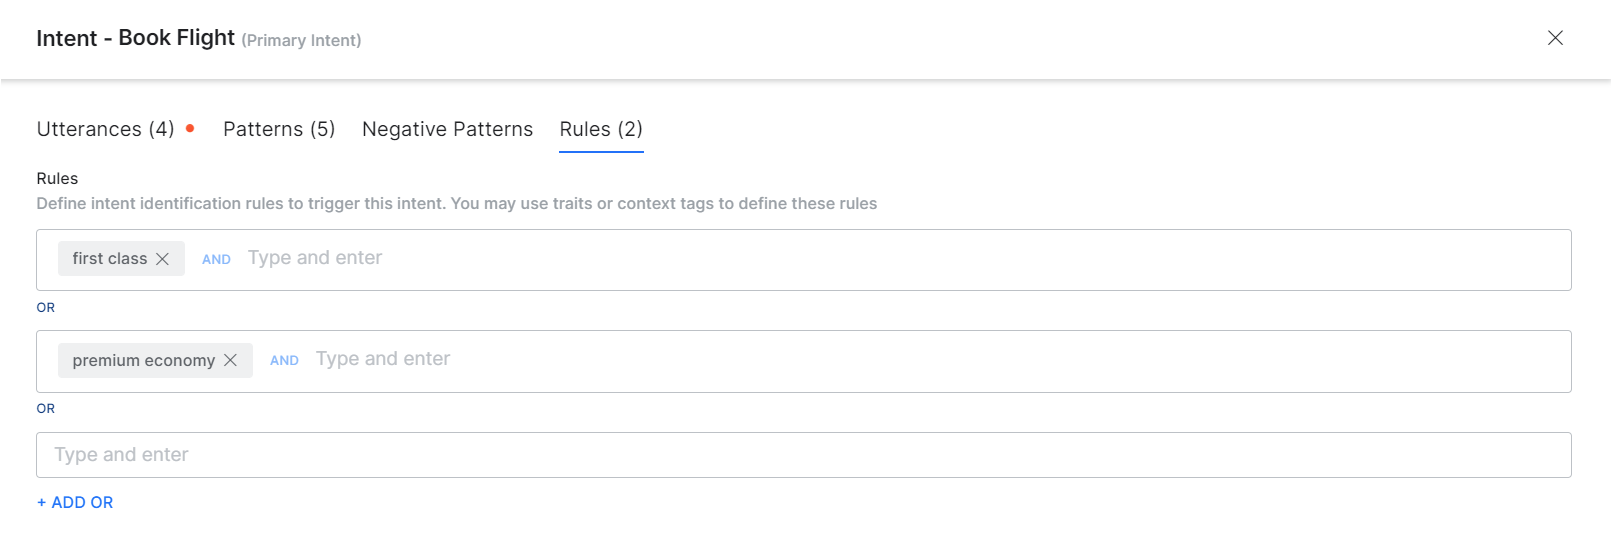
Add Rules for Intents
You can use traits or context tags to define intent identification rules for better intent detection. You can add Traits or Context Tags and conditional rules using AND, OR operators.
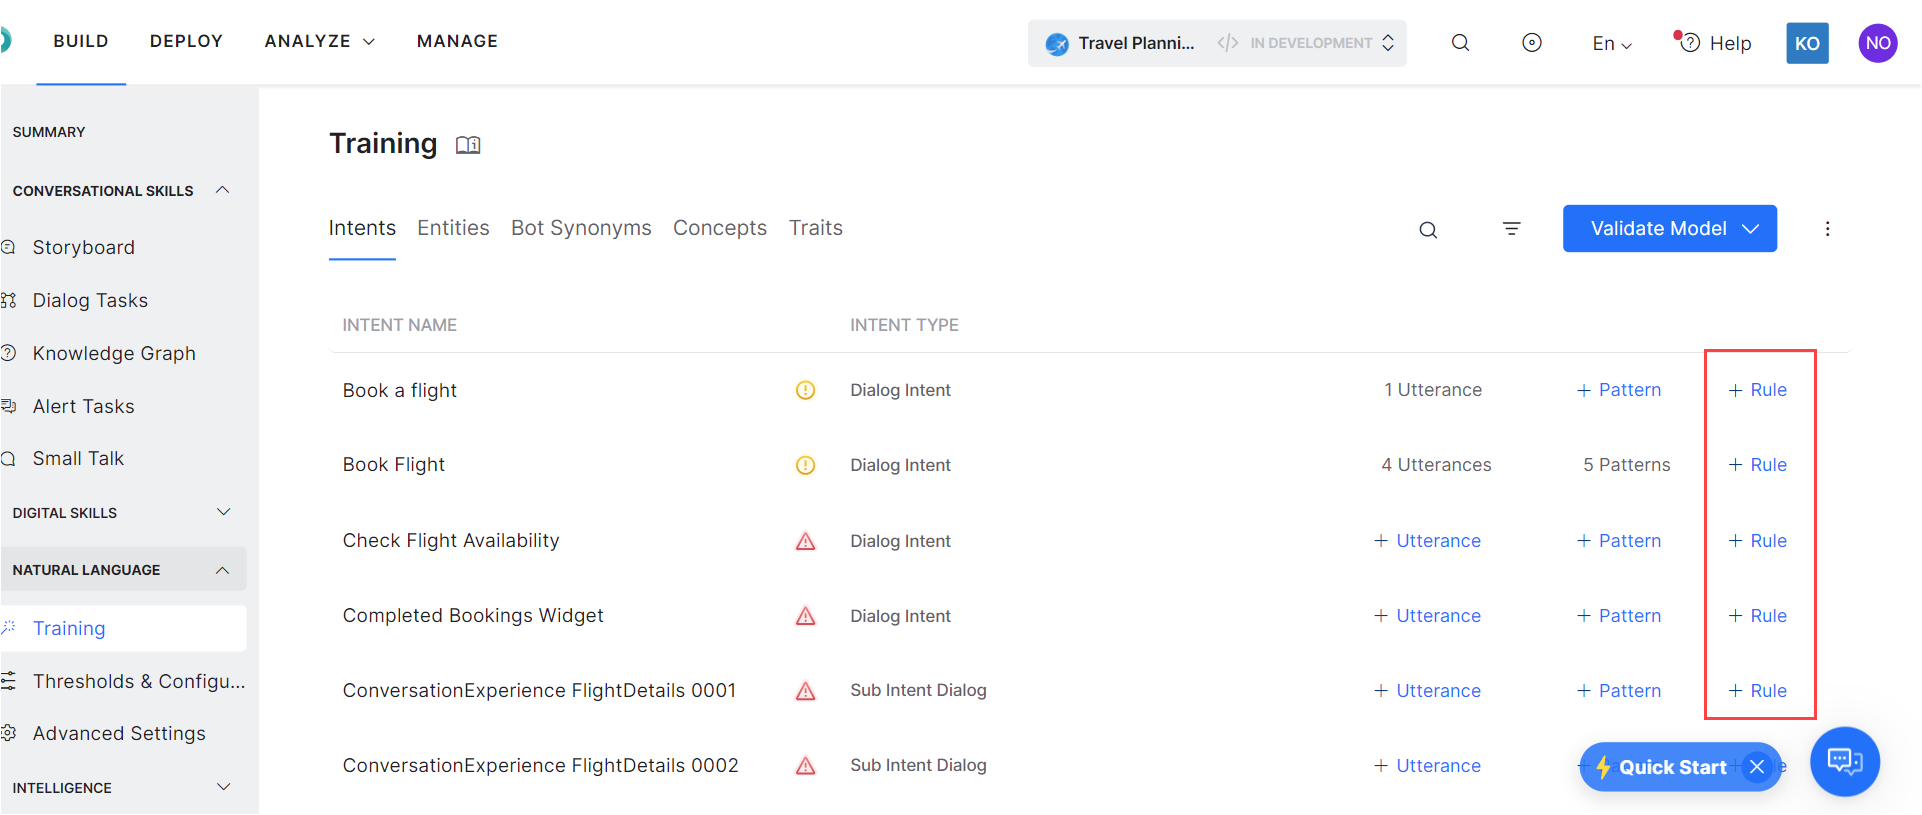
To add an intent rule, follow the below steps:
- On the Training page, click the Rules/+Rule against the intent name you want to enter the patterns for.
- In the Intent pane, enter one or more traits/context tags as conditional rules using AND OR operators, and press Enter between traits/tags.
Refer here to know more about Traits, Trait Association Rules and Context Tags.
Add Patterns for Entities
In the Entities section of the Training page, you can view, add, and delete patterns for dialog task entity node names.
To add an entity pattern, follow the below steps:
- On the Training page, click the Entities tab.
- Click the edit icon against the entity to enter the patterns to it.
- In the Entity Training page, select the Patterns tab.
- Enter one or more sentence patterns, and press ENTER between patterns.
- You can reorder, edit or delete patterns using the appropriate icons.

Negative Patterns
On the Kore.ai XO Platform, a natural language engine attempts to identify the user’s input and match it to a task.
During this process, you may want the NLP engine to identify and filter the matched intents, but not trigger them.
For example, when a user says I was trying to Book a Flight when I faced an issue, though the machine identifies the intent as Book a Flight, that is not what the user wants to do. The user is looking for a resolution to not being able to book a flight. In such a case, the Platform lets you define “was trying to“ as a negative pattern to ensure that booking a flight (the matched intent) is ignored.
The Negative Patterns feature helps filter matched intents that are a part of the user utterance without triggering the intent. In other words, Negative patterns are used to eliminate the intents detected by the Fundamental Meaning or Machine Learning models that don’t serve the required purpose before ranking and resolving the definitive intents.
To activate Negative Patterns, follow the steps below:
-
- Click the Build top menu option.
- Navigate to Natural Language -> Thresholds & Configurations -> Ranking and Resolver Engine.
- Enable Negative Patterns.

- For each of the intents in your VA, you can define negative patterns similar to how you define intent patterns.
- Go to Natural Language > Training > Intents and select the Intent to which you want to add the Negative Pattern.
- In the Intent training window, select the Negative Patterns tab.
- Add negative patterns in the Add a Pattern field, then press Enter/Return. Your new patterns are automatically saved.
- Any intents identified by FM or ML engines, if identified as one of the configured negative patterns, will be ignored and not sent to Ranking & Resolver.
- Once added, these patterns can be reordered, edited, and deleted.


Thresholds & Configurations
To train and improve the performance, Threshold and Configurations can be specified for all three NLP engines – FM, KG, and ML. You can access these settings under Build -> Natural Language > Thresholds & Configurations.
The settings for the FM engine are discussed in detail in the following sections.
| Note: If your assistant is multilingual, you can set the Thresholds differently for different languages. If not set, the Default Settings will be used for all languages. This feature is available from v7.0. |
To set up Thresholds and Configurations for the FM Engine, please follow the steps below:
- Open the assistant for which you want to configure thresholds.
- Select the Build tab from the top menu.
- From the left menu, click Natural Language -> Thresholds & Configurations.
- The Fundamental Meaning section allows you to set the threshold for the FM engine:
- Intent Detection using Task Name Words can be disabled in case your use case requires it. This is particularly useful if you have too many tasks named – place order, cancel order, request order, duplicate order. All these tasks will be matched as intents if the user utterance has the word “order” in it. Instead of trying, guessing, and training for all possible utterances, disabling this option does the trick. Disabling it will not affect the intent detection using patterns. Also, an implicit pattern using the words in the Task Name will be automatically added. The implicit pattern identifies this intent only when the user input starts and ends with the exact task name. By default, it is enabled.
- FM Threshold can be used to limit the number of results sent from the FM Engine to Ranking and Resolver, so as to reduce the possibility of presenting a low confidence match to the end-user. Enable this configuration and choose the threshold percentage as a value between 0% and 20%. Default is 2%. Only the intent matches within the set % of the top-scoring intent will be considered and all other intents will be eliminated. This configuration is available only for English, Spanish, French and German languages.

Suggested Reading
Know more about the guidelines in naming Intents, using Patterns and more, refer here.