Kore.ai allows cross-domain Bot sharing. You can share your Bot with one or more developers from the same or different enterprises enabling them to edit the shared Bot tasks, channels, and other settings.
Sharing Bots
There are two ways of sharing a Bot with your co-developers – from Bot Builder or from Bot Admin Console (as Account Admin)
From the Bot Builder
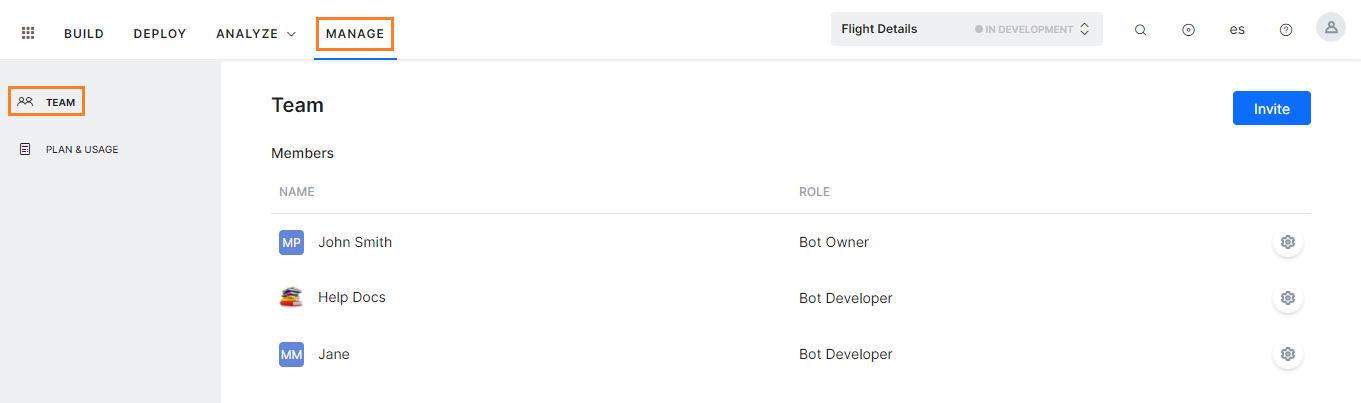
- To share the bot with another Bot Developer, log on to the Bot Builder and select the Bot you want to share.
- Select the Manage tab from the top menu.
- From the left menu click Team
Developers who have access to any of the ‘Bot Admin’ permissions, can invite new developers.
- Click the Invite button on the right side of the page. Enter the name of the developer, the list of developers will drop down and you can select from the list. You can add more than one developer at a time.
- Select the groups to which you want to assign the developer and select the Role.
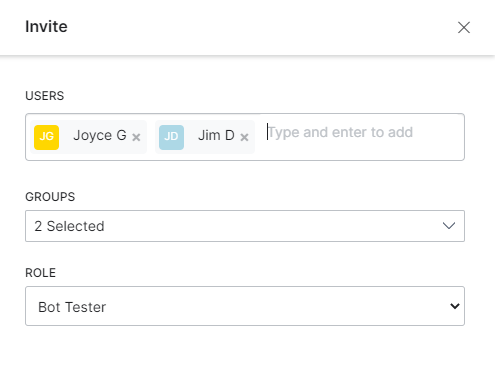
- Confirm by selecting Invite to add and share your bot with one or more developers.
- You can also use the Invite Members option from the Dashboard to add a user to your account.

To add users to workspace and invite them to access your virtual assistant from the Bot Builder, read the Invite Members section in the Using Workspace article.
From the Bot Builder you can manage the developers working on your Bot. From the settings (gear) icon against each Developer you can:
- Delete – Click to delete the bot for the selected developer. The developer immediately loses access to the bot.
- Promote to Bot Owner – Click to change the selected developer to be the Bot Owner. When selected, you are immediately removed as Bot Owner and can no longer add or manage developers for this Bot.
From Bot Admin Console
To share a bot with a developer or another user, if you do not have permission to invite new developers, it is essential for the Bot Admin to send an invitation to the developer and assign Bot Developer access.
Here are the steps for the account Admin to add users to your account:
- Log on to https://bots.kore.ai/ and select ‘Go To Admin Console’. You may be asked to login/re-login to the admin account.

- In the Bot Administration section from the right navigation go :
- to the User Management -> Users section and click on Invite new users or
- to Enrollment -> Invite section. You will be directed to the Invite user page.
- Enter the email address of the users you want to send invitations to join your enterprise account. A maximum of 5 users can be invited at a time. Then, click Send Invitations.
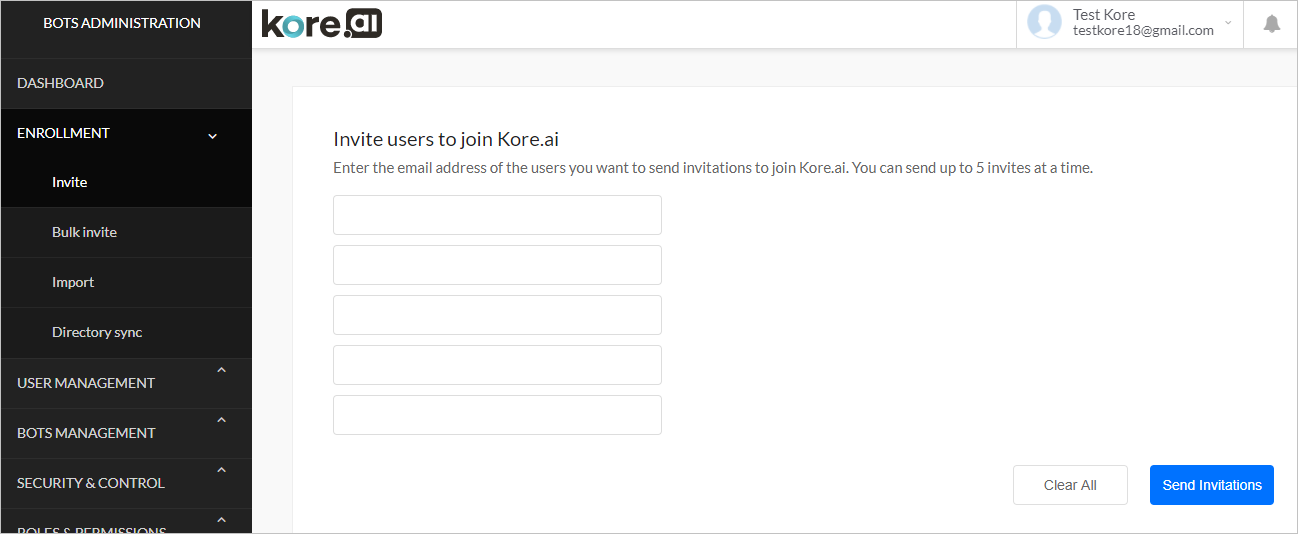
- The invitee must accept the invitation sent by the Bot Admin to get access to as a Bot User. Once the invitation is accepted, the username gets reflected in the list of Bot users for your enterprise account.
Assign Bot Builder Access
You can make changes to the Bot user settings by modifying the User Profile settings from the Bot Admin Console.
Double click on the Bot User that you want to change the settings for and you can set the Admin as well as the Bot Builder Access roles. See here for more.
When a task, channel, or flow is claimed, the lock expires after 30 minutes, or when you exit the editing mode for the task, channel, or flow, whichever comes first. After 25 minutes, you are prompted to extend the lock, if desired. If you do not extend the lock before 30 minutes has elapsed, your changes are automatically saved, editing mode is ended, and the claim lock is removed.
If you try to edit a shared task, channel, or flow that is claimed, the message, “Oops! The bot is currently being edited by < Developer Name >” message is displayed.
Only the Bot Owner and developers that are shared to the bot can access and edit the task, channel or flow.