The Service Node is a component type in a dialog task that you can use to add an API service to make REST or SOAP requests to third-party web services. You can use this node when you have the parameters needed for the API request using an entity or other nodes to capture the user input.
Add the Node
Service Nodes can only be added as part of a Bot Action node. Therefore, before you can add a Service Node, you need to add a Bot Action node. Read more about Bot Action Nodes.
Note: Post v9.0 of the XO Platform, the Service node is categorized under the Bot Action node. For details on the Bot Action node, click here.
Keeping this in mind, the setup of a Service node in a dialog task involves the following steps:
- Open the dialog task to add the Service node.
- Create and/or expand a Bot Action node.
- Add a Service node in the designated place. For steps related to adding nodes, refer here.
- The Service window is displayed with the Component Properties tab selected by default.
- To connect a Service node to a node outside of its containing Bot Action node, please read our article about the Bot Action Node.

Configure the Node
Component Properties
| Note: All changes made to the Component Properties tab will affect all instances of the Service node, across Dialog Tasks. |
To configure the Component Properties tab, please follow the steps below:
- On the Component Properties tab, under the General Settings section, enter the Name and Display Name of your Service node.
- Choose a Service Type from the drop-down list:
-
- Custom Service – Define an API request to a third-party web service. This is the default setting.
- HTML to Image – Define HTML to render as an image using JavaScript. For example, to compose HTML or the value of a key in a web service response that contains HTML markup as a string that you want to convert to an image.
- URL to Image – Define a web page URL to load to render an image.
- Custom Authentication Service – Define a URL to a third-party application that provides the authentication services necessary for the task flow. Learn more.
- Alert Subscription Service – Define contextually relevant alerts to be sent proactively to the user as a part of the dialog journey.
- Data Service – Define CRUD operations to query and manipulate the data for any given data table/table view.
- Based on the service type selected, select the Type/Sub Type from the respective drop-down lists or Auth URL.
- Click the Auth tab to create a new Authorization Profile or select an existing profile. For more information, see the Bot Authorization Overview article.
- Define the Pre-processor Script to pass the input parameters dynamically for executing an Service Node’s API call. Learn more.
- Under the Request Definition section, click Define Request.
- The Define Request for < ServiceXXXX > dialog is displayed, as shown in the following illustration.

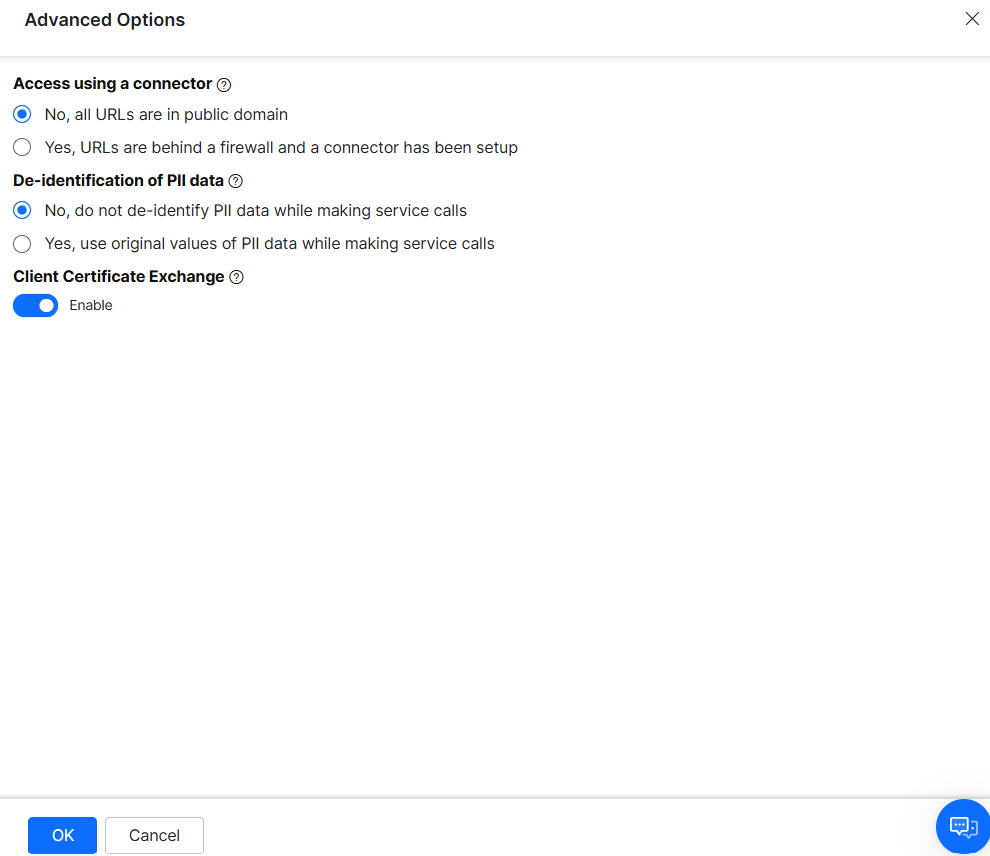
Note: In the case of a Custom Authentication Service, the Request Definition section does not apply and you can see a Response. - Select Advanced to open the Advanced Options panel.
-
- Access Using a Connector – Select All URLs are in public domain for public URLs, or URLs are behind a firewall and a connector has been setup for enterprise firewall access.
- De-identification of PII Data – Select De-identify PII data and Redact Digital Forms data to mask sensitive info (use .original suffix when original values are required), or Use original values to send unmasked data.
- Client Certificate Exchange – Enable to enforce mutual authentication with client and server certificates, adding a strong security layer against unauthorized access.
- Access Using a Connector – Select All URLs are in public domain for public URLs, or URLs are behind a firewall and a connector has been setup for enterprise firewall access.
-
- Define the Post-processor Script to fetch the API response parameters using the Service Node and define the dialog flow. Learn more.
- Add the sample response(s) you want the Service Node to return.

Depending on the Service Type selected, refer to one of the following sections in this topic: - Enable the PII Redaction for API responses.
-
- You can define the path of the API response data to be redacted in the Response Data Path. The path must start with ‘body.’ or ‘headers.’ followed by data. To add a path, click +Add.
- Select one of the following options about how you want to display the sensitive data to non-authorized users:
- Redaction – Redact the sensitive data with a unique random alphanumeric value.
- Replacement – Replace the data with a static value that you enter in the Sensitive Entity settings.
- Mask with character – Mask the first few and last few characters of the sensitive data with ‘+’ or ‘#’ symbols.
- Under Redaction of PII Data, you can specify the format for presenting this API response containing PII data in messages and post-processing:
-
- De-identify PII data when presenting it to the user or in post-processing: The redacted value is used in messages and post-processing.
- Use the original value of the PII data while presenting it to the user or in post-processing: The original value is used in messages and post-processing.
Note: These options only affect the respective instance during runtime or live interaction. PII data is always redacted/masked in chat history and internal logs, irrespective of the option selected here.
-
(For more information, see Redacting Personally Identifiable Information.)
-
- In the Variable Namespaces section, associate the variable namespaces to execute this node and its transitions. This option is visible only when the Variable Namespace is enabled for the VA. You can go with the task level settings or customize it for this node. (For more information, see Managing Namespace.)
Note: Post v11.3 release:
- Service Call Timeout and Timeout Error Handling Behavior settings have been moved from Component Properties to Instance Properties within the Service Node.
- The modifications made are exclusive to the particular dialog task and will not impact any other dialog tasks utilizing the same Service Node.
Pre-processor Script
The Pre-processor Script helps execute a custom JavaScript code within the Service Node to manipulate existing values or set new ones within the context and pass the input parameters dynamically for executing an API call using the Service Node. It works similarly to the Script Node. Learn more.
With the Pre-processor Script, the Platform does not have to process additional Script nodes to execute a single service node.
Steps to Configure a Pre-processor Script
- In the Dialog Tasks window, click the required dialog task.
- In the Build dialog flow window, click the required Service Node.

- In the Component Properties window, click Define Script in the Pre-processor/Post-processor Script section.

- In the Add Script window, add the script you want to execute, and click Save.

Note: Pre-processor Script is available for all the existing service nodes (treated as an empty script node) and does not have any JavaScript defined.
Post-processor Script
The Post-processor Script executes the defined JavaScript code following the execution of the service node.
Using this property, developers can fetch and store only the required Service Node API response parameters in the context object and define the dialog execution flow. The Post-processor Script has the same properties as the Script Node. Learn more.
The steps to configure a Post-processor Script are the same as the Pre-processor Script. Click here to learn more.
Note: Post-processor is available for all the existing service nodes (treated as an empty script node) and does not have any JavaScript defined.
Instance Properties
| Note: The settings in the Instance Properties tab are specific to the current dialog task and do not reflect in other dialog tasks that use this node. |
Use the Instance Properties to set user tags, timeout duration, and bot behavior for timeouts and service call failures.
- On the Service node properties panel, click the Instance Properties tab.

- Under the Custom Tags section, add tags to build custom profiles of your VA’s conversations. Click here for more.
- In the Advanced Controls, select the maximum wait time for the Timeout for service node calls. Also, decide how the bot can respond or choose an alternate path when a timeout or service call failure happens. You can configure the following settings:
-
- Timeout(Seconds): Select the maximum wait time from the drop-down list. The timeout range can be any value between 1 Second to 20 Seconds for Standard accounts, and between 1 Second to 30 Seconds for Enterprise accounts. The default value is 20 Seconds.
- Timeout Error Handling: Choose how the bot should respond when the timeout occurs.
- Close the Task and trigger Task Execution Failure Event (default), or
- Continue with the task and transition to this node; select the node to which the service call can transition in the flow.
- Service Call Failure Handling: Choose how the bot should respond when the service call failure occurs.
- Close the Task and trigger Task Execution Failure Event (default), or
- Continue with the task and transition to this node; select the node to which the service call can transition in the flow.

Connections Properties
Since they are contained within Bot Action nodes, Service nodes cannot be connected on their own to any other nodes outside the Bot Action node to which they belong. Connections can only be made with nodes contained within the same Bot Action node.
From the node’s Connection Properties tab, you can configure the following:
- Service Node Connections: The node within the Bot Action to execute next, after the Service node runs.
- Bot Action Connections, where you can update the node to trigger after the Bot Action group is executed. Updates made here will apply to all nodes within the same Bot Action.
For both connection types you can write conditional statements based on the values of any Entity or Context Objects in the dialog task, or you can use Intents for transitions.
| Note: The conditions configured here are applicable only for this instance and will not affect this node when being used in any other dialog. |
To set up node connection conditions, please follow the steps outlined in Adding IF-Else Conditions to Node Connections.

Service Types
You can define the Service Type as:
- Custom Service – Define an API request to a third-party web service. This is the default setting.
- HTML to Image – Define HTML to render as an image using JavaScript. For example, to compose HTML or the value of a key in a web service response that contains HTML markup as a string that you want to convert to an image.
- URL to Image – Define a web page URL to load to render an image.
- Custom Authentication Service – Define a URL to a third-party application that provides the authentication services necessary for the task flow.
- Alert Subscription Service – Define contextually relevant alerts to be sent proactively to the user as a part of the dialog journey.
- Data Table Service – Define CRUD operations to query and manipulate the data for any given data table/table view assigned to the Virtual Assistant.
Define a Custom Service
- When you select Custom Service in the Service Type, then in the Sub-Type field, select one of the options:
- REST – The API web service is using REST services.
- SOAP – The API web service is using SOAP services.
- In the Request Definition section, click Define Request to specify the settings for the web service type.
- The Define Request for < Service Node Name > dialog is displayed as shown in the following illustration.
- In the Request URL field, in the first field, select the HTTP method used for the request. You can select:
- POST – Used to send data to the server. For example, customer information, file upload, and so forth using HTML forms.
- PUT – Replaces the content of the target resource with the content sent.
- PATCH – Appends the content of an existing target resource with the content sent.
- DELETE – Deletes the content of an existing target resource.
- GET – Returns the content of an existing target resource
- In the second field of the Request URL, specify the URL for the dialog task response to process at Kore.ai. For example, http://koremessenger.com/postURL. Add query or path parameters as part of the URL, if required. To use entity node values as parameters, use the following syntax for accessing the
Contextobject: https://myDomain.com/{{context.entities.topic}} for thecontext.entities.topic. You must use the double brackets{{ context.object }}. For more information, refer to Context Object.- Optionally, click Show Advanced, and select
- Yes in the Access Using A Connector field if access for Kore.ai assistants is using the Kore.ai connector agent.
- Yes in the De-Identification of PII Data to redact any sensitive information types that users share with your assistants. For more information, refer to Redacting Personally Identifiable Information
- In the Auth tab, select the type of authorization needed for this service node call, or define a new authorization type if needed. For more information, refer to Setting Up Authentication and Bot Authorization Overview articles.
- In the Headers tab, specify the headers as key/value pairs if required to access the specified request URL. Authentication headers are auto-generated based on the authorization type specified on the Auth tab. You need to define any other standard headers. For example, Content-type, Accept, or any custom headers. Headers defined here are only applicable to this service node.
- In the Body tab, select the body content type. You can select:
- application/x-www-form-urlencoded – Also known as Multipart/Form-data, which is an encoding type that allows files to be sent through an HTTP POST request method if you want to allow a user to upload a file from a form. You can add key/value pairs that are encoded by the XO Platform.
- application/json – Use JSON to transmit data between the Kore.ai servers and your VA’s web application. Any JSON is sent with the request without any processing.
- application/xml – For SOAP services, pass XML payload using POST methods. You can pass entity node values as part of the XML, using the following syntax for accessing the
Contextobject: https://myDomain.com/{{context.entities.topic}} for thecontext.entities.topic. You must use the double brackets{{ context.object }}. For more information, refer to Context Object.
- In the Test Request tab, click Test to optionally send your API request URL using the specified Auth type, HTTP headers, and body parameters, if defined. The response is displayed in the text area. Click Save as Sample Response to save the test response as the sample response for this node.
- Click Save to save the request for the service node and close the Define Request for < Service Node Name > dialog.
- Optionally, click Show Advanced, and select
- In the Sample Response section, optionally click Add Sample Response to display the Add Sample Response dialog that you can use to manually enter or paste a sample response.
- Optionally, in the Add Sample Response drop-down list, you can select:
- JSON – A list of JSON key/value pairs available in the request URL response used in other nodes as variables.
- RAW – A list of key/value pairs that are used in other nodes as variables.
- In the Instance Properties section under Advanced Controls, select the maximum wait time for the Timeout for service node calls. Also, decide how the bot can respond or choose an alternate path when a timeout or service call failure happens. You can configure the following settings:
-
- Timeout(Seconds): Select the maximum wait time from the drop-down list. For new as well as existing nodes, the timeout range can be any value between 1 Second to 20 Seconds for Standard accounts, and between 1 Second to 30 Seconds for Enterprise accounts. The default value is 20 Seconds.
- Timeout Error Handling: Choose how the bot should respond when the timeout occurs.
- Close the Task and trigger Task Execution Failure Event (default), or
- Continue with the task and transition to this node; select the node to which the service call can transition in the flow.
- Service Call Failure Handling: Choose how the bot should respond when the service call failure occurs.
- Close the Task and trigger Task Execution Failure Event (default), or
- Continue with the task and transition to this node; select the node to which the service call can transition in the flow.
Define a URL to Convert to Image
- When you select URL to Image in the Service Type, the Type setting is read-only.
- In the Request Definition section, click Define Request to specify the settings when the URL to Image is selected for Service Type. The Define Request for < Service Node Name > dialog is displayed as shown in the following illustration.
- In the URL to Convert field, enter the URL for the image. The syntax when using a
Contextobject key in a URL is to enclose the object name in double brackets, for example, https://myURLimage.com/{{context.entities.imageName}}. - In the Render Sizes section, specify a name for the image size. For example, for an iPhone or tablet, enter the Width and Height in pixels; then click +Add to add additional sizes, or click Add to save and close the dialog.
- Click Save to save the request for the service node and close the Define Request for < Service Node Name > dialog.
Define HTML to Convert to Image
- When you select HTML to Image in the Service Type, the Type setting is read-only.
- In the Request Definition section, click Define Request to specify the settings when HTML to Image is selected for Service Type. The Define Request for < Service Node Name > dialog is displayed as shown in the following illustration.
- In the HTML to Convert field, enter the HTML for the image.
- In the Render Sizes section, specify a name for the image size. For example, for an iPhone or tablet, enter the Width and Height in pixels; then click +Add to add additional sizes, or click Add to save and close the dialog.
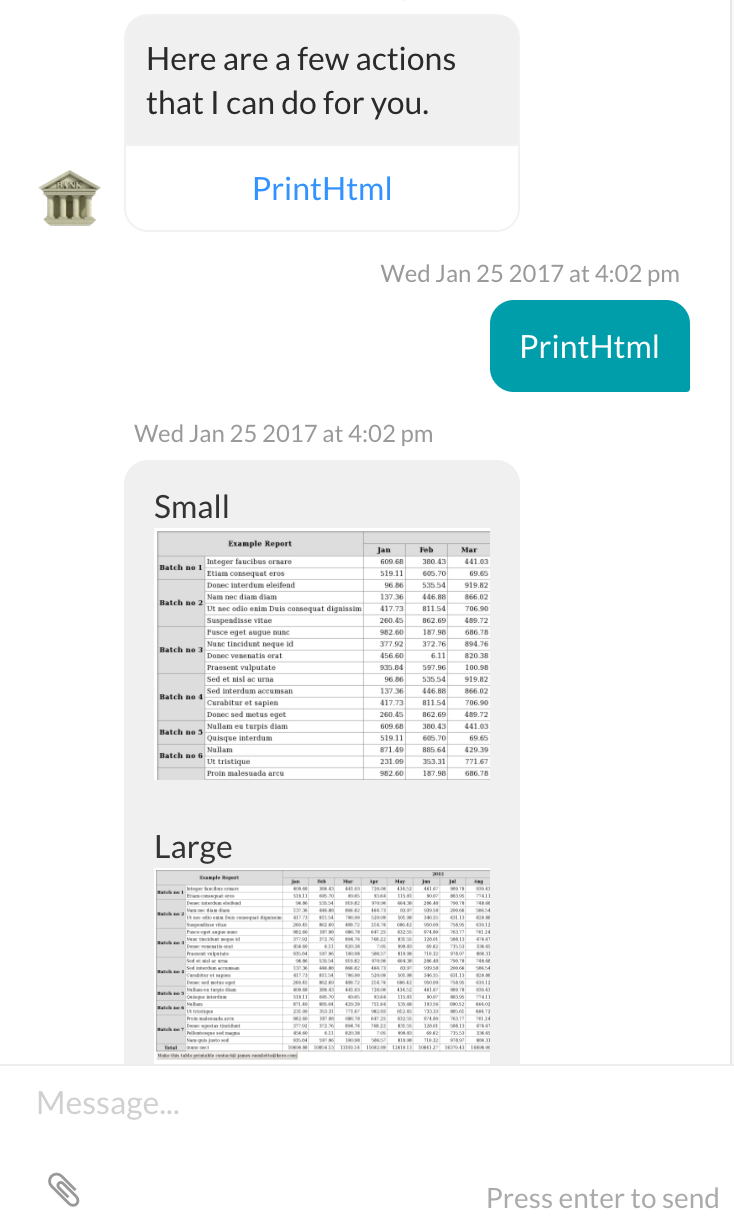
The following is an example for converting HTML to an image:
|
The preceding HTML example, when table rows are added into the example, can render the following image to an end-user.
Define an Alert Subscription Service
You can now automatically subscribe your users to send contextually relevant alerts as part of the dialog journey. For example, a person booking a flight ticket for a specific date is auto-subscribed to get regular updates on the weather forecast for the destination city.
To set up an alert subscription service, follow the below steps:
- Open the Component Properties tab of the service node to which you want to associate the alert.
- Under the General Settings section, select Auto Subscription Service from the Service Type drop-down list.
- Click Define Request.
Note: To create an alert subscription service, you must base it on an existing alert task. Users are auto-subscribed to the alert task on reaching the associated service node in the dialog. - On the Smart/Automatic Alerts dialog box, select an alert task from the Choose Alert drop-down list. The list consists of only the published alert tasks related to your VA.
- Enter the necessary information as explained below.
Alert Subscription (Smart Alert) Configurations
In a typical alert setup, the alert parameters, filters, and other necessary details are entered by the users. Since this is an auto-subscription for alerts, you need to configure those details as a developer.
Alert Parameters
These vary according to the alert you select. Provide the default parameter values to use for the Alert Subscription service.
In this example, the parameters defined for the alert are Topic Name and News Region. Since the idea is to send weather forecasts to the user for the destination city, you can set the parameter values as Weather Forecast and context.entity.destinationcity respectively.
Filters
These vary according to the alert you select. Provide the filter criteria to use for the Alert Subscription service.
Alert Frequency
Provide the frequency to send alert notifications. You need to select a Scheme, Frequency, and Time Frame.
- From the Select Scheme drop-down list, select daily, weekday, or weekend, depending on when you want to send the alert.
- From the Select Frequency drop-down list, select Every if you want to send multiple alerts at regular intervals of time in a day or select at to send one alert at a specific time of the day.
- From the Select Time drop-down list, select an interval time value or a time of the day, depending on the frequency value chosen above.
For example, Daily At 6 a.m. means that an alert is sent to the user every day at 6 a.m.
Smart Alert Expiry
Configure when to expire sending alerts to the users from one of the following options:
- Duration: Stops sending notification after the entered number of days from the date of subscription.
- Number of Notifications: Stops sending alerts after an entered number of notifications are sent.
Alert Upgrades
Define the expected behavior of this alert if an upgraded version of the underlying alert task (the published alert that you have selected at the beginning) is published.
- Remove Existing Instances – All existing subscriptions of this smart alert are removed and users will no longer receive notifications. Users are auto-subscribed to the upgraded alert task only when they execute the dialog and reach the service node in the dialog journey.
- Allow Users To Manually Upgrade Subscription – Users will receive an upgrade notification on the selected channel which is a link that guides them through to upgrade their auto-subscription. If the upgrade is successful, the user will receive a success notification.
Define a Data Service
- When you select Data Service in the Service Type, the Type setting provides two options:
- Table – choose this option to perform CRUD operations on the data table.
- View – choose this option to fetch data from a table view.
Note: Your VA should have permission to access the table/view. The owner of the table/view has to grant this permission, click here for how.
- In the Request Definition section, click Define Request to specify the operation you want to perform. Click here for details.
Next Steps
For the Service Node you set up, you might want to:
- Implement Custom Authentication, refer here; or
- Enable 2-way SSL, refer here.