Prerequisites
How to Access the Kore.ai XO Platform?
| Note: “Virtual Assistant”, “VA” and “Bot” refer to the same concept and are used interchangeably. |
Introduction
This article takes you through the major features you can access via the Dialog Builder.
The Dialog Builder is a key component of the Kore.ai XO Platform and you can use it to develop full conversations between your VA and your users – from design, to development, training and testing.
Providing Conversation, Logic and NLP based tools, the Dialog Builder gives you multiple opportunities to develop your conversational VA. You can Design, Build and Train from within a familiar interface, which improves development efficiency and enhances results.
Benefits
The purpose of the Dialog Builder is to combine human interaction and business logic, to enable your organization to collaboratively implement standards, processes and practices into valuable Virtual Assistants.
Here are a few other ways in which the Dialog Builder can benefit your organization:
- Simplifies and streamlines VA development by providing access to tools and connecting to a wide variety of services.
- Facilitates the application of business processes to Conversational VA Development.
- Encourages innovation through clear, collaborative processes to Design, Build and Train AI-powered, Conversational Virtual Assistants.
Explore Dialog Tasks
You can access Dialog Tasks by going to: Build > Virtual Assistants > Conversation Skills > Dialog Tasks. Alternatively, you can find the list of existing Dialog Tasks under Build > Virtual Assistants > Conversation Skills > Storyboard > Dialog Tasks.

The Dialog Tasks List
Moving forward, this article will be working with Dialog Tasks by navigating to Build > Virtual Assistants > Conversation Skills > Dialog Tasks. The first page you see here is the list of existing Dialog Tasks. Let us now go through the features that you can access from this page.
-
- See basic information about each dialog task, at-a-glance. This includes the task name, description, last update date, and status.
Note: If a Dialog Task has been created using our legacy builder, then you will have the option to upgrade to the new, Conversation-Driven builder. In your list, such tasks come with an upgrade icon (an upward arrow inside a gear symbol). - Dialog Task Options – When hovering over a task, you will see options to Edit, Clone or Delete the selected task. There is also a menu with more options, where you can View the task, configure Dialog Settings, Manage Interruptions or Amend Behavior.
- See basic information about each dialog task, at-a-glance. This includes the task name, description, last update date, and status.

- Search Dialog Tasks – If you are looking for a specific task, you can type its name here.
- Manage Components – Use this button to reach the Dialog Components section, where you can manage entities, webhooks, messages, agent transfers, etc; that are in use within all Dialog Tasks within your VA.
- Create a new Dialog Task – Use this button to create a new Dialog Task.
Note: Starting with version 9.0 of the Kore.ai XO Platform, newly created tasks will use the new, Conversation-Driven Builder. - Quick Start Guide – If you are just getting started using the Kore.ai XO Platform, we recommend that you take a look at this guide, which will show you the basics of working with the Dialog Builder.
- Talk to Bot – This is where you can easily test your VA, by simulating an interaction between a user and your VA.
Dialog Task Options
Clone
There are scenarios where you may need to create two similar dialog tasks with minor differences. You can achieve this with the Clone option available for each task, available on the Dialog Tasks page.
To clone a dialog task, follow the below steps:
-
- Open the VA in which you want to clone the dialog task.
- Select the Build tab from the top menu.
- From the left menu, click Conversation Skills -> Dialog Tasks.
- On the Dialog Tasks page, hover over the dialog you want to clone and click the Clone icon.
![]()
- On the Clone a Dialog window, enter a name in the Intent Name field.
- Optionally, you can add a Description and set options for the task to be independent, a Sub-intent dialog or Hide it from Help.
- Also optionally, you can adjust Intent Training, set Intent Preconditions or define Context Output.
- Click Clone.

Cloned Task Properties
The following are the properties of a cloned dialog task:
- It contains the same components, instances, NL, IVR, and connection properties as the original dialog task.
- The Dialog Settings, Interruption Settings, and Amend Behavior are also copied from the original dialog.
- If multiple languages are enabled in the original dialog, then the details for all languages are copied.
The below-listed intent-level NLP training data is not copied:
- Machine Learning Utterances.
- Intent Patterns & Rules.
- Intent Synonyms.
Delete
If you no longer require a specific Dialog Task, you can remove it.
| Warning: Deleted Tasks cannot be restored. |
To delete a Dialog Task:
- Hover over the task in the Dialog Tasks List.
- Click the Delete icon.

If you are sure that you want to delete this task, then please click OK in the confirmation window. Otherwise, please click Cancel.

More Options
Please see the articles linked below for information on:
Conversation Design, Logic Building & Training
The Conversation Designer and Dialog Builder is where you can design, build, train and test the conversations that your VA can have with your users.
You can access them by creating a new Dialog Task or by opening an existing one.
Note: This guide is applicable for the new, Conversation-Driven Dialog Builder. If your tasks are using the previous version, please consider upgrading.
The Dialog Task development process consists in three main stages:
- Design: Where you can design your conversation flow using natural language.
- Build: This is where you can add business logic to your conversation.
- Train: Once you are done creating your conversation flow, you can train your VA on it, using this section of the Dialog Builder.
Let us look at each of these areas in detail.
Design the Conversation Flow
The Top Menu

The Conversation Design process occurs in the Conversation Designer. This comes with its specific top menu, where you can access the following features:
- Exit the Dialog Task Builder and go back to the Dialog Tasks List.
- Switch between Dialog Tasks – Use this dropdown if you need to work on a different task. You don’t have to go back to the list to do so.
- Tabs designed for the main stages of the Dialog Task development process. As previously mentioned, these are: Design, Build and Train.
- Preview the conversation widget to see what it would look like on your website. This area also lets you customize the widget, and colleagues can add comments to the preview.
- Refresh the builder page.
- Get Help for contextual topics or find Kore.ai’s support channels. Please see Help and Learning Resources for details.
- More options, where you can Edit the Dialog Task’s name and description, or Clone it to make a copy.
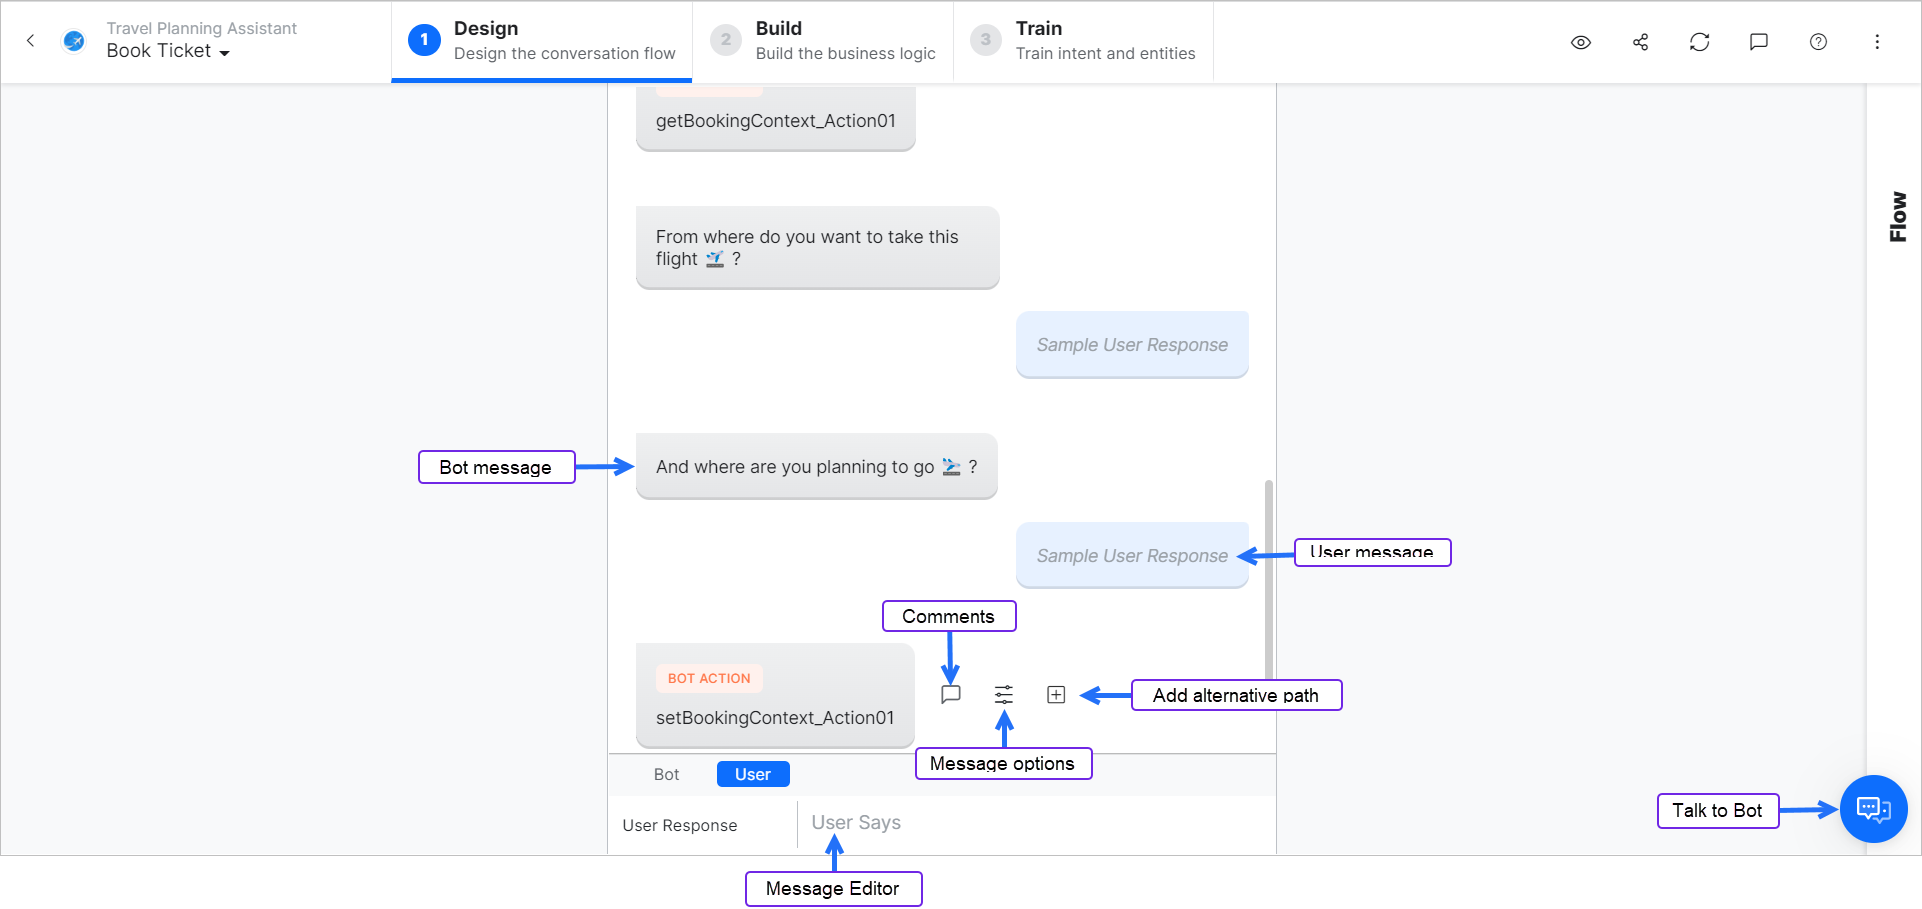
The Conversation Designer
The Conversation Designer is where you can simulate an interaction between your users and the Virtual Assistant, using natural language. This designer is organized as a chat widget that allows you to configure user and bot messaging, using the base structure of a familiar chat conversation. Let us take a look at the features you can use.
-
- Message Editor: This is where you can type in the message exchanges within the conversation.
- Message Editor Tabs for Bot and User. These determine whether your VA considers a message as coming from the user or from the VA. The editor switches between tabs by default when you add a message, but you can do so yourself when needed.
- Message Bubbles: Each message you add (by hitting Enter/Return when done editing) is then displayed within the conversation as bubbles, just like in most other chat messaging services. Each bubble comes with options that are specific to that message.
- Message Options: This is where you can Edit, Configure Properties, Comment, Remove or Link a Node. The More Options button is accessible when hovering over a message bubble.
- Alternative Path: This option lets you configure alternative paths that the conversation could take, with the currently selected message as the origin. The option is accessible when hovering over a bubble.
- Comments Icon: If the Comments icon is visible when hovering over a message bubble, it means that there are existing comments added to that message. Clicking it allows you to view the comments history for that particular message, and to add your reply.

-
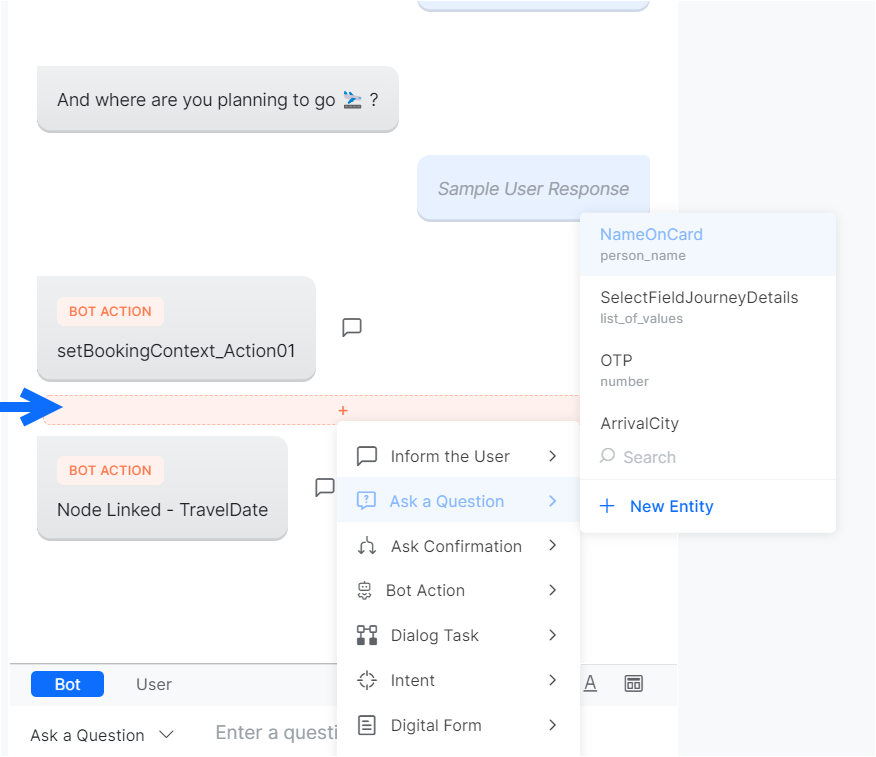
- Add Node: Hovering in-between messages lets you add a new node, by choosing one of the available node types. You can connect to an existing node or create a new one.
- Add Node: Hovering in-between messages lets you add a new node, by choosing one of the available node types. You can connect to an existing node or create a new one.
-
- Flow View: This view lets you see the overall structure of your conversation, at a glance.
- Flow View: This view lets you see the overall structure of your conversation, at a glance.

-
-
- Talk to Bot – This is where you can test your assistant, right from within the Conversation Designer.
-
Please see Mock Scenes for additional information related to the Conversation Designer.
Build Business Logic
The Top Menu

The Dialog Builder is where you can build business logic into your conversations. It comes with a dedicated top menu, which facilitates access to the following features:
-
-
- Navigate away from the Dialog Task Builder and back to the Dialog Tasks List.
- Switch between Dialog Tasks – Simply use this dropdown if you need to work on a different task. You don’t have to go back to the list to do so.
- Tabs related to the main stages of the Dialog Task development process: Design, Build and Train.
- Errors and Warnings – Use this notification area to see any potential errors or warnings that may arise throughout your development process.
- Find Nodes – Use the search field to find nodes faster within your conversation flow.
- Comments – Here is where you can browse, search and reply to comments made to the current dialog task.
- Help – This is where you can find contextual insights and ways to receive support for your project. Please see Help and Learning Resources for details.
- Additional Options – This menu provides access to: Display and Zoom Options, Auto-Arrange, Dialog Settings, Manage Interruptions and Amend Behavior.
-
The Dialog Builder
The Dialog Builder is where you have access to the tools you need in order to integrate your conversation scenarios with your business logic. Here is an overview of the features it provides.

-
-
- The Canvas – This represents the entire surface on which the components of your conversation are placed.
- The Root Intent – This is the first component of any conversation and will be displayed on your canvas by default, whenever you create a new Dialog Task.
- Nodes – These are the different points at which components of your conversation intersect. For details, please see Node Types.
- Nodes Panel – Here is where you can choose which Node Type to add and simply drag and drop it to the canvas, at the desired location. You can also add notes using the ⨁ buttons within your flow.
- Toggle the Conversation Builder – This helps you work on your VA using both the conversation and flow views simultaneously.
- Component Configuration Panel – This panel is available when a component is selected, and can be minimized (as shown in the screenshot above).
- Talk to Bot – This is where you can test your VA, right from within the Dialog Builder.
- Display Options Panel – This panel is only available when no component is selected and allows you to configure Display and Zoom Options, to Auto-Arrange components or to turn the map on or off. The map allows you to see the general area where you are currently located within your flow.
-
Remember that the more you train your Virtual Assistant and the more rigor you apply to the training data, the more effective it becomes.
Now, let’s take a look at the features that the training module offers.

-
-
- Assign the Primary Intent: This is where you decide what intent you are training the VA on.
- Add Utterances: Here is where you can add utterance options that the VA could use in order to recognize the intent you are training the VA on.
- Add Patterns: Patterns are word combinations that indicate a certain intent or entity. You can add exact word combinations that the VA will use to precisely detect the selected intent when these combinations are present in an utterance.
- Negative patterns: These are patterns which you don’t want the VA to recognize as being relevant to the intent you are training it for.
- Rules: Here is where you can define intent identification rules to trigger the intent you are working with. You may use traits or context tags to define these rules.
-