Usage Plans help you manage your bots and workspaces while keeping track of their periodic billing and usage. On the analytics-driven Plan & Usage dashboard, you can view the conversation volume and billing on a daily or monthly basis. You can also track free credits usage, add funds to your account, and manage auto payments in a single place.
When you sign up on the Platform, the Kore.ai XO Platform associates all the workspaces with a default Standard Plan. A Standard Plan offers a pay-as-you-go model that supports eCommerce flexible and customized journeys for enterprises to launch virtual assistants. You can select a standard plan that comes with self-service features, or upgrade to a customized Enterprise Plan that offers “Enterprise-grade” features by contacting our service team.
We’ve put much thought into our usage plans so you can explore the Platform effortlessly and extensively based on your business and pricing goals. This is an essential element of our product-led growth approach for eCommerce customers.
The following plans are currently available on the latest version of the Kore.ai XO Platform:
Standard Plan
As a new user, you get free credits worth $500 at the workspace level, which you can share among the Virtual Assistants in the workspace. The plan follows Conversation-based billing where each conversation handled by a Bot linked to your account is billed at a unit price of $ 0.2, deducted from your free credits (if available), otherwise paid credits balance.
You can leverage the basic features for your bots with a Standard Plan.
A Standard Plan’s key features include the following:
- If a conversation ends with 15 minutes of inactivity, and the interaction starts again, it is considered a new conversation and billed.
- Conversations-based Billing: The Standard Plan billing is done on the basis of the following primary units types:
-
- Number of Conversations: The number of conversations considered as a billing unit. If the interaction starts again after 15 minutes of inactivity, it is considered a new conversation for billing.
- Proactive Notifications: The number of event-based system notifications triggered on the Platform to the account owner.
- Alert Notifications: The number of system alerts triggered on the Platform to the account owner. For example, Free Credits expiry alerts.
-
- Free Credit Expires in 90 days: By default, a new workspace is created as a Standard Workspace and gets initial free credit of $500. The free credit expires in 90 days from the workspace creation date or the credit assignment date.

When Free credits expire, the following happen:
- Any remaining free credits get lapsed (are treated as zero balance) and cannot be used anymore.
- The free credits expiry impacts the utilization of credits, triggers low balance or zero balance emails, and highlights low or zero balance in the system warnings and messages.
- The number of free credits that lapsed on expiry displays on the account owner’s dashboard.
Free Credits Utilization
The usage deduction from the paid balance starts only after the free credits are fully utilized or expired. This ensures that the Free Credits available can be used before they expire.
Here are other important considerations:
- Free credits ($500) are shared across all the bots created in the workspace and can be used for one or more virtual assistants (VAs) mapped to the account/workspace. During the trial period, these credits are valid for 90 days.
- You must add funds and purchase paid credits to ensure that a Virtual Assistant (VA) does not stop responding if free credits are consumed collectively by all the VAs.
- Once the trial period ends, you must top up the wallet for each specific bot.
- The funds in the wallet apply only to the bot for which the top-up was made and cannot be shared with other bots in the workspace.
- For a Standard Account, all the conversations for all the virtual assistants are considered and deducted from the available free credits.
- Multiple payment methods like ACH or Wire Transfer, in addition to Credit Cards, are available for paid credits.
- You can track the Free credit usage on the Usage Plan Dashboard.
Add Paid Credits
To ensure that your Virtual Assistants in the Workspace respond after your Free Credits have exhausted or expired, you must add Paid Credits. The minimum top-up amount is $100.
The important considerations for adding Paid Credits to a Virtual Assistant (Standard Workspace) are given below:
- You can add paid credits to a particular virtual assistant from the Builder at any time in one of the following ways:
-
- Add paid credits before the virtual assistant is published.
- Add paid credits even if the workspace has free credits.
- The Platform uses the Paid Credits only when the Free Credits have been exhausted.
Enterprise Plan
The Enterprise Plan is available for all the instances of the Kore.ai XO Platform (Global, EU, and JP). It is a pay-as-you-go plan that supports enterprise bots with high-volume interactions and enterprise administration needs. The plan follows a Session-based billing model where a Session is the billing unit clocked for 15 minutes of interaction with the bot. It includes both active interactions and inactivity. You can leverage the basic features for your bots with an Enterprise Plan.
The important features include the following:
-
- Every 15 minutes of user interaction with the virtual assistant is billed as a session.
- The Enterprise Plan can be customized to your business needs. Please contact the Kore AI support team for more information.
- To initiate a Custom Enterprise Plan subscription, you must create a contract with the Kore.ai Team.
- The real-time billing usage data of your Enterprise Virtual Assistant is available on the Plan & Usage page.
- As a Workspace owner, you can view and manage your bot usage and balance by clicking the Manage menu item.

This redirects to the Plan & Usage page where all the virtual assistants linked to your account are listed with the following details:
-
-
- Bot Name
- Bot Owner
- Publish Status
- You can view the Usage & Plan details for individual Bots by clicking the Manage button.
- Usage trends are based on actual conversations billed for both Paid and Free credits.
- Daily and Monthly aggregation types are supported for the Enterprise plan to view the usage trend as follows:
-
Daily
-
-
- This is the default aggregation type and displays the usage trends each day for the selected date range. By default, the system displays the daily aggregation graph from the past 7 days (1 week). The To Date is set to one day before the current date.
- If you select Custom, the date range for daily aggregation cannot exceed 90 days.
-
Monthly
-
-
- Select this aggregation type to view the usage trends of conversations consumed each month for the selected date range. By default, the system displays the monthly aggregation graph for the previous month. You can explicitly select any other month(s) to view the information.
- The system allows to select 1 month, 2 months, or 3 months date ranges.
- If you select Custom, the date range for monthly aggregation cannot exceed 365 days.
-
Billing Units
The Enterprise Plan billing is done on the basis of the following primary unit types:
-
-
- Number of Sessions: The number of sessions consumed by a bot linked to the enterprise workspace. The aggregate of all the sessions consumed by all the bots in the workspace is reflected on the enterprise workspace owner’s dashboard.
- Proactive Notifications: The number of event-based system notifications triggered on the Platform to the account owner.
- Alert Notifications: The number of system alerts triggered on the Platform to the account owner.
-
Support Plan
-
-
- All published virtual assistants get Basic Support (Access to Community, Academy, and Documentation) by default with their Standard or Enterprise Plan subscription.
- You can choose to subscribe to a paid Standard Support plan for comprehensive support from Kore.ai experts.
- Basic Support for a Standard Plan provides an option to upgrade to support for Email tickets on weekdays. This plan Starts at $1,000/month.
- You can reach out to us from there (https://kore.ai/contact-us/) for upgrading to Enterprise Support.
-
The Support Plans article provides complete information about the Support plans.
Usage Plan Features
The Platform applies various limits and enforcements on the usage of the virtual assistant based on the plan associated with it.
| Feature | Standard Plan | Enterprise Plan | |
|---|---|---|---|
| Plan Type | Conversation-based model. | Session-based model. | |
| Price | A Pay-as-you-go model with $0.20 per session. | Session-based pricing. | |
| Usage Limits
Every user-bot conversation is billed. The VA stops responding when the free or paid credits are exhausted. |
As per credits. Minimum block purchase starts from $100. | Custom | |
| Exclusive Features | Premium features include Conversation Designer, Knowledge Graph, Multi-engine NLP, and Omnichannel Experience. | Exclusive features include Premium Features + Topic Modeler, Universal Bots, Higher Limits, and On-premise Deployments. | |
| Conversation Builder | |||
| Conversation Designer
Prototype, collaborate and design multi-turn conversations |
Yes | Yes | |
| Dialog Builder
Build conversation flows, define business rules and integration with business systems using a low code builder. |
Yes | Yes | |
| Dialog Tasks (Up to)
Dialog Tasks are business use cases involving multi-turn conversations. |
200 | Custom | |
| Topic Modeler
Analyze agent transcripts to auto-identify intents, entities, and flows. |
No | Yes | |
| Proactive Notifications
Deliver users timely, relevant, and personalized information. |
Up to 500 notifications per hour. | Custom | |
| Small Talk
Engage users in casual conversations. |
Yes | Yes | |
| Visual Experience
Complement the conversational experience using visual forms and widgets to collect and present information. |
Yes | Yes | |
| Knowledge Management | |||
| Knowledge Extraction
Extract FAQs from your existing documents like PDFs and webpages. |
Yes | Yes | |
| Knowledge Graph
Turn static FAQs into an intelligent, personalized conversational experience. |
Yes | Yes | |
| FAQs (Up to)
Maximum FAQs allowed. |
1,000 | Custom | |
| Advanced Features | |||
| Multichannel Support
Deploy on users’ preferred voice and text channels. |
All available channels. | All available channels. | |
| Multilingual Assistants
Interact with the assistant in multiple languages. |
Yes | Yes | |
| Universal Assistants
Link multiple standard assistants to a Universal Virtual Assistant for enabling collaboration between teams and providing a unified experience for your customers. |
No | Yes | |
| Training and Intelligence | |||
| Multi-Engine NLP
Leverage the power of FM, KG and ML engines for better NLP accuracy. |
Yes | Yes | |
| ML Training Models
Experiment with various training models to get the best NLP accuracy. |
Standard | Advanced | |
| Total Training Utterances (Up to)
Utterances are the training data for the ML Models. |
10,000 | Custom | |
| Conversational Intelligence
Handle contextual intents, follow-ups and interruptions. |
Yes | Yes | |
| Multi-intent Management
Identify and follow up on multiple intents from a single-user input. |
Yes | Yes | |
| Entity Amendments
Intelligent handling of amendments to entities anytime during the conversation. |
Yes | Yes | |
| Sentiment Analysis
Analyze the sentiment of the user and dynamically manage the conversations. |
Yes | Yes | |
| Testing and Validation | |||
| Test Cases per Batch Test Suite (Up to)
Measure the NLP accuracy by running automated tests. |
10,000 | Custom | |
| Test Cases for Conversation Testing (Up to)
Test intent fulfillment by automating end-to-end conversational flows. |
1000 | Custom | |
| Rate Limit for Batch Testing
Maximum batch test executions allowed. |
10 per day | Custom | |
| Rate Limit for Conversation Testing
Maximum conversation test executions allowed. |
10 per day | Custom | |
| IVR Sandbox
Test end-to-end IVR experience using Kore.ai’s Sandbox environment. |
Yes | Yes | |
| Integrations and Deployments | |||
| Service Orchestration
Securely integrate with your business systems for authenticating users, transactions, and information exchange. |
Yes | Yes | |
| Agent Transfer
Seamlessly hand off the conversations to your live agents when predefined business rules are met. |
Yes | Yes | |
| Platform SDK
Build powerful extensions to the Platform using the SDK. |
Yes | Yes | |
| Web and Mobile Clients
Instantly launch your virtual assistants on web or mobile devices. Use the SDKs to embed them in your websites and mobile apps. |
Yes | Yes | |
| Variables
Automate the SDLC process using variables to define environment-specific values. |
Yes | Yes | |
| Versions
Create, store and restore versions of the assistant for promoting across different environments. |
20 | Custom | |
| Version Comparison
Visually compare definition versions of the assistant to identify the changes made over time. |
Yes | Yes | |
| Insights and Analytics | |||
| Prebuilt Conversation & NLP Analytics
Evaluate the assistant’s performance using out-of-the-box metrics. |
Yes | Yes | |
| Custom KPIs & Analytics (Widgets)
Create custom dashboards based on your business requirements. |
10 Widgets | Unlimited | |
| Analytics History
Data retention and data viewing limits. |
3 Months | Custom | |
| Administration | |||
| Deployment Model
Choose from On-premise, Hybrid & Cloud models for hosting the assistants. |
Cloud | Cloud, Hybrid & On-Premises | |
| SSO
Single Sign-On authentication for your domain users. |
Yes | Yes | |
| Data Retention
Limit on user data retention. |
Standard | Advanced | |
| Collaborators (per assistant)
Invite team members for collaborative development. |
Unlimited | Unlimited | |
| Access to Public APIs
Design, build and monitor the assistants using APIs. |
Yes | Yes | |
| AD Sync
Sync and import key user info from your organization’s directory. |
No | Yes | |
| Cloud Connector
Connectors to establish secure communications through the firewall. |
No | Yes | |
| Support | |||
| Basic Support
Access to Community, Academy, and Documentation. |
Yes | Yes | |
| Standard Support
Access email support on weekdays from 8 am-5 pm with a 24-hour initial response time |
Option to upgrade to Standard Support. Plans start at $1,000/month. | Guided Success Program 24*7 availability (Email, Phone & Video). |
|
| Enterprise Support
Email, phone, and video support (24*7). Guided success program. |
Not Available | Yes, with an option to upgrade to the Enterprise Support Plan. | |
To access the Plan and Usage feature on the Bot Builder, follow the steps below:
-
-
- Click your Virtual Assistant on the Virtual Assistants page.
- Navigate to the Manage section and click Plan and Usage on the left menu.
-

Alternatively, the Bot Owner can view the Plan and Usage summary data for multiple bots with the steps below:
-
-
- On the Virtual Assistants page, click the workspace tab on the top right.
- In the Workspaces slider, click the Manage button to navigate to the required workspace.
-

In the Plan & Usage section, you can do the following:
-
-
- View the billing conversations handled by an assistant in a given period.
- Filter the billing conversations graph based on the selected filters.
- Export the conversations billing report as a .csv file.
- Upgrade to an Enterprise Custom Plan.
- Add Funds to your Standard Account mapped to the Standard Plan.
-
View Plan and Usage Information
You can now view the in-depth usage trends, current workspace balance for free and paid credits, the number of billing units consumed and available, the allowed conversations/sessions, and the average daily conversations for daily and monthly date ranges on your Standard or Enterprise workspace. This information helps track how efficiently your bots are used and managed.
The Plan & Usage summary panel for a Standard Plan displays the following information:
Summary View
-
-
- The Workspace Plan Name.
- An Upgrade Plan button to initiate the upgrade to an Enterprise Plan.
- Paid Bot Summary: Displays the number of paid and inactive bots.
- A list view of the Bots summary with the following details:
- Bot Name
- Bot Owner
- Balance Status
- Remaining Balance
- Support Plan
-

Usage Plan Dashboard
At an individual Virtual Assistant level, the following Usage Information appears when you click the Manage Button on the Summary page.
-
-
- Plan Name
- Current Paid credits balance
- Upgrade Plan link
- Auto-reload status
- Add Funds button
- A bar graph depicting the billing conversations count based on the applied filters Date, Month, Custom, and Week (one to four weeks).
- Button to switch between graph and tabular view of the conversations billing data.
-
Paid Credits Status Information
For paid credits, the system displays the following:
-
-
- Sufficient funds when there are sufficient funds for VA sessions.
- Low Balance when there is 0 or lesser than minimum paid credits balance.
-
For free credits, Using Free Credits is displayed.
Inactive is displayed if the VA is inactive (suspended due to zero or insufficient credits in the account).
-
-
- Remaining Balance: The balance after the credits have been used for sessions by the VA.
- Support Plan; The name of the support plan if subscribed by the account owner.
-
Free Credits Details
The Usage Plan dashboard displays the usage summary of the free credits in the Standard Account including the following:
-
-
- The Free Credits in Workspace displayed in USD.
- The validity date of the Free Credits.
- The Usage Trend which includes the Avg. Daily Conversations.
-
Add Funds to your Account to Buy Paid Credits
You can add funds to your virtual assistant standard account in one of the following scenarios:
-
-
- To reload/add paid credits for the first publish flow of your VA.
- To ensure continued bot responses through paid credits/additional free credits after your first publish or when there is zero balance (for paid/free credits) in your account.
-
Important Considerations
-
-
- You can specify the minimum credit (funds) to be maintained in your account.
- You’re redirected to our payment gateway to complete the payment.
- You can automate your balance top-ups by specifying the auto-reload amount. Once the credit falls below this limit, the auto-reload amount you’ve defined will be automatically debited from your card and credited to your account.
- You can view the transaction, order, and invoice details in the Orders and Invoices section.
- The available credits and the corresponding billing units get updated automatically on the Plan and Usage panel.
- The usage details for the added funds are updated after 30 minutes.
- If your virtual assistant is mapped to an Enterprise account, the Billing Units are presented as Billing Sessions.
- If your virtual assistant is mapped to a Standard account, the Billing Units are presented as Billing Conversations.
-
Adding funds can be done either manually or by enabling auto-reload or automatic balance top-up as follows:
Manual Recharge
-
-
- The reloaded amount is added to the available balance.
- An invoice is generated for every account reload.
-
Automatic Recharge
-
-
- Auto-reload/recharge refers to the automatic addition of funds to the virtual assistant or the automatic balance top-up when it drops below the minimum limit (for end-user and admin user accounts) you define. Enabling this feature reduces the hassle of manual payment and ensures your Bot is published and implemented without interruptions.
- The system checks your preferred payment authorization method in the auto-reload settings before automatically recharging the account.
- If Automate your balance top-ups is enabled, the balance will be automatically updated with the recharge amount you define when it drops below the minimum limit. You should provide the following inputs to configure auto-recharge:
- Auto Reload for – The amount (in USD) to be reloaded when the minimum balance is reached.
- When Balance Drops Below – The minimum balance or threshold below which the system triggers auto-reload.
-
-
-
- The system enables auto-reload as a part of the manual reload flow and only if at least one manual fund addition completes.
- The system regularly monitors the available balance for an account and triggers auto-reload when the account reaches the minimum balance. Once the system completes an auto-reload transaction using your payment authorization method, the system adds the recharge amount to your virtual assistant account’s available balance.
- An invoice is generated automatically after the auto-reload.
-
Minimum and Maximum Limits
The threshold limits for the balance top-up are as follows:
Minimum Reload Amount
The minimum top-up amount depends on the current plan. For a Standard plan, it is $ 100.
Maximum Reload Amount
The maximum top-up amount for a single transaction is $20,000 by default. This limit is configurable and doesn’t cause functional limitations. The Kore.ai XO Platform ensures protection against unsolicited issues or conflicts with this threshold limit.
Payment Methods
The following payment modes are available on the Payment page when you add funds to the Platform:
PayPal (Default Selection)
Link your PayPal email account to the Platform’s payment gateway to add paid credits.

Credit/Debit Card
Initiate the transaction for paid credits using a valid credit/debit card. Add the card number, account holder’s name, expiry date, and CVV security code to authorize the transaction and validate using an OTP.

Wire Transfer
Select the wire transfer payment mode while adding funds. A wire transfer is a form of electronic payment that sends money directly from one bank account (Payer) to another (Payee).
![]()
Important Considerations
-
-
- View Order Details: When you place an order by selecting the wire transfer method, it gets registered with pending payment clearance status. The order summary page provides you the total amount to transfer along with the break-up summary. Meanwhile, you should also receive an email from Paypro with the detailed steps to complete your Wire Transfer order.
<ahref=”https://kore-wordpress.s3.us-east-2.amazonaws.com/developer.kore.ai/wp-content/uploads/20230419111041/wire_transfer1.png”>
- Ability to Add Funds during pending Wire Transfer: A Wire Transfer process may take four to eight days to complete. The paid credits are loaded only after the transfer is successful. If the VA runs out of balance and your Wire Transfer order is still in ‘Pending’ status, you can add funds using an alternative payment method like a credit card or PayPal.
- View Order Details: When you place an order by selecting the wire transfer method, it gets registered with pending payment clearance status. The order summary page provides you the total amount to transfer along with the break-up summary. Meanwhile, you should also receive an email from Paypro with the detailed steps to complete your Wire Transfer order.
-
Add Funds and Set up Automatic Reload
To set up automatic recharge for your account, follow the steps below:
-
-
- On the Bot Builder, navigate to Manage > Plan & Usage.
- Click Add Funds in the Usage Plan section.
-

-
-
- In the Add Funds window, follow the steps below:
- Enter the value for Amount to Credit to specify the amount you’d like to add to your account.
- Enable Automate your balance top-ups if you want to automatically add funds to your account. Otherwise, disable this option.
Note: The automatic top-up will not work if you select the Wire Transfer payment method. - Enter the value for Auto reload for (minimum value is $100).
- Enter the value for When Balance Drops Below to specify the minimum credits to be maintained in your account reaching which the auto-recharge is done.
- Click Authorize Payment.
-

You will be redirected to the Payment Page hosted by PayPro Global to complete the purchase.
- Enter the Billing Information, select a Payment Method, and enter the payment details.
- Click Submit Order.
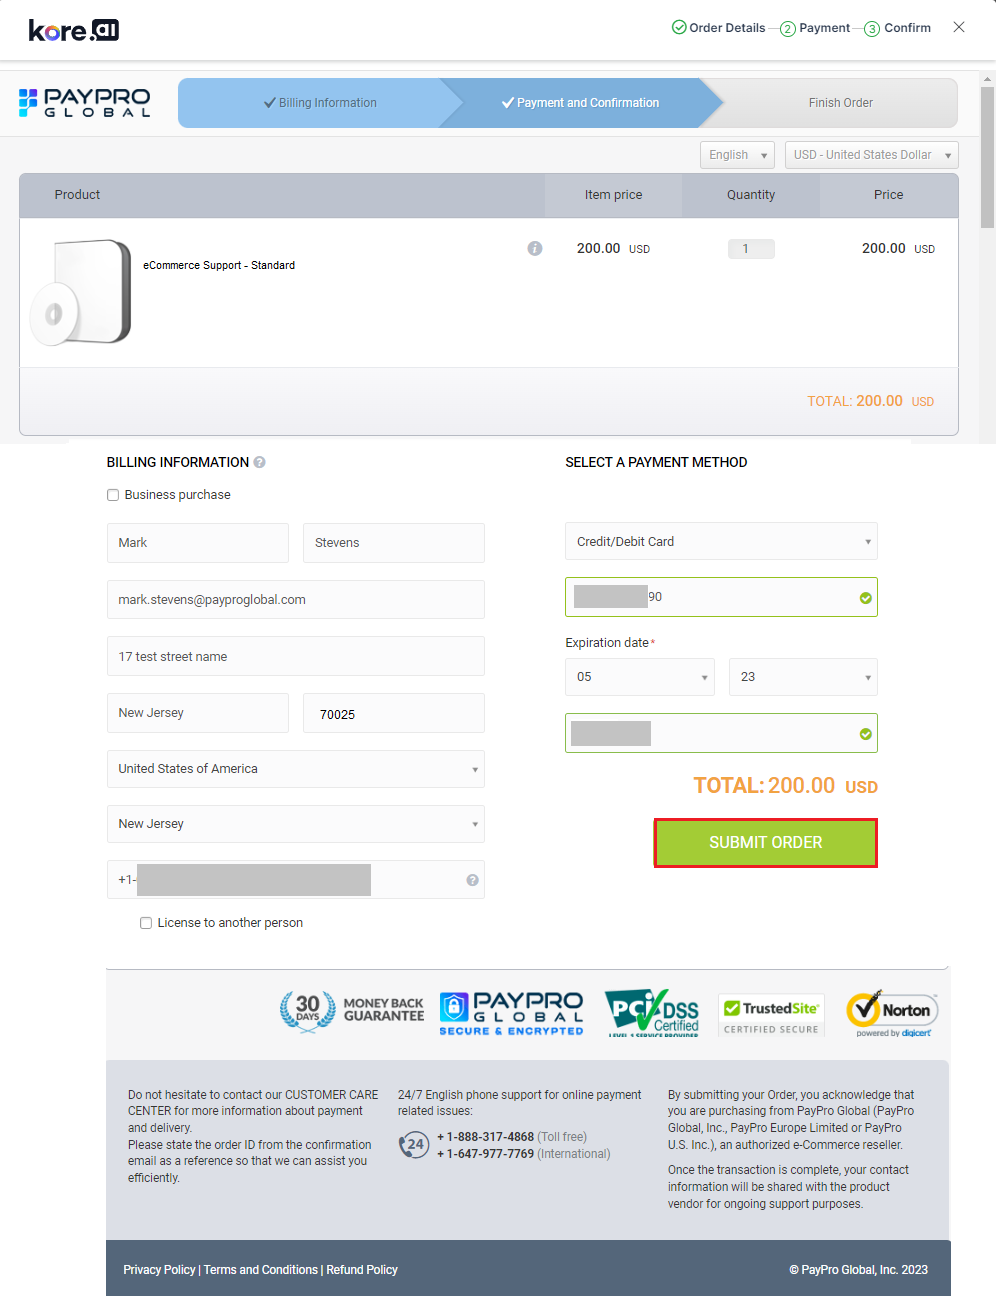
The bot will be published after the payment is successful.
Publishing your Virtual Assistant
You can publish your Virtual Assistants for a Standard Account under the standard or enterprise custom plans. For a standard plan with Free Credits, an Admin Approval is required to publish. However, the virtual assistant is auto-published when it is enabled for paid plans. For an Enterprise Custom Plan, the virtual assistants are auto-published. Please click here to learn more about publishing a Virtual Assistant.
Standard Account
-
-
- You can publish a virtual assistant for the first time to explore the Platform using free credits.
- Once you sign up, you are automatically upgraded to a Standard Plan. To publish a bot for the first time, you must add funds to your account and use paid credits.
- You can distribute the paid credits among the shared virtual assistants to publish them.
-
Standard Workspace with Free Credits
-
-
- The Publish request is instantly approved without any constraints/checks if the workspace has free credits. You can see the available billing units from the Plan and Usage module.
- A plan selection is not required when publishing the virtual assistant.
- Auto-approval is disabled by default for publishing the virtual assistant and can be enabled only when paid credits are purchased.
-
When you use a standard account with free credits, you will see the following attribution message on the Web UI channel indicating the Free Credits plan.

This message indicates using free credits. You can further explore the Platform before adding paid credits to your standard account and do the following:
-
-
- Publish a virtual assistant on your website using Kore. AI-hosted web UI channel (URL or code snippet).
- Make your VAs production-ready.
-
Standard Workspace with Zero Free Credits
-
-
- The virtual assistant cannot be published if no free credits remain in the workspace.
- The system notifies the owner to load credits to the virtual assistant for publishing.
-
Publishing in the Enterprise Plan
Virtual assistants in an Enterprise Account are automatically published under the Enterprise Plan. Please contact us to learn more.
First Publish Scenarios
When you first publish a VA after subscribing to a Standard Plan, the following scenarios may apply:
First Publish: Zero Balance
For the first publish, when there is zero balance in your account, the following notification is displayed:

Payment Processed
For the first publish, you will be automatically upgraded to the Standard account when the payment is processed and the credits are added. The following notification appears:

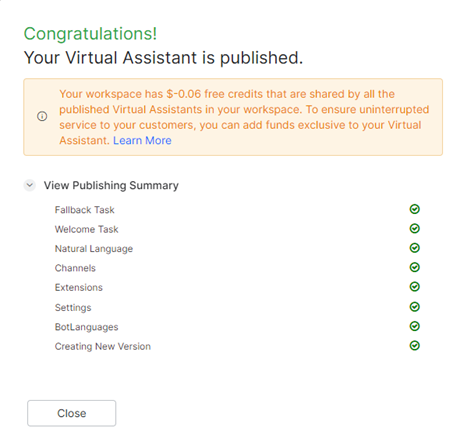
VA Published with Leftover Shared Free Credits
For a successful first VA publish, the following message appears when your account has existing free credits shared with the other VAs.
Notifications and Alerts for Subsequent Publish
You can subsequently publish a VA when upgraded to a Standard Plan and have paid and free credit account balances. The system displays notifications for subsequent publish scenarios detailed below based on the availability of free and paid credits:
Low Balance
For a subsequent publish, when there is a low or negative balance in your account, the following message appears:

Zero Paid and Free Credits Balances
For a subsequent publish, when there are zero paid/free credits in your account, the following message appears:

Paid Credits

Free Credits

Zero Paid Credits and Leftover/Existing Free Credits Balance
The subsequent publish status is when the balance is zero paid credits/no funds are added, and leftover free credits are used for shared VAs.

Paid Credits Available, and Zero/Positive Free Credits Balance Available
When there is a positive paid credits balance but there are no free credits in your account, the following message appears:

Previous Payment in Progress
When you try to add funds and a previous payment is in progress for your account, the following message appears:

Upgrading a Standard Plan to an Enterprise Custom Plan
You can upgrade the Standard Plan to an Enterprise Custom Plan, which offers premium features like Topic Modeler, Universal Bots, Higher Limits, On-premise Deployments, and more. The custom plan includes session-based pricing, 24/7 technical support via Email, Phone & Video, and program guidance from our team.
Important Considerations
-
-
- An Enterprise custom plan upgrade from a standard plan can only be done via Kore.ai customer support.
- The upgrade can be done via the Kore.ai XO Bot Builder and Admin Consoles.
- On the Bot Builder Console, the following applies:
- If the auto-approval for deploy/publish requests is enabled for your account, you can upgrade the standard plan while publishing the assistant.
- Auto Approval is enabled for all the accounts by default. Your enterprise administrator can disable it based on your organization’s policies.
- You can submit the publish request to your administrator even when Auto Approval is enabled.
- You can choose different plans for virtual assistants in the same account. You can assign some of your assistants to the Standard Plan and others to the Enterprise Custom plan.
-
To upgrade your standard plan, follow the below steps:
-
-
- Click the Manage tab.
- From the left menu, select Plan & Usage.
- Click the Upgrade Plan link in the Usage Plan panel.
-

-
-
- Click the Contact us button in the Select Subscription Plan window.
-

The system redirects to the Kore.ai XO Platform contact page, where you can fill in the contact form for further assistance.
Admin Console – Plan and Usage
An Admin user can view and manage all the plan subscriptions for their own account and publish Virtual Assistants on the Admin Console like any end user. Additionally, the Admin user can approve VA publish requests from account owners based on their Usage Plan, and manage usage from a single dashboard under the Billing section. Learn more.
To access the Plan and Usage feature on the Admin Console, follow the steps below:
-
-
- On the Bot Builder, click the profile icon in the top right corner.
- Click Go to Admin Console.
-

-
-
- Login and navigate to BILLING > PLAN & USAGE on the left menu.
-

Deployment Flow
The admin can take action for a Standard Workspace VA deployment request based on the following scenarios:
Standard Workspace with Free Credits
The admin user can approve a deployment request without constraints/checks or any plan selection flows if the workspace has free credits.
Standard Workspace without Free Credits
If the standard workspace has exhausted all the free credits, the admin cannot approve the publish request until funds/ credits are added to the account.
Standard Workspace with Paid Credits
If a VAt account has paid credits, then the admin user can approve the deployment flow.
Adding Paid Credits
The admin can add paid credits to the Standard Workspace in the following scenarios:
-
-
- When the free credits shared by all the bots in a workspace expire.
- When the free credits shared by all the bots in a workspace have exhausted, or there’s zero free credits balance.
- When the free credits of a specific bot in a workspace expire.
- When the free credits of a specific bot in a workspace have exhausted, or there’s zero free credits balance.
- To set up the auto-recharge (reload) of credits for one or more bots. Learn more.
-
Utilization of Credits
On the Admin Console, paid credits in the account are utilized as follows:
-
-
- The platform provides the bar graph representation of the following usage metrics for each Virtual Assistant in a workspace:
- Requests: The number of user initiated messages/requests to a Virtual Assistant in a billing session. A request count increments by 1 when a chat session ends.
- Conversations: The total number of billing sessions between a Virtual Assistant and end user.
- Proactive notifications: The proactive notifications delivered to the user by the Platform.
- Alert Notifications: Alert task notifications (including Smart Alerts) delivered to the user by the Platform.
-
In addition to the bar graph, you can get a table view of the above metrics as shown below. Total Units is the sum of all the abovementioned metrics for s given period.

-
-
- The platform deducts paid credits only from the paid credits balance. If there are no paid credits, the platform checks for free credits at the workspace level and does the following:
- If a free credits positive balance exists, deductions happen from the balance.
- If there are no free credits and the account needs a manual to reload, the virtual assistants in your workspace don’t respond until you add funds.
- If there are no free credits and the account has auto-reload enabled, the platform does the following:
- Automatically replenishes the allowed free credits.
- Processes the requests.
- Deducts from the paid credits and then deducts from the free credits once the paid credits are exhausted.
-
Emails and Notifications
The Platform sends notifications and marketing emails to the bot developers/account owners at various stages of their Bot-building journey. For the Usage Plans feature. In a nutshell, these emails are classified as follows:
-
-
- Signup and Sign-in Flows.
- Ecommerce Flows (Manual and Auto-approvals).
- Support Plans, Marketing, and notifications.
- Invitation emails
- Publish and Other Update Emails.
-
System-Triggered Email Templates
The following table describes the automatic emails triggered by the system when an event occurs:
Email Template NameDescription
| Sign-up and Sign-in Flows | |||
| Sign-up – Email Confirmation | An account verification link is sent to the user to complete the setup. | ||
| Signup – Resend Email Confirmation | Account sign-up confirmation email with the verification link triggered on the user’s request. | ||
| Ecommerce Flows for the Free Plan- Virtual Assistant | |||
| First Time Publish – Auto Approval – Free Credits | This email is sent to the VA owner when a VA is published for the first time, and the account has leftover free credits shared by all the VAs and zero paid credits. | ||
| First Time Publish – Admin Approval – Free Credits | This email is sent to the VA owner after the administrator approves a VA’s publish request for the first time. In this case, the account has leftover free credits shared by all the VAs and zero paid credits. | ||
| First Time Publish – Auto Approval – Paid Credits | When a VA is published for the first time using auto-approval, this email is sent to the owner, and the account has paid credits. | ||
| First Time Publish – Admin Approval – Paid Credits | This email is sent to the owner when a VA is published for the first time after the admin’s approval and the account has paid credits. | ||
| Ecommerce Flows for the Standard Plan- Virtual Assistant | |||
| Standard Plan – Purchases for a Bot | This email is sent to the VA owner/admin who makes a purchase (first or subsequent) for a Usage plan for a VA that is published. The email contains the following information:
|
||
| Standard Plan – Auto Reloads | This email is sent to the VA owner when an automatic purchase is successful (auto-reload is enabled for the account). The email contains the following information:
|
||
| Order Confirmation | |||
| Order Invoice | This email is sent to the VA owner for a PayPal order confirmation along with the following invoice details:
|
||
| Auto-Recharge | |||
| Auto Recharge is Enabled | This email is sent to the VA owner when auto-recharge is enabled for a VA. The email contains the following details:
Note: Auto-reload can only be enabled if the user has made one or more previous purchases. |
||
| Auto Recharge is Disabled | This email is sent to the VA owner when auto-recharge is deactivated for a VA. The email contains the following details along with the reactivation link:
|
||
| Wallet Balance and Credits | |||
| Low Balance Alert | This email is sent as a reminder when auto-reload is disabled or fails and the account balance reaches the lower threshold limit. A link to activate auto-reload is available in the email.
Note: The low balance limit is set to $ 50. |
||
| Paid Wallet Balance 0 and No free credits to backup | This email is sent to the owner when the paid and free credits have been exhausted. When there are no free credits to back up the zero balance for paid credits, this email triggers and displays a recharge now link. |
||
| Paid Wallet Balance goes below 0 – Free credits available | The email is sent to the owner when the paid credits have been exhausted but shared free credits are available at the workspace level. This email displays a recharge now link. | ||
| Free credits exhausted – Inactive bots | The email is sent to the VA owner when the free credits have been exhausted at the workspace level and paid credits have not been added or have been exhausted. This email displays a recharge now link. | ||
| Free credits exhausted – Workspace Summary | The email is sent to the workspace owner when the free credits have been exhausted at the workspace level. The email displays a usage summary for each VA with the Free Credits consumption and current status information. | ||
| WorkSpace Plan Switch | |||
| Workspace Plan Switch | The email is sent to the workspace owner when the workspace plan is switched to a new plan. | ||
| Workspace Plan Switch – Impacted VAs | The email is sent to the VA owner (only once, if a user is a VA owner for multiple bots) when the workspace plan is switched to a new plan. An Explore Benefits link is displayed in the email. | ||
| Auto-reload Failure | |||
| Auto-recharge Failure – Credit Card | This email is triggered to the VA owner if the credit card cannot be authorized for payment. The subscription plan name and the subscription price are displayed in the email. | ||
| Auto-recharge Failure – PayPal | This email is triggered to the VA owner if there is an error when charging the card for the payment via PayPal. The following details are displayed in the email:
|
||
| Payment Method Expiry | |||
| Reminder – Payment Method Nearing Expiry | This email is sent when the payment method (card) is nearing the expiration date. A link to update the payment information is displayed in the email. | ||
| The payment method has expired | This email is sent when the payment method (card) has expired. A link to update the payment information is displayed in the email. | ||
| Subscription Cancellation | |||
| Subscription has been Canceled | This email is sent when the VA owner cancels the subscription made via the PayPal payment mode. The following details are displayed:
|
||
| Support Plans | |||
| Purchase | This email is sent to the VA owner for a paid support plan purchase confirmation. The following details are displayed:
|
||
| Invoice | This email is sent to the VA owner to share the invoice for a support plan purchase. The following details are displayed in the email:
|
||
| Support Plan Auto-renewal | This email is sent five days before the renewal to the VA owner. It notifies about the automatic renewal on the specific date along with the following details:
Note: A URL to update the payment method is provided to help the user update the payment information. |
||
| Support Plan Problem with Processing the Renewal Payment | This email is sent to the VA owner when the payment for a renewal fails. The following details are displayed:
Note: A URL to update the payment method is provided to help the user switch to an alternative payment method. |
||
Change the Bot Owner
Similar to how the Admin user can change a Bot owner on the Bot Admin Console (BAC), the workspace owner or admin can also transfer the bot ownership from one user to another on the Plan and Usage page – for both published and unpublished bots.
Important Considerations
Please note the following considerations when using this feature:
-
-
- The Master Admin can now change the bot owner on the BAC by navigating to Administration > Bots Management. Learn more.
-

-
-
- The admin can change bot ownership to any workspace user, even if the user is not on the bot team.
- When the bot ownership is changed, all the permissions and rights granted to the bot owner for the specific bot are transferred to the new bot owner.
- The new bot owner can manage the bot settings, tasks, and plans.
-
Steps to Change the Bot Owner
To change the Bot owner, follow the steps mentioned below:
-
-
- First, log in to your workspace.
- Next, select the bot you want to change ownership for.
-

-
-
- Next, click the workspace icon in the top-right corner.
- Click Manage.
-

-
-
- On the left menu, click Team.
- Hover over the Bot Owner row, and click the Configuration icon.
- Click Change Owner.
-

-
-
- Select the new bot owner and role in the Change bot owner window.
- Click Proceed.
-

Alternatively, to promote a workspace user to the Bot owner, follow the steps below:
-
-
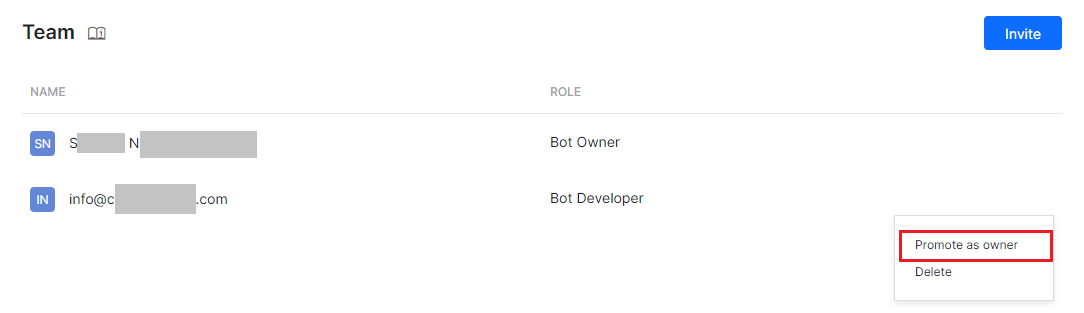
- After navigating to the Team page, hover over the entry of the user whom you wish to make the owner.
- Click the Configuration icon.
- Click Promote as Owner.
-
-
-
- In the Promote bot owner window, select a role for the current bot owner.
- Click Save.
-

Alternative Navigation Flow
You can also click the Plan & Usage option on the left menu for your workspace, and follow the steps below:
-
-
- On the Bots list, click the three-dotted (ellipses) icon for the desired Bot entry.
- Click Change Bot Owner.
-

-
-
- Follow the instructions from step 8 in the previous section.
-
Result
A success confirmation message appears, and The bot owner is updated on the Team and Plan & Usage pages.

Manage the Usage & Plan Details
The Kore.ai XO Platform allows an authorized Admin user to manage the plans and billing information both in the Platform and on the Bot Admin Console (BAC). The workspace owner or master admin can transfer the bot ownership from one user to another and grant him the admin role. Once the Admin role is transferred, they can manage the Plan and Usage details – for both published and unpublished bots.
Important Considerations
Please note the following considerations when using this feature:
-
-
- The Master Admin can change the bot owner on the BAC by navigating to Administration > Bots Management.. Learn more.
- The admin can change bot ownership to any workspace user, even if the user is not on the bot team.
- When the bot ownership is changed, all the permissions and rights granted to the bot owner for the specific bot are transferred to the new bot owner.
- The new bot owner can manage the bot settings, tasks, upgrade plans, and change billing order.
-
Manage the Plan Details in the XO Platform
Steps to manage the Usage and Plan details in the XO Platform:
-
-
- Log in to your workspace.
- Select the bot you want to manage the plan details for.
- Click the Profile Name at the top-right corner.
- Click Manage.
-

-
-
- On the Plan & Usage page, click Upgrade Plan.

- You can choose the Plan and upgrade the details. For information, see the Upgrading a Standard Plan to an Enterprise Custom Plan section.
- To manage users, select the Bots tab and choose the bot that you want to Manage.
- On the Plan & Usage page, click Upgrade Plan.
-

-
-
- On the Usage Plan page, you can add funds or upgrade plan details. For information, see the Add Funds to Your Plan section.
-
Manage the Plan Details in Bot Admin Console
Steps to manage the Usage and Plan details in BAC:
-
-
- Log in to the Bot Admin Console with admin user credentials.
- Select the bot you want to manage the plan details for.
- Navigate to Billing > Plan & Usage and select the Bot, then click Manage.

- On the Usage Plan page, you can add funds or upgrade plan details. For information, see the Add Funds to Your Plan section.

-