In this How-To, we will explore a scenario in a Travel Planning assistant, through which a user can book a flight. We will see how Digital Forms can be used to gather all the required information from the user, then make the booking based on that information.
For details on what Digital Forms are and how they are implemented in the Kore.ai XO Platform, refer here.
Problem Statement
Consider a Travel Planning Assistant helping a user book a flight. There are several information categories that the VA should collect from the user in order to complete this task. Rather than asking the user for each piece of information one by one, the VA can ask the user just once to complete a form that collects all the necessary data. Once the form is successfully submitted, the VA can pull the data and process the booking.
Prerequisites
To go through these configurations, you need to know at least the basics of the following XO Platform features:
- Building a Virtual Assistant: This is because your assistant needs to have been already built when you begin working on your forms.
- Working with Digital Forms.
Configurations
When a user makes a booking, the following needs to happen within your assistant
- A Digital Form needs to be displayed in order to gather input from the user;
- A Dialog Task needs to:
- trigger the above Digital Form; and
- capture the user-entered booking information.
Digital Form Configuration
Moving forward, we will be creating a form that gathers some of the necessary information in order to allow the user to book a flight:
- Trip Type – Roundtrip or One Way.
- Departure Airport (From);
- Arrival Airport (To);
- Departure Date;
- Return Date
- Fare – default selection set to Premium Economy;
- Pro Tip – showcases a promotional offer for Premium Economy seats and only displays when the selected Fare is Economy.
- Passenger First Name and Last Name.
Form Creation
- From the Kore.ai XO Platform, open the Travel Planning assistant.
- Select the Build tab from the top menu.
- From the left navigation menu, select Digital Skills > Digital Forms.
- Click New Form and enter the following:
- Name – name to the form, say BookingForm
- Display Name for the form, say Booking Form
- Description of the form.
- Logo and style for the form header
- Description toggle set to on/off depending on whether you want to display the form description in the header
- Save & Proceed to the next step.

The Form Editor
The Form Editor opens with components on the left, and a blank form. You can drag and drop components to the form as per your requirement. By default, a Submit button is added to the form. This would trigger the submit event which would capture the user input and save in the context object. As soon as you drag and drop a component, its property settings panel will be displayed. There are several settings available for each component and you can set them up according to your own requirements. Some of these settings include: making a field mandatory, adding tooltips, securing field data, and more. This article takes you through the basic ones.
- Start by adding a selection field for the Trip Type. Drag and drop a Toggle component onto the form and set the following values:
- Display Name, say Trip Type.
- Name used for internal reference, say TripType.
- Description of the field.
- Placeholder value to be displayed in the field when blank, say, Please select whether you are booking a roundtrip.
- Value used to display functionality when the toggle is either on or off. When the toggle is enabled, set the value to Roundtrip. For the disabled state of the toggle, set the value to One Way.

- Drag and Drop a Dropdown component onto the form, for the From field.
- Display Name, say From.
- Name used for internal reference, say From.
- Description of the field.
- Placeholder value to be displayed in the field when blank, say, Select the trip type.
- Scroll and locate Data Settings, then click Add Values to enter the values. You can add a list of airports from which flights are departing.

- Repeat Step 2 to add the To field, for the arrival airport.
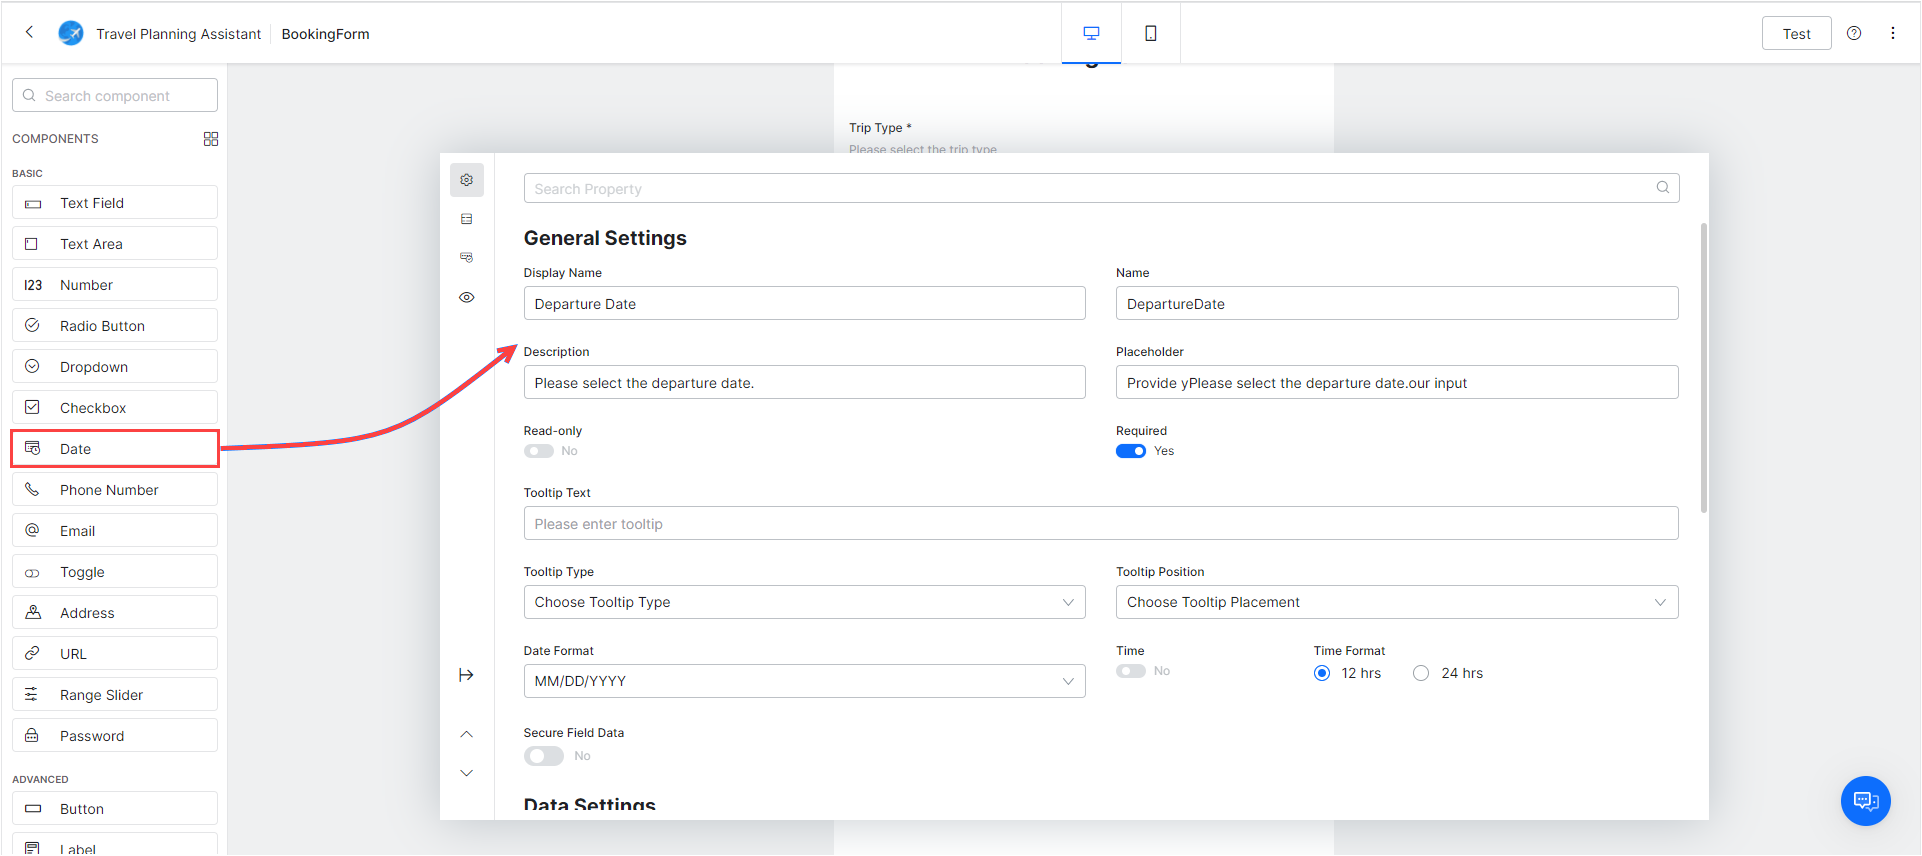
- Drag and drop a Date field onto the form, to add the Departure Date.
- Display Name, say Departure Date.
- Name used for internal reference, say DepartureDate.
- Description of the field.
- Placeholder value to be displayed in the field when blank, say, Please select the departure date.
- Default Value (Optional), you can, for example, mention the Current Date; please note that you can clear (using the ‘x’ option on the field) as well as edit this value at run-time, if the field is not read-only.

- Add a second Date field, for the Return Date and repeat Step 4.
- Drag and drop a Radio Button component onto the form for the Fare field, and set it up as follows:
- Display Name, say Fare.
- Name used for internal reference, say Fare.
- Description of the field.
- Placeholder value to be displayed in the field when blank, say, Please select the Fare Category.
- Scroll and locate Data Settings, then click Add Values to enter the values – Economy, Premium Economy and First Class. You can mark one value, e.g. Premium Economy, as default. This would be selected by default at the time of execution.

- Add a Pro Tip component. This field will only be visible if the user selects Economy as the Fare.
- Display Name, say Pro Tip
- Name used for internal reference, say Protip.
- Description of the field, say Book a Premium Economy seat and get a free hot meal onboard.
- Placeholder value to be displayed in the field when blank.
- Scroll down to Visibility Settings and click Add Visibility Rule.
- Now, set the rule by building the following logical expression:Fare
Equal to ValueEconomy.This rule ensures that the Pro Tip will only be visible when the user selects the Economy option under the Fare field.

- Drag and drop a Text Field component onto the form, to add the Passenger First Name field.
- Display Name, say Passenger First Name.
- Name used for internal reference, say PassengerFirstName.
- Description of the field.
- Placeholder value to be displayed in the field when blank, say, Enter the name of the account holder.

- Repeat Step 7 to add the Passenger Last Name field.
- Use any additional fields that are required for your process. For example, a Select Flight field, as a Radio Button, further fields for flight documents, (as e.g.: Text, Text Area, etc.) onboard meal options (as e.g.: Checkboxes or Radio Buttons), etc.
- You can select how the VA handles the conversation when the user cancels the form. You can choose from two options:
- Discard the task and trigger End of Task Event: This is the default option.

- Continue with this task and transition to this node: In the Select Node drop-down list, you can select any node present in the current dialog task.

Note: :The target node has to be in the same dialog, you cannot make a jump to a target node outside the current dialog. The list of target nodes only shows the local nodes. If the target node is not present during runtime, the platform presents the error Error in continuing the conversation, and the task should get discarded. - Discard the task and trigger End of Task Event: This is the default option.


Your form is ready.
You can toggle between Desktop View and Mobile View to see how it looks on each device type.

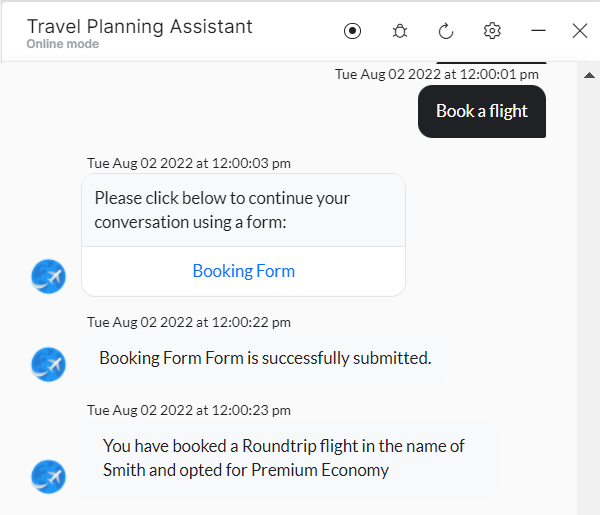
Use the Test button to see a preview. Below is a demo of the user experience with the form we have built:

Dialog Task Configuration
We will be creating a dialog task and adding a form node to trigger the Digital Form created in the above step and use a service node to make a service call to complete the booking process. Please see Using the Dialog Builder for details on working with Dialog Tasks.
Create a Dialog Task
- Select the Build tab from the top menu
- From the left navigation menu, select Conversational Skills > Dialog Tasks.
- Click Create Dialog to create a new Task
- Enter the Intent Name, say, Book a Flight
- Create & Proceed to open the dialog builder page.

Add a Digital Form Node
- Click the + next to the intent node and select the Digital Form node.
- From the dropdown list select the Booking Form we created earlier.
- You will be prompted to select the Form Experience. Kore.ai XO Platform allows you to gather user input both from the form and through conversation based on the channel.
- For this use case, let us select Only Form UI experience.
- A Form Node would be added, you can customize the form name, etc.
- We are changing the Name to BookingForm and Display Name to Booking Form.

Add a Message Node
Next, we will see how to capture the values returned by the Form Node using a Script and a Message node..
- Add a Message Node to the form node.
- Set the Name to FormMessage and Display Name to Form Message.
- Click Manage under Bot Responses to open the message editor.
- Select the JavaScript tab and enter the following code. This is a simple script that captures some of the data from within the context object, as submitted by the user into the Form, and displays it accordingly.
var message;
message = 'You have booked a '+context.forms.BookingForm.TripType+' flight in the name of '+context.forms. BookingForm.PassengerLastName;
message = message + ' and opted for '+ context.forms. BookingForm.Fare;
print(message);

- Your dialog task is ready to use a digital form.


Test the Assistant
Talk to the bot to trigger the above dialog. The form will be displayed, enter the values and click Submit, the message will be displayed.
You can use the context object as shown above in Script or Service nodes for further processing of the booking.
See here for how to add this data into data tables.