はじめに
対話型AIプラットフォーム
チャットボットの概要
自然言語処理(NLP)
ボットの概念と用語
クイックスタートガイド
プラットフォームへのアクセス
ボットビルダーの操作
リリースノート
最新バージョン(英語)
以前のバージョン(英語)
廃止機能(英語)
コンセプト
設計
ストーリーボード
ダイアログタスク
ダイアログタスクとは
ダイアログビルダー
ノードタイプ
インテントノード
ダイアログノード
エンティティノード
フォームノード
確認ノード
ロジックノード
ボットアクションノード
サービスノード
Webhookノード
スクリプトノード
グループノード
エージェント転送ノード
ユーザープロンプト
音声通話プロパティ
イベント ハンドラー
ナレッジグラフ
ナレッジグラフの抽出
ナレッジグラフの構築
ボットにナレッジグラフを追加
グラフの作成
ナレッジグラフの構築
既存のソースからFAQを構築
特性、同義語、停止用語
変数ネームスペースの管理
更新
ノード間の質問と回答の移動
用語の編集と削除
質問と応答の編集
ナレッジグラフの分析
通知タスク
スモールトーク
デジタルスキル
デジタルフォーム
デジタルビュー
デジタルビューとは
パネル
ウィジェット
トレーニング
トレーニングとは
機械学習
機械学習とは
モデル検証
ファンダメンタルミーニング
ナレッジグラフ
示唆
ランキングおよび解決
NLPの詳細設定
NLPのガイドライン
インテリジェンス
インテリジェンスとは
コンテキスト
コンテキストインテント
割り込み
複数インテントの検出
エンティティの変更
デフォルトの会話
センチメント管理
トーン分析
テストとデバッグ
ボットと会話
発話テスト
バッチテスト
会話テスト
デプロイ
チャネル
公開
分析
ボットの分析
NLPメトリクス
会話フロー
Usage Metrics
封じ込め測定
カスタムダッシュボード
カスタムダッシュボードとは
メタタグ
カスタムダッシュボードとウィジェット
ユニバーサルボット
ユニバーサルボットとは
ユニバーサルボットの定義
ユニバーサルボットの作成
ユニバーサルボットのトレーニング
ユニバーサルボットのカスタマイズ
他言語の有効化
ストア
プラントと使用
Overview
Usage Plans
Support Plans
Invoices
管理
ボット認証
複数言語対応ボット
個人を特定できる情報の編集
ボット変数の使用
IVRのシステム連携
一般設定
ボット管理
ハウツー
会話スキルの設計
バンキングボットを作成
バンキングボット – 資金の振り替え
バンキングボット – 残高を更新
ナレッジグラフを構築
スマートアラートの予約方法
デジタルスキルの設計
デジタルフォームの設定方法
デジタルビューの設定方法
データテーブルのデータの追加方法
データテーブルのデータの更新方法
Add Data from Digital Forms
ボットのトレーニング
示唆の使用方法
インテントとエンティティのパターンの使用方法
コンテキスト切り替えの管理方法
ボットのデプロイ
エージェント転送の設定方法
ボット関数の使用方法
コンテンツ変数の使用方法
グローバル変数の使用方法
Web SDK Tutorial(英語)
Widget SDK Tutorial(英語)
ボットの分析
カスタムダッシュボードの作成方法
カスタムタグを使ってフィルタリング
管理
ボット管理者コンソール
ダッシュボード
ユーザーの管理
ユーザーの管理
グループの管理
ロール管理
ボット管理モジュール
登録
ユーザーの招待
招待状の一括送信
ユーザーデータのインポート
Active Directoryからユーザーを同期
セキュリティ/コンプライアンス
シングル サインオンの使用
セキュリティ設定
Billing(日本未対応)
  1. ホーム
  2. Docs
  3. Virtual Assistants
  4. How Tos
  5. Travel Planing Assistant
  6. Create a Travel Virtual Assistant

Create a Travel Virtual Assistant

After you have signed up with the Kore.ai XO Platform, the next step is to create a Virtual Assistant. Before you create it, we recommend you to go through the basics of building a VA by reading this article.

This present article takes you through the creation of a simple, travel related VA, that gives users the flight status arriving/departing from Los Angeles International Airport. 

Assistant Capabilities

This assistant can perform the following tasks:

  • Ask the user if they want to know about the arrivals or departures.
  • Make a service call to an API to fetch the details of flights arriving and departing out of the airport.
  • Display the flight numbers based on the user preference of Arrival or Departure.
  • Request the user to select a flight number.
  • Display the status details of the selected flight.
  • Handle any errors.

Create the Assistant

To build your Travel Virtual Assistant, follow the steps below: 

  1. On the landing page, click New Bot.
  2. In the Create New Bot window, select Start from Scratch.
  3. Enter a Name
  4. Select an icon or click the + icon to upload your own. Images should be in PNG format and should not exceed 40×40 pixels. The file size is limited to 80kb. 
  5. Select Travel Management as the Purpose of your VA.
  6. Choose Standard Bot as the Bot Type.
  7. Select the Default Language.
  8. Click Proceed when ready.

  9. Next, you can generate use cases for your new Virtual Assistant. Add a meaningful description and click Get Use Cases to generate intents that will be automatically added to the VA. You can update the Bot Name and Purpose and remove use cases. 
  10. Click Create to create your VA with generated use cases, or click Create without Use Cases to create your VA without any generated use cases.
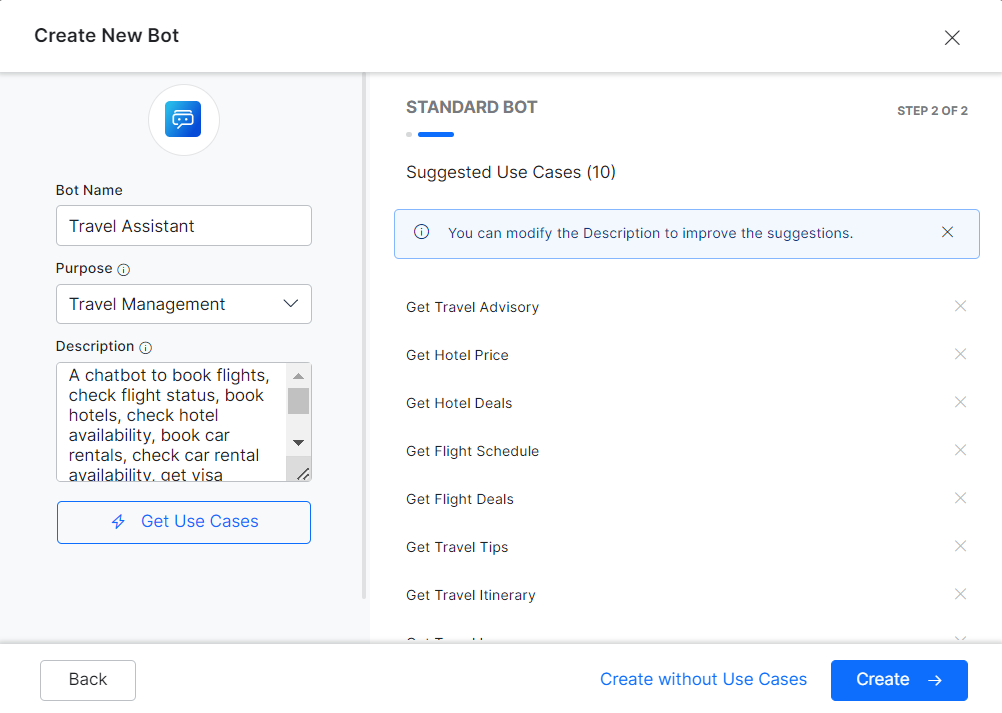
  11. Wait a few moments for your VA to be configured. Once done, you can continue developing it. If you have chosen to generate use cases, you will find them as Dialog Tasks.

Create a Dialog Task

After creating your assistant, you are directed to the Bot Summary page. The first step is to add an Intent Dialog to support various business-specific use cases. The Intent Dialog is the first step in the user-VA conversation flow.

To create a Dialog Task, please follow the steps below:

  1. On the Tasks widget, click + New Task and select Dialog Task.

  2. On the Create Dialog page, enter the following details:
    • Intent Name – Enter the Intent name. This is the phrase that triggers the dialog. The intent name must be simple and not more than 3-4 words. For example, Check flight status.
    •  Under More Options, you can add a description and other dialog-related details. Let us retain the default settings.
  3. Click Proceed.

  4. When prompted to upgrade to Conversation Driven Dialog Builder, select Upgrade. For instructions on the Legacy Dialog Builder, refer here
  5. Once your task has been created, you will see the Dialog Builder Canvas, with the first node displayed – the Intent Node, which receives the name of the task and represents the main node within the Dialog Task. Learn more about working with the Dialog Builder.

Create a User Preference Entity Node

An Entity node is typically used to gather information from the user. Let us use it to capture the user preference for arrival or departure details.

  1. Click the + icon next to the User Intent node.
  2. Select Entity > + New Entity.

  3. You can also drag and drop Entity from the node panel on the left.
  4. Click the newly added Entity node to open the Entity window.
  5. By default, the Component Properties tab is selected.
    1. Under the General Settings section, enter the following details:
      • Name
      • Display Name
      • Type: Select List of Items (enumerated) from the drop-down list. You can provide a list of values that the user can select. To add a list of values:
        1. Click the Settings icon next to the field.
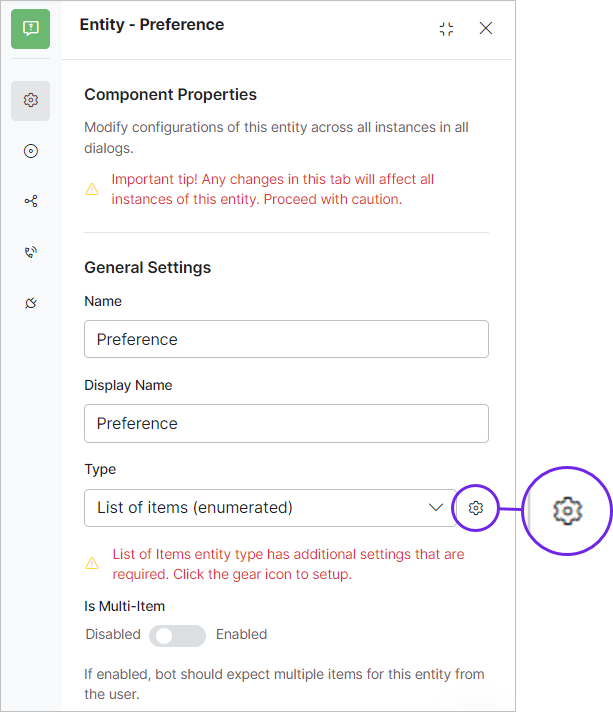
        2. Select the Static List option.
        3. Under the Keys & Values To Use section, enter the Display Name as Arrival and Departure in separate rows. Value and Synonyms columns auto-populate, leave them as is.
        4. Define the percentage of Auto Correction to be applied to match the user’s input to a value in the list. Set to 0 if you do not want to apply auto correction at all.
        5. Click Save.
  6. Go back to the Entity window.
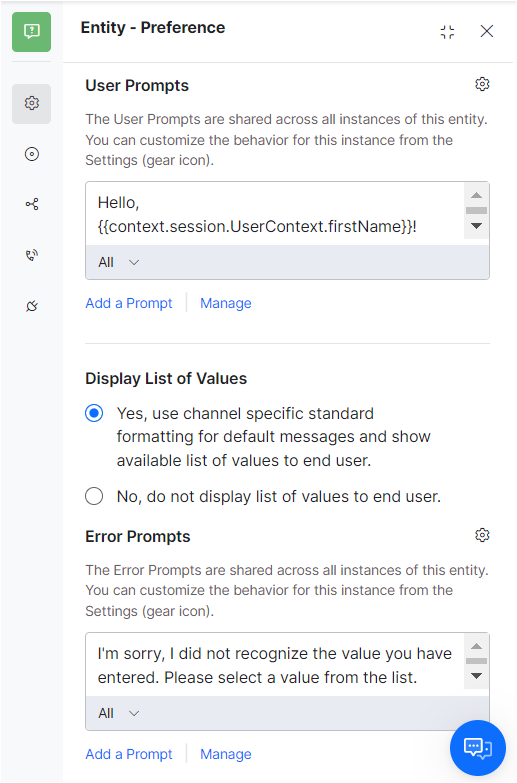
  7. Under the User Prompts section, enter the following text:
Hello {{context.session.UserContext.firstName}}! Welcome to *Los Angeles International Airport*.
I can help you with flight Arrival/Departure information. Please select your preference.
Note: The context variable retrieves the user’s first name. Also, markdown is used for the airport name to appear in bold.
    1. Under the Display List of Values section, select Yes, use channel-specific standard formatting for default messages and show the available list of values to the end-user option. This displays the list of values as a button template in supported channels.

    2. Close the Entity window.

Create a Service Node

A Service Bot Action node allows you to make a backend API call. Here the service node is used to call an API to get flight information for flights From and To LAX airport. In this tutorial, a dummy API setup is used.

  1. Click the + icon below the Preference Entity node.
  2. Select Bot Action > + New Bot Action.
  3. Under the General Settings section, enter the following details:
    • Name: FlightDetails
    • Display Name: Flight Details
  4. Click the + icon next to the Bot Action node to expand the Bot Action.
  5. From within the Bot Action node, click +.
  6. Select Service > + New service. The service node is used to make a backend API call to get flight information for flights From and To LAX airport.
  7. Click the Service node to open the Service window, by default, the Component Properties tab is selected.
  8. Under the General Settings section, enter the following details:
    1. Name: Fetchflightdetails
    2. Display Name: Fetch Flight Details
    3. Service Type: Custom Service
    4. Type: Webservice
    5. Sub Type: REST
    6. Under the Request Definition section, click DEFINE REQUEST.
    7. On the Define Request page, enter the following details:
      1. Request TypeGET
      2. Request URLhttp://5e85a56644467600161c6579.mockapi.io/FlightDetails
        This API does not require any Auth or Header Parameters.
      3. Click the Test Request tab.
        1. Click Test on the top-right.
        2. Wait for the test to complete and you get a Status Code 200.
        3. Click Save as Sample Response.
        4. Click Save.

    8. Return to the dialog builder.
  9. Under the Connections section, set the Default Connection Rule to End of Bot Action.

  10. Close the Service window.
  11. Collapse the Bot Action node.

Create a Flight Selection Entity Node

This Entity node is to capture the Flight Number for which the user wants the status details.

  1. Click the + icon next to the Flight Details Bot Action node.
  2. Select Entity > + New entity . The Entity node is required to capture the flight number selected by the user.
  3. In the Entity window, by default, the Component Properties tab is selected.
  4. Under the General Settings section, enter the following details:
    • Name: SelectFlight
    • Display Name: Select Flight 
    • Type: String (users can write a custom script to convert the API string output to a list of values in the following steps, this is the requirement of the dummy API used)
  5. Under the User Prompts section, enter the following text:

    Please provide the flight number.
    1. Manage: Users can define a specific prompt for the Web SDK channel.
    2. Click Manage. Read more about managing user prompts.
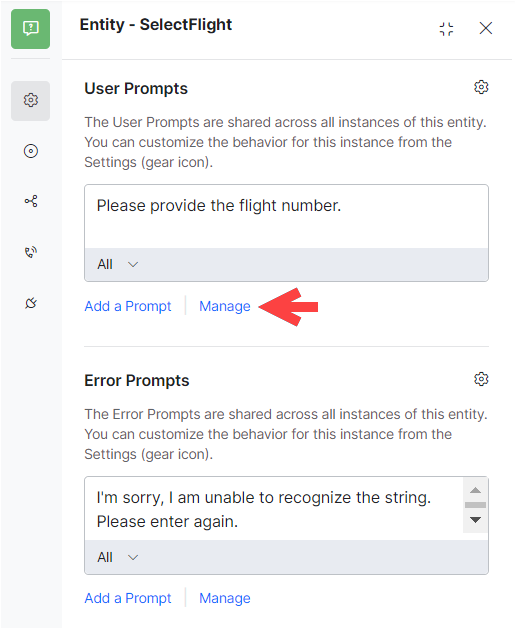
    3. Click Add User Prompts.
    4. In the New Prompt Message window, select Web/Mobile client from the Channel drop-down list.
    5. Under the Message section, delete all text from the Plain Text tab and click the Advanced tab.
    6. Copy and paste the following JavaScript into the Advanced tab. The JavaScript extracts flight numbers matching user preference from the string output from API call and displays them in the Quick Reply format.
      var data = context.Fetchflightdetails.response.body.details;
      context.flights = [];
      context.info;
      var msg;
      for (var i = 0; i < data.length; i++)
      {
          if (context.entities.Preference == data[i].Type)
          {
              var details = {
                  "Airlines" : data[i].Airlines,
                  "FlightNo" : data[i].FlightNo,
                  "Airport" : data[i].Airport,
                  "AirportName" : data[i].AirportName,
                  "Time" : data[i].Time
              };
              context.flights.push(details);
          }
      }
      var message = {
          "type" : "template",
          "payload" : {
             "template_type" : "quick_replies",
             "text" : "Here are the flights " + context.entities.Preference + " details for Los Angeles International Airport today. Please select the flight number to see details",
             "quick_replies" : []
          }
      };
      for (i=0; i < context.flights.length; i++)
      {
         var replies = {
              "content_type":"text",
              "title" : context.flights[i].FlightNo,
              "payload" : context.flights[i].FlightNo
          };
      message.payload.quick_replies.push(replies);
      }
      print(JSON.stringify(message));
  6. Click Save.
  7. Go back to Dialog Builder and close the Entity window.

Create a Script Node

A Script node is used to write custom JavaScript in the Dialog task. Here, users can use the script to extract the selected flight details. Later, users can add more functionality to this script. To add and configure a script node, follow the steps below:

  1. Click the + icon below the Select Flight Entity node.
  2. Select Bot Action > + New Bot Action.
  3. Under the General Settings section, enter the following details:
    • Name: FlightValidation
    • Display Name: Flight Validation 
  1. Click the + next to the Bot Action node to expand the Bot Action.
  2. From within the Bot Action node click +
  3. Select Script > + New script.
  4. On the Script window, by default, the Component Properties tab is selected.
  5. Under the General Settings section, enter the following details:
    • Name: ValidateFlight
    • Display Name: Validate Flight 
  1. Under the Script Definition section, click Define Script.
  2. On the Add Script dialog box, copy and paste the following JavaScript. This code extracts the details of the selected flight number and also mitigates potential task failures caused by users not selecting a preference and instead manually entering information that is not found within the Context. Learn more about the Context Object.
    context.valid = false;
    context.details;
    var x = context.flights.length;
    for (var l = 0; l < x; l++)
    {
        if (context.entities.SelectFlight == context.flights[l].FlightNo)
        {
             context.valid = true;
             context.details = {
                "Airlines" : context.flights[l].Airlines,
                "FlightNo" : context.flights[l].FlightNo,
                "Airport" : context.flights[l].Airport,
                "AirportName" : context.flights[l].AirportName,
                "Time" :context.flights[l].Time
            };
            break;
        }
    }
    if (context.valid === false)
    {
        delete context.entities.SelectFlight;
    }
  3. Click Save.

  4. Under the Connections section, set the Default Connection Rule to End of Bot Action
  5. Close the Script window.
  6. Collapse the Bot Action node.

Create a Message Node to provide the Flight Status

A Message node is used to display a message from the VA to the user. Here, users can use the Message node to show appropriate flight details, based on user preference. This message node is triggered when the user enters a valid flight number.

  1. Click the + icon next to the Validate Flight Script node.
  2. Select Message > New message node +.
  3. On the Message window, by default, the Component Properties tab is selected.
  4. Under the General Settings section, enter the following details:
    • Name: FlightStatus
    • Display Name: Flight Status
  1. Under the Bot Responses section, enter the following text:
    Here are your flight details.
  2. Click Enter to save.
  3. Manage Prompts: Users can define a specific prompt for the Web SDK channel as follows:
    1. Click Manage
    2. On the Manage Bot Responses page, click Add User Prompts.
    3. Select Web/Mobile client from the Channel drop-down list.
    4. Under the Message section, delete all text in the Plain Text tab and click the Advanced tab.
    5. Copy and paste the following JavaScript. The JavaScript is written to display the flight details in the Table format.
      var elements = [context.details];
      var message = {
          "type": "template",
          "payload": {
              "template_type": "table",
              "text": "Here are your flight details",
              "columns": [
                  ["Airline"],["FlightNo"], ["Airport"], ["Time"]
              ],
              "table_design": "regular",
              speech_hint: "Here are your flight details",
              elements: []
          }
      };
      var ele = [];
      for (var i = 0; i < elements.length; i++) {
          var elementArr = [elements[i].Airlines, elements[i].FlightNo, elements[i].Airport, elements[i].Time];
          ele.push({'Values': elementArr});
      }
      message.payload.elements = ele;
      print(JSON.stringify(message));
    6. Click Save.
  1. Return to the Message window.
  2. On the Message window, click the Connections tab.
    • From the drop-down list, change the default connection from Not Connected to End of Dialog.
    • Click Save.
  3. Close the Message window.

When you have finished configuring your Dialog Task, it should look something like the illustration below.

Create a Conditional Flow for an Error Message

The Conditional Flow is required when, for example, the user provides input that cannot be identified by the VA, rather than selecting from one of the options you have configured (i.e.: either Arrivals or Departures.) In such a case, you would want to have the VA respond to the user with an error message.

The following are the steps required in order to add the conditional flow from the Validate Flight Script node. A new connection from this Script node to a new Message node is established. This is to display an error message from the VA to the user and redirect to select the flight number again.

Create the Error Message

  1. Hover over the connection between Flight Validation Bot Action node and Flight Status message node.
  2. You can see the Add Node button, click the button and then on the “+” to insert a node.
  3. Create a new Message node.
    1. Select Message > + New Message.
    2. On the Message window, by default, the Component Properties tab is selected.
    3. Under the General Settings section, enter the following details:
      1. Name: ErrorMessage
      2. Display Name: Error Message
    4. Under the Bot Responses section, enter the text:
      The Flight number you entered is incorrect. Let us start again.
    5. Click the Connections tab.
    6. From the drop-down list, change the default connection from FlightStatus to SelectFlight.
    7. Close the Error Message window.

Add IF Condition

As you can see in the demonstration above, the initial validation message remains disconnected after adding the error message. To fix this, you need to add a conditional connection so that the Flight Validation Bot Action Node connects to the Flight Status Message node to provide flight information; or to the Error Message, so the user is asked to provide valid input. The steps to take in order to achieve this are the following:

  1. Click the Flight Validation Bot Action node.
  2. On the Flight Validation Bot Action window, click the Connections tab, and follow the steps below:
    1. Click + ADD IF under Bot Action Group Connections.
    2. Under the IF section, Select Context.
    3. For If Condition, enter “valid” in the context text field.
    4. Select the operator as Equals To.
    5. Enter “true” in the value text field.
    6. If this condition is true, then the dialog goes to FlightStatus.
    7. Under the ELSE section,
    8. If this condition is false, then the dialog goes to ErrorMessage.
    9. Close the Validate Flight Script window.
    10. Click and drag the ErrorMessage node to the right to view the flow.

When completed, the task might look similar to the illustration below:


Add Events

Currently, the assistant is waiting for user input on the start. However, it can also guide the user at the start of the conversation. For this, you can add an Event Handler to initiate this task every time a new connection is established from the Web/Mobile SDK. Learn more about Event Handlers.

  1. Close the Dialog Builder to go back to the Dialog Tasks page.
  2. From the Left Navigation pane, and select Intelligence > Events.
  3. From the events list, click Configure against the On Connect event.
  4. On the On Connect window, by default, the Initiate Task option is selected; retain it.
  5. From the drop-down list, select the Get Flight Status task.
  6. Click Save.

Test the Assistant

To test the Dialog task, you can use the Talk to bot option at the bottom right. Since the onConnect event is configured, the dialog is automatically initiated. Alternately, you can always try the following utterance (intent name) Get me the flight status.

Follow the instructions:

  1. Select Arrival / Departure.
  2. Enter an invalid flight number rather than selecting on of the prompts.
  3. You can see the appropriate error message and be prompted to enter the flight number again.
  4. Select a flight number from the prompts.
  5. You can see the flight details in a tabular format.

You have successfully created and tested your first Virtual Assistant.
メニュー