This document is part of the documentation related to creating a sample travel assistant.
Assistant Capabilities
The assistant we build will perform basic travel booking tasks, as follows:
- Check the status of a flight, based on the flight number provided by the user, as seen here.
- Update a flight booking, as discussed here.
- Perform a flight change, based on the current flight and new flight preference provided by the user. as discussed in this present article.
Add the Change Flight Dialog Task / Intent
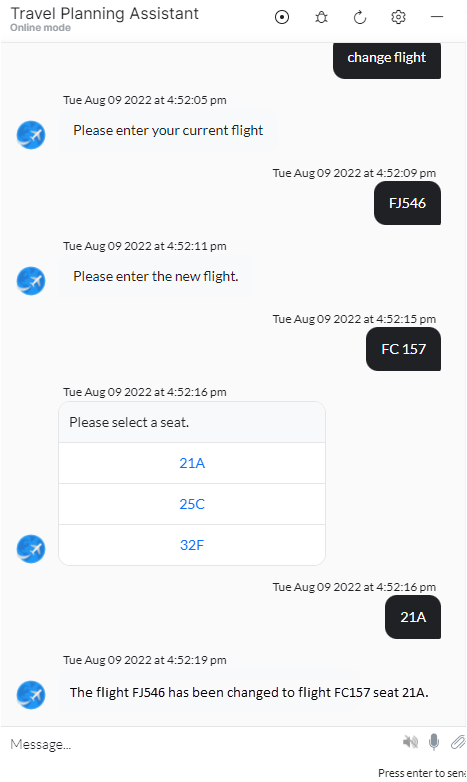
- The Change Flight task will prompt the user to enter their Current and New Flight Numbers. numbers.
- Next it would prompt for the Seat preference.
- It will then make a service call to update the booking appropriately.
- The message indicating success or failure is displayed before the end of the dialog.
To add this Dialog Task, follow the steps below:
- Open the Travel Planning Assistant, with the two pre-configured tasks – Check Flight Status and Update Booking.
- Navigate to the Build > Conversational Skills -> Dialog Task page from the left menu.
- Click Create Dialog from the top right. The Create Dialog screen will open.
- Enter the following details:
- Intent Name – Enter the Intent name, this is the phrase that triggers the dialog. The intent name should be simple and not more than 3-4 words. For example, Change Flight.
- Under More Options, you can add a description and other dialog-related details. Let’s retain the default settings.
- You can also include utterances to train this intent.
- Select Try Conversation Driven Dialog Builder option.
- Click Proceed.
Note: For instructions related to the Legacy Dialog Builder, refer here 
- Close the User Intent Property Panel.
Add Entity nodes
An Entity Node is typically used to gather information from the user.
Here we will be using it to capture the user input for the Current Flight (to change from) and New Flight (to change to).
Add an Entity Node to retrieve the Current Flight to change from,
- Click the + below to the User Intent node
- Select the Entity option
- Click the + New entity. The Property Panel for the Entity Node is displayed. If not click on the newly added entity node to open
- Enter the following details:
- Name: CurrentFlight
- Display Name: Current Flight
- Type: String
- User Prompts: Enter the following text:
Enter the Current Flight that you want to change from. - Close the CurrentFlight Entity Property Panel.
Add an Entity Node to retrieve the New Flight to change to
- Repeat the above steps to add another entity with the following details:
- Name: NewFlight
- Display Name: New Flight
- Type: String
- User Prompts: Enter the following text
Enter the New Flight that you want to change to.
- Close the NewFlight Entity Property Panel.
Add a Seat Selection Entity Node
- Repeat the above steps to add another entity with the following details:
- Name: Seat
- Display Name: Seat
- Type: List of items (Enumerated). We need to provide the list of values that the user can select.
- Click the Settings (gear) icon that appears next to the field.
- Opt for Static List.
- Enter the following options under separate rows as the Display name – e.g.: 21A, 25C, 32F. Value and Synonym columns will auto-populate, leave them as is.
- Define the percentage of Auto-correction to be applied to match the user’s input to a value in the list.
- Click Save.

- Under Display List of Values, select Yes, use channel specific standard formatting for default messages and show an available list of values to the end user.
- User Prompts: Enter the following text
Please select a seat.Note: You can use Javascript in the User Prompt to display available seats. In this case you would need to set the Type as ‘String’. For the purpose of this use case, we have chosen to list fixed values, which is why we have set the Type to ‘List of Items’. - Close the Seat Entity Property Panel.

Add a Bot Action – Service Node
A Service Node allows you to make a backend API call. It is included in the Bot Actions node. Here the service node is used to call an API to update the provided booking based on the user’s input, with the new flight and the selected seat.
To add a Bot Action – Service Node:
- Click the + below the Seat Entity node
- Select Bot Action, click to open properties, name it UpdateBooking, and close the properties window.
- To add a service node, click the + next to the Update Booking Bot Action node to expand it
- Click the + within the Bot Action layout, and select Service.
- Click + New Service
- The Property Panel for the Service Node is displayed, if not click on the newly created entity node to open it.
- Enter the following details:
- Name: UpdateBookingService
- Display Name: Update Booking Service
- Under Request Definition: click Define Request. Here is an example request to enter:
https://5c3c633d29429300143fe4d2.mockapi.io:{{context.entities.CurrentFlight}}./BookingDetails/{{context.entities.NewFlight}}./BookingDetails/{{context.entities.Seat}}.
Add a Message Node
A Message Node is used to display a message from the VA to the user. Here we will be using the Message node to confirm the update to the user..
- Click the + below the UpdateBooking Bot Action node.
- Select Message and click + New message. The Property Panel for the Message Node is displayed. If not click on the newly added dialog node to open
- Enter the following details:
- Name: FlightChangeConfirmation
- Display Name: Flight Change Confirmation
- Bot Responses:
The flight {{context.entities.CurrentFlight}} has been changed to flight {{context.entities.NewFlight}} seat {{context.entities.Seat}}
- On the Bot Response Property Panel, open the connections tab by clicking the Connections icon.
- Change the Default connection from Not Connected to End of Dialog.
- Close the Property Panel.
The completed task might look similar to the illustration below:

Test the Assistant
To test the Dialog task, you can use the Talk to Bot feature at the bottom right corner of the Platform.
Enter the following utterance (intent name)
Change Flight
Follow the instructions:
- Enter the Current Flight;
- Enter the New Flight;
- Select the Seat;
- See the success message.