ServiceNow helps you build digital workflows on a single, unified platform. Kore.ai XO Platform’s ServiceNow Agent integration allows you to seamlessly hand off the virtual assistant conversations to your live agents on ServiceNow.
This post provides the configuration steps to enable the ServiceNow Agent integration for Utah, Vancouver, and higher versions of the ServiceNow system. Use the configurations provided below as general guidelines, as there could be some differences based on the release and the specific version of the ServiceNow that you are using.
Overview
Kore.ai’s Virtual Assistant (VA) serves as the central point of interaction for the users. In addition to its regular capabilities, the VA acts as a proxy or intermediary between the users and the ServiceNow agents to hand over conversations seamlessly. The VA also allows you to integrate with the ServiceNow platform. The VA facilitates communication and interaction between the user and the ServiceNow agent using the chat module.
Configuration
Complete the following steps to configure the ServiceNow agent for Utah and higher versions:
- Step 1: Retrieve the ServiceNow Instance URL
- Step 2: Enable the ServiceNow Agent
- Step 3 : Install required plugins
- Step 4: Assign Roles to the Consumer Service Support Group
- Step 5. Update the Webhook Endpoint and enable the Integration
- Step 6: Testing Configuration
Step 1: Retrieve the ServiceNow Instance URL
- Log in to your ServiceNow account with admin user credentials. The ServiceNow account will have a unique URL for each developer instance in their Service Management or App Engine Studio, for example, https://devXXX67.service-now.com.
- Copy the Instance ID from the URL and paste it into the Configurations tab of the ServiceNow Agent page. Refer to step 2.
Step 2: Enable the ServiceNow Agent
- Log in to the Kore.ai XO Platform: https://bots.kore.ai/botbuilder
- Select a Virtual Assistant for which you want to configure the ServiceNow agent.
- Navigate to Build > Integrations > Agent Transfer and click the ServiceNow button.

- On the Configurations tab, select your preferred authentication option (Basic vs. OAuth) and then provide the details as explained in the options below.
Option 1: Basic Auth – Enter the ServiceNow Instance Credentials

-
- Select the Agent Chat (Supported for Utah and higher versions) option.
- Select the Basic Auth option for enabling ServiceNow Agent with the Basic Authentication.
- Instance URL: The company’s URL where the ServiceNow instance is hosted, for example, https://devXXX67.service-now.com.
- User Name: The username of your ServiceNow account.
- Password: The password of your ServiceNow account.
- Queue ID: The unique queue identification number.
- Webhook URL: The web URL for custom application function callbacks.
Option 2: OAuth with Refresh Token – Follow the instructions in this ServiceNow Documentation to generate a refresh token.

- Select the Agent Chat (Supported for Utah and higher versions) option.
- Select the OAuth with Refresh Token option for enabling ServiceNow Agent with the Refresh Token Authentication.
- Instance URL: The company’s URL where the ServiceNow instance is hosted, for example, https://devXXX67.service-now.com.
- Client ID: The client ID of your ServiceNow application copied in Step 2.
- Client Secret: The client secret of your ServiceNow application copied in Step 2.
- Refresh Token: The unique refresh token that you generated in Step 2.
- Webhook URL: The web URL for custom application function callbacks.
-
- Click Authorize to authenticate and allow the XO platform to handover conversations to ServiceNow agent.
- If you want to make ServiceNow as the default agent, enable the Default Agent System for all bot channels option.
Note: This option is enabled only when you have multiple agents configured for your VA.
- You can customize the channel mapping by clicking the Configure link as shown below:

- Once you click Configure, you can map the channels for which you want to use ServiceNow agent to hand over the conversations.
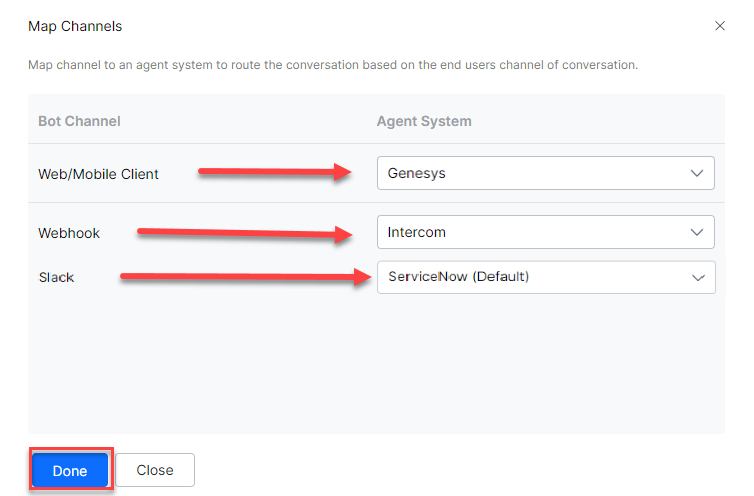
For example, if you have configured a Genesys chat integration, Intercom and ServiceNow agents. You can make one of them as default and map channels to agent systems. In this case, the Web Client and WebHook are mapped to Genesys and Intercom. Slack is mapped to the default ServiceNow agent. To learn more about channel enablement, see Adding channels to your bot. - After mapping channels, click Done.
- Click Save to enable the ServiceNow agent.
- Publish the VA. For more information, see Publishing Bot.
Step 3: Install the required plugins
- Log in to the ServiceNow Developer instance with Admin User Credentials.
- To create an application, search and select the System Definition under Plugins from the left menu.

- Search and install the following plugins:
- Omni-experience Standard Feature Set

- Advanced Work Assignment

- Customer Service Management

- Glide Virtual Agent

- Virtual Agent API

- Omni-experience Standard Feature Set
- Verify that all required plugins are installed with the required permissions.
Step 4: Assign Agent roles to the Consumer Service Support Group
- Log in to the ServiceNow Developer instance with Admin User Credentials.
- To create an application, search and select the Advanced Work Assignment under Management > Groups from the left menu.

- Select the Consumer Service Support group and navigate to the group details screen.

- Select the Roles tab and click the Edit button to navigate to the roles screen.

- In the Roles collection, Search for awa_agent and agent_workspace_user roles, assign them to the Consumer Service support, and save them.

- Navigate back to the group details screen, select the Group Members tab, click the edit button, and navigate to the Edit Members screen.

- In the Users Collection, Search for the required user. For example, select Abel Tuter user, assign it to the Consumer Service support, and click Save.

- Navigate back to the group details screen and click Update.

Step 5. Update the Webhook Endpoint and enable the Integration
- Log in to the ServiceNow Instance
- Select All menu and navigate to System Web Services >Outbound>REST messages.

- Select the VABot to Bot from the list to the VABot to Bot details.

- Edit the VABot to Bot details, Copy the Webhook URL from the Configuration tab of ServiceNow Agent page, and paste it into the EndPoint field on the VABot to Bot edit details.

- Scroll down and select the HTTP methods, update the same Webhook URL for the postMessage and click Update.

- Enable the ServiceNow Agent Integration by clicking the Save button.
Step 6: Testing Configuration
This section helps you verify how the conversations from the Kore.ai XO Platform are handed over to the ServiceNow agent after enabling it.
To verify the data exchange between Kore.ai’s VA and ServiceNow agent, follow these steps:
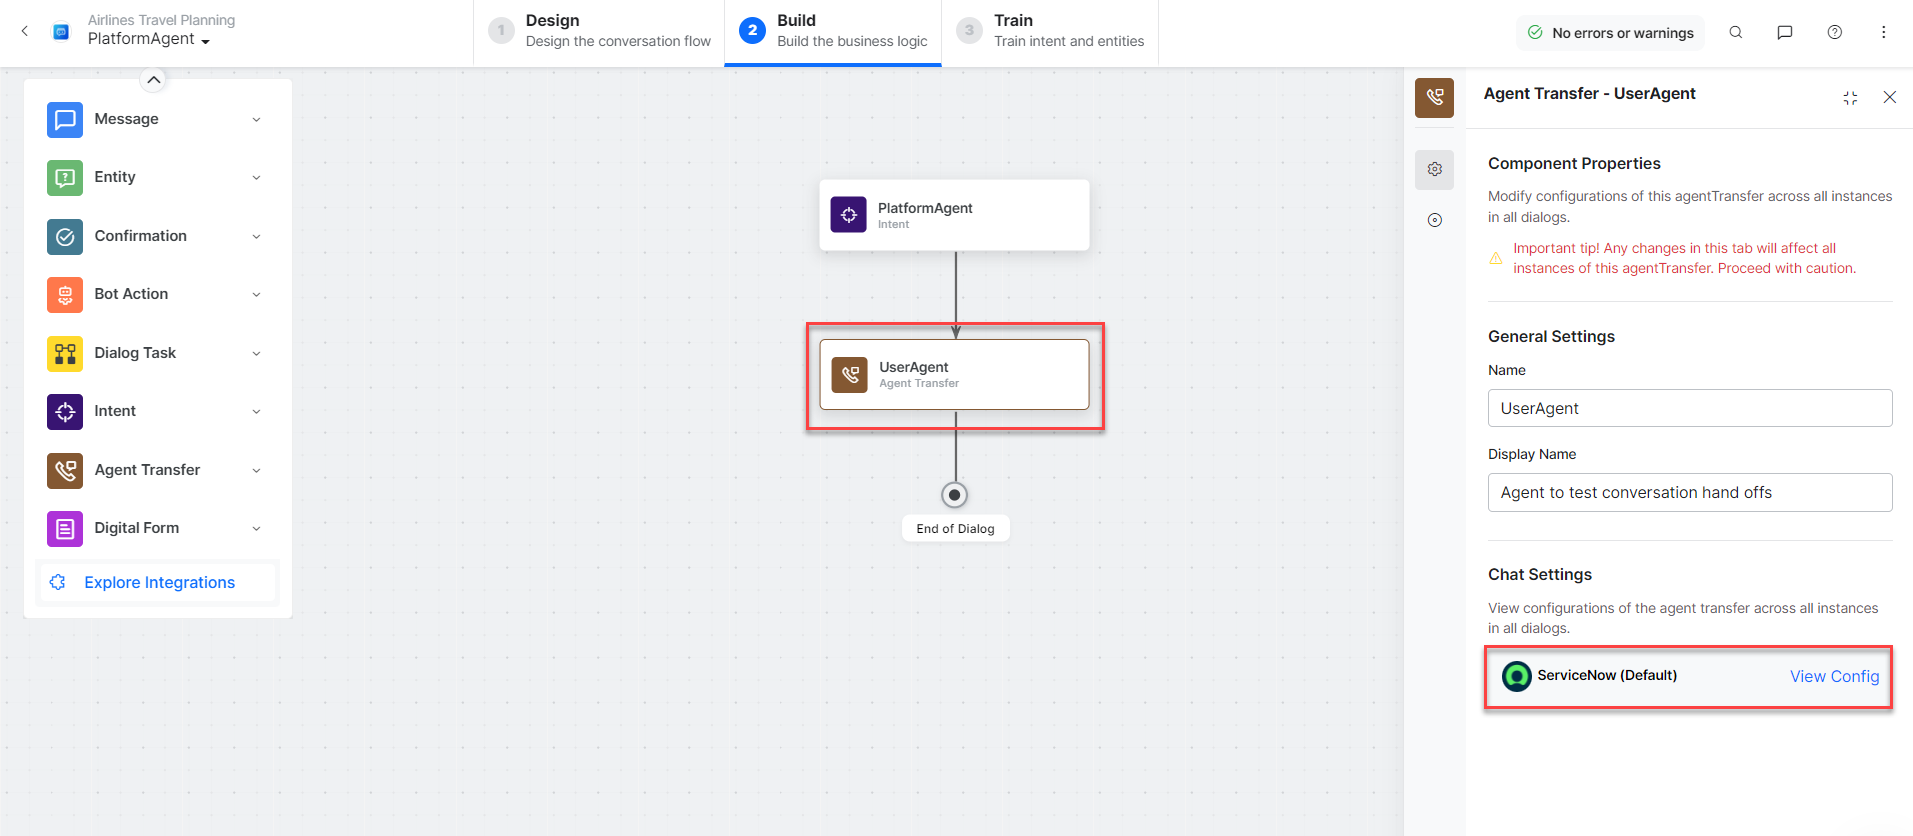
- Open a virtual assistant for which you have enabled the ServiceNow agent.
- Create a new Agent Transfer Node task. For example, create a Platform Agenttask with the UserAgent node and configure it to use the ServiceNow agent. For more information, see Agent Transfer Node.
- Click the Talk to Bot icon to launch the VA and enter Help.
- Log in to the ServiceNow Instance, select the Impersonate User from the Profile option as shown:

- Enter the Username that you created. For example, select the Abel Tuter username.

- Select All and navigate to Workspace Experience>Workspaces>Agent Workspace Home.

- In the Agent Workspace page, select Inbox and set the Status to Available.

- When a user initiates the chat from the VA, it transfers the conversation to the ServiceNow agent and sends a message to the user.
- Agent receives a notification about this on ServiceNow.
- Now, the connection between the ServiceNow agent and the user has been established, and the conversation continues.

Additional Capabilities
Pass User Information to the ServiceNow Agent System
By default, when the Platform transfers an end user’s conversation to the ServiceNow Agent System, the end user appears as a Guest in the agent system.
You can pass on the user information from the Platform to the agent system using the “ServiceNowMetaData” object. You can set the values in the “ServiceNowMetaData” object using the “agentUtils.setMetaInfo” function in the context from all the places where you can define a javascript.
Subsequently, you can use the passed values to make required changes in the ServiceNow Agent System to populate the username in the agent chat.
Steps:
- Configure Message Authentication for inbound communication in your ServiceNow instance as explained here – https://docs.servicenow.com/bundle/vancouver-servicenow-platform/page/administer/virtual-agent/task/set-up-message-auth-va-api.html.
- Before the agent transfer node is executed, you must set the meta info (userId, emailId, and the static token generated in the previous step) in the context in a specific format.
For example:- The bot can collect the Servicenow UserId and Servicenow EmailId from the users as part of the entity nodes.

- Then, in the script node, you can add the “ServiceNowMetaData” object and set it in the context using the “agentUtils.setMetaInfo” in-built function.
A sample script that can be added in the Script node:let metaData = { "payloadFields" : { "userId" : context.entities.UserID, // ServiceNow user Id; it can be a dynamic or static value. "emailId" : context.entities.UserEmail // ServiceNow user email; it can be a dynamic or static value. }, "headerFields" : { "token" : "Token_generated_in_ServiceNow_Instance" } } agentUtils.setMetaInfo("ServiceNowMetaData", JSON.stringify(metaData))
Note: By default, the context object may not include information such as user ID, email address, etc. You should explicitly capture the required details that need to be populated in the ServiceNow Agent System. Also, if the “ServiceNowMetaData” object is not defined, values are not included in the context object shared with the ServiceNow Agent System.
- The bot can collect the Servicenow UserId and Servicenow EmailId from the users as part of the entity nodes.
Route User Messages to Different Agent Groups by ‘streamId’
The Platform sends ‘streamId’ as a context variable in the request payload sent to ServiceNow. To route user messages to different agent groups by ‘streamId’ in the ServiceNow Agent System, you can define a Work Item Routing Condition in the Queue using the ‘streamId’ context variable.
Steps to access the ‘streamId’ while defining the Work Item routing condition:
- Go to the Conversational Interfaces Home and then create a new context variable with the name – streamId.

- Define a Work item routing condition in the Queue using the ‘streamId’ context variable, as shown in the screenshot below.

- You must configure the Work item routing condition based on the ‘streamId’ in each queue. For example, if the routing condition of queue 1 has a condition on ‘streamId’, but in queue 2, no condition is defined on ‘streamId’, both queues qualify for this work item. Therefore, to avoid this situation, ensure that the Work item routing conditions are defined in all the queues, as explained in the previous step.
For more information on the Work item routing condition and queue, see the following links and sample screenshots from the ServiceNow product documentation.
ServiceNow Documentation > Create a work item queue:

ServiceNow Documentation > Virtual Agent Bot Integration API:

Enable Attachment Sharing with Live Agents
Follow these steps:
- Log in to your ServiceNow account with admin user credentials.
- Go to System Properties > sys_cs_provider_application.list > Configure > Form Layout.
- In the Trusted Media Domains field, enter the domain you want to send and receive the attachments.

Agent Transfer Status
The XO platform now records the status of the agent transfer in both Debug Logs and Analytics. This information helps to analyze whether the agent transfer is successful or not. Thus, it facilitates improved tracking and troubleshooting of transfer-related issues.
Failed Agent Transfer Notification
The platform now displays a default, non-editable message to users when a ServiceNow agent transfer fails due to agent unavailability, improving user clarity and reducing the need for repeated transfer attempts.
Default message: No agents are available to handle your request. Please try again later.