Salesforce is used for various needs of different teams in an organization, such as marketing, sales, commerce, service, and IT work as one from anywhere using the chat module. Kore.ai XO Platform’s Salesforce Agent integration allows you to seamlessly hand off the virtual assistant conversations to your live agents on Salesforce.
Use the configuration steps below as general guidelines to enable the Salesforce Agent integration. You may notice minor differences based on the version of Salesforce you are using.
Overview
Kore.ai’s Virtual Assistant (VA) serves as the central point of interaction for the users. The VA facilitates communication and interaction between the user and the Salesforce agent using the chat module. In addition to its regular capabilities, the VA acts as an intermediary between the users and the Salesforce agents to hand over conversations seamlessly. The VA also allows you to integrate with the Salesforce platform.
Configuration
The XO Platform supports the following Salesforce integration methods for agent transfer:
- Live Chat (Legacy): This method enables agent transfer using Salesforce’s traditional live chat interface. It suits users with existing Live Chat setups and offers real-time messaging between virtual assistants and human agents.
- Messaging for In-App and Web (MIAW): This is Salesforce’s latest messaging service, built for seamless and persistent conversations across in-app and web channels. MIAW offers an enhanced customer experience and is the default option for new integrations.
Before configuring a Salesforce agent, users must be enabled with the Service Cloud User license to ensure all options are displayed in the Customize section of the left navigation.
Configure Live Chat
To configure the Salesforce agent, follow these steps:
Step 1: Set Up a Salesforce Live Agent
- Log in to your Salesforce account.
- From the main menu on the top, navigate to Setup > Customize > Chat Agent > Settings.
Note: Make sure you switch to the Classic view; the Live Agent settings do not come up under the Lightning Experience view. For detailed instructions on setting up Live Agent, visit:https://help.salesforce.com/s/articleView?language=en_US&id=live_agent_intro.htm. - Find the Live Agent section under Build > Customize > Chat > Chat Agent Configurations.

- To add a new Live Agent configuration, click the New button.
- In the New Live Agent Configuration form, you can enter the configuration details, such as the name and description.
- Once you have entered the required details, click the Save button to save the new Live Agent configuration.

Step 2: Retrieve the Live Agent URL/API Endpoint
To retrieve the live agent URL/API endpoint, follow the steps:
- From the main menu on the top, navigate to Setup > Customize > Chats > Chat Sessions > Deployments.

- In the Chat Deployments page, you will see a list of all the configured Live Agent deployments.
- To get the Live Agent URL/API endpoint, click the name of the Live Agent deployment that you want to use.
- In the Deployment Code region, you will find the Live Agent URL/API endpoint in the Code field as shown below:

Step 3: Retrieve the Organization ID
To retrieve the Organization ID, follow these steps:
- From the main menu on the top, navigate to Administer > Company Settings > Company Information.
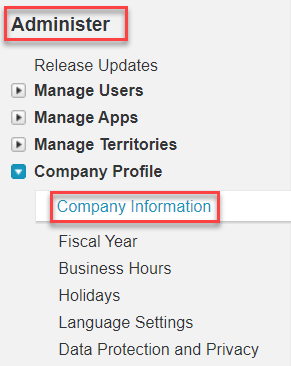
- In the Company Information page, you will see a list of details about your organization.
- To retrieve the Organization ID, search for the Salesforce.com Organization ID field.
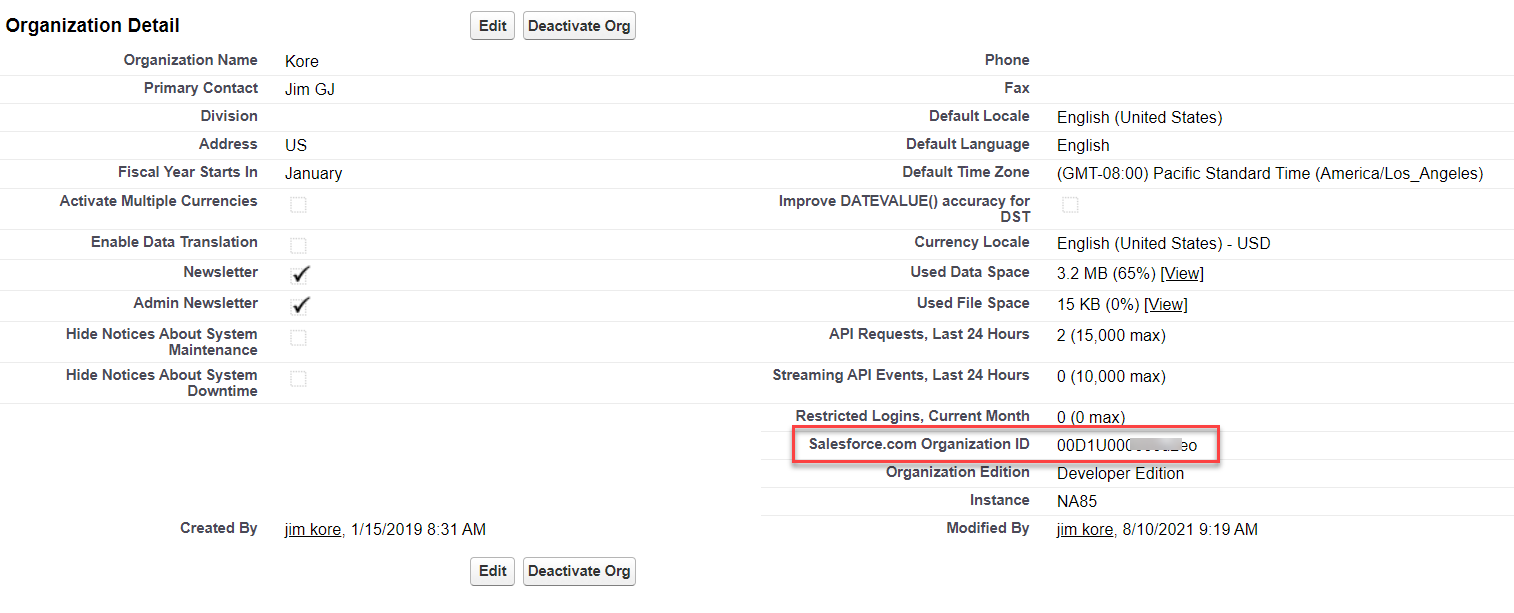
Note: The Organization ID is a unique identifier for your Salesforce organization. - Copy and keep it for future use.
Step 4: Retrieve the Deployment ID
To retrieve the Deployment ID, follow these steps:
- From the main menu on the top, navigate to Setup > Customize > Chats > Chat Sessions > Deployments.
- In the Chat Deployments page, you will see a list of all the configured Live Agent deployments.
- In the Deployment Code region, you will find the Deployment ID in the Code field as shown below:
- Copy and keep it for future use.
Step 5: Retrieve the Button ID
To retrieve the Button ID, follow these steps:
- Go to Customize > Chats Chat Sessions > Chat Buttons & Invitations page, and click the button that you want to use for this integration.
- In the Chat Deployments page, you will see a list of all the configured Live Agent deployments.
- In the Deployment Code region, you will find the Deployment ID in the Code field as shown below:

The Button ID is the string of characters after the last slash / in the URL. For example: https://meya-dev-ed.my.salesforce.com/5731I000000PL9G - Copy and save it for future use.
Step 6: Enable the Salesforce Agent
- Log in to the Kore.ai XO Platform https://bots.kore.ai/botbuilder.
- Select a Virtual Assistant for which you want to configure the Salesforce agent.
- Navigate to Build > Integrations > Agent Transfer and click the Salesforce.

- Click the Configurations tab and enter the following credentials for the Salesforce Agent:
- Live Agent URL: The live agent URL endpoint for the Salesforce, copied before.
- Organization ID: The Organization ID for the Salesforce, copied before.
- Deployment ID: The Deployment ID for the Salesforce, copied before.
- Button ID: The Button ID for the Salesforce, copied before.

- If you want to make Salesforce the default agent, enable the Default Agent System for all bot channels option.
Note: This option is available only when multiple agents are configured for your VA. - Click Manage to map the channels you want to use Salesforce agent for handing over the conversations. To learn more about channel enablement, see Adding channels to your bot.

- After mapping channels, click Done.
- Click Save to enable the Salesforce agent.
- Publish the VA. For more information, see Publishing Bot.
Execution
This section helps you verify how the conversations from the Kore.ai XO Platform are being handed over to the Salesforce agent after enabling it.
To verify the data exchange between Kore.ai’s VA and Salesforce agent, follow these steps:
- Go to the Salesforce Chat Console and launch the Live Agent that you created in Step 1.
Note: The Salesforce Chat Console URL is unique for your region and company. Contact your Salesforce System Administrator to find your Chat Console URL. - In the Salesforce Classic Chat view, click the Apps icon and select the App Launcher option.

- In the App Launcher page, click the Live Agent to open the chat console as shown below:

- Open a virtual assistant for which you have enabled the Salesforce agent.
- Create a new Agent Transfer Node task. For example, create a Talk to Live Agent task with the LiveChats node and configure it to use the Salesforce agent. For more information, see Agent Transfer Node.

- Click the Talk to Bot icon to launch the VA and enter Help.
- Once you invoke the agent transfer dialog, the Salesforce Chat Console receives a notification alert.
- When a user initiates the chat from the VA, it transfers the conversation to the Salesforce agent and sends a message to the user. Agent receives a notification about this on Salesforce.
- Now, the connection between the Salesforce agent and the user has been established, and the conversation continues.

Configure Messaging for In-App and Web (MIAW)
To configure the Salesforce agent, follow these steps:
Step 1: Publish a Deployment
Create a custom client deployment that can be referenced in public REST API endpoints.
- Complete the steps in Prepare a Salesforce Org for Messaging for In-App and Web:
- Configure Omni-Channel.
- Create an Omni-Channel flow to route messages.
- Create a Messaging for In-App and Web channels on the Messaging Settings page.
- Configure the Service Console to support messaging.
- From Setup, in the Quick Find box, enter Embedded Service Deployments and select Embedded Service Deployments.
- Click New Deployment.
- Select Messaging for In-App and Web, and then click Next.
- Click Custom Client, and then click Next.
- Name your Embedded Service deployment, and customize the API name if desired.
- Select the Messaging for In-App and Web channels that you created earlier. If you haven’t created one yet, go to the Messaging Settings page and do so.
- Save your work.
- Create and publish your new deployment, which takes a few minutes. Don’t navigate away from the page until it’s complete.
Step 2: Retrieve Organization ID, Organization Base URL, and Developer Name
- Log in to your Salesforce account.
- Click your profile icon in the top-right corner, then select Setup.
- In the Quick Find search bar on the left panel, type Embedded Service Deployments and select it. Select the Messaging Channel and then select Code Snippet.

- From the Code Snippet, copy Organization ID, Organization Base URL, and Developer Name.

Step 3: Enable the Salesforce Agent
- Log in to the Kore.ai XO Platform https://bots.kore.ai/botbuilder.
- Select a Virtual Assistant for which you want to configure the Salesforce agent.
- Navigate to Build > Integrations > Agent Transfer and click the Salesforce.
- On the Configurations tab, select Messaging for In-App and Web(MIAW) and enter the following credentials for the Salesforce Agent:
- Organization ID: The Organization ID for Salesforce, copied before.
- Organization Base URL: The Deployment ID for Salesforce, copied before.
- Developer Name: The Salesforce developer’s name, copied before.

- If you want to make Salesforce the default agent, enable the Default Agent System for all bot channels option.
Note: This option is available only when multiple agents are configured for your VA. - Click Manage to map the channels you want to use Salesforce agent for handing over the conversations. To learn more about channel enablement, see Adding channels to your bot.
- After mapping channels, click Done.
- Click Save to enable the Salesforce agent.
- Publish the VA. For more information, see Publishing Bot.
Additional Capabilities
The Salesforce MIAW Agent Integration supports agent name display, real-time read receipts, automatic inactivity timeouts, UI-based configuration of standard responses and stop words, and metadata transfer for context. These enhancements improve the agent experience, streamline session handling, and simplify configuration through the Salesforce interface.
Internal Agent Transfer and Conference Handling
The Platform offers seamless agent transfers and conferencing capabilities within Salesforce MIAM. These features ensure uninterrupted customer support sessions, smooth agent transitions, and real-time updates for end-users.
- Session Continuity: The chat session lifecycle is decoupled from individual agent disconnections, ensuring the session remains active as long as at least one agent or the customer is engaged.
- Seamless Transitions: The Platform utilizes Salesforce Server-Sent Events (SSE) to handle agent transfers, joins, and exits during transfer and conference scenarios, enabling smooth handoffs between agents.
- Transparent Communication: Customers receive clear, real-time system messages during agent transfers and conferences, keeping them informed about the status of their support session.
Display of Agent Name
Salesforce automatically displays the human agent’s name in the chat once they join the conversation.
Read Receipts
The Salesforce and the Platform show real-time read receipts for both agent and user messages. Salesforce triggers the agent-to-user read receipts through events.
Inactivity Session Closure
The Salesforce Integration allows you to configure automatic session end after a specified duration of user inactivity. For more information on configuration, refer to Automatically Mark Messaging Sessions Inactive.
Configurable Standard Responses
Salesforce enables the full configuration of system messages displayed to end-users during agent handoffs and live chat sessions, including wait time alerts, agent join messages, and session closure prompts. For more information on configuration, refer to Auto-Response Components.
Conversation Stop Word Configuration
The Salesforce Integration enables end-users to end live agent sessions using a keyword configured in the Salesforce console. This helps reduce agent occupancy when the session is no longer actively needed. For more information on configuration, refer to Customize the Messaging.
Pass Metadata or User Information to the Salesforce Agent System
The platform automatically transfers comprehensive user context to Salesforce agents during handoffs, including usernames, case IDs, and other details. You can customize which metadata gets passed by configuring the script node before agent transfer. This seamless context sharing provides agents with complete conversation visibility, eliminating the need for users to repeat information and accelerating issue resolution.
Sample Script:
let miawMetaInfo = {};
miawMetaInfo.preChatInfo = {
"Pincode": "500081",
"City": "Hyderabad",
"Country": "India"
};
context.session.BotUserSession.miawMetaInfo = miawMetaInfo;
Follow the steps to transfer the metadata and populate it on the Salesforce dashboard:
- Step 1: Configure Salesforce Agent in AI for Service
- Step 2: Update Messaging Session Object In Salesforce
- Step 3: Map Custom Parameter In Salesforce
- Step 4: Add Pre-Chat Field in Embedded Service Deployment in Salesforce
- Step 5: Create a Flow to Update Messaging Session in Salesforce
Step 1: Configure Salesforce Agent in AI for Service
Follow these steps:
- Log in to Platform and navigate to App Settings > Integrations > Agent Transfer > Chat > Salesforce.
- On the Configurations tab, select Messaging for In-App and Web(MIAW) and enter the following credentials for the Salesforce Agent:
- Organization ID: The Organization ID for Salesforce, copied before.
- Organization Base URL: The Deployment ID for Salesforce, copied before.
Note: If your base URL is
koreaiinc.my.salesforce.com, enter it ashttps://koreaiinc.my.salesforce-srct.com. - Developer Name: The developer’s name, copied before.
- Click Save.
- Go to the Dialogflow and insert a Script Node before the Agent Transfer Node.
- Use the sample script to configure the metadata to be transferred in the key-value pair.
Step 2: Update Messaging Session Object In Salesforce
Follow these steps:
- Log in to the Salesforce account.
- Navigate to Object Manager > Messaging Session > Fields & Relationships.
- Click New to create a custom field.
- Select the Data Type and click Next.
- Enter the Field Label, Length, and Field Name values. Click Next.

- Check the Visibility and Ready-only check boxes as required. Click Next.

- Click Save. Ensure to create a custom field for each field of metainfo.

Step 3: Map Custom Parameter In Salesforce
Follow these steps:
- Navigate to Feature Settings > Service > Messaging > Messaging Settings.
- Locate and click on the Messaging Channel on which you want to map the custom parameter, for example, CustomClientTest.

- In the Custom Parameter, click New map parameter.
- Enter Parameter Name, Parameter API Name, Channel Variable Name, Data Type, and Maximum Length. Click Save.

- In Parameter Mappings, click New to add your custom parameter to the flow or agent task.
- Enter the Parameter and Flow Variable Name. Click Save.

- Scroll to the top and click Active.
Step 4: Add Pre-Chat Field in Embedded Service Deployment in Salesforce
Follow these steps:
- Navigate to Feature Settings > Service > Embedded Service > Embedded Service Deployments. The Embedded Service Deployment Settings page is displayed.
- Click the Messaging Channel and click Edit Pre-Chat.

- In the Visible Pre-Chat Fields section, click Add. Select the field type to add the created field, which is available in the Hidden Pre-Chat Fields section.

- Select the Field Type and Channel Variable Name. Click Save.

- Once the field is added in the Visible Pre-Chat Fields section, you can optionally mark it as required. Scroll down and click Save.
- Click Pushish in the top right corner.
Step 5: Create a Flow to Update Messaging Session in Salesforce
Follow these steps:
- Navigate to Process Automation > Flows.
- Locate and click the configured flow for the Messaging Channel, or create a new flow and configure it.

- In the Toolbox, click New Resource. Select the Resource Type, API Name, Data Type, and Availability Flow. Click Done.
Note: Ensure the flow variable matches the API name of your custom Messaging Session field. This enables seamless metadata transfer from the Platform to Salesforce, providing agents with complete context.
- Click Update Records and set the field values for the messaging session records.

- Save the updated record as a New version and then click Activate.