Genesys Voice Platform unifies web and VoIP telephony networks to enable new and powerful voice self-service applications. Kore.ai XO Platform’s Genesys Agent integration allows you to seamlessly hand off the virtual assistant conversations to your live agents on Genesys.
This post provides the configuration steps for enabling the Genesys Agent integration. Use the configurations provided below as general guidelines, as there could be some differences based on the version of the Intercom that you are using.
Overview
Kore.ai’s Virtual Assistant (VA) serves as the central point of interaction for the users. In addition to its regular capabilities, the VA acts as a proxy or intermediary between the users and the Genesys agents to hand over conversations seamlessly. The VA also allows you to integrate with the Intercom platform. The VA facilitates communication and interaction between the user and the Genesys agent using the chat module.
The XO Platform supports the following Genesys integration methods for agent transfer:
- WebChat: Genesys WebChat allows agents to engage in real-time, text-based conversations with customers, similar to instant messaging. The system routes chat requests based on agent skills, availability, or queue rules. Agents can handle multiple chats at once, depending on configuration. During a chat, agents can use canned responses, follow scripts, and request supervisor assistance. When escalation or specialized support is needed, agents can transfer the active chat to another agent or queue without interrupting the customer experience.
- Web Messaging: Genesys Web Messaging supports asynchronous and real-time conversations with a persistent chat history. Agents can view the full customer journey, respond across sessions, and use features like quick replies and rich media. When needed, agents can transfer the ongoing conversation to another agent or queue without losing context, ensuring a seamless and consistent experience.
Current Limitations of WebMessaging
As of now, the following features are not supported and will be available in the upcoming release:
- Resuming the same Interaction again
- Rich Media Messaging
Configuration
To configure the agent, follow these steps:
Step 1. Add the Genesys Cloud login URL
- Log in to your Genesys Cloud account. The login URL will be visible in your browser’s address bar e.g., https://login.mypurecloud.com.
- Copy the URL and keep it for future use.
- Alternatively, you can also get your region-specific “Genesys Cloud login URL” by referring to this Genesys Cloud region URL’s info.
Step 2. Retrieve the Organization ID
- To retrieve your organization ID, please follow the steps mentioned in Find your Organization ID.
- Copy the ID and keep it for future use.
Step 3. Create a Queue
- Navigate to Admin > Contact Center > Queues.
- Click Create Queue.
- Enter the queue name, and select the appropriate division.
- Click Save and navigate to the Queue settings screen.
- Assign agents or groups as queue members.
- Configure routing methods and other queue settings as needed.
- Click Save.
- Copy the queue name and keep it for future use.
Step 4. Create an Inbound Message Flow
- Navigate to Admin > Architect.
- Hover over the Flows menu and select Inbound Message Flow.
- Click Add to create a new inbound message flow.
- Enter a unique name and (optionally) a description of the flow.
- Select the appropriate division for the flow.
- Click Create Flow to open the flow configuration page.
- In the flow editor, add a Transfer to ACD action and select the target queue for agent transfer.
- Configure any additional logic or error handling as needed.
- Validate and Publish the flow to make it available for routing.
Step 5. Create a Deployment Key
For WebChat
- Navigate to Admin > Contact Center > Widgets.
- Click Create Widget, select the widget type as Third Party, and save it.
- In the widget settings, select Route to Flow.
- Choose the Inbound Message flow you have created in Architect for routing.
- Once saved, the system will display a Deployment Key.
- Copy this key and keep it for future use.
For WebMessaging
- Navigate to Admin > Message > Messenger Configurations and click New Configuration.
- Enter a name and description, then under Labels & Languages Support, choose the supported languages and set the default language.
- In the Apps tab, set Conversation Disconnect to Display conversation status and disconnect session, and click Save.
- Navigate to Admin > Message > Messenger Deployments and click Create New Deployment.
- Enter a deployment name, select the Messenger configuration you have created, and for Supported Content Profile, choose WebMessaging Legacy Default.
- Set domain restrictions as needed.
- For Select your Architect Flow, choose the inbound message flow you have created.
- Click Save to generate the Deployment Key, then copy the same and keep it for future use.
Step 6. Add the WebSocket URL
Note: If you are configuring WebChat, skip to step no 7: Enable the Genesys Agent.
- Go to the following link to find your region’s Genesys WebSocket URL: Genesys WebSocket Region Info.
- Locate the WebSocket address that matches your Genesys Cloud region.
- Copy the WebSocket URL (e.g., wss://streaming.mypurecloud.com/v2/websocket) and keep it for future use.
Step 7: Enable the Genesys Agent
- Log in to the Kore.ai XO Platform: https://bots.kore.ai/botbuilder
- Select a Virtual Assistant for which you want to configure the Genesys agent.
- Navigate to Build > Integrations > Agent Transfer > Chat and click the Genesys button.

- Click the Configurations tab and enter the following credentials for the Genesys Agent:
- Genesys Cloud login URL: URL of your Genesys AWS Region, which will allow the platform to route the conversation requests to the provided Genesys AWS region. This is a mandatory field. You can find the URL of your region through the link provided in the field.
- Organization_Id: The organization ID hosted on Genesys.
- Deployment_Id: The deployment ID of your Genesys account.
- Queue Name: The unique queue name.
- Genesys Web socket URL: The unique web socket URL (applicable only for WebMessaging).

- If you want to make Genesys the default agent, enable the Default Agent System for all bot channels option.
Note: This option is available only when you have multiple agents configured for your VA. - You can customize the channel mapping by clicking the Manage link.
- Once you click Manage, you can map the channels for which you want to use the Genesys agent to hand over the conversations. To learn more about channel enablement, see Adding channels to your bot.
- After mapping channels, click Done.
- Click Save to enable the Genesys agent.
- Publish the VA. For more information, see Publishing Bot.
Execution
This section helps you verify how the conversations from the Kore.ai XO Platform are handed over to the Genesys agent after enabling it.
To verify the data exchange between Kore.ai’s VA and Genesys agent, follow these steps:
- Open a virtual assistant for which you have enabled the Genesys agent.
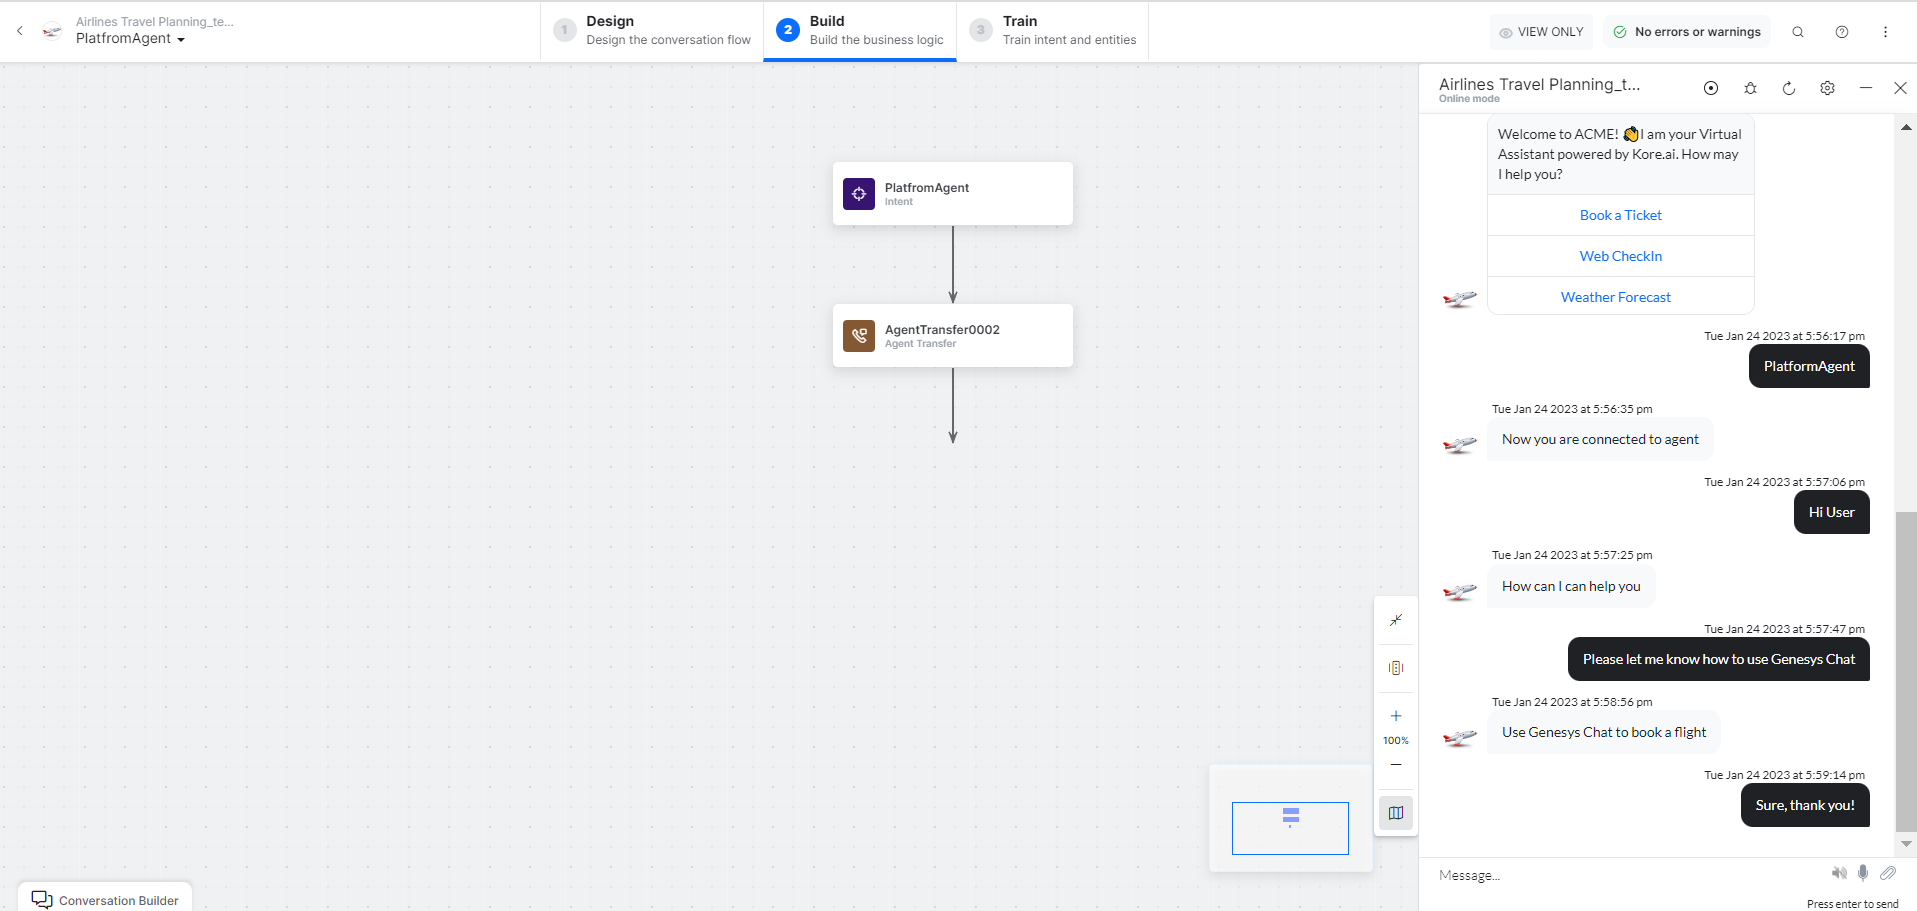
- Create a new Agent Transfer Node task. For example, create a PlatformAgent task with the AgentTransfer node and configure it to use the Genesys agent. For more information, read the Agent Transfer Node article.

- Click the Talk to Bot icon to launch the VA and enter Help.
- When a user initiates the chat from the VA, it transfers the conversation to the Genesys agent and sends a message to the user.
- Agent receives a notification about this on Genesys.
- Now, the connection between the Genesys agent and the user has been established, and the conversation continues.
Additional Capabilities
Metadata or User Information Transfer
The XO platform introduces a dedicated agent metadata object to streamline the transfer of context during agent hand-offs.
For the Genesys agent integration, the metadata object is named GenesysMetaData. Developers can use the built-in utility function agentUtils.setMetaInfo to set the metadata they want to pass to the agent. This function can be used wherever the platform supports JavaScript, offering flexibility to inject context at various points in the conversation flow. This ensures agents receive all relevant information when a conversation is transferred.
How to Pass Metadata in the Genesys Agent System
Before executing the agent transfer node in the platform, developers should populate the metadata object with any relevant information they want to pass to the agent.
For instance, if you need to include an employee’s “Employee ID” and “Department” in the metadata, you can use a script to extract these details from the conversation context. When employee data is collected through entities, you can dynamically assign these values to the metadata object by referencing the relevant context properties.
Sample Script on how you can set the metadata using a Script node:
The platform allows you to assign both fixed (static) and variable (dynamic) values to the metadata.
let metaData = {

  "EmployeeID": context.entities.EmployeeID,

  "Department": context.entities.Department

};

agentUtils.setMetaInfo("GenesysMetaData", JSON.stringify(metaData));

How to Access the Metadata in the Genesys Agent System
Once the Agent Transfer process begins, the metadata you’ve passed will be stored in the Participant Data section. To view this metadata in the Genesys Agent Desktop, go to Admin > Performance > Workspace > Interactions > [Select the Interaction] > Participant Data.

If you want to use the metadata by mapping it to attributes or flow variables before transferring the interaction to an agent, you can utilize the GetParticipantData action within the Architect Message Inbound flow, before the Transfer to the ACD node.
- Add the GetParticipantData action before the Transfer to the ACD node in the Architect Message Inbound Flow.
- In the GetParticipant Data action, create flow variables and then map the relevant metadata attributes to these flow variables.
- Then, reference these flow variables as needed in the Transfer to the ACD node to ensure the metadata is properly utilized during the agent transfer.


Dynamic Queue Handling
Dynamic Queue Handling in Genesys Cloud enables organizations to intelligently route customer interactions to the most appropriate queue in real-time, based on the current context and metadata of each conversation. Instead of statically assigning every interaction to a fixed queue, dynamic queue handling enables the system to evaluate factors such as customer details, issue type, language preference, or priority, and then determine the most suitable queue for handling that specific interaction.
To enable dynamic queue handling in Genesys Cloud, the queue name should be included as part of the metadata transferred from your platform during the agent hand-off. This queue name can be dynamically set by the developer based on the specific use case or routing logic required for each interaction.
Note: The queue name in the Entity node accepts underscores (_) only when Auto Correct is turned off. We recommend either avoiding underscores in the queue name or turning off Auto Correct in the Entity node to ensure dynamic queuing works as expected.
Follow These Steps:
- Pass the QueueName as part of the metadata when initiating the transfer from your platform to Genesys.
- In the Genesys Architect Inbound Message Flow, add a ‘Get Participant Data’ action before the ‘Transfer to ACD’ node to retrieve the QueueName from the metadata and assign it to a flow variable.
Note: Ensure that the attributeName matches the exact key used in the platform’s metadata. For clarification, you can refer to the screenshots below. - In the Transfer to ACD node, set the Queue Name field to Expression and use the FindQueue() function with the flow variable to dynamically resolve the target queue.
- This configuration enables dynamic routing of conversations to the appropriate queue based on the metadata, offering flexibility in queue assignment according to your business logic.


