사용자 정의 스크립트 파일을 사용하면 다른 작업, 노드 및 기타 봇 요소에서 사용할 수 있는 재사용 가능한 유틸리티 JavaScript 기능을 수집하고 관리할 수 있습니다. 사용자 정의 스크립트 파일을 봇에 업로드하면 봇의 어느 곳에서나 파일의 모든 기능에 액세스할 수 있으므로 중복 개발 노력이 줄어듭니다.
사용자 정의 스크립트 파일 사용하기
쇼핑 봇의 한 사용 사례를 통해 사용자 정의 스크립트 파일을 활용하여 개발 기간을 상당히 단축할 수 있는 방법을 알아보겠습니다. 소비자에게 다양한 옵션을 제공하는 쇼핑 봇의 다음 대화형 흐름을 살펴보세요. 아래 대화에서 봇은 먼저 사용자에게 여성용 또는 남성용 제품을 클릭하여 제품군을 선택하라는 메시지를 표시한 다음 의류, 신발 또는 액세서리와 같은 제품 유형을 선택하라는 메시지를 표시합니다.  위의 대화에서 제품군 및 제품 유형 옵션은 기능면에서 모두 동일하지만 표시되는 선택 사항만 다르다는 것을 확인할 수 있습니다. 버튼 템플릿의 기능을 각 노드에 하드 코딩하는 대신 옵션을 전달하여 이러한 노드에서 호출할 수 있는 사용자 정의 스크립트 파일에 함수를 작성할 수 있습니다. 다음은 기능을 수행하기 위한 샘플 함수 스크립트입니다.
 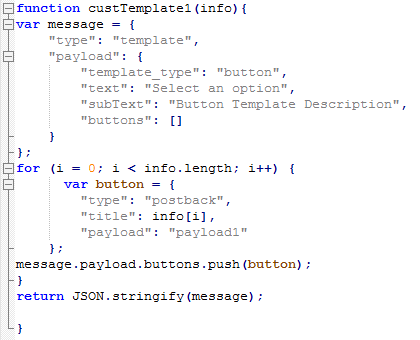 다음 이미지는 노드에서 함수를 호출하는 방법을 보여줍니다.
사용자 정의 스크립트 파일 업로드하기
스크립트 파일을 봇에 업로드하려면 다음 단계를 따르세요.
- 상단 메뉴에서 빌드 탭을 선택합니다
- 왼쪽 메뉴에서 설정 >봇 기능을 선택합니다.
- 사용자 정의 스크립트에서 가져오기를 클릭합니다.
- 사용자 정의 스크립트 가져오기 대화 상자에서 찾아보기를 클릭하고 로컬 컴퓨터의 스크립트 파일로 이동합니다. 가져오기를 클릭합니다.
- 가져오기가 성공적으로 완료되면 완료를 클릭합니다.
사용자 정의 스크립트 파일 업데이트하기
파일을 다운로드하고 수정한 다음 봇으로 다시 가져와 사용자 정의 스크립트 파일에 기능을 추가하거나 수정할 수 있습니다. 새 사용자 정의 스크립트 파일을 가져오면 기존 파일이 변경되며, 나중에 다시 되돌릴 수 없습니다. 따라서 다운로드한 파일의 복사본을 백업을 위해 보관하고 주의를 기울이는 것이 좋습니다.
- 상단 메뉴에서 빌드 탭을 선택합니다
- 왼쪽 메뉴에서 설정 >봇 기능을 선택합니다.
- 사용자 정의 스크립트에서 다운로드를 클릭하여 로컬 컴퓨터에 파일 복사본을 저장합니다.
- 파일을 변경한 후 새로 가져오기를 클릭합니다.
- 찾아보기를 클릭하여 로컬 컴퓨터에서 사용자 정의 스크립트 파일 위치로 이동한 다음 가져오기를 클릭합니다.
- 가져오기가 완료되면 완료를 클릭합니다.