The Form node lets you integrate Digital Forms with Dialog Tasks. This facilitates the presentation of forms to capture user inputs for specific use cases.
The primary purpose of the Form node is to represent a UI Form in the dialog task and make the form available for end-users on their channel. For example, let us consider a travel assistant that has a form to capture the customer details to make a new booking. During this process, you may want to use the form instead of prompting for each and every entity value.
Add the Node
Before you can begin setting up a Form node, you need to have previously created a Digital Form to use within the node.
To add a form node to the dialog task, follow the below steps:
- Open the dialog task to which you want to add the Form node.
- Add the Form node in the designated place. To learn how to add nodes, please click here. You will be shown a list of existing Digital Forms from which you can choose the one to add to this node.

- Choose the channels on which you want to offer the form experience.

- Choose the Form Experience: If you are offering your Virtual Assistant on multiple channels, you can choose whether to enable the Digital Form Experience as the default experience on all these channels, or use a combination of Digital Form Experience and Conversation Experience.
- Only UI Form: Users will be presented the Digital Form Experience on all the channels that are enabled for the assistant that you are working with. This will create a Form Node and automatically open the Component Properties panel, where you can continue configuring the node.
- Both Digital Form and Conversational Experience: You can choose the channels on which the Digital Form Experience should be enabled and all other channels will use the Conversational Experience.

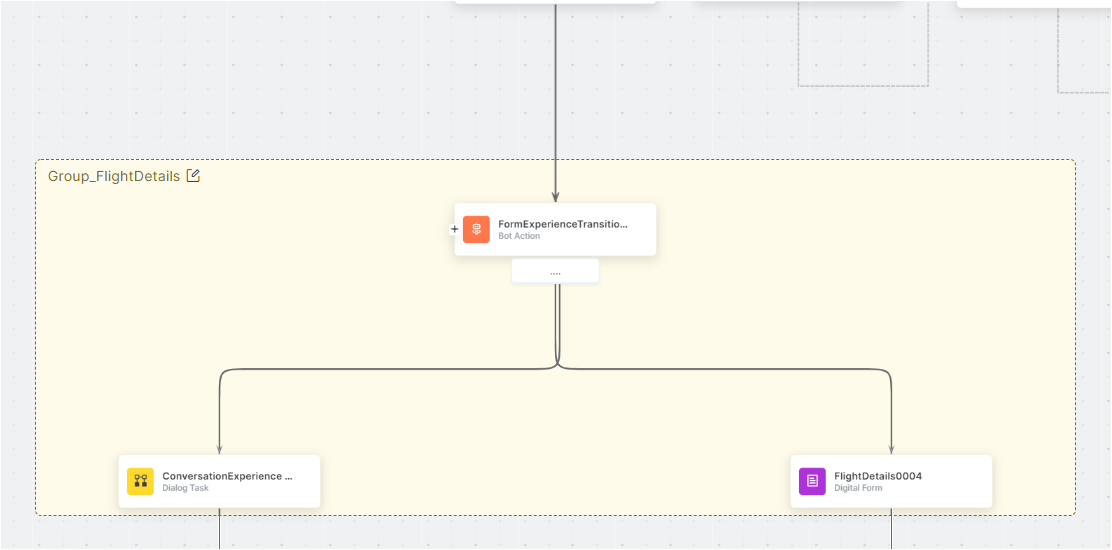
- By following this process, the Platform will automatically add a Form Experience Transition (Bot Action) node group, which ramifies into the necessary Dialog Task and Form Node, to allow you to further customize the Form Experience and Conversation Experience for your channel selection. This Transition is composed of individual nodes, which you will need to configure separately, according to their respective node types.
Configure the Node
This configuration applies to the Form Node Type – regardless of whether it is standalone by selecting Only UI Form during setup, or whether it is part of a Form & Conversation Experience.
Component Properties
| Note: The configurations you set up or modify in this section are reflected in all other dialog tasks that use this node. |
The Form Component Properties allow you to configure a variety of settings and prompts related to your Form Node, as follows:
- On the Component Properties tab, under the General Settings section, enter a Name and Display Name for the form node. Node names cannot contain spaces, but the Display Name can.
- In the User Prompts text box, enter the prompt message that you want the user to see for this form. It should instruct the user to click on the link to initiate the form. It is not recommended to change the context variable reference (of the form {{context.form_node.formLink}})coded therein. You can enter channel-specific messages for user prompts. For more information, refer to Using the Prompt Editor.
- In the Error Prompts text box, review the default error message, and if required modify it. For more information, refer to Using the Prompt Editor.
- In the Submit Prompts text box, review the default message that is displayed after successful submission of the form, and if required, modify it. This message is applicable only when the UI Form is opened in a browser tab.
Steps to personalize form submission prompt for Mobile/Web SDK:- Under Submit Prompts, click Add a prompt.

- In the additional prompt editor, select Web/Mobile Client.

- Write or change the message as appropriate.

For more information, refer to Using the Prompt Editor.
- Under Submit Prompts, click Add a prompt.
- Under the Web/Mobile SDK Form Behavior section, you can set how the form is displayed. You can select:
- Open full page popup form – This is the default setting where the form opens as a full page on the SDK chat interface.
- Open inline form – The form opens as an inline form within the chat window.
- Under Advanced Controls section, you can choose the submit prompt to show for Web/Mobile SDK and select how the VA handles the conversation when the user cancels the form.
- In the Submit Prompts for Web/Mobile SDK section, select the prompt to show on successful form submission. The options are:
a. Use Submit Prompts – The custom message added in the prompt is shown.
b. Use default system response – The following confirmation is shown – {{FormName}} Form is successfully submitted.
- In the Form Cancellation Behavior section, select how the VA handles the conversation when the user cancels the form:
a. Discard the task and trigger End of Task Event – This is the default option.
b. Continue with this task and transition to this node – In the Select Node drop-down list, you can select any node present in the current dialog task.

Note: The target node has to be in the same dialog, you cannot make a jump to a target node outside the current dialog. The list of target nodes only shows the local nodes. If the target node is not present during runtime, the platform presents the error Error in continuing the conversation, and the task should get discarded. - In the Submit Prompts for Web/Mobile SDK section, select the prompt to show on successful form submission. The options are:


Instance Properties
Use the Instance Properties to define any user tags that you want to set.
| Note: The settings in the Instance Properties tab are specific to the current dialog task and do not reflect in other dialog tasks that use this form node. |
To configure this tab, please follow these steps:
- On the Form window, click the Instance Properties tab.
- Under the Custom Tags section, add tags to build custom profiles of your conversations. Click here for more.

Connections Properties
From the node’s Connections tab, you can determine the node in the dialog task to execute next. You can write the conditional statements based on the values of any Entity or Context Objects in the dialog task, or you can use intents for transitions.
| Note: These conditions are applicable only for this instance and will not affect the node when being used in any other dialog. |
For details on how to work with connection conditions, please see Adding IF-Else Conditions to Node Connections.
