In this How-To, we will explore a scenario in a Banking Bot, where the account-related data for a customer is stored in a Data Table. We will see how the data can be updated by a request from the user.
For details on what Data Tables are and how it is implemented in the Kore.ai Bots platform, refer here.
Problem Statement
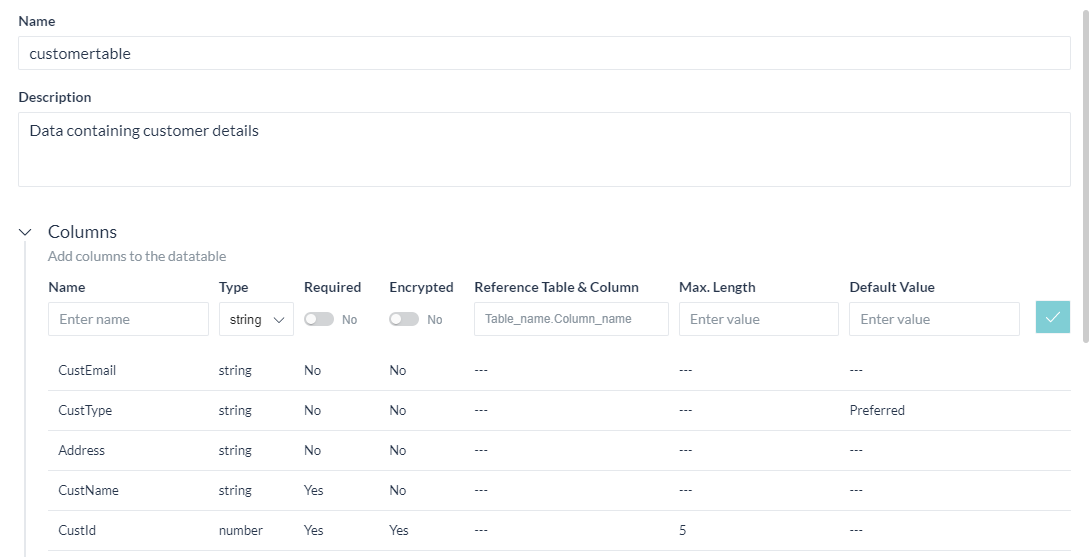
Consider a Banking Bot, for a given customer, the following data is stored. This data needs to be updated as per customer request. Customers can update only email id and address details.
- Id;
- Name;
- Email id;
- Address; and
- Type
Pre-requisites
- Bot building knowledge;
- A Banking Bot with access to the above-mentioned table, and data existing in that table (refer here for use case example to create and add data).
Configurations
Let us consider each of the following scenarios one by one:
- Dialog Task to:
- gather required information; and
- invoke a service to update the customer information.
Dialog Task Configuration
We will be creating a dialog task to gather the required information, and use a Service node to update the data table with the values thus gathered.

Create Dialog Task
- From the left navigation menu, select Bot Tasks -> Dialog Tasks.
- Click the + against the Dialog Tasks to create a new Task
- Enter IntentName, say, UpdateCustomer
- Create & Proceed to open the dialog builder page.
- Retain the Intent Node default settings, and close the Intent Node.
- Click the + next to the intent node and add an Entities to capture the customer id:
Entity Name Type User Prompts CustId String Enter your customer id - First, we will fetch data from the table for the given Cust Id and then use a Logic node to control the process flow.
Fetch Data
You can use a Service call to fetch data from the table:
- Click the + against the entity node.
- Select Service -> New Service Node option.
- From the General Settings section configure the following:
- Name say GetCustomerData
- Display Name say Get Customer Data
- Service Type select Data Service
- Type select Table
- Under Request Definition click Add Request to define a request to fetch data from the table.
- In the Data Service Request Definition page, enter the following:
- Choose Table Name as customertable
- Actions as Get Data
- Choose Filters to select the CustId = {{context.entities.CustId}}
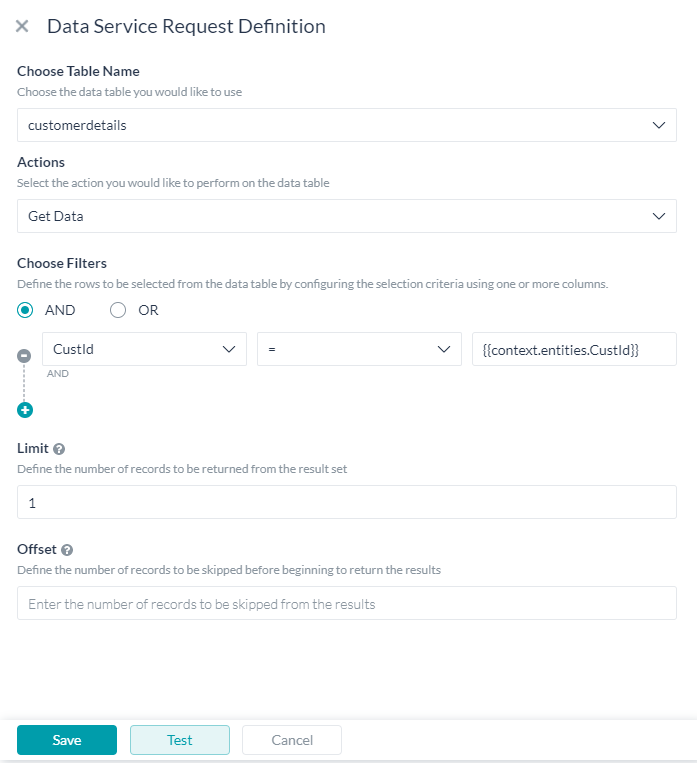
- Save the definition and close the service node.
- Add a Message Node to display the records fetches using the following context variable values, since we are fetching only one record, we are using a static [0] reference to the row:
'For the customer number entered, we have the following details: {{context.GetCustomerData.response.body.queryResult[0].CustName}}, {{context.GetCustomerData.response.body.queryResult[0].CustEmail}}, {{context.GetCustomerData.response.body.queryResult[0].Address}}, {{context.GetCustomerData.response.body.queryResult[0].CustType}}'
Update Data
We will be using an entity node and a logic node to capture the inputs from the customer and to control the process flow:
- Click the + against the last message node added above.
- Select an Entity Node and add a List of Items (enumerated) type entity with the following settings.
Display Name Value Email Id Email Id Address Address - Add a Logic Node and based upon the value from the entity node above fetch either Email ID or Address from the customer, here CustEmail and CustAddress are the entities to capture customer email id and customer address.

- Also populate the context variables with the current details, these variables would be used to update the data table.

- From the Email Id and Address entity trigger a Script Node to modify the context variables appropriately using the following script:
if (context.entities.CustUpdateChoice == 'Address') { context.custAdd = context.entities.CustAddress; } else { context.custEmail = context.entities.CustEmail; } - Select Service -> New Service Node option.
- From the General Settings section configure the following:
- Name say UpdateCust
- Display Name say Update Customer Data
- Service Type select Data Service
- Type select Table
- Under Request Definition click Add Request to define a request to add data to the table.
- In the Data Service Request Definition page, enter the following:
- Choose Table Name as customertable defined earlier
- Actions as Update Data
- Assign Values from the entities defined as follows, remember you need to include all the fields and their values, else the field would be set to null value:
Column Entity context CustName {{context.CustName}} CustEmail {{context.CustEmail}} Address {{context.CustAddress}} CustType {{context.CustType}} CustId {{context.CustId}} 
- Add a Message node to display the success message.
- Using Talk to bot option, enter the values when prompted and see the message being displayed.
Conclusion
In this post, we have seen:
- How to fetch the data from the table using a service node and use it for further processing;
- How to update data to the table from the Dialog task using a service node;