Chatbot Overview
Conversational Bots
Intents & Entities
Intelligent Bots
Kore.ai's Approach
Kore.ai Conversational Platform
Bot Concepts and Terminology
Natural Language Processing (NLP)
Bot Types
Bot Tasks
Starting with Kore.ai Platform
How to Access Bot Builder
Working with Kore.ai Bot Builder
Building your first Bot
Getting Started with Building Bots
Using the Dialog Builder Tool
Creating a Simple Bot
Release Notes
Latest Updates
Older Releases
Bot Builder
Creating a Bot
Design
Develop
Storyboard
Dialog Task
User Intent Node
Dialog Node
Entity Node
Supported Entity Types
Composite Entities
Supported Time Zones
Supported Colors
Supported Company Names
Message Nodes
Confirmation Nodes
Service Node
Custom Authentication
2-way SSL for Service nodes
Script Node
Agent Transfer Node
WebHook Node
Connections & Transitions
Managing Dialogs
Prompt Editor
Alert Tasks
Alert Tasks
Ignore Words and Field Memory
Digital Views
Knowledge Graph
Terminology
Building
Generation
Importing and Exporting
Analysis
Knowledge Extraction
Small Talk
Action & Information Task
Action Tasks
Information Tasks
Establishing Flows
Natural Language
Overview
Machine Learning
ML Model
Fundamental Meaning
NLP Settings and Guidelines
Knowledge Graph Training
Traits
Ranking and Resolver
NLP Detection
Bot Intelligence
Overview
Context Management
Session and Context Variables
Context Object
Dialog Management
Sub-Intents
Amend Entity
Multi-Intent Detection
Sentiment Management
Tone Analysis
Sentiment Management
Default Conversations
Default Standard Responses
Channel Enablement
Test & Debug
Talk to Bot
Utterance Testing
Batch Testing
Record Conversations
Publishing your Bot
Analyzing your Bot
Overview
Dashboard
Custom Dashboard
Conversation Flows
Bot Metrics
Advanced Topics
Bot Authorization
Language Management
Collaborative Development
IVR Integration
koreUtil Libraries
Universal Bots
Defining
Creating
Customizing
Enabling Languages
Smart Bots
Defining
Sample Bots
Github
Asana
Travel Planning
Flight Search
Event Based Bot Actions
Bot Settings
Bot Functions
General Settings
PII Settings
Customizing Error Messages
Bot Management
Using Bot Variables
API Guide
API Overview
API List
API Collection
SDKs
SDK Overview
SDK Security
SDK App Registration
Web SDK Tutorial
Message Formatting and Templates
Mobile SDK Push Notification
Widget SDK Tutorial
Widget SDK – Message Formatting and Templates
Web Socket Connect & RTM
Using the BotKit SDK
Installing
Configuring
Events
Functions
BotKit SDK Tutorial – Agent Transfer
BotKit SDK Tutorial – Flight Search Sample Bot
Using an External NLP Engine
Bot Administration
Bots Admin Console
Dashboard
User Management
Managing Users
Managing Groups
Managing Role
Bots Management
Enrollment
Inviting Users
Bulk Invites
Importing Users
Synchronizing Users from AD
Security & Compliance
Using Single Sign-On
Security Settings
Cloud Connector
Analytics
Billing
How Tos
Creating a Simple Bot
Creating a Banking Bot
Transfer Funds Task
Update Balance Task
Context Switching
Using Traits
Schedule a Smart Alert
Configuring Digital Views
Custom Dashboard
Custom Tags to filter Bot Metrics
Patterns for Intents & Entities
Build Knowledge Graph
Global Variables
Content Variables
Using Bot Functions
Configure Agent Transfer
  1. Home
  2. Docs
  3. Bots
  4. Channel Enablement
  5. Adding the Widget SDK Channel

Adding the Widget SDK Channel

Widgets SDK channel allows you to host widgets for presenting information from your bots and enabling interaction with your bots.

To add the Widget SDK Channel to your bot, you must first register, or create an app in Bot Builder. When you create an app, you are provisioning credentials for you application to communicate securely with Kore.ai servers. After you create an app, you can use that app registration in the configuration to add the Widget SDK Channel to your Bot.

To add the Widget SDK channel

  1. Open the bot to which you want to add the Widget SDK channel.
  2. On the bots menu, click Channel > Widget SDK.
  3. Navigate to Configurations tab.
  4. In the Select App drop-down list, select your existing app registration or click Create App to create a new app.
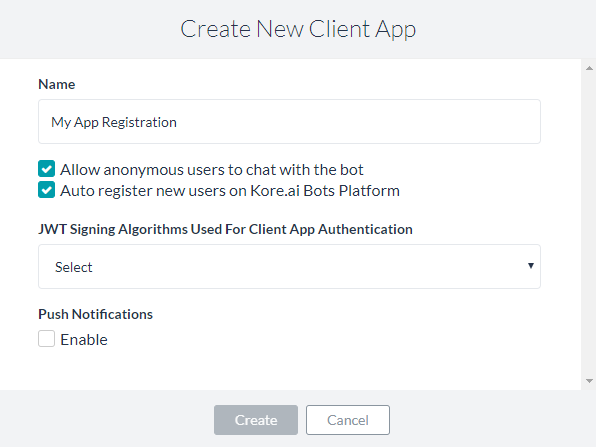
  5. In the Name field, enter the name for the app registration used in Bot Builder, for example, My App Registration.
  6. Select one of these scopes for the app:
    • Allow anonymous users to chat with the bot: enables anonymous users to interact with the bot.
    • Auto register new users on Kore.ai Bots Platform: Select to control the auto-user registration in Kore.ai if the user assertion is unknown.
  7. In the JWT Signing Algorithms Used For Client App Authentication drop-down list, select one of the following security algorithms:
    • RS256: Select to enable the Public Key field. The Public Key is used by the Kore.ai Bots Platform to authenticate the client application.
    • HS256: Select to generate a Secret Key and a Client ID. The Client ID is required for SDK initialization, and the Secret Key used by the Kore.ai Bots Platform to authenticate the client application.
  8. Optionally, In the Push Notifications section, click Enable and then specify a URL to send the notifications to.
  9. Click Create. The app registration details appear.
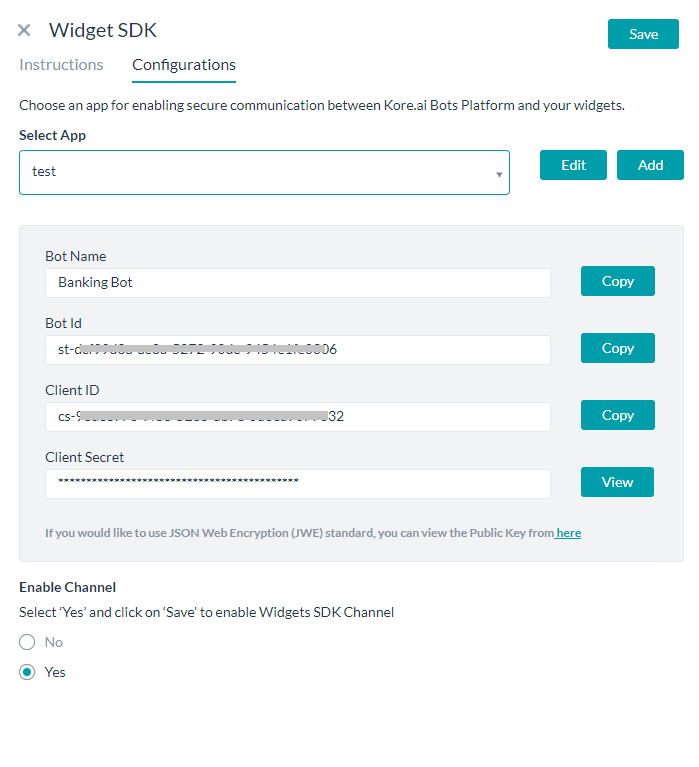
  10. To copy the app registration details to the clipboard for your application, you can click Copy for Bot Name, Bot ID, and Client ID. For Client Secret, click View, and then click Copy.
  11. In the Enable Channel section, select Yes to enable the channel immediately after saving.
  12. Click Save to save the settings and close the Widget SDK Channel page.

The Channel Information updated successfully message is displayed on the top-right corner of the page.

Once enabled see here for steps to integrate your Bot at your web application.

Editing the Channel

To edit the Widget SDK channel, just click on the Channel card.

For more edit options, hover your mouse over the channel to modify, and then click the Settings icon displayed to show the command menu.

Select one of the following commands to modify the channel:

  • Disable/Enable – Click Disable to temporarily disable use of the Web/Mobile Client channel for your Bot. When the channel is disabled, click Enable to enable use of the Widget SDK channel.
  • Delete – Click Delete, and then click OK in the Delete Confirmation dialog to permanently delete the Bot channel configuration.

    Warning: This operation is permanent, and cannot be undone.

On this Page

Menu