
Interactions with virtual agents are typically conducted using chat / messaging tools, voice channels or digital assistants. In the majority of the cases, the virtual agents respond to the user queries only when the users have requested for some information. This works well for conducting on-demand tasks that need user input for execution and the result is usually a short response, confirmation or acknowledgment. But, with the emergence of Digital Assistants, the need for proactive updates to users via engaging user interface has become a key requirement. This can be achieved by providing engaging interfaces that present relevant information to end-users with minimal need for user input. These interfaces can also trigger mobile/web apps from within the chatbot.
Using Digital Views from the Kore.ai Bots platform, you can design interactive components, Panels and Widgets, to proactively present relevant information to your customers. Panels are the placeholders that hold one or more widgets. Widgets are individual components that display information to the end-users. Your customers can interact with your bot either in the conversation mode or directly get the required information from the widgets.
Note: This feature was introduced in ver 7.2 of the platform
This document gives an overview of the working and implementation of Panels and Widgets. For an step-by-step usage instructions, refer to this how to.
Use Case
- Using Digital Views, an organization offers to its employees a single interface for various work-related activities.
- Multiple Panels constitute a Digital View.
- Each of the Panels gives access to various functions like Sales, HR, ITSM, etc.
- Employee accesses these panels for information pertaining to each of the above functions and perform follow up actions.
- As an example, HR Panel has multiple widgets showing:
- company-wide announcements;
- leave balance;
- benefits and enrol for additional benefits through bot conversation.
Setup
You can access Digital Views from under the Bot Tasks menu and setup Panels and Widgets.
Following are the steps to setting up Panels and Widgets:
- Configure Widgets: Define widgets by connecting them either to your bot tasks or any other source like JavaScript generating JSON file. In cases where you are using bot task as source, ensure that the message is formatted properly for Widget SDK channel.
- Preview the Widgets: Preview your widgets from the Bot Builder.
- Set up Panels: You may create multiple panels and each panel can host widgets that present relevant information. You can use the pre-defined widgets or create new.
- Test the Panels to see how the Panels and Widgets will be rendered in the chat window.
- Publish the Bot: Publish the bot so that the panels and widgets can be made available for your end-users.
- Host the Panel: You can choose to host your widgets independently or co-host them along with the WebSDK. You can download the SDKs from Kore.ai GitHub page. Do ensure to enable WidgetSDK as a channel.
Configure Widgets
Widgets are individual components that can communicate with the bot for presenting information to the end-users. The source of information for widgets can be from a Dialog Task or a JSON using any of the pre-defined widget templates.
Steps in configuring Widgets:
- Use Create Widget button to create a widget.

- In the New Widget popover, enter
- Name of the Widget
- Display Name for the Widget
- Auto Refresh to set the frequency with which this widget needs poll for fresh data. The refresh is applicable only when the Panel containing the Widget is active.
- Source for a widget can be either from the execution of Dialog Task or from JavaScript defining a JSON:
- JSON can be specified in the JavaScript Editor that is presented.

- Dialog Task option allows you to trigger a task and present the output in the widget.
- Select Dialog Task dropdown will list all available tasks in the current bot, select one from the list.
Note: In the connected Dialog Task make sure to use a Message node to present the required information in the widget using any of the supported widget templates.
You can use the icon next to the Dialog Task to open the Dialog Task for checking the task details like entity names etc..

- Any Entities used by the selected Dialog Task needs to be pre-populated with values by mapping Entity Name with Entity Values.
- If the selected Dialog Task has any authorization profile defined, the same will be displayed here.
- Select Dialog Task dropdown will list all available tasks in the current bot, select one from the list.
- JSON can be specified in the JavaScript Editor that is presented.
- Save the Widget.
- Once Saved the Widget will be In Development state. You can Edit or Delete the Widget.
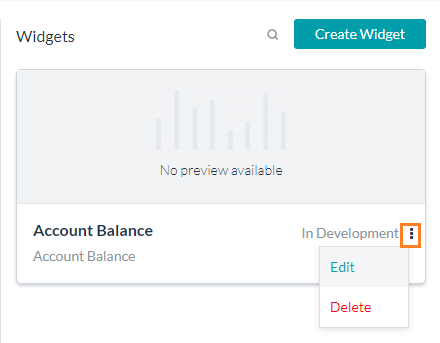
- Edit widget, apart from allowing modification to any of the above fields, will allow you to Run & Preview the widget.
You can save the preview as the thumbnail display for the widget.
Set up Panels
Panel refers to containers that hold one or more widgets. You can add existing widget to the Panel or create new widgets.
- Use Create Panel button to create a panel.
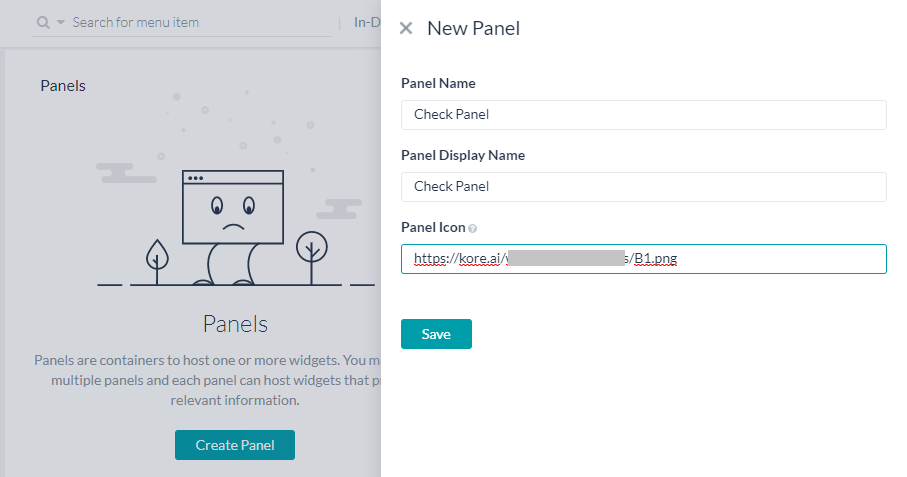
- In the New Panel popover, enter
- Name of the Panel.
- Display Name for the Panel.
- Auto Refresh to set the frequency with which this widget needs poll for fresh data. The refresh is applicable only when the Panel containing the Widget is active.
- Panel Icon to be displayed in the chat window (URL to the location).
- Save the Panel.
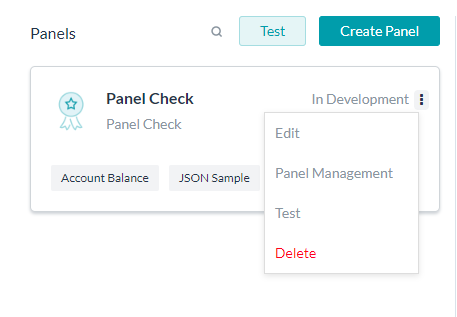
- Once Saved the Panel will be In Development state.
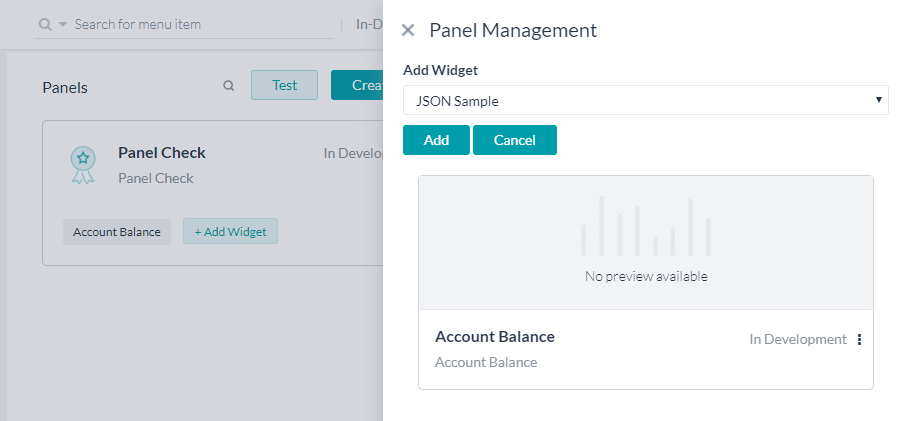
- Use the Add Widget button to add widgets to the panel. Select widgets from the drop down list.
- You have the following options for a given Panel:
- Edit the panel details;
- Panel Management to add existing widgets, create new widget or remove already added widgets from the Panel;
- Test the individual Panel – this will open the talk to bot window along with the panel listing with the current panel active and data presented;
- Delete the Panel.
- Test panels will open the Talk to Bot window listing all the Panels with the chat window active. You can interact and test the Panels.
Publish
Publish your bot ensuring that the panels and widgets are selected.

Hosting
Widget SDK is provided by the platform for hosting and managing panels and widgets. You can choose to host your widgets independently or co-host them along with the WebSDK. You can download the SDKs from Kore.ai GitHub page. Do ensure to enable WidgetSDK as a channel. Refer to this tutorial on how.