
Bot Builder Platform offers the unique ability to map bot tasks to other bot tasks within the same or different bot.
For example, you can match an Add a Comment or Assign a Ticket task to an alert that occurs when a new service ticket is created. The event data detailed within alert tasks can be used to auto-populate the input field of Action tasks in the same or different system. Bots also can suggest actions to the user based on the content found within an alert and support the automatic execution of actions based on event data.
Flow tasks link a message response from one task to another related task of the same, or different bot. You can create flows between different Bots from action tasks to action tasks, alert tasks to action tasks, and alert tasks to dialog tasks.
To map dialog tasks to other dialog tasks, or to sub-intents within the dialog task, you must use conditional transitions. For more information, see Creating Dialog Task Flows.
How Flows Work
When a bot sends a message to a user, they can click the task icon located to the right of the message to display the tasks mapped to the task as a flow as shown in the following image. The user can use the Tweet task to tweet the message, or post to their Linked In account using the Share Post task.
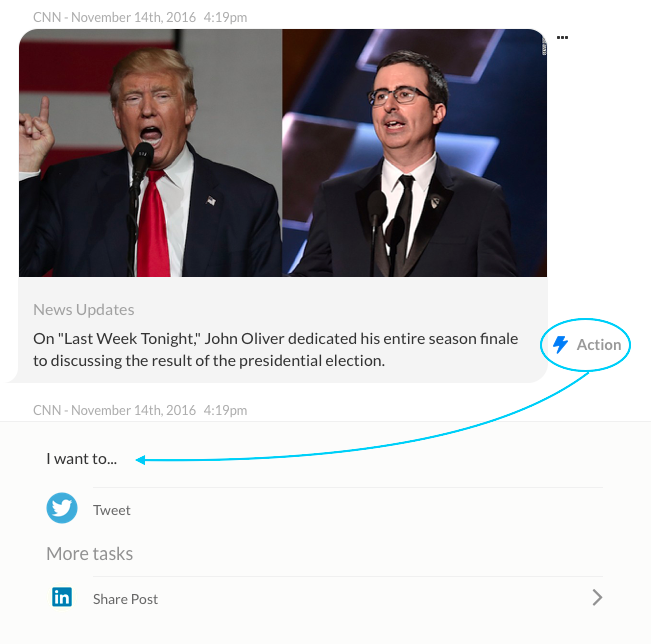
To view the mapped tasks, the user can click the Task icon, selects a task, and then define the parameters for the task.
You can use parameters from the first task’s payload to pre-populate fields in the following tasks. For example, in a Twitter task payload response, the New Follower Name can be pre-populated in the Salesforce Create Contact task.
Creating a Flow
To create a new flow, you need an existing bot as well as at least one published task. For more information, see Defining Bot Tasks.
Follow these steps to create a Flow:
- Open the bot in which you want to create a Flow.
- Hover over the left-side navigation panel, and click Bot Tasks.
- On the Bot Tasks page, hover over the Flows tab and click the plus icon.
- The Create Flow page opens.
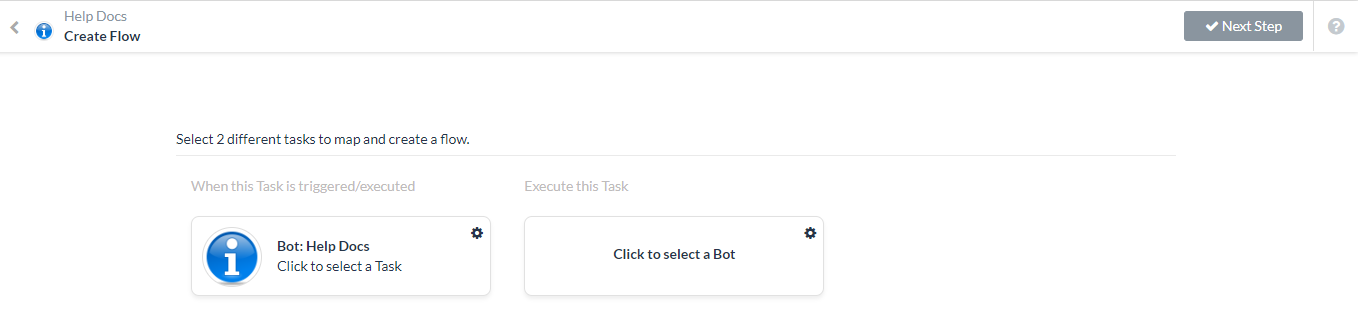
- In the When this Task is triggered/executed column on the left, click Click to select a Task to display the tasks available.
Note: Only tasks that are published and approved by the Bots Admin are displayed as options to create a flow.
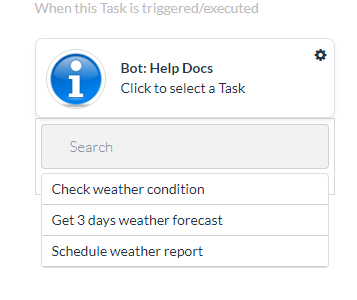
- Select the task that you want to add a flow to, for example, Schedule Weather Report. A list of fields is displayed for mapping.
- In the Execute this Task column on the right, click Click to select a Bot and choose a Bot for the task that you will map to, for example, Flight Management.
- For the second bot, select Click to select a Task to map the bot tasks and display the field mapping dialog.
- Drag-and-drop fields in the When this Task is triggered/executed column on the left to the Field section on the right for the following fields:
- Label Mapping – The field label displayed to the end-user.
- Value Mapping – The value displayed in the field for the end-user.
- Click the expand text area icon to display the mapping fields in a full-size editor.
- After you map a parameter from one task to the next task, select one of the following options shown in the previous illustration for each Field displayed:
- Editable – The mapped value is displayed and editable by the end-user.
- Hidden – The Field is not displayed to the end-user. For example, you may need to pass a User ID to the Bot, but only display the User Name drop-down to the end-user.
- Read Only – The Field and mapped value is displayed, but not editable by the end-user. For example, for the Assign Task task for Asana, you need the Task Id and Workspace, which can be mapped from the Asana Task Updates alert task, but are read-only because the end-user only needs to select which user to assign the task to.
- Click Next Step to display the Mapping Name section.
- Enter the name of the mapping used in Bot Builder in the Mapping Name field to identify this mapping for the flow. Optionally, select Mark this Task as Suggested Task to show the task on the Suggested Tasks tab.
- If all mandatory fields for the task are defined, the Allow flow automation option is displayed.
When selected, the end-user can enable this task to run automatically. For example, when an alert message for Crashlytics indicates a server is down, using the predefined mapped fields, a JIRA ticket can be automatically created without additional end-user input provided all required fields are mapped. - Click Save & Exit to save the flow and close the Create Flow page.
Publishing a Flow
After you configure your flow, you must publish the flow to make the mapping from one task to another available for end-users.
To publish a flow
- Open the bot that contains the Flow.
Note: Only flows with status set to Configured can be published.
- Hover over the left-side navigation panel and click Publish.
- Click the Settings
 icon for the flow you want to publish, and then click Publish.
The Flow published successfully message is displayed and the flow is immediately available for any users that add the task to their account when the flow is saved. You can edit the flow at any time and changes are applied immediately for end-users when the flow is saved for any published task approved and deployed by the Bots Admin.