
Dialog node lets you start a new Dialog task within an existing Dialog task if the user intent changes.
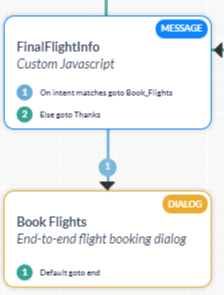
For example, let’s consider a travel bot that has the following three Dialog tasks: Flight Availability, Book a Flight, and Book a Hotel. You may want to invoke the Book a Flight Dialog task from the Flight Availability Dialog task.
Key features of Dialog nodes:
- The ability to carry data from the current Dialog task to the target dialog task as entity pre-assignments described in the later section.
- When a target Dialog task is invoked, the current Dialog flow begins at the root intent of the new Dialog task. If you write transitions for the Dialog node, then the flow returns to the source Dialog task after completing the Target. If you do not write transitions, the Dialog task ends after executing the target Dialog task. This differs from an optional User Intent node, where the dialog flow processes a related user intent and then continues in the same Dialog task thereafter.
Configuring a Dialog Node
Follow these steps to set up a Dialog Node to invoke a new Dialog Task:
Step 1: Adding a Dialog Node to the Dialog Task
- Open the Dialog Task in which you want to add the Dialog node.
- Hover over the node next to which you want to add the node, and click the Plus
 icon.
icon. - Go to Dialog Task and select the dialog task from the available list (Note you cannot create a new Dialog Task from within a Dialog like other nodes).
- The Component Properties panel opens.
Step 2: Define Component, Transition & NLP Properties
- Modify general Component Properties like Name and Description
- From the Connections tab set the Transition properties to determine which node in the dialog task to execute next. You can write the conditional statements based on the values of any Entity or Context Objects in the dialog task, or you can use intents for transitions. If you have defined the Transition Property as “End the current task“, then these settings will be ignored.
- Select the Connections tab
- Click Add IF.
- Configure the conditional expression based on one of the following criteria:
- Entity: Compare an Entity node in the dialog with a specific value:
- Select the entity;
- select an operator using the drop-down lists: Exists, equals to, greater than equals to, less than equals to, not equal to, greater than, and less than.
- type the number in the Value box. Example: PassengerCount (entity) greater than (operator) 5 (specified value)
- Context: Compare a context object in the dialog with a specific value using one of these operators: Exists, equals to, greater than equals to, less than equals to, not equal to, greater than, and less than. Example: Context.entity.PassengerCount (Context object) greater than (operator) 5 (specified value)
- Intent: Select an intent that should match the next user utterance.
- Entity: Compare an Entity node in the dialog with a specific value:
- In the Then go to drop-down list, select the next node to execute in the dialog flow if the conditional expression succeeds. For example, if the PassengerCount (entity) greater than (operator) 5 (specified value), Then go to Offers (sub-dialog).
- In the Else drop-down list, select the node to execute if the condition fails.
Note: If you want to write multiple If conditions, click Add Else If below the last If conditional expression.
- From the NLP Properties tab
- Machine Learning settings to provide user utterances to improve the detection for this Node.
- Bot Synonyms or related phrases for this Node.
- Patterns to capture this Node if the user’s utterance contains these specific patterns.
Step 3: Define Instance Properties
Instance Properties include the settings for this instance of the Dialog.
- Click the Instance Properties icon on the Dialog node.
- Click the Advanced controls to set up these options:
- Hold & Resume
- Use the task level ‘Hold & Resume’ setting: The bot refers to the Hold & Resume settings set at the dialog task level.
- Customize for this node option: You can customize the Hold & Resume settings for this node by selecting this option and configuring the same. Read the Interruption Handling and Context Switching article for more information.
- Custom Tags defines tags to build custom profiles of your bot conversations. See here for more.
- Hold & Resume
- Entity Pre-assignments can be used to pre-assign values from this session or node data to the entities required by the Dialog Task. Any remaining required values will be handled by the sub-intent. (see below for details)
- Transition Options define the flow to be followed once the task completes. You can choose from two options:
- return to the current node on task completion
- end the current task and initiate this task
- Entity Post-Assignments displays a list of entities available in the current task with an option to add custom variables. These entities can be assigned with values from the linked dialogs session data. For example,
context.entities.will list the entities from the linked sub-dialog for selection. The values will be assigned once the linked dialog execution is complete.
NOTE: This option is available only if the Transition Options is set to return to the current node on task completion. This feature was introduced in ver 7.1 of the platform.
Currently, there is a limitation when using URL entity types. URL values withhttpas opposed tohttpsor withoutwwwsuffix will not work.
About Entity Pre-Assignments
You can pre-populate data for the destination Dialog task by:
- adding values to the entity keys,
- adding additional custom keys and values to pass data from the current Dialog task
Contextobject to the destination Dialog task as needed.
By default, the Entity nodes defined in the target Dialog task are displayed as key/value pairs. You can then define values for associated entities or add custom keys and values as needed using session and context variables.
Transitioning from the source Dialog task to the destination Dialog task occurs at runtime when the user input matches one of any linked dialog tasks. When more than one dialog task must be mapped, you can define which dialog tasks are displayed to the end-users using conditional transitions.
When you call another dialog task, you may want to carry information from the first Dialog task, into the next Dialog task. For example, customer information collected in a Book a Flight dialog task could be passed to the Book a Hotel dialog task.
In the Bots Platform, you can use the mappedIntents variable in the Context object which holds the reference of the Intent nodes as well as the context of the source dialog task as shown in the following JSON syntax:
{ 'title': 'title of the link', 'link':' url for the link' ,'postbackpayload': 'system generated payload'}
For example, a link to GetEmail in the Context object can be:
{
   "title":"GetEmail",
   "link":"https://app.collab.ai/wf/1.1/market/users/bots/st-bb1eb3da-cfa7-5244-b241-b5042d333e76/dialogue/dg-15fd2927-219c-5795-b038-5b830718bea7/execute?nodeId=message2&contextId=dcx-f9bae173-4d69-53e4-9aa7-21e89aae776d&intent=GetEmail",
   "postbackpayload":"MappedDialog_dc-f7b42932-dc06-53ac-92c0-1db706794f91_dg-15fd2927-219c-5795-b038-5b830718bea7_dcx-f9bae173-4d69-53e4-9aa7-21e89aae776d"
}
You can access and present these variables in a prompt message to a user to display a list of mapped dialog tasks with the link, or as a list of choices. You can pass the source dialog context to the target dialog task even if the source Dialog task is no longer active using the Context object.
The value for the postbackpayload key is generated by the Bots Platform, and can be used in some channels, such a Facebook and Slack, which defines when a link or choice is made for a target Dialog task.
For more information, see Using Session and Context Variables in Tasks and the Context Object.