
This is document details steps in creating a sample banking bot. This bot is used in various use case scenarios presented in the How-Tos section of the developer documentation.
Prerequisites:
- You must have signed up with the Kore.ai Bots Platform
- You must be aware of the basics of Bot building (refer to this link)
- You must have created a simple bot (refer here for an example)
- You must have created a Banking Bot (refer here for example)
Bot Overview
The Bot we will be building will be performing the basic banking transactions.
This Bot will:
- Get account balance based on the Account Number and Account Type entered by the user, as seen here.
- Update accounts with the balance, as seen here.
- Transfer a specified amount from the user account to a payee account.
Let us add the Transfer Funds task.
Transfer Funds Intent
- The Transfer Funds task will prompt the user to enter Payee and Payer account number.
- Next it would prompt for the amount to be transferred.
- It will then make a service call to update the accounts appropriately.
- The message indicating success or failure is displayed.
Step 1: Dialog Task
We need to add an Intent Dialog as the first step in the Bot. Intent Dialog is the first step in the user-bot conversation flow.
- Open the Banking Bot with the two pre-configured tasks – Get Balance and Update Balance.
- From the left navigation menu, select Bot Tasks
- Click on the + next to the Dialog Task.
- Bot Task Page will open
- Enter the following details:
- Intent Name – Enter the Intent name, this is the phrase that triggers the dialog. The intent name should be simple and not more than 3-4 words. For example, ‘Transfer Funds’
- Under the More Options, you can add a description and other dialog related details. Let’s retain the default settings.
- Click Create & Proceed.
- Property Panel for User Intent will be displayed. We will retain the default properties.
- Close the User Intent Property Panel.
Step 2: Entity nodes
Entity Node is typically used to gather information from the user.
Here we will be using it to capture the user input for the Payee and Payer Account Number and amount to be transferred.
- Click the + next to the User Intent node
- Select the Entity option.
- Click the New entity node +
- Property Panel for the Entity Node is displayed
- Enter the following details:
- Name: PayerAccount
- Display Name: Payer Account
- Type: Number
- User Prompts: Enter the following text and hit enter to save:
Enter the Account from where you want to transfer funds.
- Close the PayerAccount Entity Property Panel.
- Repeat the above steps to add another entity with the following details:
- Name: PayeeAccount
- Display Name: Payee Account
- Type: Number
- User Prompts: Enter the following text and hit enter to save:
Enter the Account to which you want to transfer funds.
- Close the PayeeAccount Entity Property Panel.
- Repeat the above steps to add another entity with the following details:
- Name: Amount
- Display Name: Amount
- Type: Number
- User Prompts: Enter the following text and hit enter to save:
Enter the amount to transfer.
- Close the Amount Entity Property Panel.
The next steps would update the balance in both the Payer and Payee accounts. Since we already have Update Balance task, we will see how to run it from the current task.
Step 3: Run Dialog Task
Pre-defined dialog tasks can be triggered from within another task. Let us see how.
- Click the + next to the Amount Entity node
- Select Dialog Task
- From the given task list, select the required task – UpdateBalance
- Property Panel for the Dialog Node is displayed

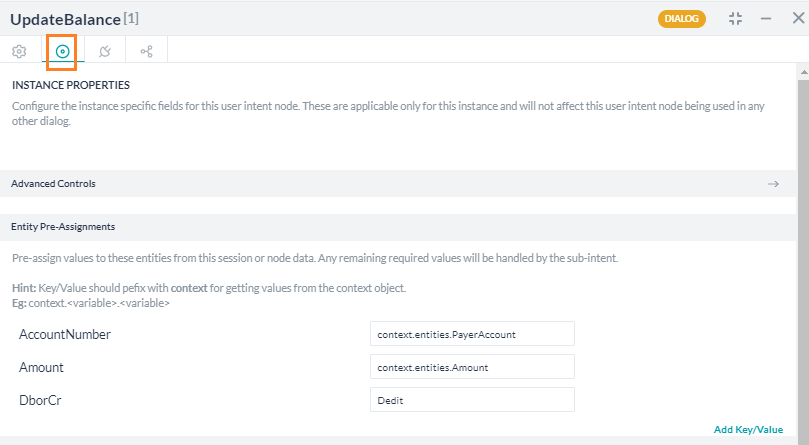
- Navigate to the Instance Properties tab and enter the following details:
- Entity Pre-Assignments section – these are the entity values required by the Dialog Task if they are not populated here the user will be prompted to enter the same. Since we have already collected the information through the entities defined in the previous step we will be passing those user-entered values to the UpdateBalance task
- AccountNumber: context.entities.PayerAccount
- Amount: context.entities.Amount
- DBorCR: Debit (payer account needs to be deducted of the transferred amount)
- Close the UpdateBalance Dialog Properties panel.
- Repeat the same steps to Update the Payee Account with the following values
- Entity Pre-Assignments section
- AccountNumber: context.entities.PayeeAccount
- Amount: context.entities.Amount
- DBorCR: Credit
- Close the UpdateBalance Dialog Properties panel.
Step 4: Message Node
A Message Node is used to display a message from the Bot to the user.
Here we will be using the Message node to show the balance.
- Click the + next to the UpdateBalance [2] Service node
- Select Message and click the ‘New message node +‘
- Property Panel for the Message Node is displayed
- Enter the following details:
-
- Name: FinalMessage
- Display Name: Final Message
- Bot Responses:
-
- On the Bot Response Property Panel, open the connections tab by clicking the ‘Connections‘ icon.
- Change the Default connection from ‘Not Connected‘ to ‘End of Dialog‘.
- Click Save.
- Close the Property Panel.
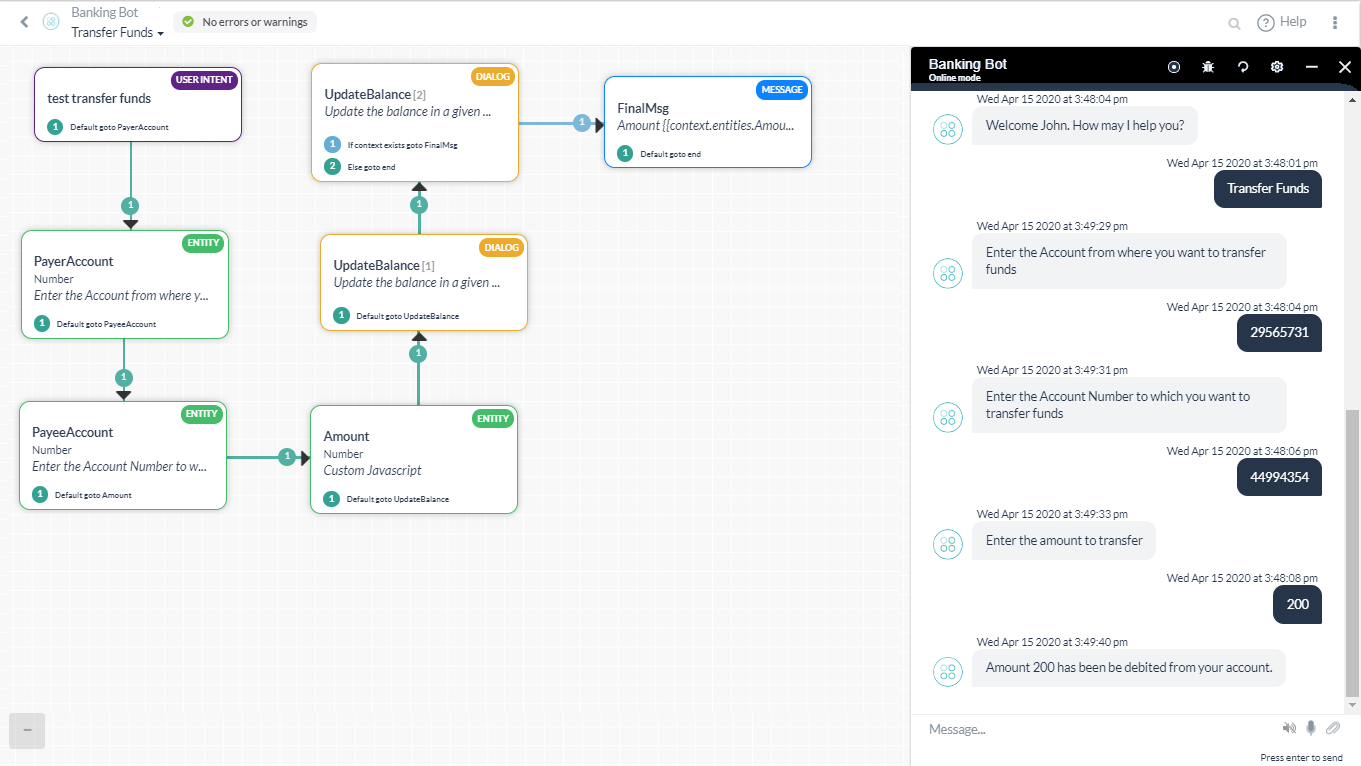
Test
To test the Dialog task, you can use the ‘Talk to bot’ at the bottom right corner.
Enter the following utterance (intent name)
“Transfer Funds”
Follow the Bot instructions:
- Enter Payer Account – 02929664;
- Enter Payee Account – 44994354;
- Enter Transfer Amount – 200
- See the success message.