
Alert tasks deliver timely, relevant, and personalized information from enterprise systems to customers and employees by polling the relevant service in real-time or according to a user-defined schedule. These alerts can contain detailed information, such as name, ID, notes, amount, and more, in a variety of formats for eacah channel.
Key Features
- Scheduled Alerts: Users can schedule alerts to trigger according to the days, times, and frequencies they specify.
- Filtered Alerts: Users can configure alerts to trigger when certain thresholds are met such as amounts, dates, text matches, and more.
Example Use Cases
The following are a few sample use cases for Alert tasks:
- A time or location-based promotional offers
- Scheduled delivery updates
- Inventory level changes
- Critical issue notification
- Pandemic or weather-related awareness
- Cross-company status changes
Configuring
To configure an Alert task, you need to complete the following settings:
General Settings
The first step is to define how the task looks to the end-user. The General tab Settings includes details such as task name, connection mode, descriptions, and a few advanced settings such as task demo, search keywords, etc..
- Open the bot in which you want to create the Alert Task.
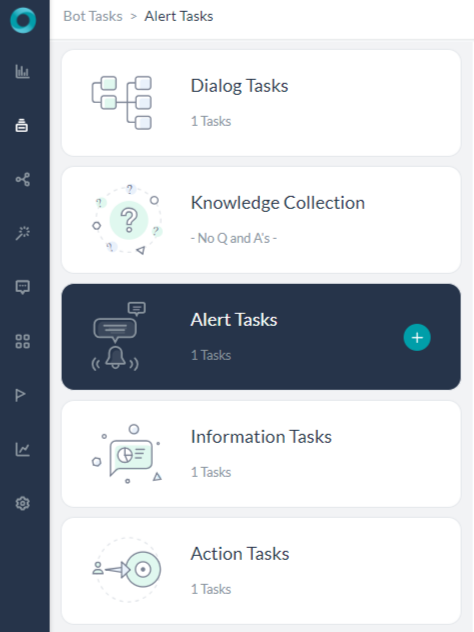
- Hover over the side navigation panel of the bot, and click Bot Tasks.
- On the Bot Tasks page, hover over the Alert Task tab and click the plus icon.
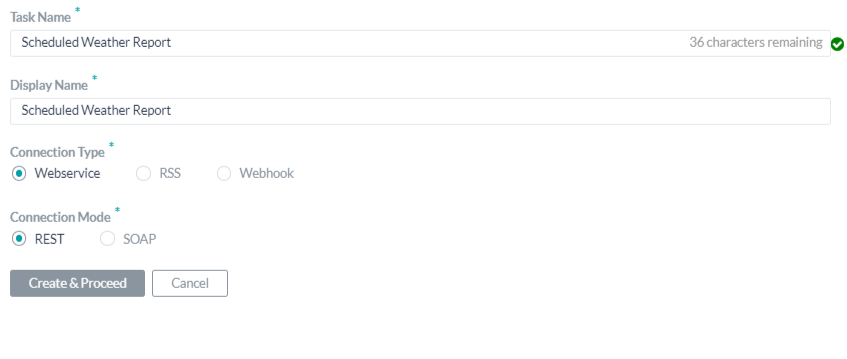
- Enter a Name for the task, which also doubles up as the Display Name. Bot Store uses the display name of the task. You can change the display name if needed.
- Select the Connection Type and Mode (see table below for details) and click Create & Proceed.
- The Create Alert Task dialog opens. Enter the following details for the task:
Advanced Settings
To configure the advanced settings for the task, expand the section and enter the relevant details.
The following table describes the optional fields in the Advanced Settings section on the General tab.
| Field Name | Description |
|---|---|
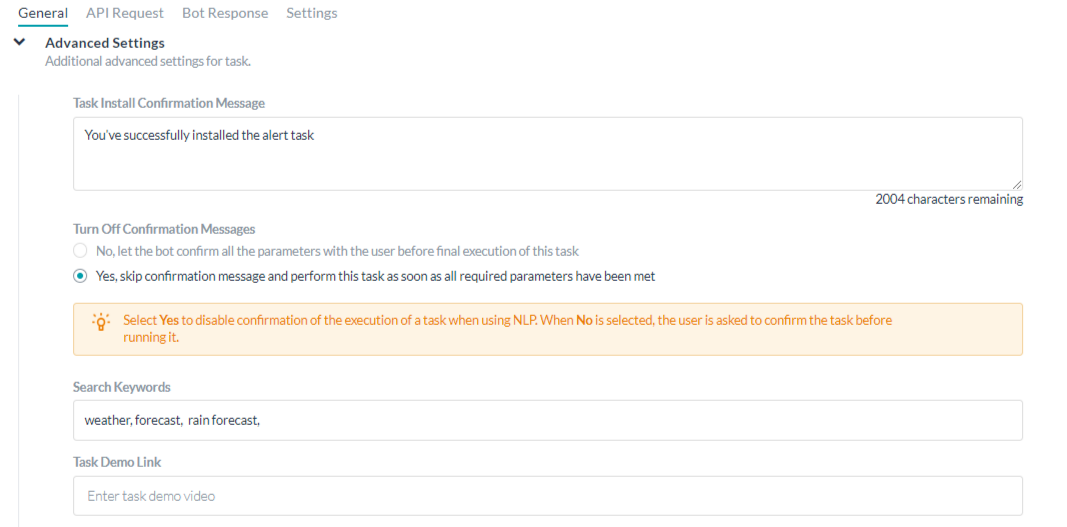
| Task Install Confirmation Message | The message displayed to the end-user when the task is successfully set up. |
| Turn Off Confirmation Messages | Select Yes to disable confirmation of the execution of a task when using NLP. When No is selected, the user is asked to confirm the task before running it. |
| Search Keywords | Specify one or more search words an end-user can use to help locate this task in the Kore.ai Bot Store. |
| Task Demo Link | Enter a www.youtube.com link, for example, https://www.youtube.com/watch?v=qB3P7kDKXZ4, to display a task demo icon next to the task displayed in the Bot Store. |
Authorization
You may need to define how the end-user must be authorized to get the alert task notification message. For example, Twitter is an alert task using web services that require an authorized end-user. The authorization for the alert task would be the same end-user log in username and password for Twitter to allow Kore.ai to access the end-user account and poll for the alert task data.
Note: Authorization for alert tasks with the Connection Type set to Webhook is not required as part of the alert task configuration.
After you define the general settings for an alert task, the next step is to go to the Authorization section on the API Request tab as shown in the following illustration.
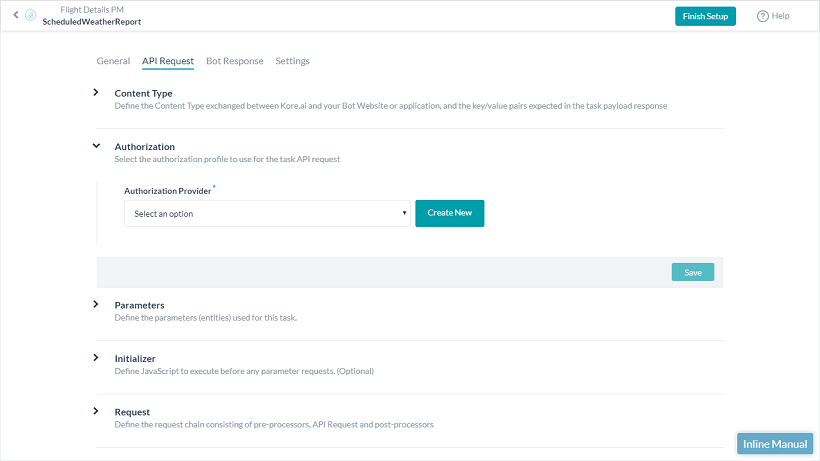
To get started with defining the Authorization for a task, on the API Request tab, click the Expand ![]() icon in the Authentication section.
icon in the Authentication section.
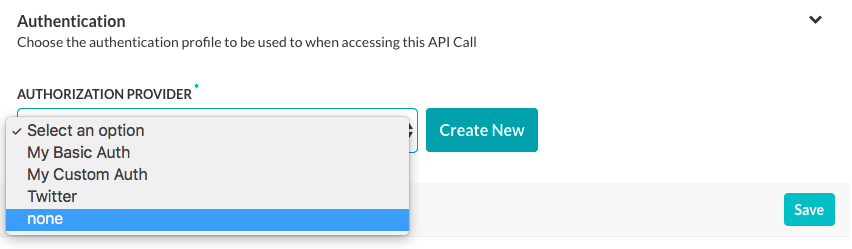
If you have previously defined authorization for this task, you can select it in the Authorization Provider drop-down list. If your task does not require authentication, you can select None in the Authorization provider drop-down list as shown in the following image.
To define a new authorization provider, click Create New to display the New Authorization Mechanism dialog.
In the Authorization Type drop-down list, select the type of authorization used by your Bot as shown in the following illustration.
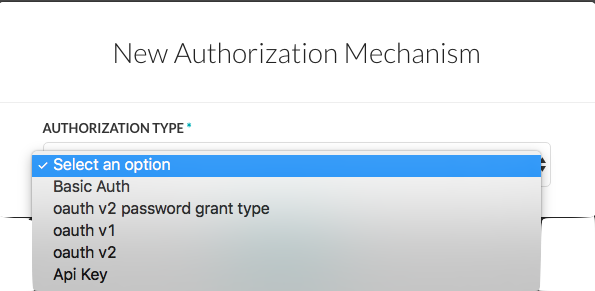
You can choose one of the following types of authorization:
- Basic Auth – A standard protocol to collect username and password information. Kore.ai uses SSL encryption in combination with basic authentication to help secure end-user information. Click on the below link for the configuration details.
Setting Up Authorization using Basic AuthThe following illustration is an example of the Basic Auth fields that you must define to enable basic authorization for your task.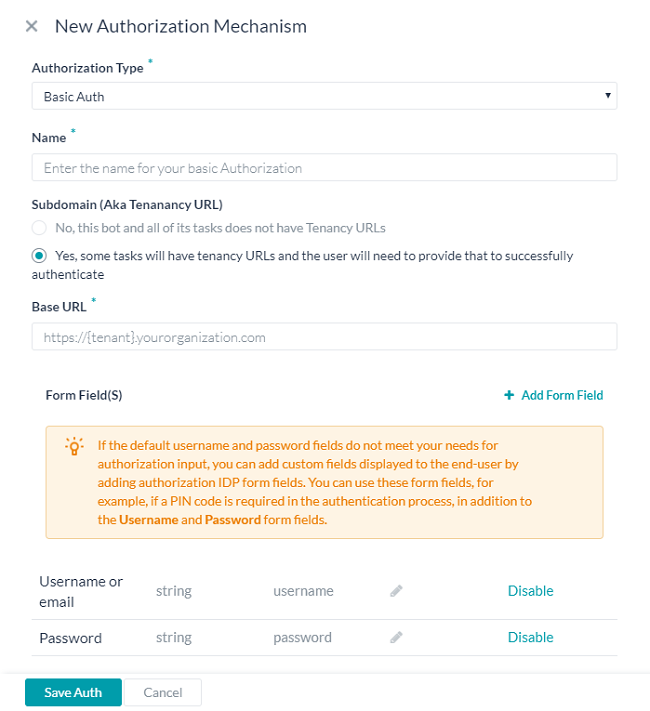 To define basic authorization, select Basic Auth in the Authorization Type field. Then specify a Name for the authorization to be displayed in the Bot builder user interface.
Defining Tenancy
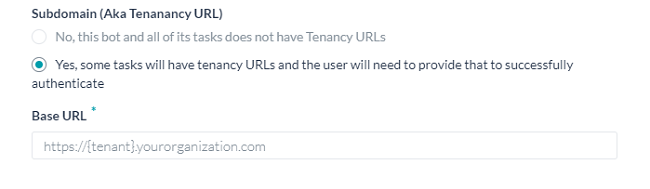
If required, in the Subdomain section, select Yes if the base URL for a web application or user interface the uses a tenant name in the URL. For example, kore is the tenant organization for a web service using tenants as www.kore.someCompany.com.
In the following example configuration, the tenancy URL contains the {tenant} organization placeholder.
Adding Form Fields
If the default username and password fields do not meet your needs, you can add new fields displayed to the end-user by adding authorization form fields. To add fields on the authorization form, click + Add Form Field. The following illustration is an example of a definition to add a password field to the authorization dialog.
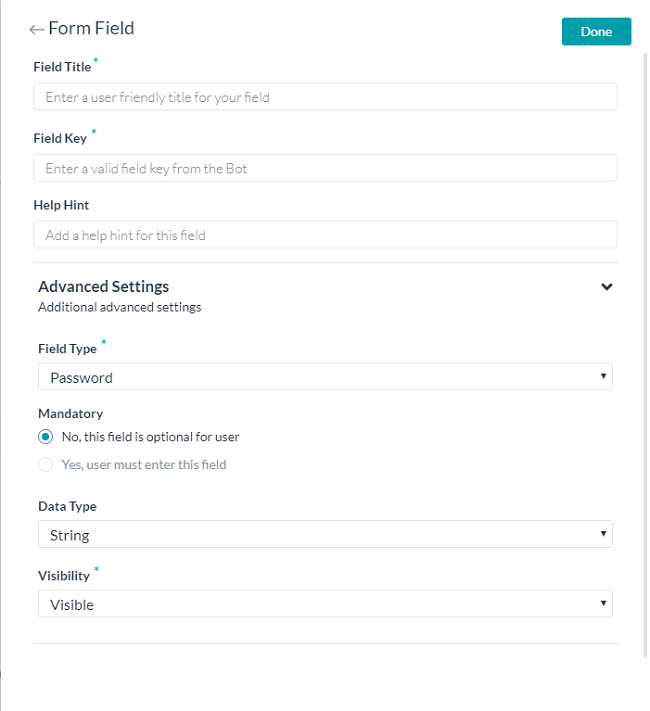
The following table describes the fields used to define an authorization IDP form field.FIELD NAME DESCRIPTION Field Title Specify the name of the field displayed to the end-user in the authentication dialog. Field Key The value represents the end-user input value to the authenticating service. Help Hint The help text displayed in the field to describe what should be entered into the field. Field Type When Advanced Options is selected, specify the type of field displayed in the end-user interface to collect the user input assigned as the value for the Field Key, one of: - Textbox
- Password
Mandatory When Advanced Options is selected, select if the end-user must define this field to complete authentication. Data Type When Advanced Options is selected, specify the type of data expected as input from the end-user, for example, String. Visibility When Advanced Options is selected, specify if the authentication field should be visible, hidden, or displayed as read-only. Adding Authorization Fields
By default, authorization fields are configured as part of the header of the task request message. If your task request requires additional authorization fields or the expected authorization is not part of the header, for example, social security number or PIN, click + Add Authorization Field and then define the fields as shown in the following illustration.

In the Field Type field, you can select one of the following depending on where in the task request message and the type of authorization fields that are required.- Header – The Bot expects the authorization fields as part of the header of the request.
- Payload – The Bot expects the authorization fields as part of the content of the body of the request.
- Query String – The Bot expects the authorization fields as a query in the body of the request.
- Path Param – The Bot expects the authorization fields as part of the URL path for the request.
In the Field Key field, enter the name of the field for the selected Field Type.
In the Field Value field, enter the value for the Field Key specified.
Click Done. The new authorization field is added in the Authorization Fields section.
To add additional authorization fields, click Add in the Authorization Fields section.
In the Authorization Check URL field, optionally define a URL that can be used to test the authentication settings from Bot Builder before you deploy the task with the authorization mechanism. You can use dynamic fields, path parameter fields, query fields, and so forth, to define the test URL, for example,
https://kore.someCompany.com/sap/opu/odata/sap/{{authfield1}}/?$format=json
In the Access Using a Connector section, select Yes to enable access for Kore.ai Bots using the Kore.ai Connector agent. If your domain does not have any active Kore.ai Connectors defined, a warning message is displayed to contact the Bots Admin Console system administrator. For more information, see Using the Kore.ai Connector in the Bots Admin Console documentation.
Click Save to save the authorization settings and close the New Authorization Mechanism dialog.Testing the Authorization – Basic Auth
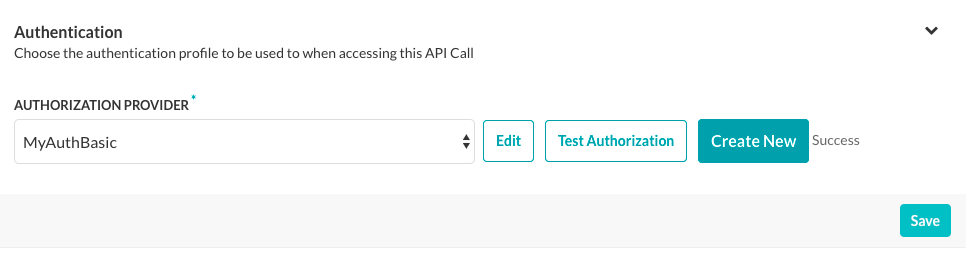
After you save the authentication, if you defined an Authorization Check URL for your new authorization type, you can test your authorization definition on the Authorization tab when you click Test Authorization before continuing to develop the remaining steps of your task.

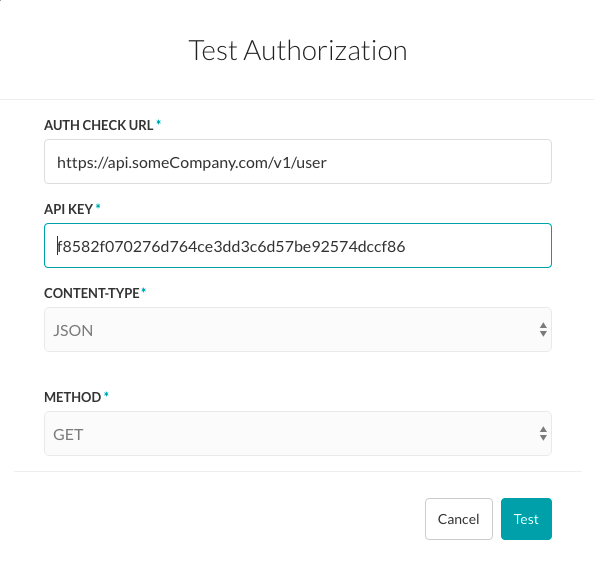
When you click Test Authorization, the Test Authorization dialog is displayed and populated with the URL you specified in the Authorization Check URL section, as shown in the following illustration.

To configure the Test Authorization – Basic Auth- In the Auth Check URL field, verify or enter the URL to test the authentication configuration.
- If your bot uses subdomains, the Tenancy field is displayed and you must specify the tenant.
- Enter your User Name and Password for the web service.
- Select the content type expected for the URL in the Content-Type field.
- For testing the URL, the Method field is read-only and set to GET.
- Click Test to begin the authorization test.
When the validation of authentication is complete, the Test Authorization dialog is closed and the results of the validation, either success or failure, is displayed to the immediate right of the Test Authorization button as shown in the following illustration.
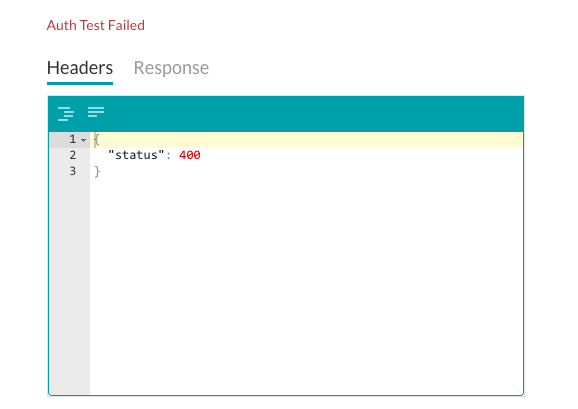
If the authorization fails, the Auth Test Failed message is displayed along with the Headers and Response tabs as shown in the following illustration.
How it all Works – Basic Auth
When basic authorization is used for a task, the Kore.ai application automatically prompts the user for log in credentials to access the web application or web service as shown in the following illustration.
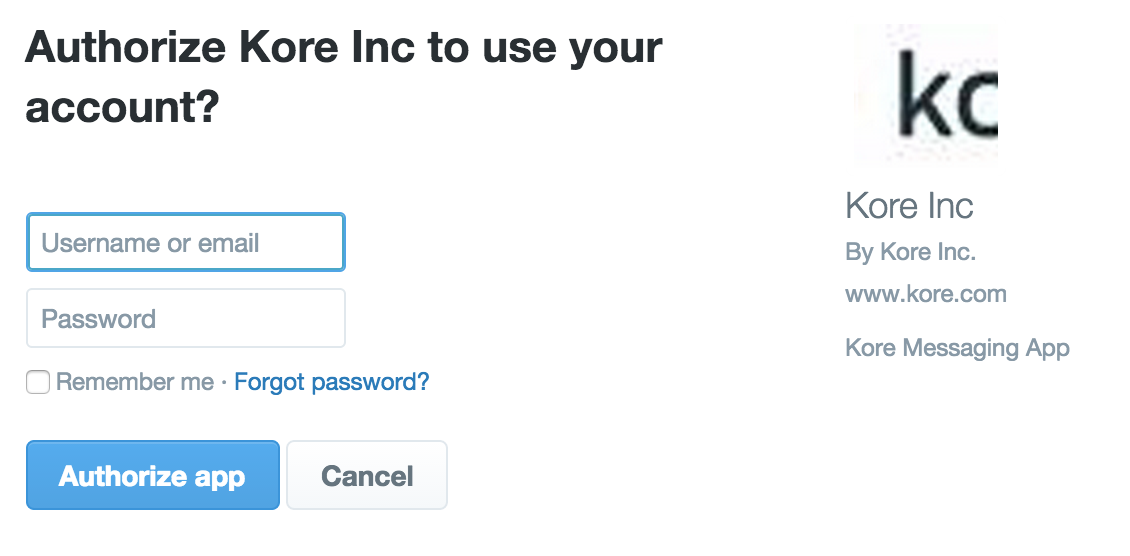
After the end-user is authorized, the settings are saved using the following naming syntax:{{ First Name }} {{ Last Name }} {{ Bot Name }} {{ Account # }} {{ Sequence # }}For example, John Smith’s Twitter Account #1.
The Kore.ai application can access the web application or web service for all future task requests using this account. In addition, the end-user can reuse the account for other tasks for the same Bot.
- OAuth v2 password grant type – Define a custom authorization type for non-standard web service authorization types. Click on the link below for the configuration details.
Setting Up Authorization using oAuth v2 password grant
The following illustration is an example of the oAuth v2 password grant authorization type fields that you must define to enable a customized authorization for your task.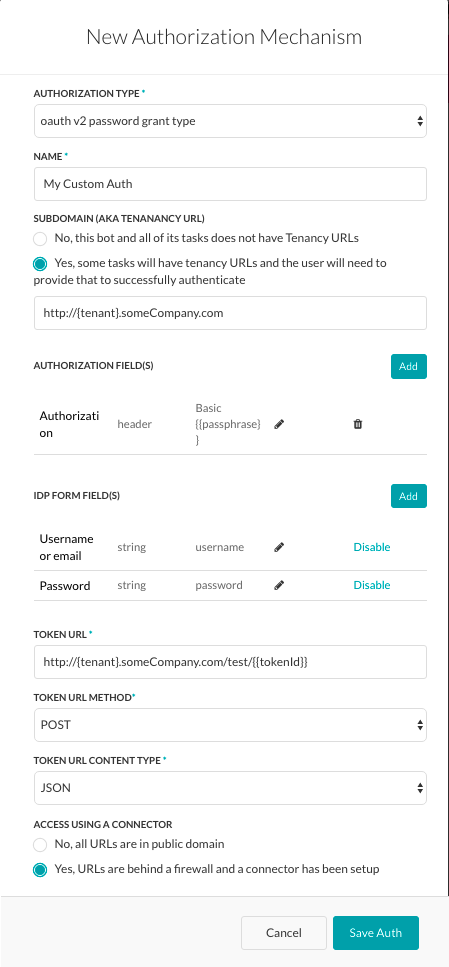 To define a custom authorization, select oAuth v2 password grant in the Authorization Type field. Then specify a Name for the authorization to be displayed in the Bot builder user interface.
Defining Tenancy
If required, in the Subdomain section, select Yes if the base URL for a web application or user interface the uses a tenant name in the URL. For example, kore is the tenant organization for a web service using tenants as www.kore.someCompany.com.
In the following example configuration, the tenancy URL contains the {tenant} organization placeholder.
Adding Form Fields
If the default username and password fields do not meet your needs, you can add new fields displayed to the end-user by adding authorization form fields. To add fields on the authorization form, click + Add Form Field. The following illustration is an example of a definition to add a password field to the authorization dialog.
The following table describes the fields used to define an authorization IDP form field.FIELD NAME DESCRIPTION Field Title Specify the name of the field displayed to the end-user in the authentication dialog. Field Key The value represents the end-user input value to the authenticating service. Help Hint The help text displayed in the field to describe what should be entered into the field. Field Type When Advanced Options is selected, specify the type of field displayed in the end-user interface to collect the user input assigned as the value for the Field Key, one of: - Textbox
- Password
Mandatory When Advanced Options is selected, select if the end-user must define this field to complete authentication. Data Type When Advanced Options is selected, specify the type of data expected as input from the end-user, for example, String. Visibility When Advanced Options is selected, specify if the authentication field should be visible, hidden, or displayed as read-only. Adding Authorization Fields
By default, authorization fields are configured as part of the header of the task request message. If your task request requires additional authorization fields or the expected authorization is not part of the header, for example, social security number or PIN, click + Add Authorization Field and then define the fields as shown in the following illustration.
In the Field Type field, you can select one of the following depending on where in the task request message and the type of authorization fields that are required.- Header – The Bot expects the authorization fields as part of the header of the request.
- Payload – The Bot expects the authorization fields as part of the content of the body of the request.
- Query String – The Bot expects the authorization fields as a query in the body of the request.
- Path Param – The Bot expects the authorization fields as part of the URL path for the request.
In the Field Key field, enter the name of the field for the selected Field Type.
In the Field Value field, enter the value for the Field Key specified.
Click Done. The new authorization field is added in the Authorization Fields section.
To add additional authorization fields, click Add in the Authorization Fields section.Defining the Token URL
In the Token URL field, optionally define a URL that can be used to test the authentication settings from Bot Builder before you deploy the task with the authorization mechanism. You can use dynamic fields, path parameter fields, query fields, and so forth, to define the test URL, for example,
http://{tenant}.someCompany.com/test/{{tokenId}}
In the Token URL Method field, select the HTTP request method type for the Token URL. One of PUT, POST, PATCH, DELETE, and GET.
In the Token URL Content Type field, select the content type expected from the Token URL. One of: JSON, RSS, XML, URL Encoded JSON, CSV, Text, Twitter Encoded JSON, Multipart/Form-data,Multipart/Related, or Oracle ADF.
In the Access Using a Connector section, select Yes to enable access for Kore.ai Bots using the Kore.ai Connector agent. If your domain does not have any active Kore.ai Connectors defined, a warning message is displayed to contact the Bots Admin Console system administrator. For more information, see Using the Kore.ai Connector in the Bots Admin Console documentation.
Click Save Auth to save the authorization settings and close the New Authorization Mechanism dialog.Testing the Authorization
After you save the authentication, if you defined an Authorization URL for your new authorization type, you can test your authorization definition on the Authorization page when you click Test Authorization before continuing to develop the remain steps of your task.
When you click Test Authorization, the Test Authorization dialog is displayed and populated with the URL you specified in the Authorization Check URL section, as shown in the following illustration.

Click Test to begin the authorization test. When the validation of authentication is complete, the Test Authorization dialog is closed and the results of the validation, either success or failure, is displayed to the immediate right of the Test Authorization button. If the authorization fails, the Auth Test Failed message is displayed along with the Headers and Response tabs as shown in the following illustration.
- OAuth v2 client credential –
- OAuth v1 – Enables web applications or web services to access protected resources using an API without end-users having to disclose their log on credentials to Kore.ai. Click on the link below for the configuration details.
Setting Up Authorization using OAuth v1
OAuth is an open protocol to allow secure authorization in a simple and standard method from web, mobile, and desktop applications.To use OAuth, you must first register an account with the web application as you will need the log in credentials for that application to configure the settings for the authorization mechanism.How OAuth v1 Works
- The Kore.ai application obtains an unauthorized request token from the web application. The Kore.ai application redirects the user to a login dialog at the web application.
- The user authorizes the request token, associating it with their account. The web application redirects the user back to the Kore.ai application.
- The Kore.ai application exchanges the request token for an access token.
- The access token allows the Kore.ai application to access a protected resource at the provider, on behalf of the user.
The following illustration is an example of the oAuth v1 authorization type fields that you must define to enable a customized authorization for your task.
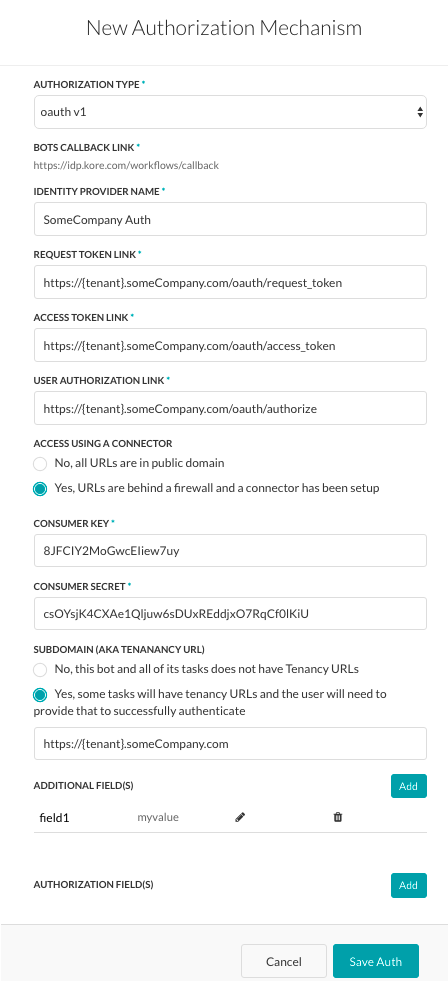
To define oAuth v1, define the fields described in the following table.FIELD NAME DESCRIPTION Authorization Type Set to oAuth v1. Callback URL The URL used by the web application or web service to redirect the end-user after end-user authorization is complete. This value, https://idp.kore.ai/workflows/callback/, is provided as a read-only value by the Kore.ai application when you define oAuth v1 settings. Identity Provider Name The name of the web application or web service, for example, Twitter. This field is required. Consumer Key The value provided as the Kore.ai application identification to the web application. This field is required. Consumer Secret The secret value provided by the Kore.ai application to establish ownership of the Consumer Key. This field is required. Request Token Link The URL used by the Kore.ai application to obtain an unauthorized request token. A request token is the value used by the Kore.ai application to obtain authorization from the end-user to obtain an access token. For example, https://{tenant}.someCompany.com/oauth/request_token. After end-user authorization, an access token can be requested by the Kore.ai application. This field is required. Access Token Link The URL used to exchange the end-user authorized request token for an access token. The access token is the value used by the Kore.ai application to gain access to the web application or web service on behalf of the end-user, instead of using the end-users log on credentials. For example, https://{tenant}.someCompany.com/oauth/access_token. This field is required. User Authorization Link The URL used to obtain end-user authorization for the Kore.ai application to access the web application or web service using the access token. For example, https://{tenant}.someCompany.com/oauth/authorize. This field is required. Access Using a Connector Select Yes to enable access for Kore.ai Bots using the Kore.ai Connector agent. This option is only visible if a Kore.ai Connector agent is configured and enabled in your enterprise on-premises network. For more information, see Using the Kore.ai Connector. Defining Tenancy
If required, in the Subdomain section, select Yes if the base URL for a web application or user interface the uses a tenant name in the URL. For example, kore is the tenant organization for a web service using tenants as www.kore.someCompany.com.
In the following example configuration, the tenancy URL contains the {tenant} organization placeholder.
Adding Additional Fields
Click + Add Additional Fields to open the Additional Fields dialog, and then enter one or more key/value pairs that represent additional authorization input fields if required as shown in the following illustration.
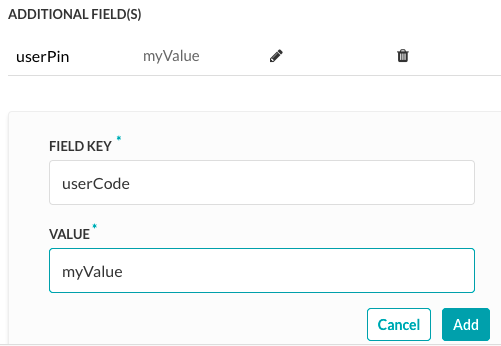
Specify the following fields:- Field Key – The name of the custom field to specify for authorization.
- Field Value – The value of the custom field to specify for the authorization.
Click Add to save the Additional Field.
To add more Additional Fields, click Add in the Additional Fields section.Adding Authorization Fields
By default, authorization fields are configured as part of the header of the task request message. If your task request requires additional authorization fields or the expected authorization is not part of the header, for example, social security number or PIN, click + Add Authorization Field and then define the fields as shown in the following illustration.
In the Field Type field, you can select one of the following depending on where in the task request message and the type of authorization fields that are required.- Header – The Bot expects the authorization fields as part of the header of the request.
- Payload – The Bot expects the authorization fields as part of the content of the body of the request.
- Query String – The Bot expects the authorization fields as a query in the body of the request.
- Path Param – The Bot expects the authorization fields as part of the URL path for the request.
In the Field Key field, enter the name of the field for the selected Field Type.
In the Field Value field, enter the value for the Field Key specified.
Click Add. The new authorization field is added in the Authorization Fields section.
To add additional authorization fields, click Add in the Authorization Fields section.Testing the Authorization
After you save the authorization, you can test your authorization definition on the Authorization page when you click Test Authorization before continuing to develop the remain steps of your task.
When you click Test Authorization, the test is executed using the authentication token URLs and the Consumer Key and Consumer Token. If the tenancy was defined, the Test Authorization dialog is displayed as shown in the following illustration.

Click Test to begin the authorization test. When the validation of authentication is complete, the Test Authorization dialog is closed and the results of the validation, either success or failure, is displayed to the immediate right of the Test Authorization button. If the authorization fails, the Auth Test Failed message is displayed along with the Headers and Response tabs as shown in the following illustration.
- OAuth v2 – The newest version of OAuth protocol focusing on specific authorization flows for web applications and web services. Click on the link below for the configuration details.
Setting Up Authorization using OAuth v2
OAuth v2 is the new version of the open protocol to allow secure authorization in a simple and standard method from web, mobile, and desktop applications.To use oAuth v2, you must first register an account with the web application as you will need the log in credentials for that application to configure the settings for the Authorization Mechanism.How oAuth v2 Works
- The Kore.ai application redirects the user to a login dialog at the web application.
- The user authenticates.
- The web application redirects the user back to the Kore.ai application with an access token.
- The Kore.ai application validates the access token.
- The access token allows the Kore.ai application to access a protected resource at the provider, on behalf of the user.
The following illustration shows the fields to define for the oAuth v2 Authorization Type.
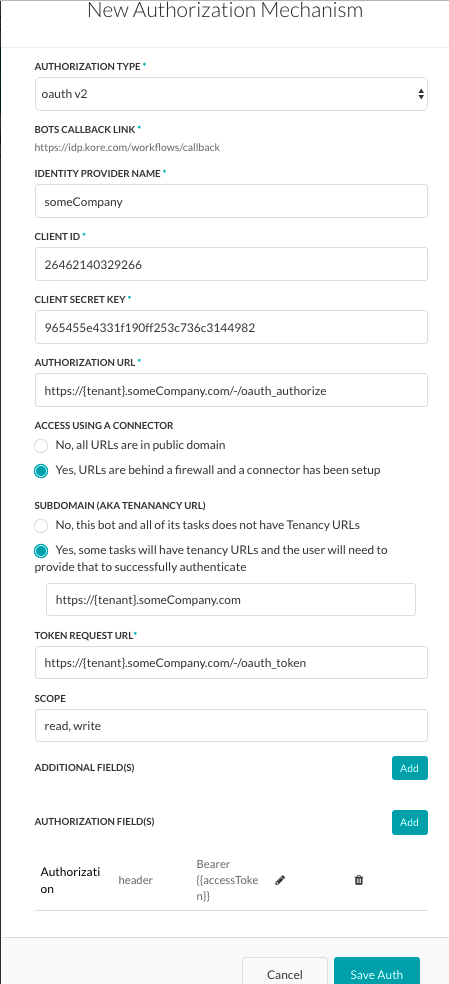
To configure oAuth v2, define the fields described in the following table.FIELD NAME DESCRIPTION Authorization Type Set to oAuth v2. Callback URL The URL used by the web application or web service to redirect the end-user after end-user authorization is complete. This value, https://idp.kore.ai/workflows/callback/ is provided as a read-only value by the Kore.ai application when you define oAuth v2 settings. Identity Provider Name The name of the web application or web service, for example, Asana. This field is required. Client ID The ID of the Kore.ai client. Client Secret Key The value provided as the Kore.ai application authentication based on the Client ID to the web application. Authorization URL The URL used to obtain end-user authorization for the Kore.ai application to access the web application or web service using the access token. This field is required. Access Using a Connector Select Yes to enable access for Kore.ai Bots using the Kore.ai Connector agent. This option is only visible if a Kore.ai Connector agent is configured and enabled in your enterprise on-premises network. For more information, see Using the Kore.ai Connector. Authorization URL The URL used by the Kore.ai application to obtain an unauthorized request token. A request token is a value used by the Kore.ai application to obtain authorization from the end-user to obtain an access token. After end-user authorization, an access token can be requested by the Kore.ai application. This field is required. Defining Tenancy
If required, in the Subdomain section, select Yes if the base URL for a web application or user interface the uses a tenant name in the URL. For example, kore is the tenant organization for a web service using tenants as www.kore.someCompany.com.
In the following example configuration, the tenancy URL contains the {tenant} organization placeholder.
Adding Additional Fields
Click + Add Additional Fields to open the Additional Fields dialog, and then enter one or more key/value pairs that represent additional authorization input fields if required as shown in the following illustration.
Specify the following fields:- Field Key – The name of the custom field to specify for authorization.
- Value – The value of the custom field to specify for the authorization.
Click Add to save the Additional Field.
To add more Additional Fields, click Add in the Additional Fields section.Adding Authorization Fields
By default, authorization fields are configured as part of the header of the task request message. If your task request requires additional authorization fields or the expected authorization is not part of the header, for example, social security number or PIN, click + Add Authorization Field and then define the fields as shown in the following illustration.
In the Field Type field, you can select one of the following depending on where in the task request message and the type of authorization fields that are required.- Header – The Bot expects the authorization fields as part of the header of the request.
- Payload – The Bot expects the authorization fields as part of the content of the body of the request.
- Query String – The Bot expects the authorization fields as a query in the body of the request.
- Path Param – The Bot expects the authorization fields as part of the URL path for the request.
In the Field Key field, enter the name of the field for the selected Field Type.
In the Field Value field, enter the value for the Field Key specified.
Click Add. The new authorization field is added in the Authorization Fields section.
To add additional authorization fields, click Add in the Authorization Fields section.Testing the Authorization
After you save the authorization, you can test your authorization definition on the Authorization page when you click Test Authorization before continuing to develop the remain steps of your task.
When you click Test Authorization, the test is executed using the authentication token URLs and the Client ID and Client Secret Key. If the tenancy was defined, the Test Authorization dialog is displayed as shown in the following illustration.
Click Test to begin the authorization test. When the validation of authentication is complete, the Test Authorization dialog is closed and the results of the validation, either success or failure, is displayed to the immediate right of the Test Authorization button. If the authorization fails, the Auth Test Failed message is displayed along with the Headers and Response tabs as shown in the following illustration.
- API Key – An identification and authorization token generated or provided by a web application or web service used to identify the incoming application request, and in some cases, also provide authentication for secure access. Click on the link below for the configuration details.
Setting Up Authorization using an API Key
An API key can act as both a unique identifier and a secret token for identification as well as authentication to provide a set of access rights on the associated API. Instead of prompting the end-user for both a username and password for access, the user is prompted only for an API key when configuring the task.To use the API Key Authorization Type, you must first register an account with the web application and then generate an API Key for that application to configure the settings for the Kore.ai authorization mechanism.The following illustration shows the fields to define for the API Key Authorization Type. To define an API key authorization, select API Key in the Authorization Type field. Then specify a Name for the authorization to be displayed in the Bot builder user interface.
Defining Tenancy
If required, in the Subdomain section, select Yes if the base URL for a web application or user interface the uses a tenant name in the URL. For example, kore is the tenant organization for a web service using tenants as www.kore.someCompany.com.
In the following example configuration, the tenancy URL contains the {tenant} organization placeholder.
Adding Form Fields to the Authorization Form
If the default username and password fields do not meet your needs, you can add new fields displayed to the end-user by adding authorization form fields. To add fields on the authorization form, click + Add Form Field. The following illustration is an example of a definition to add a password field to the authorization dialog.
The following table describes the fields used to define an authorization IDP form field.FIELD NAME DESCRIPTION Title of Field Specify the name of the field displayed to the end-user in the authentication dialog. Field Key The value represents the end-user input value to the authenticating service. Help Hint The help text displayed in the field to describe what should be entered into the field. Field Type When Advanced Options is selected, specify the type of field displayed in the end-user interface to collect the user input assigned as the value for the Field Key, one of: - Textbox
- Password
Mandatory When Advanced Options is selected, select if the end-user must define this field to complete authentication. Data Type When Advanced Options is selected, specify the type of data expected as input from the end-user, for example, String. Visibility When Advanced Options is selected, specify if the authentication field should be visible, hidden, or displayed as read-only. Adding Authorization Fields
By default, authorization fields are configured as part of the header of the task request message. If your task request requires additional authorization fields or the expected authorization is not part of the header, for example, social security number or PIN, click + Add Authorization Field and then define the fields as shown in the following illustration.
In the Field Type field, you can select one of the following depending on where in the task request message and the type of authorization fields that are required.- Header – The Bot expects the authorization fields as part of the header of the request.
- Payload – The Bot expects the authorization fields as part of the content of the body of the request.
- Query String – The Bot expects the authorization fields as a query in the body of the request.
- Path Param – The Bot expects the authorization fields as part of the URL path for the request.
In the Field Key field, enter the name of the field for the selected Field Type.
In the Field Value field, enter the value for the Field Key specified.
Click Add. The new authorization field is added in the Authorization Fields section.
To add additional authorization fields, click Add in the Authorization Fields section.Testing the Authorization – API Key
After you save the authentication, if you defined an Authorization Check URL for your new authorization type, you can test your authorization definition on the Authentication tab when you click Test Authorization before continuing to develop the remain steps of your task.
When you click Test Authorization, the Test Authorization dialog is displayed and populated with the URL you specified in the Authorization Check URL section, as shown in the following illustration.
To configure the Test Authorization – API Key- In the Auth Check URL field, verify or enter the URL to test the authentication configuration.
- If your bot uses subdomains, the Tenancy field is displayed and you must specify the tenant.
- Enter the API key for the application in the API Key field.
- Select the content type expected for the URL in the Content-Type field.
- For testing the URL, the Method field is read-only and set to GET.
- Click Test to begin the authorization test.
When the validation of authentication is complete, the Test Authorization dialog is closed and the results of the validation, either success or failure, is displayed to the immediate right of the Test Authorization button. If the authorization fails, the Auth Test Failed message is displayed along with the Headers and Response tabs as shown in the following illustration.
API Request
Configure the API request that asks for data from your Bot website, system, or web application for the task. You can configure the API Request Settings an action task for WebHook, Rest, SOAP or RSS APIs. You can define API Parameters, optional API task Initializer, API Request pre- or post-processor, and the API Request. You also need to add a Response Sample expected from your API Request payload.
After you define the authorization mechanism and then click Save Auth, you are ready to configure the alert task request. The configuration settings for an alert task request are based on the Connection Type that you define for the task. For more information, click the corresponding section.
For a task with the Connection Type specified as Webhook, you will need to define:
- Content Type – They type of data exchanged between Kore.ai and your web application.
Defining the Content Type
The Content Type describes the type of data exchanged between Kore.ai and your Bot website or application, and the key-value pairs expected in the task payload response. To define the Content Type for the API Request, expand the Content Type tab and select one of these options:
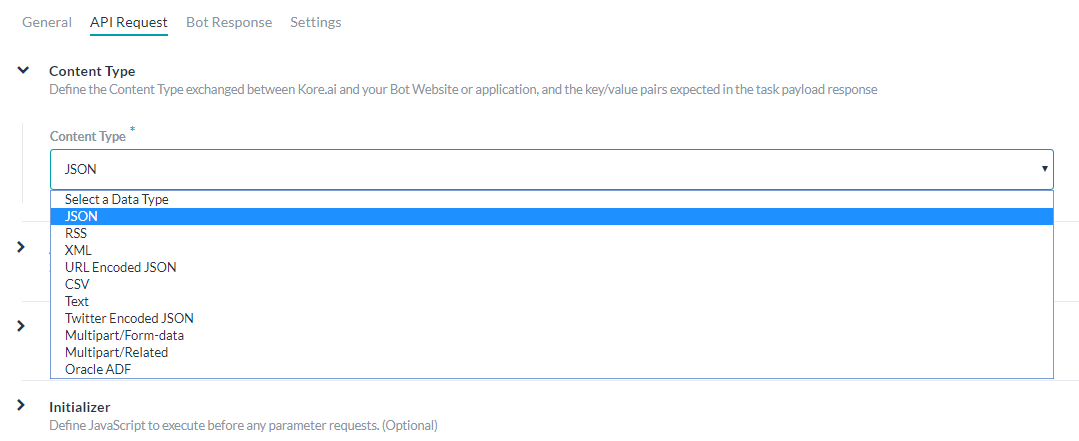
- JSON – JavaScript Object Notation is an open standard format using human-readable text to transmit data objects as attribute-value pairs. You can use JSON to transmit data between the Kore.ai servers and your Bot web application.
- RSS – Rich Site Summary, or Really Simple Syndication, is family of standardized formats used to publish frequently updated information such as blog entries, news headlines, audio, and video.
- XML – Extensible Markup Language is a markup language that defines a set of rules for encoding documents in a format which is both human-readable and machine-readable. Oftentimes, web services use XML schemas to process the XML data.
- URL Encoded JSON – URLs using JSON encoding for reserved characters.
- CSV – Comma-separated value lists.
- Text – Text-based key-value pairs.
- Twitter Encoded JSON – URLs for Twitter using JSON encoding for reserved characters.
- Multipart/Form-data – An encoding type that allows files to be sent through an HTTP POST request method if you want to allow a user to upload a file from a form.
- Multipart/Related – Used when the same information is presented in different body parts in different forms. The body parts are ordered by increasing complexity.
- Oracle ADF – For Oracle Application Development Framework.
- Response Sample – Define key-value pairs that you expect to receive in the Alert task payload. The keys that you provide are available as drop-down choices for handling the data to display to the end-user.
Adding Response Sample Data
In the Response Sample section, you can enter or paste examples of the key-value pairs that you expect to receive in the task payload. When you define the response sample, the keys specified in the Response Sample section are available as drop-down choices for handling the output data.Adding the Sample Response
- On the API Request tab, Expand the Sample Response section.
- Enter your Response Sample that contains the key-value pairs from your JSON response payload. Do one of the following:
- To format the view of the response as a JSON structure with indentation as shown in the following illustration, click the Formatted
 icon.
icon.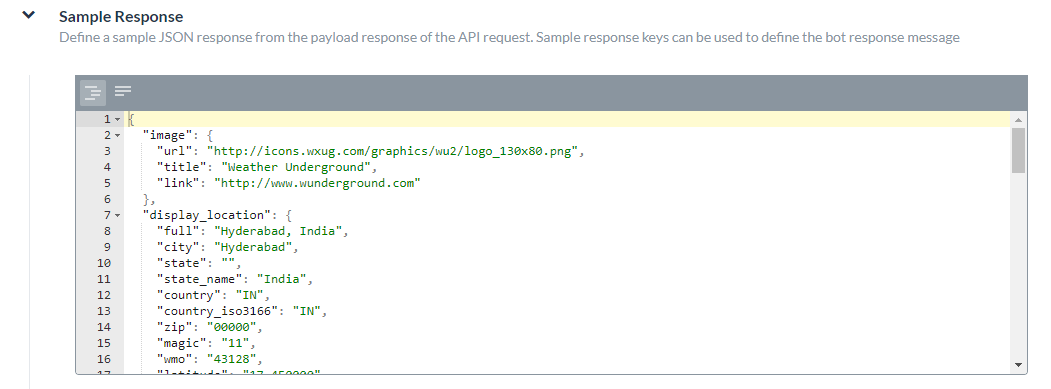
- To format the view of the response in serialized compact form as shown in the following illustration, click the Unformatted
 icon.
icon.
- To format the view of the response as a JSON structure with indentation as shown in the following illustration, click the Formatted
- Alert Tasks Path – Optionally define a specific path for data from the API.
Defining the Alert Tasks Path
The last section, Alert Tasks Path, is an optional field that you can specify if the Response Sample section contains a hierarchical tree structure of data and you only want a specific hierarchical level submitted for the task request object.
To define the Alert Tasks Path for an alert task using a webhook, on the API Request tab, click the Expand icon in the Alert Tasks Path section as shown in the following illustration.
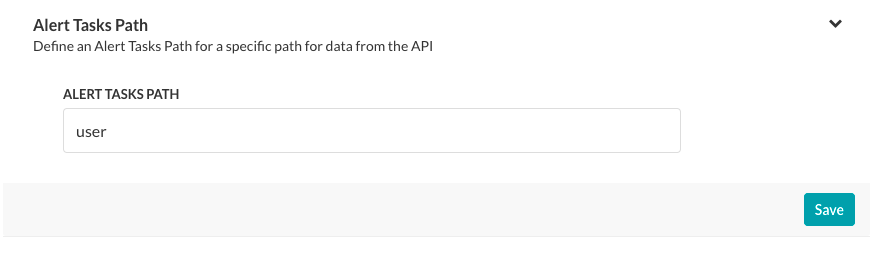
For example, in the following Response Sample, you may only want to expose the user data in the alert task response by defining user in the Alert Tasks Path field.{ "user":{ "timeZone":"Asia/Kolkata", "active":"true", "displayName":"John Doe", "avatarUrls":{ "32x32":"https://koreteam.atlassian.net/secure/useravatar?size=medium&ownerId=john.doe&avatarId=11801", "16x16":"https://koreteam.atlassian.net/secure/useravatar?size=xsmall&ownerId=john.doe&avatarId=11801", "24x24":"https://koreteam.atlassian.net/secure/useravatar?size=small&ownerId=john.doe&avatarId=11801", "48x48":"https://koreteam.atlassian.net/secure/useravatar?ownerId=john.doe&avatarId=11801" }, "emailAddress":"john.doe@kore.com", "key":"john.doe", "name":"john.doe", "self":"https://koreteam.atlassian.net/rest/api/2/user?username=john.doe" }, "webhookEvent":"jira:issue_updated", "timestamp":"1438431826045", "user_key":"john.doe", "user_id":"john.doe" }After you enter the Alert Tasks Path field, click Save.
The following illustration is an example of the API Request tab on the Edit Alert – < Task Name > page for an alert task with the Connection Type specified as Webservice and the Connection Mode set to REST defined on the General tab.
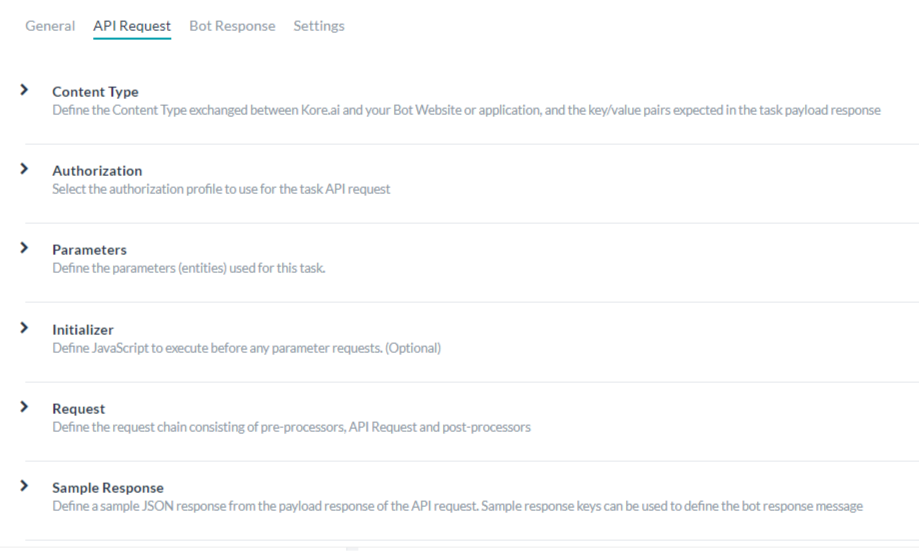
For a task with the Connection Type specified as Webservice and the Connection Mode set to REST you need to define:
- Content Type – The type of data exchanged between Kore.ai and your web application.
Defining the Content Type
The Content Type describes the type of data exchanged between Kore.ai and your Bot website or application, and the key-value pairs expected in the task payload response. To define the Content Type for the API Request (REST), expand the Content Type tab and select one of these options:

- JSON – JavaScript Object Notation is an open standard format using human-readable text to transmit data objects as attribute-value pairs. You can use JSON to transmit data between the Kore.ai servers and your Bot web application.
- RSS – Rich Site Summary, or Really Simple Syndication, is family of standardized formats used to publish frequently updated information such as blog entries, news headlines, audio, and video.
- XML – Extensible Markup Language is a markup language that defines a set of rules for encoding documents in a format which is both human-readable and machine-readable. Oftentimes, web services use XML schemas to process the XML data.
- URL Encoded JSON – URLs using JSON encoding for reserved characters.
- CSV – Comma-separated value lists.
- Text – Text-based key-value pairs.
- Twitter Encoded JSON – URLs for Twitter using JSON encoding for reserved characters.
- Multipart/Form-data – An encoding type that allows files to be sent through an HTTP POST request method if you want to allow a user to upload a file from a form.
- Multipart/Related – Used when the same information is presented in different body parts in different forms. The body parts are ordered by increasing complexity.
- Oracle ADF – For Oracle Application Development Framework.
- Authentication – If required for your alert task, you will need to define the authentication to access the API, for example, using basic authorization, OAuth, or API Key. Refer here for more details.
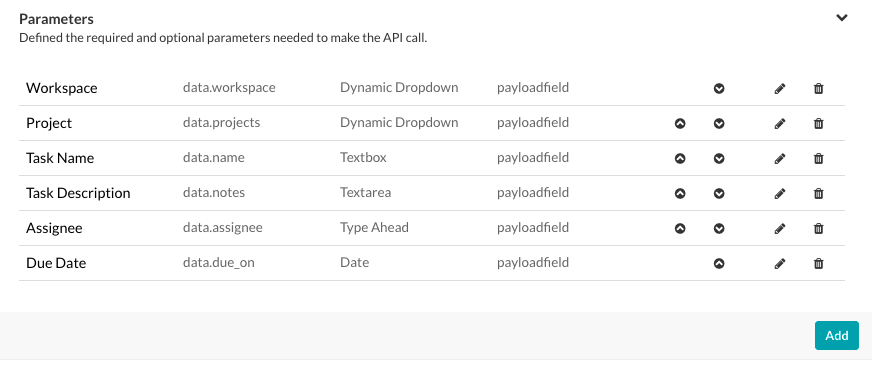
- Parameters – Define one or more parameters used to process the API request, for example, input from user prompts, selection by an end-user from a list of choices, a URL, and so forth.
Defining Parameters for an Alert Task
Follow these steps to define API Request (REST) parameters:- Click the Parameters section, and then click Add. The Set Up Task Parameter dialog opens.
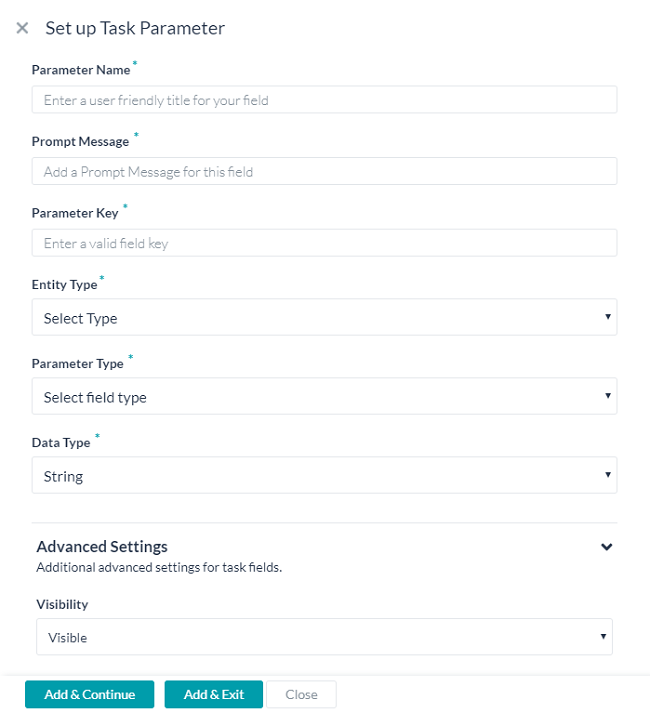
- Depending on your selection, enter the values for the relevant fields as described in the following table.
Field Name Description Type of Task Parameter Specify one of the following: - Payload Parameter – Use this field type to represent payload data for an HTTP method, such as POST, PUT, GET, DELETE, and so forth. For example:
{ "taskId":"{payloadfield2}", "message":"{payloadfield1}" } - Query Parameter – This field type is used as part of a URL path or query within a URL. For example:
http://app.asana.com/api/workspaces/{queryfield1}/project/{queryfield2}?userId={queryfield3}
Parameter Name The title of the task input field displayed to the user, for example, Choose account Prompt Message The help description displayed below the parameter name, for example, Which account would you like to access? Parameter Key The task key that represents the end-user input value that you want to collect, for example, accountType. Parameter Type Specifies the type of task input field displayed in the end-user interface to collect user input for the request object to assign to the Key value. The default setting is Textbox, but can be customized to any one of the following: - Date – Displays the Format field where you can select the date format syntax for the end-user to define when the task is configured for their account. In the Select Date Format drop-down list, select one of the following:
- dd-MM-YYYY – For example, 16-05-1999
- MM-dd-YYYY – For example, 05-16-1999
- dd-MM-YY – For example, 16-05-99
- YYYY-MM-dd – For example, 1999-05-16
- URL – Displays a text box for the end-user to enter a URL including field validation for a correct URL syntax. In the Placeholder field, enter the help hint displayed in the text box, for example, Enter the URL for the website here.
- Textbox – Displays a text box for the end-user to enter text as the task input field, typically just a few words. In the Placeholder field, enter the help hint displayed in the text field, for example, Type in the name you want to embroider.
- Static Dropdown – Displays a drop-down list of choices to the end-user. Click Add Option to begin adding the list of items to display to the end-user with the following parameters:
- Option Name – The name of the option displayed to the end-user.
- Option Value – The value the represents the Option Name returned to the application.
- Default Value – Select the default value for the option when more than one option is defined.
- Searchable – Select to enable dynamic search and display as the end-user enters text in this field, or if no matches, allow free-form entry.
Click Save. To add additional items, click Add Option again. Edit or remove options in the Actions column for options.
- Dynamic Dropdown – Displays a drop-down list dynamically populated at runtime based on the response from a URL for your Bot, for example, a list of projects for a JIRA task notification. Define the following properties for a dynamically populated dropdown.
- Endpoint URL – The Bot endpoint URL, for example, https://app.asana.com/api/1.0/workspaces.
- Endpoint Content Type – The content type expected from the specified endpoint URL. One of: JSON, RSS, XML, URL Encoded JSON, CCV, Text, or Twitter Encoded JSON.
- Endpoint Method – One of:
- GET – Specifies an HTTP Request GET method for the task field.
- POST – Specifies an HTTP Request POST method for the task field.
- Response Path – The path in the response that contains the desired drop-down list values, for example, data.
- Label Key – The key for the label of the drop-down option, for example, name.
- Option Value Key – The key for the value of the drop-down option, for example, id.
- Add Payload Field – Click to add one or more fields from the response payload as options for the dynamic dropdown. For each payload field, enter the Payload field key and the Payload field value, and then click Save. Edit or delete payload fields in the Actions column.
- Searchable – Select to enable dynamic search and display as the end-user enters text in this field, or if no matches, allow free-form entry.
- Textarea – Displays a text area box for the end-user to enter text as the task input, typically for several sentences. In the Placeholder field, enter the help hint displayed inside the text area.
- Type Ahead – Displays a dynamically populated drop-down list of choices to the end-user at runtime when the user enters three or more characters that match the search results based on the response from the URL defined for the task. For example, a list of projects for a JIRA task notification message. Define the following properties for a dynamically populated drop-down.
- Endpoint URL – The Bot endpoint URL, for example, https://app.asana.com/api/1.0/workspaces.
- Endpoint Content Type – The content type expected from the specified endpoint URL. One of: JSON, RSS, XML, URL Encoded JSON, CCV, Text, Twitter Encoded JSON, Multipart/Form-data, or Multipart/Related.
- Endpoint Method – One of:
- GET – Specifies an HTTP Request GET method for the task field.
- POST – Specifies an HTTP Request POST method for the task field.
- Response Path – The path in the response that contains the desired drop-down list values, for example, data.
- Label Key – The key for the label of the drop-down option, for example, name.
- Option Value Key – The key for the value of the drop-down option, for example, id.
- Add Payload Field – Click to add one or more fields from the response payload as options for the type ahead field. For each type ahead field option, enter the Payload field key and the Payload field value, and then click Save. Edit or delete payload fields in the Actions column.
- Editable – Enables the end-user to enter text free-from in the field as an option when type-ahead search results do not match.
- Email – Displays a text box for the end-user to input an email address. In the Placeholder field, enter the help hint to display to the end-user inside the text box.
- Date & Time – Displays a text box for the end-user to input a date with time. In the Format field, enter the expected date or time format to display to the end-user in the date text box. In the Select Date Format drop-down list, select the date with time format.
- Time Zone – Displays a drop-down list of time zones based on the operating system settings.
- Location – Displays a text box for the end-user to enter a geographical location, for example, Orlando, FL, or 32801.
- Nested Form – Displays end-user input fields in a nested format below the parent input field. Specify the following fields for a nested form input field:
- Array Element Type – Select the data type of the parent input form element.
- Add Nested Form Field – Click to add one or more nested form fields.
- File Upload – Displays end-user control to search for, and select a file to upload. When clicked, enter the File Upload Payload Key. When the File Upload Payload Key is defined, in the File Upload Payload Field Value drop-down list, select one of the following types:
- File Name
- File Size
- File Content Type
Data Type Select one of these user input types: - String – Users can input any sequence of numbers, letters, or special characters.
- Number – Users can input a number. No special characters are allowed.
- Boolean – User can input a Boolean value of true or false.
- Email – User can input a valid email address.
- Object – Data from a Bot can be received as JSON objects, for example, as location details defined as:
“location” : {
“lat” : 17.4374614,
“lng” : 78.4482878
}
where you can refer to the properties in a request chain or task request as location.lat, and location.lng. - Array – Users can pass a comma-separated list of values to the Bot. For example, in Google Calendar, multiple attendees with data can be passed as:
“attendees”: [“user1”, “user2”, “user3”]
When selected, specify the Type for the array of end-user input as one of:- String
- Number
- Boolean
- Array
- Date
- Date – Users can type a complete date or select it from a date picker.
Is Multi Select Allows the user to make more than one selection or entry. This field is displayed depending on the Field Type selected. - Payload Parameter – Use this field type to represent payload data for an HTTP method, such as POST, PUT, GET, DELETE, and so forth. For example:
- Click the Advanced Settings tab to define additional optional settings for the task fields.
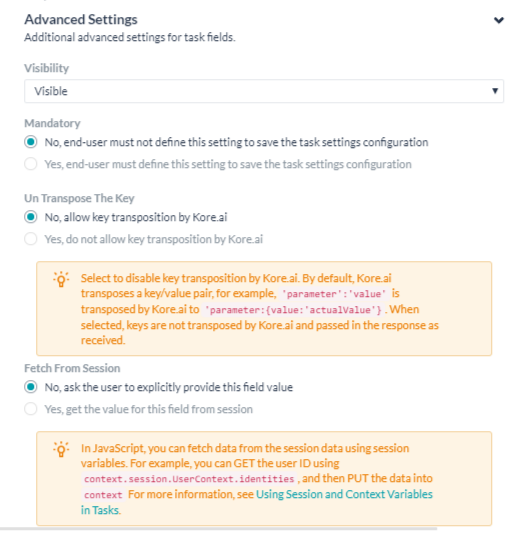
Field Name Description Visibility Specify if the task input field should be visible or hidden from the end-user.
The Visibility field can also be set to Custom where data is captured from the user but not used as a query parameter or payload field. For example, with a JIRA bot, posting a comment on a ticket using an @mention tag as shown below:
“@Mike, please look into this issue”
The JIRA API to ‘Post a comment’ requires one query field and one payload field as:- Issue ID
- Comment
With the Visibility field set to Custom, you can capture the user information for the user mentioned as
@Mikeusing the JIRA API to fetch data to append to thecommentfield value, but not to use as payload field or query field. The default Visibility field setting is Visible.Mandatory Select if the end-user must define this setting to save the task settings configuration. Untranspose the Key Select to disable key transposition by Kore.ai. By default, Kore.ai transposes a key/value pair, for example, “parameter”:”value” is transposed by Kore.ai to “parameter:{value:”actualValue”}. When selected, keys are not transposed. Fetch from Session Select to store the user input value for this field as a session variable. When selected, the Field Value from Session field is displayed. Select an existing variable, or select Add New Session Variable to define a new variable. To create a new session variable, you must select the Scope of the variable and define the Key to store the variable. In the Scope field, select one of: - EnterpriseContext – Define a key/value pair available to all users in an enterprise.
- BotContext – Define a key/value pair available to all users of this bot.
- UserSession – Define a key/value pair available for this user for any bots in an enterprise.
- BotUserSession – Define a key/value pair available a bot based on user inputs.
- Click Add & Continue to save the parameter for the task request and add another parameter, or click Add & Exit to save the parameter for the task request and close the dialog. You should organize multiple parameters in the order that the bot user should provide inputs. Use the
 and
and  icons to move the parameters.
- Click the Parameters section, and then click Add. The Set Up Task Parameter dialog opens.
- Initializer – Specify custom JavaScript to run, or set session variables prior to creating a task instance when web services require code to be executed, or session variables set, or modification of user context details before an API request is executed.
Defining an Initializer for an Alert Task
To run a task, you may need to put or get values from a session before executing the task using Kore.ai session-specific variables. For more information, see Using Session and Context Variables in Tasks.Some web services require executed code, session variables, or modification of user context details before executing an API request. For example, a web service may require two-factor user authorization where the first step is a user login, and the second step is a partner authorization. After validating both these steps, an access token is granted and used in the header of subsequent API calls to that web service. Using the Initializer, you can complete partner authorization and retrieve the access token from the response of the user authentication. The access token can be stored as a custom session variable and set as the header for subsequent API calls.Defining Task Initializer
To configure the task initializer, click the Initializer tab. It opens a JavaScript editor in which you can write the required code.

In the JavaScript editor, define the Key and the Scope as follows:- EnterpriseContext – A key-value pair available to all bots and all users in an enterprise. For example, for a GitHub bot, a user needs to access one or more enterprise repositories. In the Initializer, you can persist the repository data as Gitrepository (Enterprise Context) with the following JavaScript code:
var userRepository = { "title": _labels_[repository], "value": repository }; EnterpriseContext.put('Gitrepository', userRepository, 200000); - BotContext – A key-value pair available to all users of this specific bot. For example, you may want to set up a default currency for financial transactions in a session based on the user location. In the Initializer, you can persist the default currency data as currency (Bot Context) with the following JavaScript code:
var defaultCurrency = { TODO Custom JavaScript for location-based currency } BotContext.put('currency', defaultCurrency, 200000); - UserContext – A key-value pair available to all bots for a user. These keys are read-only and provided by the system as user data for:
- _id – The Kore.ai userId.
- emailId – The email address associated with the userId.
- lastName – The last name of the user.
- firstName – The first name of the user.
- profImage – The image or avatar filename of the user.
- profColour – The account color for the user.
- activationStatus – The account status of the user.
- title – The title of the user, if defined.
- orgId – The organizational ID of the user account, if defined.
- UserSession – Define a key-value pair available for this specific user for all bots in an enterprise. For example, you may want to store a user location to make it available to all bots, such as a user home address for commerce, transportation, and home delivery services. In the Initializer, you can persist the default location data as HomeLocation (UserSession) with the following JavaScript code:
var location = { "title": labels[location], "value": { "latitude": location.latitude, "longitude": request.location.longitude } }; UserSession.put('HomeLocation', location, '20000'); - BotUserSession – Define a key-value pair available to a specific bot based on a specific user’s inputs. For example, you may want to persist a user location for more than one bot task. For a travel bot, the user may be able to book a flight and a hotel based on the same home and destination addresses. In the Initializer, you can persist the default home and destination data as HomeLocation (BotUserSession) and DestinationLocation (BotUserSession) with the following JavaScript code:
var homelocation = {
 "title": labels[request.sourceLocation],
 "value": {
 "latitude": request.sourceLocation.latitude,
 "longitude": request.sourceLocation.longitude
 }
};
BotUserSession.put('HomeLocation', homelocation, '20000');
var destlocation = {
 "title": labels[request.destLocation],
 "value": {
 "latitude": request.destLocation.latitude,
 "longitude": request.destLocation.longitude
 }
};
BotUserSession.put('DestinationLocation', destlocation, '20000’);
GET and PUT Syntax
The following code examples show the syntax to GET or PUT a key-value pair for each context type.
"EnterpriseContext" : {
       "get" : function(key){...},//get the specified key
       "put" : function(key, value, ttl){...} //put the value at the key for the specified ttl, ttl is in minutes
   },
   "BotContext" : {
       "get" : function(key){...},//get the specified key
       "put" : function(key, value, ttl){...} //put the value at the key for the specified ttl, ttl is in minutes
   },
   "UserContext" : {
       "get" : function(key){...},//get the specified key
   },
   "UserSession" : {
       "get" : function(key){...},//get the specified key
       "put" : function(key, value, ttl){...} //put the value at the key for the specified ttl, ttl is in minutes
   },
   "BotUserSession" : {
       "get" : function(key){...},//get the specified key
       "put" : function(key, value, ttl){...} //put the value at the key for the specified ttl, ttl is in minutes
   }
For example:
    BotContext.put("topicSessionVariable","music",2000);
    UserSession.put("firstName","Mary",20000);
    UserContext.get("firstName");
Exception Syntax
You can also define custom error messages to catch errors before setting up a task, for example, authentication failure. If an exception is captured, the task setup is halted. Use the following syntax to throw the exception:
{
    "exceptions": {
        "message": " Error Message"
    }
}
For example,
var ex ={};
var exceptions={};
exceptions.message ='You can not proceed further with out valid permissions';
ex.exceptions = exceptions;
print(JSON.stringify(ex)); //print is mandatory.
In the Initializer section, you can use session Keys, or other session variables, however, you cannot set or access values. For example,
var name = UserContext.get("firstName")+UserContext.get("lastName");
UserSession.put("fullName") = name;
In the preceding code example, you PUT a value into the session using a task Parameter defined with the Fetch from Session field in the Advanced Settings section for the task. The Key is defined as
fullNamefor the custom definedUserSessioncontext variable.Task Initializer Example
The following code is an example of a Task Initializer to get the user ID and email data to pre-populate variables in the API request.
var x = UserContext.get("identities"); var isEmailFound = false; for (var i = 0; i < x.length; i++) { if (x[i].type === "mapped") { var identity = x[i].val var arr = identity.split("/"); var pattern = /^cs/i; var result = arr[0].match(pattern); if (result) { isEmailFound = true; UserSession.put("rtmEmail", arr[1], '20000'); } } } if (!isEmailFound) { for (var j = 0; j < x.length; j++) { if (x[j].type === "email") { UserSession.put("rtmEmail", x[j].val, '20000'); } } } - EnterpriseContext – A key-value pair available to all bots and all users in an enterprise. For example, for a GitHub bot, a user needs to access one or more enterprise repositories. In the Initializer, you can persist the repository data as Gitrepository (Enterprise Context) with the following JavaScript code:
- Request – Define a request chain used to make an API call to a web service to initiate the task using URLs and paths to your Bot to initiate the delivery of the data payload from the web service to the Bots Platform. The request chain can consist of pre-processors, API request, and post-processors.
Defining the Request Chain for an Alert Task
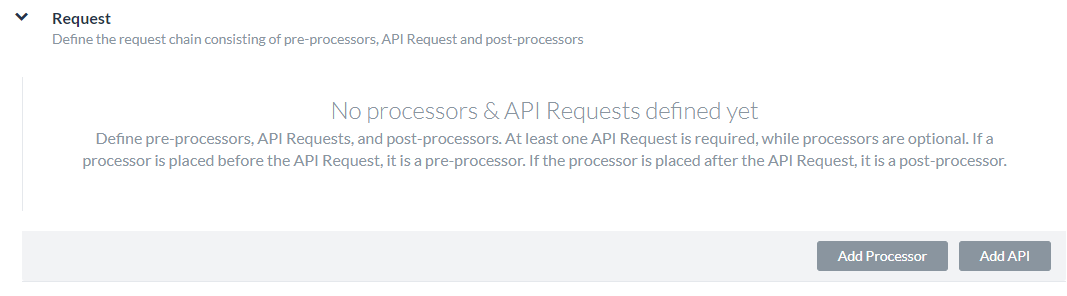
In the Request section of the API Request tab, you can define an API request chain consisting of pre-processors, API Requests, and post-processors. At least one API Request is required, while processors are optional.API Request
For any task, you will need to define an API request to make a call to a web service to initiate the task. At least one API request is required for each task. For each API request, you must add one or more request URLs and paths to your task to initiate the delivery of the data payload from the web service.
Configuring the API Request
- On the API Request tab, expand the Request tab, and then click, Add API.
- Specify the values for the fields in the Add API dialog as described in the following procedure.
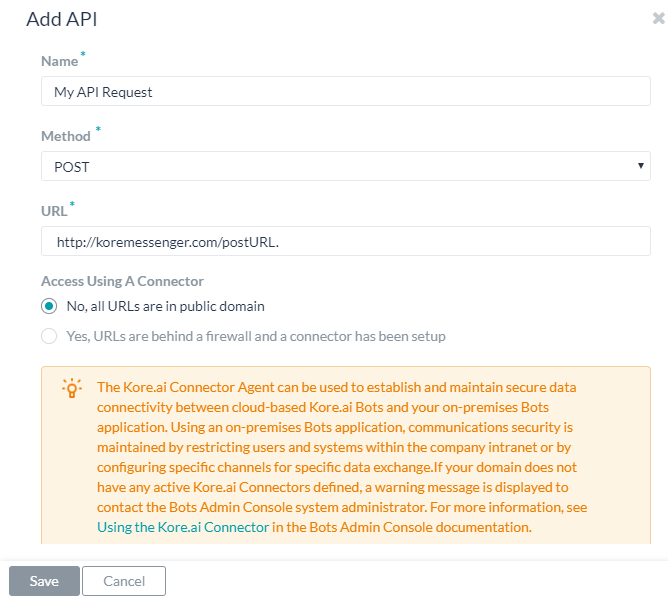
- In the Name field, enter the name of your API request, for example, My API Request.
- In the Method drop-down list, select the HTTP method used for the task. One of:
- POST – Used to send data to the server such as customer information, file upload, using HTML forms.
- PUT – Replaces the content of the target resource with the content sent.
- PATCH – Appends the content of an existing target resource with the content sent.
- DELETE – Deletes the content of an existing target resource.
- GET – Returns the content of an existing target resource.
- In the URL field, specify the URL for the bot task response to process, for example, http://koremessenger.com/postURL. You can also use session variables in the URL as shown in the following example:
https://mySite.crm.ondemand.com/sap/c4c/odata/v1/c4codata/ServiceRequestCollection?$filter=ID eq '{id}' and ReporterEmail eq '{userEmail}'&$expand=ServiceRequestHistoricalVersion,ServiceRequestDescription - In the Access Using A Connector field, select Yes to enable access for Kore.ai Bots using the Kore.ai Connector agent. This option is only visible if a Kore.ai Connector agent is configured and enabled in your enterprise on-premises network. For more information, see Using the Kore.ai Connector.
- On the Headers tab, in the Content Type field, select one of the following supported data types for your sample response data.
- JSON – JavaScript Object Notation is an open standard format using human-readable text to transmit data objects as attribute-value pairs. You can use JSON to transmit data between the Kore.ai servers and your Bot web application.
- RSS – Rich Site Summary, or Really Simple Syndication, is family of standardized formats used to publish frequently updated information such as blog entries, news headlines, audio, and video.
- XML – Extensible Markup Language is a markup language that defines a set of rules for encoding documents in a format which is both human-readable and machine-readable. Oftentimes, web services use XML schemas to process the XML data.
- URL Encoded JSON – URLs using JSON encoding for reserved characters.
- CSV – Comma-separated value lists.
- Text – Text-based key-value pairs.
- Twitter Encoded JSON – URLs for Twitter using JSON encoding for reserved characters.
- Multipart/Form-data – An encoding type that allows files to be sent through an HTTP POST request method if you want to allow a user to upload a file from a form.
- Multipart/Related – Used when the same information is presented in different body parts in different forms. The body parts are ordered by increasing complexity.
- Oracle ADF – For Oracle Application Development Framework.
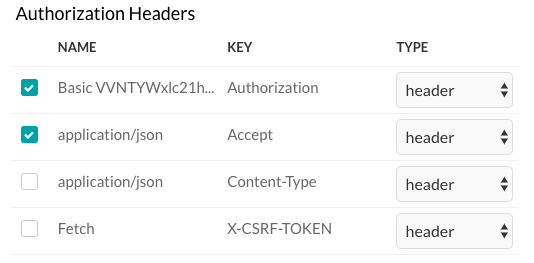
- In the Authorization Headers section, select or clear keys to enable or disable the key for the header as shown in the following illustration.
- On the Parameters tab, select or clear any Auth Parameters or Parameters to include in the header as shown in the following illustration.

- Click Save to save and close the API Request configuration.
Processors
Processors allow you to manipulate data collected in the user session before, during, or after an API request to a web service using JavaScript.
If you define and place a processor before the API Request, it is a pre-processor. Pre-processors allow you to manage input parameters and values from session variables before the API Request is made.
If the processor is sequentially placed after the API Request, it is a post-processor. You can use a post-processor to access payload response keys from the API request. To access keys, use one of the following post-processor types:- Resolve: To use the results of one payload response as input for a second request.
- Spread – To separate arrays of data in a payload.
- Extract – To specify a path to a specific object in a payload with multiple objects.
- Assign – To specify a variable name for the payload response.
Pre-processors
You can use a pre-processor to manage request parameters before the API Request is executed, using session variables and parameters. When defining a pre-processor, you must set Type of Process to custom and then enter your code in the JavaScript editor displayed. A pre-processor can only be of Type custom.
Adding a Pre-Processor
- On the API Request page, expand the Request tab, and then click Add Processor.
- Enter the name of your processor in the Name field.
- In the Type of Process drop-down list, you must select Custom for a pre-processor.
- Add your code for manipulating the request parameters as needed using the following syntax:
{
    "fields": {
        "payloadFields": { // to set value to a payload field
            "key1": "value1", // Payload fields are not applicable for Alert tasks.
            "key2": "value2"....
        },
        "headerFields": { // to set value to a header field
            "key1": "value1",
            "key2": "value2"....
        },
        "pathFields": { // to set value to a path field or query field.
            "key1": "value1",
            "key2": "value2"....
        }
    }
}
For example, the following code snippet can be used to set the path field or the query field of an API object:
var fields= {};
var pathFields = {};
pathFields.fullName = UserContext.get("firstName")+UserContext.get("lastName")
fields.pathFields = pathFields;
var finalObject = {};
finalObject.fields = fields;
print(JSON.stringify(finalObject));
In the previous code, if
firstNameandlastNameare stored as session variables, asJohnandSmithrespectively, then the JSON response payload from the pre-processor would be:{ fields: { "pathFields": { "key": "fullName", "value": "John Smith" } } }In the following pre-processor example, variables are set with session variables prior to the actual API request call.
var fields = {}; var pathFields = {}; var UserEmailID = UserSession.get("rtmEmail"); pathFields.userEmail = UserEmailID; fields.pathFields = pathFields; var finalObject = {}; finalObject.fields = fields; print(JSON.stringify(finalObject)); - Click Save to save and close the Add Processor dialog.
When a processor is placed in the Request section before the API Request, the processor is considered as a pre-processor. When placed after an API Request, the processor is considered a post-processor.Adding a Post-Processor
You may need more than one API request to get the desired data payload from your web service, using Kore.ai post-processors.
Defining a Custom Post-Processor
If you want to create a custom post-processor, you could access the response keys of the previous API Request using the following syntax”
payload[0].{ key }
JSON Syntax
{
 "payload":
   {
    "key1" : "value1",
    "key2" : "value2"
   }
}
Example
var final = {};
var data = payload[0]; //Accessing the response of the previous API object
data.title[0] = 'New value for key here';
final.payload = data;  // Updating the response of the API object
print(JSON.stringify(final));  // This step is mandatory
For custom processors, you must print the final response as shown in the preceding code, otherwise, an empty response is returned. Use the following syntax:
print(JSON.stringify( <<object>> ));
Configuring Standard Post Processors
Follow these steps to add a standard post-processor:
- On the API Request tab, expand the Request tab, and then click Add Processor.
- Kore.ai also provides a set of standard post-processors that you can use instead of creating custom code for a post-processor. In Type of Process field, select one of the following four types of standard processors:
- Resolve: You can use the results of one payload response as input for a second request. For example, click Add Processor, enter a Name for your processor, set Type of Process to resolve, and Key to the name of the variable, and then define the Post URL using a variable from the first API Request. For example, https://app.asana.com/api/1.0/projects/{project_id} that returns the id field in the payload response as:
 ...
"id":80468818418144, <br/>
"created_at":"2016-01-14T05:34:35.848Z",
"modified_at":"2016-01-20T04:29:52.505Z",
"owner":{
"id":73114591129714,
"name":"jaganmohan.evuri" },
...
that is then used as a variable input as shown in the following Post URL:
https://app.asana.com/api/1.0/projects/{id}/tasks?opt_fields=completed,modified_at
You must also specify the HTML Content Type expected in the payload response as well as the HTML Request method.
For more information, see Using Session and Context Variables in Tasks. - Spread: For payloads that contain arrays of data that you need to separate. For example, click Add Processor, enter a Name for your processor, set the Key field to, for example, data, and Type of Process to spread to capture the content in the
dataelement in the following code example to extract each item of the array.{ "attribution": null, "tags": [], "type": "image", "location": null, "comments": { "count": 51, "data": [{ "created_time": "1453900980", "text": "43rd", "from": { "username": "kore_hyd", "profile_picture": "https://scontent.cdninstagram.com/t51.2885-19/11906329_960233084022564_1448528159_a.jpg", "id": "2056218675", "full_name": "Kore.ai Hyd" }, "id": "1171728804843572377" }, { "created_time": "1453901222", "text": "44th", "from": { "username": "kore_hyd", "profile_picture": "https://scontent.cdninstagram.com/t51.2885-19/11906329_960233084022564_1448528159_a.jpg", "id": "2056218675", "full_name": "Kore.ai Hyd" }, "id": "1171730841379491107" }, { "created_time": "1453901997", "text": "45th", "from": { "username": "kore_hyd", "profile_picture": "https://scontent.cdninstagram.com/t51.2885-19/11906329_960233084022564_1448528159_a.jpg", "id": "2056218675", "full_name": "Kore.ai Hyd" }, "id": "1171737339782450909" }, { "created_time": "1453902304", "text": "46th and 47th", "from": { "username": "kore_hyd", "profile_picture": "https://scontent.cdninstagram.com/t51.2885-19/11906329_960233084022564_1448528159_a.jpg", "id": "2056218675", "full_name": "Kore.ai Hyd" }, "id": "1171739915923967873" }, { "created_time": "1453902638", "text": "48th", "from": { "username": "kore_hyd", "profile_picture": "https://scontent.cdninstagram.com/t51.2885-19/11906329_960233084022564_1448528159_a.jpg", "id": "2056218675", "full_name": "Kore.ai Hyd" }, "id": "1171742713994497101" }, { "created_time": "1453964684", "text": "49th", "from": { "username": "venkataphani.ailavarapu", "profile_picture": "https://scontent.cdninstagram.com/t51.2885-19/11906329_960233084022564_1448528159_a.jpg", "id": "2679234818", "full_name": "Phani" }, "id": "1172263199715314941" }, { "created_time": "1453964710", "text": "50th", "from": { "username": "kore_hyd", "profile_picture": "https://scontent.cdninstagram.com/t51.2885-19/11906329_960233084022564_1448528159_a.jpg", "id": "2056218675", "full_name": "Kore.ai Hyd" }, "id": "1172263415747136776" }, { "created_time": "1453964717", "text": "51st", "from": { "username": "kore_hyd", "profile_picture": "https://scontent.cdninstagram.com/t51.2885-19/11906329_960233084022564_1448528159_a.jpg", "id": "2056218675", "full_name": "Kore.ai Hyd" }, "id": "1172263474056350986" }] ... - Extract: For payloads that contain multiple objects, you can specify a path to the specific object. For example, click Add Processor, enter a Name for your processor, set the Key field to
data, and then Type of Process to extract to use the object data in the following payload response.{ "user": { "full_name": "Kore.ai Hyd", "id": "2056218675", "profile_picture": "https://instagramimages-a.akamaihd.net/profiles/anonymousUser.jpg", "username": "kore_hyd" }, ... }, "likes": { "data": [{ "full_name": "kstream002", "id": "2100724876", "profile_picture": "https://instagramimages-a.akamaihd.net/profiles/anonymousUser.jpg", "username": "kstream002" } }, ... } - Assign: Using the Assign processor, you can specify a variable name for the payload response, if needed, for example, when the payload does not contain a key for the payload response data. For example, set Type of Process to assign, and then in the Output Variable field, you can for example, define an output variable for the following payload that is an array of three objects.
[
  {
    "Cost": "$0.00",
    "Desc1": "$150 bonus after $500 of purchases in the first 3 months from account opening. ",
    "Desc2": "Earn unlimited cash back Earn unlimited 1.5% cash back on every purchase – it's automatic. Redeem for cash back – any amount, any time. ",
    "Keywords": "weekend dining,online,groceries,fuel,rewards,rebate,365,allaround",
    "OfferName": "Freedom Unlimited",
    "OfferType": "CreditCard",
    "Status": "1",
    "imageURL": "http://www.psdgraphics.com/file/credit-card.jpg",
    "id": "5b5195e264bbd800"
  },
  {
    "Cost": "$95.00",
    "Desc1": "Pay 0 balance transfer fee when you transfer a balance during the first 60 days.",
    "Desc2": "Jumpstart your financial fitness Get an introductory fee for balance transfers, save on interest†, and get your free monthly credit score.",
    "Keywords": "privileges,rebate,health,wellness,great eastern,insurance,policy,installments,split,cashflo",
    "OfferName": "Premium Plus",
    "OfferType": "CreditCard",
    "Status": "1",
    "imageURL": "http://i.imgur.com/rMOXYql.jpg",
    "id": "5caf2155873f89c8"
  },
  {
    "Cost": "$10.00",
    "Desc1": "Pay 0 balance transfer fee when you transfer a balance during the first 60 days.",
    "Desc2": "Jumpstart your financial fitness Get an introductory fee for balance transfers, save on interest†, and get your free monthly credit score.",
    "Keywords": "privileges,rebate,health,wellness,great eastern,insurance,policy,installments,split,cashflo",
    "OfferName": "Frequent Flyer",
    "OfferType": "CreditCard",
    "Status": "1",
    "imageURL": "http://www.moneychoice.org/wp-content/uploads/sites/13/2016/01/credit-card-calculator-image.png.jpeg",
    "id": "c0b05bc3062658ee"
  }
]
In the Output Variable field, specify a variable to represent the array, as
offers, for example. If you used the UX Preview feature, the response from Kore.ai would be:{ "response": { "offers": [ { "Cost": "$0.00", "Desc1": "$150 bonus after $500 of purchases in the first 3 months from account opening. ", "Desc2": "Earn unlimited cash back Earn unlimited 1.5% cash back on every purchase – it's automatic. Redeem for cash back – any amount, any time. ", "Keywords": "weekend dining,online,groceries,fuel,rewards,rebate,365,allaround", "OfferName": "Freedom Unlimited", "OfferType": "CreditCard", "Status": "1", "imageURL": "http://www.psdgraphics.com/file/credit-card.jpg", "id": "5b5195e264bbd800" }, { "Cost": "$95.00", "Desc1": "Pay 0 balance transfer fee when you transfer a balance during the first 60 days.", "Desc2": "Jumpstart your financial fitness Get an introductory fee for balance transfers, save on interest†, and get your free monthly credit score.", "Keywords": "privileges,rebate,health,wellness,great eastern,insurance,policy,installments,split,cashflo", "OfferName": "Premium Plus", "OfferType": "CreditCard", "Status": "1", "imageURL": "http://vignette3.wikia.nocookie.net/objectmayhem/images/5/52/Credit_card.png/revision/latest?cb=20130629150408", "id": "5caf2155873f89c8" } ] } }With the Output Variable set to
offers, you can use the variable asresponse.offersin Bot Builder, for example, in a task response object as follows:print(JSON.stringify(response)); var data = response.offers for (i = 0; i < data.length; i++) { print('<a href="' + data[i].imageURL + '" target="_blank">' + data[i].OfferName + '</a><br>'); print(data[i].Desc1) print('<br>'); print('<br>'); print('Cost: ' + data[i].Cost) print('<br>'); if (i < data.length - 1) { print('<br>'); print('<br>'); } }
- Resolve: You can use the results of one payload response as input for a second request. For example, click Add Processor, enter a Name for your processor, set Type of Process to resolve, and Key to the name of the variable, and then define the Post URL using a variable from the first API Request. For example, https://app.asana.com/api/1.0/projects/{project_id} that returns the id field in the payload response as:
- Click Add to save the API request and then create another, or click Add & Exit to save the API request and close the dialog.
For multiple API requests, you should order the requests in the sequential order needed to get to entire data response. For example, you may need to request a list of workspaces, then a list of projects, and finally, a list of users. Use the Move Up
icon and the Move Down icon to reorder the API requests.Note: No confirmation dialog is displayed when deleting an API request. If you click Continue or Save, the delete action is permanent and cannot be undone.
- Response Sample – Define key/value pairs that you expect to receive in the task payload. The keys that you provide are available as drop-down choices for handling the data to display to the end-user.
Adding the Response Sample to an Alert Task
In the Response Sample section, you can enter or paste examples of the key-value pairs that you expect to receive in the task payload. When you define the response sample, the keys specified in the Response Sample section are available as drop-down choices for handling the output data.Adding the Sample Response
- On the API Request tab, Expand the Sample Response section.
- Enter your Response Sample that contains the key-value pairs from your JSON response payload. Do one of the following:
- To format the view of the response as a JSON structure with indentation as shown in the following illustration, click the Formatted icon.
- To format the view of the response in serialized compact form as shown in the following illustration, click the Unformatted icon.
- To format the view of the response as a JSON structure with indentation as shown in the following illustration, click the Formatted
- Preview Website Link Content in Post – The website preview content displayed in the task notification message.
Customizing the Website Preview Content
Some web services send links to preview media as part of the payload response. In this section, you can enable or disable preview links, and define the path to the links in the payload. By default, website preview links are disabled. The following illustration is an example of the Preview Website Link Content in Post section, when Yes is selected.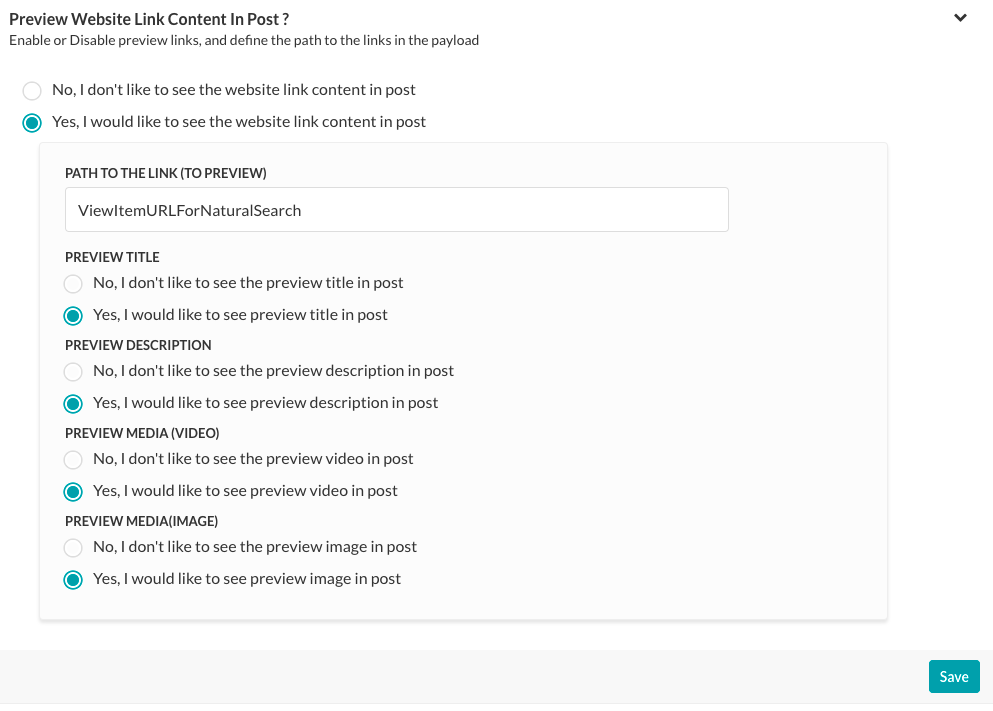 When enabled, define the path to the preview links in the payload in the Path to the Link(toPreview) field, if the path is not in the root of the payload. For example, in the following code example from an RSS payload, the path to the preview is
...
"item": [
    {
        "title": "U.S. to Boost Refugee Intake by 30,000 by 2017",
        "guid": {
            "-isPermaLink": "false",
            "#text": "SB12418904751422433479504581245034032986752"
        },
        "link": "http://www.wsj.com/articles/john-kerry-says-u-s-to-admit-30-000-more-refugees-in-next-2-years-1442768498?mod=fox_australian",
        ...
When Preview website link content in Post is enabled, select preview objects such as:
- Preview Title – Displays the title of the website content.
- Preview Description – Displays the description of the website content.
- Preview Media(Video) – Enables display of video links from the website content.
- Preview Media(Image) – Enables display of image links from the website content.
Click Save to save the API request settings.
For a task with the Connection Type specified as Webservice and the Connection Mode set to RSS you need to define:
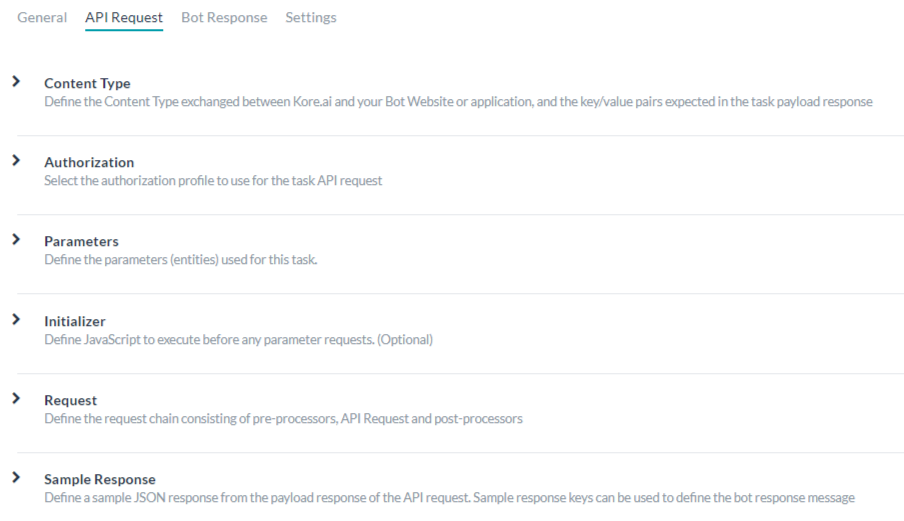
- Content Type – The type of data exchanged between Kore.ai and your web application.
Defining the Content Type
The Content Type describes the type of data exchanged between Kore.ai and your Bot website or application, and the key-value pairs expected in the task payload response. To define the Content Type for the API Request (RSS), expand the Content Type tab and select one of these options:
- JSON – JavaScript Object Notation is an open standard format using human-readable text to transmit data objects as attribute-value pairs. You can use JSON to transmit data between the Kore.ai servers and your Bot web application.
- RSS – Rich Site Summary, or Really Simple Syndication, is family of standardized formats used to publish frequently updated information such as blog entries, news headlines, audio, and video.
- XML – Extensible Markup Language is a markup language that defines a set of rules for encoding documents in a format which is both human-readable and machine-readable. Oftentimes, web services use XML schemas to process the XML data.
- URL Encoded JSON – URLs using JSON encoding for reserved characters.
- CSV – Comma-separated value lists.
- Text – Text-based key-value pairs.
- Twitter Encoded JSON – URLs for Twitter using JSON encoding for reserved characters.
- Multipart/Form-data – An encoding type that allows files to be sent through an HTTP POST request method if you want to allow a user to upload a file from a form.
- Multipart/Related – Used when the same information is presented in different body parts in different forms. The body parts are ordered by increasing complexity.
- Oracle ADF – For Oracle Application Development Framework.
- Authentication – If required for your alert task, you will need to define the authentication to access the API, for example, using basic authorization, OAuth, or API Key. Refer here for more details.
- Parameters – Define one or more parameters used to process the API request, for example, input from user prompts, selection by an end-user from a list of choices, a URL, and so forth.
Defining Parameters for an Alert Task
Follow these steps to define API Request (REST) parameters:- Click the Parameters section, and then click Add. The Set Up Task Parameter dialog opens.
- Depending on your selection, enter the values for the relevant fields as described in the following table.
Field Name Description Parameter Name The title of the task input field displayed to the user, for example, Choose account Prompt Message The help description displayed below the parameter name, for example, Which account would you like to access? Parameter Key The task key that represents the end-user input value that you want to collect, for example, accountType. Parameter Type Specifies the type of task input field displayed in the end-user interface to collect user input for the request object to assign to the Key value. The default setting is Textbox, but can be customized to any one of the following: - Date – Displays the Format field where you can select the date format syntax for the end-user to define when the task is configured for their account. In the Select Date Format drop-down list, select one of the following:
- dd-MM-YYYY – For example, 16-05-1999
- MM-dd-YYYY – For example, 05-16-1999
- dd-MM-YY – For example, 16-05-99
- YYYY-MM-dd – For example, 1999-05-16
- URL – Displays a text box for the end-user to enter a URL including field validation for a correct URL syntax. In the Placeholder field, enter the help hint displayed in the text box, for example, Enter the URL for the website here.
- Textbox – Displays a text box for the end-user to enter text as the task input field, typically just a few words. In the Placeholder field, enter the help hint displayed in the text field, for example, Type in the name you want to embroider.
- Static Dropdown – Displays a drop-down list of choices to the end-user. Click Add Option to begin adding the list of items to display to the end-user with the following parameters:
- Option Name – The name of the option displayed to the end-user.
- Option Value – The value the represents the Option Name returned to the application.
- Default Value – Select the default value for the option when more than one option is defined.
- Searchable – Select to enable dynamic search and display as the end-user enters text in this field, or if no matches, allow free-form entry.
Click Save. To add additional items, click Add Option again. Edit or remove options in the Actions column for options.
- Dynamic Dropdown – Displays a drop-down list dynamically populated at runtime based on the response from a URL for your Bot, for example, a list of projects for a JIRA task notification. Define the following properties for a dynamically populated dropdown.
- Endpoint URL – The Bot endpoint URL, for example, https://app.asana.com/api/1.0/workspaces.
- Endpoint Content Type – The content type expected from the specified endpoint URL. One of: JSON, RSS, XML, URL Encoded JSON, CCV, Text, or Twitter Encoded JSON.
- Endpoint Method – One of:
- GET – Specifies an HTTP Request GET method for the task field.
- POST – Specifies an HTTP Request POST method for the task field.
- Response Path – The path in the response that contains the desired drop-down list values, for example, data.
- Label Key – The key for the label of the drop-down option, for example, name.
- Option Value Key – The key for the value of the drop-down option, for example, id.
- Add Payload Field – Click to add one or more fields from the response payload as options for the dynamic dropdown. For each payload field, enter the Payload field key and the Payload field value, and then click Save. Edit or delete payload fields in the Actions column.
- Searchable – Select to enable dynamic search and display as the end-user enters text in this field, or if no matches, allow free-form entry.
- Textarea – Displays a text area box for the end-user to enter text as the task input, typically for several sentences. In the Placeholder field, enter the help hint displayed inside the text area.
- Type Ahead – Displays a dynamically populated drop-down list of choices to the end-user at runtime when the user enters three or more characters that match the search results based on the response from the URL defined for the task. For example, a list of projects for a JIRA task notification message. Define the following properties for a dynamically populated drop-down.
- Endpoint URL – The Bot endpoint URL, for example, https://app.asana.com/api/1.0/workspaces.
- Endpoint Content Type – The content type expected from the specified endpoint URL. One of: JSON, RSS, XML, URL Encoded JSON, CCV, Text, Twitter Encoded JSON, Multipart/Form-data, or Multipart/Related.
- Endpoint Method – One of:
- GET – Specifies an HTTP Request GET method for the task field.
- POST – Specifies an HTTP Request POST method for the task field.
- Response Path – The path in the response that contains the desired drop-down list values, for example, data.
- Label Key – The key for the label of the drop-down option, for example, name.
- Option Value Key – The key for the value of the drop-down option, for example, id.
- Add Payload Field – Click to add one or more fields from the response payload as options for the type ahead field. For each type ahead field option, enter the Payload field key and the Payload field value, and then click Save. Edit or delete payload fields in the Actions column.
- Editable – Enables the end-user to enter text free-from in the field as an option when type-ahead search results do not match.
- Email – Displays a text box for the end-user to input an email address. In the Placeholder field, enter the help hint to display to the end-user inside the text box.
- Date & Time – Displays a text box for the end-user to input a date with time. In the Format field, enter the expected date or time format to display to the end-user in the date text box. In the Select Date Format drop-down list, select the date with time format.
- Time Zone – Displays a drop-down list of time zones based on the operating system settings.
- Location – Displays a text box for the end-user to enter a geographical location, for example, Orlando, FL, or 32801.
- Nested Form – Displays end-user input fields in a nested format below the parent input field. Specify the following fields for a nested form input field:
- Array Element Type – Select the data type of the parent input form element.
- Add Nested Form Field – Click to add one or more nested form fields.
- File Upload – Displays end-user control to search for, and select a file to upload. When clicked, enter the File Upload Payload Key. When the File Upload Payload Key is defined, in the File Upload Payload Field Value drop-down list, select one of the following types:
- File Name
- File Size
- File Content Type
Data Type Select one of these user input types: - String – Users can input any sequence of numbers, letters, or special characters.
- Number – Users can input a number. No special characters are allowed.
- Boolean – User can input a Boolean value of true or false.
- Email – User can input a valid email address.
- Object – Data from a Bot can be received as JSON objects, for example, as location details defined as:
“location” : {
“lat” : 17.4374614,
“lng” : 78.4482878
}
where you can refer to the properties in a request chain or task request as location.lat, and location.lng. - Array – Users can pass a comma-separated list of values to the Bot. For example, in Google Calendar, multiple attendees with data can be passed as:
“attendees”: [“user1”, “user2”, “user3”]
When selected, specify the Type for the array of end-user input as one of:- String
- Number
- Boolean
- Array
- Date
- Date – Users can type a complete date or select it from a date picker.
Is Multi Select Allows the user to make more than one selection or entry. This field is displayed depending on the Field Type selected. - Date – Displays the Format field where you can select the date format syntax for the end-user to define when the task is configured for their account. In the Select Date Format drop-down list, select one of the following:
- Click the Advanced Settings tab to define additional optional settings for the task fields.
Field Name Description Visibility Specify if the task input field should be visible or hidden from the end-user.
The Visibility field can also be set to Custom where data is captured from the user but not used as a query parameter or payload field. For example, with a JIRA bot, posting a comment on a ticket using an @mention tag as shown below:
“@Mike, please look into this issue”
The JIRA API to ‘Post a comment’ requires one query field and one payload field as:- Issue ID
- Comment
With the Visibility field set to Custom, you can capture the user information for the user mentioned as
@Mikeusing the JIRA API to fetch data to append to thecommentfield value, but not to use as payload field or query field. The default Visibility field setting is Visible.Mandatory Select if the end-user must define this setting to save the task settings configuration. Untranspose the Key Select to disable key transposition by Kore.ai. By default, Kore.ai transposes a key/value pair, for example, “parameter”:”value” is transposed by Kore.ai to “parameter:{value:”actualValue”}. When selected, keys are not transposed. Fetch from Session Select to store the user input value for this field as a session variable. When selected, the Field Value from Session field is displayed. Select an existing variable, or select Add New Session Variable to define a new variable. To create a new session variable, you must select the Scope of the variable and define the Key to store the variable. In the Scope field, select one of: - EnterpriseContext – Define a key/value pair available to all users in an enterprise.
- BotContext – Define a key/value pair available to all users of this bot.
- UserSession – Define a key/value pair available for this user for any bots in an enterprise.
- BotUserSession – Define a key/value pair available a bot based on user inputs.
- Click Add & Continue to save the parameter for the task request and add another parameter, or click Add & Exit to save the parameter for the task request and close the dialog. You should organize multiple parameters in the order that the bot user should provide inputs. Use the and icons to move the parameters.
- Click the Parameters section, and then click Add. The Set Up Task Parameter dialog opens.
- Initializer – Specify custom JavaScript to run, or set session variables prior to creating a task instance when web services require code to be executed, or session variables set, or modification of user context details before an API request is executed.
Defining an Initializer for an Alert Task
To run a task, you may need to put or get values from a session before executing the task using Kore.ai session-specific variables. For more information, see Using Session and Context Variables in Tasks.Some web services require executed code, session variables, or modification of user context details before executing an API request. For example, a web service may require two-factor user authorization where the first step is a user login, and the second step is a partner authorization. After validating both these steps, an access token is granted and used in the header of subsequent API calls to that web service. Using the Initializer, you can complete partner authorization and retrieve the access token from the response of the user authentication. The access token can be stored as a custom session variable and set as the header for subsequent API calls.Defining Task Initializer
To configure the task initializer, click the Initializer tab. It opens a JavaScript editor in which you can write the required code.
In the JavaScript editor, define the Key and the Scope as follows:- EnterpriseContext – A key-value pair available to all bots and all users in an enterprise. For example, for a GitHub bot, a user needs to access one or more enterprise repositories. In the Initializer, you can persist the repository data as Gitrepository (Enterprise Context) with the following JavaScript code:
var userRepository = { "title": _labels_[repository], "value": repository }; EnterpriseContext.put('Gitrepository', userRepository, 200000); - BotContext – A key-value pair available to all users of this specific bot. For example, you may want to set up a default currency for financial transactions in a session based on the user location. In the Initializer, you can persist the default currency data as currency (Bot Context) with the following JavaScript code:
var defaultCurrency = { TODO Custom JavaScript for location-based currency } BotContext.put('currency', defaultCurrency, 200000); - UserContext – A key-value pair available to all bots for a user. These keys are read-only and provided by the system as user data for:
- _id – The Kore.ai userId.
- emailId – The email address associated with the userId.
- lastName – The last name of the user.
- firstName – The first name of the user.
- profImage – The image or avatar filename of the user.
- profColour – The account color for the user.
- activationStatus – The account status of the user.
- title – The title of the user, if defined.
- orgId – The organizational ID of the user account, if defined.
- UserSession – Define a key-value pair available for this specific user for all bots in an enterprise. For example, you may want to store a user location to make it available to all bots, such as a user home address for commerce, transportation, and home delivery services. In the Initializer, you can persist the default location data as HomeLocation (UserSession) with the following JavaScript code:
var location = { "title": labels[location], "value": { "latitude": location.latitude, "longitude": request.location.longitude } }; UserSession.put('HomeLocation', location, '20000'); - BotUserSession – Define a key-value pair available to a specific bot based on a specific user’s inputs. For example, you may want to persist a user location for more than one bot task. For a travel bot, the user may be able to book a flight and a hotel based on the same home and destination addresses. In the Initializer, you can persist the default home and destination data as HomeLocation (BotUserSession) and DestinationLocation (BotUserSession) with the following JavaScript code:
var homelocation = {
 "title": labels[request.sourceLocation],
 "value": {
 "latitude": request.sourceLocation.latitude,
 "longitude": request.sourceLocation.longitude
 }
};
BotUserSession.put('HomeLocation', homelocation, '20000');
var destlocation = {
 "title": labels[request.destLocation],
 "value": {
 "latitude": request.destLocation.latitude,
 "longitude": request.destLocation.longitude
 }
};
BotUserSession.put('DestinationLocation', destlocation, '20000’);
GET and PUT Syntax
The following code examples show the syntax to GET or PUT a key-value pair for each context type.
"EnterpriseContext" : {
       "get" : function(key){...},//get the specified key
       "put" : function(key, value, ttl){...} //put the value at the key for the specified ttl, ttl is in minutes
   },
   "BotContext" : {
       "get" : function(key){...},//get the specified key
       "put" : function(key, value, ttl){...} //put the value at the key for the specified ttl, ttl is in minutes
   },
   "UserContext" : {
       "get" : function(key){...},//get the specified key
   },
   "UserSession" : {
       "get" : function(key){...},//get the specified key
       "put" : function(key, value, ttl){...} //put the value at the key for the specified ttl, ttl is in minutes
   },
   "BotUserSession" : {
       "get" : function(key){...},//get the specified key
       "put" : function(key, value, ttl){...} //put the value at the key for the specified ttl, ttl is in minutes
   }
For example:
    BotContext.put("topicSessionVariable","music",2000);
    UserSession.put("firstName","Mary",20000);
    UserContext.get("firstName");
Exception Syntax
You can also define custom error messages to catch errors before setting up a task, for example, authentication failure. If an exception is captured, the task setup is halted. Use the following syntax to throw the exception:
{
    "exceptions": {
        "message": " Error Message"
    }
}
For example,
var ex ={};
var exceptions={};
exceptions.message ='You can not proceed further with out valid permissions';
ex.exceptions = exceptions;
print(JSON.stringify(ex)); //print is mandatory.
In the Initializer section, you can use session Keys, or other session variables, however, you cannot set or access values. For example,
var name = UserContext.get("firstName")+UserContext.get("lastName");
UserSession.put("fullName") = name;
In the preceding code example, you PUT a value into the session using a task Parameter defined with the Fetch from Session field in the Advanced Settings section for the task. The Key is defined as
fullNamefor the custom definedUserSessioncontext variable.Task Initializer Example
The following code is an example of a Task Initializer to get the user ID and email data to pre-populate variables in the API request.
var x = UserContext.get("identities"); var isEmailFound = false; for (var i = 0; i < x.length; i++) { if (x[i].type === "mapped") { var identity = x[i].val var arr = identity.split("/"); var pattern = /^cs/i; var result = arr[0].match(pattern); if (result) { isEmailFound = true; UserSession.put("rtmEmail", arr[1], '20000'); } } } if (!isEmailFound) { for (var j = 0; j < x.length; j++) { if (x[j].type === "email") { UserSession.put("rtmEmail", x[j].val, '20000'); } } } - EnterpriseContext – A key-value pair available to all bots and all users in an enterprise. For example, for a GitHub bot, a user needs to access one or more enterprise repositories. In the Initializer, you can persist the repository data as Gitrepository (Enterprise Context) with the following JavaScript code:
- Request – Define a request chain used to make an API call to a web service to initiate the task using URLs and paths to your Bot to initiate the delivery of the data payload from the web service to the Bots Platform. The request chain can consist of pre-processors, API request, and post-processors.
Defining the Request Chain for an Alert Task
In the Request section of the API Request tab, you can define an API request chain consisting of pre-processors, API Requests, and post-processors. At least one API Request is required, while processors are optional.API Request
For any task, you will need to define an API request to make a call to a web service to initiate the task. At least one API request is required for each task. For each API request, you must add one or more request URLs and paths to your task to initiate the delivery of the data payload from the web service.
Configuring the API Request
- On the API Request tab, expand the Request tab, and then click, Add API.
- Specify the values for the fields in the Add API dialog as described in the following procedure.
- In the Name field, enter the name of your API request, for example, My API Request.
- In the Method drop-down list, select the HTTP method used for the task. One of:
- POST – Used to send data to the server such as customer information, file upload, using HTML forms.
- PUT – Replaces the content of the target resource with the content sent.
- PATCH – Appends the content of an existing target resource with the content sent.
- DELETE – Deletes the content of an existing target resource.
- GET – Returns the content of an existing target resource.
- In the URL field, specify the URL for the bot task response to process, for example, http://koremessenger.com/postURL. You can also use session variables in the URL as shown in the following example:
https://mySite.crm.ondemand.com/sap/c4c/odata/v1/c4codata/ServiceRequestCollection?$filter=ID eq '{id}' and ReporterEmail eq '{userEmail}'&$expand=ServiceRequestHistoricalVersion,ServiceRequestDescriptionNote: In some URLs, you may want to use proprietary Kore.ai parameter values for the end and start parameters. For more information about Kore.ai parameter values, see the Bot-specific documentation in Adding Bots. - In the Access Using A Connector field, select Yes to enable access for Kore.ai Bots using the Kore.ai Connector agent. This option is only visible if a Kore.ai Connector agent is configured and enabled in your enterprise on-premises network. For more information, see Using the Kore.ai Connector.
- On the Headers tab, in the Content Type field, select one of the following supported data types for your sample response data.
- JSON – JavaScript Object Notation is an open standard format using human-readable text to transmit data objects as attribute-value pairs. You can use JSON to transmit data between the Kore.ai servers and your Bot web application.
- RSS – Rich Site Summary, or Really Simple Syndication, is family of standardized formats used to publish frequently updated information such as blog entries, news headlines, audio, and video.
- XML – Extensible Markup Language is a markup language that defines a set of rules for encoding documents in a format which is both human-readable and machine-readable. Oftentimes, web services use XML schemas to process the XML data.
- URL Encoded JSON – URLs using JSON encoding for reserved characters.
- CSV – Comma-separated value lists.
- Text – Text-based key-value pairs.
- Twitter Encoded JSON – URLs for Twitter using JSON encoding for reserved characters.
- Multipart/Form-data – An encoding type that allows files to be sent through an HTTP POST request method if you want to allow a user to upload a file from a form.
- Multipart/Related – Used when the same information is presented in different body parts in different forms. The body parts are ordered by increasing complexity.
- Oracle ADF – For Oracle Application Development Framework.
- In the Authorization Headers section, select or clear keys to enable or disable the key for the header as shown in the following illustration.
- On the Parameters tab, select or clear any Auth Parameters or Parameters to include in the header as shown in the following illustration.
- Click Save to save and close the API Request configuration.
Processors
Processors allow you to manipulate data collected in the user session before, during, or after an API request to a web service using JavaScript.
If you define and place a processor before the API Request, it is a pre-processor. Pre-processors allow you to manage input parameters and values from session variables before the API Request is made.
If the processor is sequentially placed after the API Request, it is a post-processor. You can use a post-processor to access payload response keys from the API request. To access keys, use one of the following post-processor types:- Resolve: To use the results of one payload response as input for a second request.
- Spread – To separate arrays of data in a payload.
- Extract – To specify a path to a specific object in a payload with multiple objects.
- Assign – To specify a variable name for the payload response.
Pre-processors
You can use a pre-processor to manage request parameters before the API Request is executed, using session variables and parameters. When defining a pre-processor, you must set Type of Process to custom and then enter your code in the JavaScript editor displayed. A pre-processor can only be of Type custom.
Adding a Pre-Processor
- On the API Request page, expand the Request tab, and then click Add Processor.
- Enter the name of your processor in the Name field.
- In the Type of Process drop-down list, you must select Custom for a pre-processor.
- Add your code for manipulating the request parameters as needed using the following syntax:
{
    "fields": {
        "payloadFields": { // to set value to a payload field
            "key1": "value1", // Payload fields are not applicable for Alert tasks.
            "key2": "value2"....
        },
        "headerFields": { // to set value to a header field
            "key1": "value1",
            "key2": "value2"....
        },
        "pathFields": { // to set value to a path field or query field.
            "key1": "value1",
            "key2": "value2"....
        }
    }
}
For example, the following code snippet can be used to set the path field or the query field of an API object:
var fields= {};
var pathFields = {};
pathFields.fullName = UserContext.get("firstName")+UserContext.get("lastName")
fields.pathFields = pathFields;
var finalObject = {};
finalObject.fields = fields;
print(JSON.stringify(finalObject));
In the previous code, if
firstNameandlastNameare stored as session variables, asJohnandSmithrespectively, then the JSON response payload from the pre-processor would be:{ fields: { "pathFields": { "key": "fullName", "value": "John Smith" } } }In the following pre-processor example, variables are set with session variables prior to the actual API request call.
var fields = {}; var pathFields = {}; var UserEmailID = UserSession.get("rtmEmail"); pathFields.userEmail = UserEmailID; fields.pathFields = pathFields; var finalObject = {}; finalObject.fields = fields; print(JSON.stringify(finalObject)); - Click Save to save and close the Add Processor dialog.
When a processor is placed in the Request section before the API Request, the processor is considered as a pre-processor. When placed after an API Request, the processor is considered a post-processor.Adding a Post-Processor
You may need more than one API request to get the desired data payload from your web service, using Kore.ai post-processors.
Defining a Custom Post-Processor
If you want to create a custom post-processor, you could access the response keys of the previous API Request using the following syntax”
payload[0].{ key }
JSON Syntax
{
 "payload":
   {
    "key1" : "value1",
    "key2" : "value2"
   }
}
Example
var final = {};
var data = payload[0]; //Accessing the response of the previous API object
data.title[0] = 'New value for key here';
final.payload = data;  // Updating the response of the API object
print(JSON.stringify(final));  // This step is mandatory
For custom processors, you must print the final response as shown in the preceding code, otherwise, an empty response is returned. Use the following syntax:
print(JSON.stringify( <<object>> ));
Configuring Standard Post Processors
Follow these steps to add a standard post-processor:
- On the API Request tab, expand the Request tab, and then click Add Processor.
- Kore.ai also provides a set of standard post-processors that you can use instead of creating custom code for a post-processor. In Type of Process field, select one of the following four types of standard processors:
- Resolve: You can use the results of one payload response as input for a second request. For example, click Add Processor, enter a Name for your processor, set Type of Process to resolve, and Key to the name of the variable, and then define the Post URL using a variable from the first API Request. For example, https://app.asana.com/api/1.0/projects/{project_id} that returns the id field in the payload response as:
 ...
"id":80468818418144, <br/>
"created_at":"2016-01-14T05:34:35.848Z",
"modified_at":"2016-01-20T04:29:52.505Z",
"owner":{
"id":73114591129714,
"name":"jaganmohan.evuri" },
...
that is then used as a variable input as shown in the following Post URL:
https://app.asana.com/api/1.0/projects/{id}/tasks?opt_fields=completed,modified_at
You must also specify the HTML Content Type expected in the payload response as well as the HTML Request method.
For more information, see Using Session and Context Variables in Tasks. - Spread: For payloads that contain arrays of data that you need to separate. For example, click Add Processor, enter a Name for your processor, set the Key field to, for example, data, and Type of Process to spread to capture the content in the
dataelement in the following code example to extract each item of the array.{ "attribution": null, "tags": [], "type": "image", "location": null, "comments": { "count": 51, "data": [{ "created_time": "1453900980", "text": "43rd", "from": { "username": "kore_hyd", "profile_picture": "https://scontent.cdninstagram.com/t51.2885-19/11906329_960233084022564_1448528159_a.jpg", "id": "2056218675", "full_name": "Kore.ai Hyd" }, "id": "1171728804843572377" }, { "created_time": "1453901222", "text": "44th", "from": { "username": "kore_hyd", "profile_picture": "https://scontent.cdninstagram.com/t51.2885-19/11906329_960233084022564_1448528159_a.jpg", "id": "2056218675", "full_name": "Kore.ai Hyd" }, "id": "1171730841379491107" }, { "created_time": "1453901997", "text": "45th", "from": { "username": "kore_hyd", "profile_picture": "https://scontent.cdninstagram.com/t51.2885-19/11906329_960233084022564_1448528159_a.jpg", "id": "2056218675", "full_name": "Kore.ai Hyd" }, "id": "1171737339782450909" }, { "created_time": "1453902304", "text": "46th and 47th", "from": { "username": "kore_hyd", "profile_picture": "https://scontent.cdninstagram.com/t51.2885-19/11906329_960233084022564_1448528159_a.jpg", "id": "2056218675", "full_name": "Kore.ai Hyd" }, "id": "1171739915923967873" }, { "created_time": "1453902638", "text": "48th", "from": { "username": "kore_hyd", "profile_picture": "https://scontent.cdninstagram.com/t51.2885-19/11906329_960233084022564_1448528159_a.jpg", "id": "2056218675", "full_name": "Kore.ai Hyd" }, "id": "1171742713994497101" }, { "created_time": "1453964684", "text": "49th", "from": { "username": "venkataphani.ailavarapu", "profile_picture": "https://scontent.cdninstagram.com/t51.2885-19/11906329_960233084022564_1448528159_a.jpg", "id": "2679234818", "full_name": "Phani" }, "id": "1172263199715314941" }, { "created_time": "1453964710", "text": "50th", "from": { "username": "kore_hyd", "profile_picture": "https://scontent.cdninstagram.com/t51.2885-19/11906329_960233084022564_1448528159_a.jpg", "id": "2056218675", "full_name": "Kore.ai Hyd" }, "id": "1172263415747136776" }, { "created_time": "1453964717", "text": "51st", "from": { "username": "kore_hyd", "profile_picture": "https://scontent.cdninstagram.com/t51.2885-19/11906329_960233084022564_1448528159_a.jpg", "id": "2056218675", "full_name": "Kore.ai Hyd" }, "id": "1172263474056350986" }] ... - Extract: For payloads that contain multiple objects, you can specify a path to the specific object. For example, click Add Processor, enter a Name for your processor, set the Key field to
data, and then Type of Process to extract to use the object data in the following payload response.{ "user": { "full_name": "Kore.ai Hyd", "id": "2056218675", "profile_picture": "https://instagramimages-a.akamaihd.net/profiles/anonymousUser.jpg", "username": "kore_hyd" }, ... }, "likes": { "data": [{ "full_name": "kstream002", "id": "2100724876", "profile_picture": "https://instagramimages-a.akamaihd.net/profiles/anonymousUser.jpg", "username": "kstream002" } }, ... } - Assign: Using the Assign processor, you can specify a variable name for the payload response, if needed, for example, when the payload does not contain a key for the payload response data. For example, set Type of Process to assign, and then in the Output Variable field, you can for example, define an output variable for the following payload that is an array of three objects.
[
  {
    "Cost": "$0.00",
    "Desc1": "$150 bonus after $500 of purchases in the first 3 months from account opening. ",
    "Desc2": "Earn unlimited cash back Earn unlimited 1.5% cash back on every purchase – it's automatic. Redeem for cash back – any amount, any time. ",
    "Keywords": "weekend dining,online,groceries,fuel,rewards,rebate,365,allaround",
    "OfferName": "Freedom Unlimited",
    "OfferType": "CreditCard",
    "Status": "1",
    "imageURL": "http://www.psdgraphics.com/file/credit-card.jpg",
    "id": "5b5195e264bbd800"
  },
  {
    "Cost": "$95.00",
    "Desc1": "Pay 0 balance transfer fee when you transfer a balance during the first 60 days.",
    "Desc2": "Jumpstart your financial fitness Get an introductory fee for balance transfers, save on interest†, and get your free monthly credit score.",
    "Keywords": "privileges,rebate,health,wellness,great eastern,insurance,policy,installments,split,cashflo",
    "OfferName": "Premium Plus",
    "OfferType": "CreditCard",
    "Status": "1",
    "imageURL": "http://i.imgur.com/rMOXYql.jpg",
    "id": "5caf2155873f89c8"
  },
  {
    "Cost": "$10.00",
    "Desc1": "Pay 0 balance transfer fee when you transfer a balance during the first 60 days.",
    "Desc2": "Jumpstart your financial fitness Get an introductory fee for balance transfers, save on interest†, and get your free monthly credit score.",
    "Keywords": "privileges,rebate,health,wellness,great eastern,insurance,policy,installments,split,cashflo",
    "OfferName": "Frequent Flyer",
    "OfferType": "CreditCard",
    "Status": "1",
    "imageURL": "http://www.moneychoice.org/wp-content/uploads/sites/13/2016/01/credit-card-calculator-image.png.jpeg",
    "id": "c0b05bc3062658ee"
  }
]
In the Output Variable field, specify a variable to represent the array, as
offers, for example. If you used the UX Preview feature, the response from Kore.ai would be:{ "response": { "offers": [ { "Cost": "$0.00", "Desc1": "$150 bonus after $500 of purchases in the first 3 months from account opening. ", "Desc2": "Earn unlimited cash back Earn unlimited 1.5% cash back on every purchase – it's automatic. Redeem for cash back – any amount, any time. ", "Keywords": "weekend dining,online,groceries,fuel,rewards,rebate,365,allaround", "OfferName": "Freedom Unlimited", "OfferType": "CreditCard", "Status": "1", "imageURL": "http://www.psdgraphics.com/file/credit-card.jpg", "id": "5b5195e264bbd800" }, { "Cost": "$95.00", "Desc1": "Pay 0 balance transfer fee when you transfer a balance during the first 60 days.", "Desc2": "Jumpstart your financial fitness Get an introductory fee for balance transfers, save on interest†, and get your free monthly credit score.", "Keywords": "privileges,rebate,health,wellness,great eastern,insurance,policy,installments,split,cashflo", "OfferName": "Premium Plus", "OfferType": "CreditCard", "Status": "1", "imageURL": "http://vignette3.wikia.nocookie.net/objectmayhem/images/5/52/Credit_card.png/revision/latest?cb=20130629150408", "id": "5caf2155873f89c8" } ] } }With the Output Variable set to
offers, you can use the variable asresponse.offersin Bot Builder, for example, in a task response object as follows:print(JSON.stringify(response)); var data = response.offers for (i = 0; i < data.length; i++) { print('<a href="' + data[i].imageURL + '" target="_blank">' + data[i].OfferName + '</a><br>'); print(data[i].Desc1) print('<br>'); print('<br>'); print('Cost: ' + data[i].Cost) print('<br>'); if (i < data.length - 1) { print('<br>'); print('<br>'); } }
- Resolve: You can use the results of one payload response as input for a second request. For example, click Add Processor, enter a Name for your processor, set Type of Process to resolve, and Key to the name of the variable, and then define the Post URL using a variable from the first API Request. For example, https://app.asana.com/api/1.0/projects/{project_id} that returns the id field in the payload response as:
- Click Add to save the API request and then create another, or click Add & Exit to save the API request and close the dialog.
For multiple API requests, you should order the requests in the sequential order needed to get to entire data response. For example, you may need to request a list of workspaces, then a list of projects, and finally, a list of users. Use the Move Up
icon and the Move Down icon to reorder the API requests.Note: No confirmation dialog is displayed when deleting an API request. If you click Continue or Save, the delete action is permanent and cannot be undone.
- Response Sample – Define key/value pairs that you expect to receive in the task payload. The keys that you provide are available as drop-down choices for handling the data to display to the end-user.
Adding the Response Sample to an Alert Task
In the Response Sample section, you can enter or paste examples of the key-value pairs that you expect to receive in the task payload. When you define the response sample, the keys specified in the Response Sample section are available as drop-down choices for handling the output data.Adding the Sample Response
- On the API Request tab, Expand the Sample Response section.
- Enter your Response Sample that contains the key-value pairs from your JSON response payload. Do one of the following:
- To format the view of the response as a JSON structure with indentation as shown in the following illustration, click the Formatted icon.
- To format the view of the response in serialized compact form as shown in the following illustration, click the Unformatted icon.
- To format the view of the response as a JSON structure with indentation as shown in the following illustration, click the Formatted
- Preview Website Link Content in Post – The website preview content displayed in the task notification message.
Customizing the Website Preview Content
Some web services send links to preview media as part of the payload response. In this section, you can enable or disable preview links, and define the path to the links in the payload. By default, website preview links are disabled. The following illustration is an example of the Preview Website Link Content in Post section, when Yes is selected.When enabled, define the path to the preview links in the payload in the Path to the Link(toPreview) field, if the path is not in the root of the payload. For example, in the following code example from an RSS payload, the path to the preview is
...
"item": [
    {
        "title": "U.S. to Boost Refugee Intake by 30,000 by 2017",
        "guid": {
            "-isPermaLink": "false",
            "#text": "SB12418904751422433479504581245034032986752"
        },
        "link": "http://www.wsj.com/articles/john-kerry-says-u-s-to-admit-30-000-more-refugees-in-next-2-years-1442768498?mod=fox_australian",
        ...
When Preview website link content in Post is enabled, select preview objects such as:
- Preview Title – Displays the title of the website content.
- Preview Description – Displays the description of the website content.
- Preview Media(Video) – Enables display of video links from the website content.
- Preview Media(Image) – Enables display of image links from the website content.
Click Save to save the API request settings.
For a task with the Connection Type specified as Webservice and the Connection Mode set to SOAP you need to define:
- Authentication – If required for your alert task, you will need to define the authentication to access the API, for example, using basic authorization, OAuth, or API Key as mentioned in the previous section.
- WSDL URL – Define the URL that contains your WSDL data. When the URL is retrieved, you can choose from a list of Available Operations based on the WSDL, and then customize the user input fields.
Defining the WSDL URL- On the API Request tab, expand the WSDL URL section
- To begin the request task configuration for a SOAP request, enter the URL for your SOAP WSDL in the WSDL URL field.

- Click Get WSDL Description. A list of available operators defined in the WSDL opens.
- Click Select for the SOAP request that you want to use for your task. Kore.ai will automatically populate one or more Alert Task Fields if necessary for user input.

Customizing SOAP Alert Task Fields
You can customize the default input fields provided by Kore.ai after you select one or more of the Available Operations from your WSDL. To customize the default Alert Task Fields, click Edit for the Alert Task Field that you want to customize. The Set up Alert Task Field dialog is displayed as shown in the following illustration.
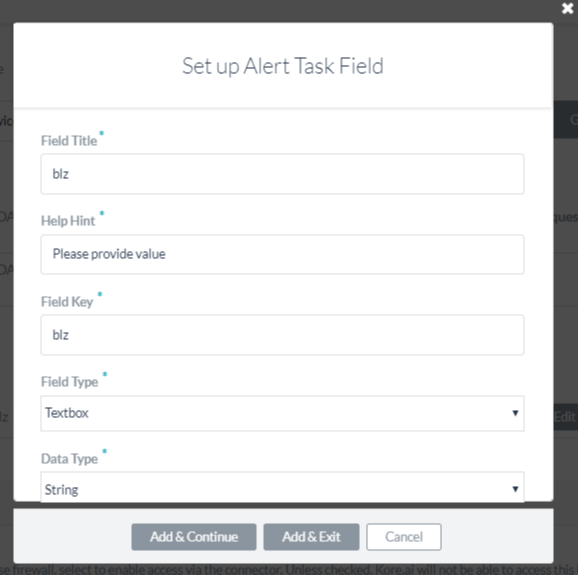
To define end-user fields for a task, specify the values for the parameters in the Set up Alert Task Field dialog as described in the following table.Field Name Description Field Title The title of the task input field displayed in the end-user interface, for example, Country. Help Hint The help text displayed below the task setting title to describe the task, for example, Enter the Country Name you want the Weather for.. Field Key A read-only key that represents the end-user input value that you want to collect, for example, country. Field Type Specifies the type of task input field displayed in the end-user interface to collect user input for the request object to assign to the Key value. The default setting is Textbox, but can be customized to any one of the following: - Date – Displays the Format field where you can select the date format syntax for the end-user to define when the task is configured for their account. In the Select Date Format drop-down list, select one of the following:
- dd-MM-YYYY – For example, 16-05-1999
- MM-dd-YYYY – For example, 05-16-1999
- dd-MM-YY – For example, 16-05-99
- YYYY-MM-dd – For example, 1999-05-16
- URL – Displays a text box for the end-user to enter a URL including field validation for a correct URL syntax. In the Placeholder field, enter the help hint displayed in the text box, for example, Enter the URL for the website here.
- Textbox – Displays a text box for the end-user to enter text as the task input field, typically just a few words. In the Placeholder field, enter the help hint displayed in the text field, for example, Type in the name you want to embroider.
- Static Dropdown – Displays a drop-down list of choices to the end-user. Click Add Option to begin adding the list of items to display to the end-user with the following parameters:
- Option Name – The name of the option displayed to the end-user.
- Option Value – The value the represents the Option Name returned to the application.
- Default Value – Select the default value for the option when more than one option is defined.
- Searchable – Select to enable dynamic search and display as the end-user enters text in this field, or if no matches, allow free-form entry.
Click Save. To add additional items, click Add Option again. Edit or remove options in the Actions column for options.
- Dynamic Dropdown – Displays a drop-down list dynamically populated at runtime based on the response from a URL for your Bot, for example, a list of projects for a JIRA task notification. Define the following properties for a dynamically populated dropdown.
- Endpoint URL – The Bot endpoint URL, for example, https://app.asana.com/api/1.0/workspaces.
- Endpoint Content Type – The content type expected from the specified endpoint URL. One of: JSON, RSS, XML, URL Encoded JSON, CCV, Text, or Twitter Encoded JSON.
- Endpoint Method – One of:
- GET – Specifies an HTTP Request GET method for the task field.
- POST – Specifies an HTTP Request POST method for the task field.
- Response Path – The path in the response that contains the desired drop-down list values, for example, data.
- Label Key – The key for the label of the drop-down option, for example, name.
- Option Value Key – The key for the value of the drop-down option, for example, id.
- Add Payload Field – Click to add one or more fields from the response payload as options for the dynamic dropdown. For each payload field, enter the Payload field key and the Payload field value, and then click Save. Edit or delete payload fields in the Actions column.
- Searchable – Select to enable dynamic search and display as the end-user enters text in this field, or if no matches, allow free-form entry.
- Textarea – Displays a text area box for the end-user to enter text as the task input, typically for several sentences. In the Placeholder field, enter the help hint displayed inside the text area.
- Type Ahead – Displays a dynamically populated drop-down list of choices to the end-user at runtime when the user enters three or more characters that match the search results based on the response from the URL defined for the task. For example, a list of projects for a JIRA task notification message. Define the following properties for a dynamically populated drop-down.
- Endpoint URL – The Bot endpoint URL, for example, https://app.asana.com/api/1.0/workspaces.
- Endpoint Content Type – The content type expected from the specified endpoint URL. One of: JSON, RSS, XML, URL Encoded JSON, CCV, Text, Twitter Encoded JSON, Multipart/Form-data, or Multipart/Related.
- Endpoint Method – One of:
- GET – Specifies an HTTP Request GET method for the task field.
- POST – Specifies an HTTP Request POST method for the task field.
- Response Path – The path in the response that contains the desired drop-down list values, for example, data.
- Label Key – The key for the label of the drop-down option, for example, name.
- Option Value Key – The key for the value of the drop-down option, for example, id.
- Add Payload Field – Click to add one or more fields from the response payload as options for the type ahead field. For each type ahead field option, enter the Payload field key and the Payload field value, and then click Save. Edit or delete payload fields in the Actions column.
- Editable – Enables the end-user to enter text free-from in the field as an option when type-ahead search results do not match.
- Email – Displays a text box for the end-user to input an email address. In the Placeholder field, enter the help hint to display to the end-user inside the text box.
- Date & Time – Displays a text box for the end-user to input a date with time. In the Format field, enter the expected date or time format to display to the end-user in the date text box. In the Select Date Format drop-down list, select the date with time format.
- Time Zone – Displays a drop-down list of time zones based on the operating system settings.
- Location – Displays a text box for the end-user to enter a geographical location, for example, Orlando, FL, or 32801.
- Nested Form – Displays end-user input fields in a nested format below the parent input field. Specify the following fields for a nested form input field:
- Array Element Type – Select the data type of the parent input form element.
- Add Nested Form Field – Click to add one or more nested form fields.
- File Upload – Displays end-user control to search for, and select a file to upload. When clicked, enter the File Upload Payload Key. When the File Upload Payload Key is defined, in the File Upload Payload Field Value drop-down list, select one of the following types:
- File Name
- File Size
- File Content Type
Data Type Select one of these user input types: - String – Users can input any sequence of numbers, letters, or special characters.
- Number – Users can input a number. No special characters are allowed.
- Boolean – User can input a Boolean value of true or false.
- Email – User can input a valid email address.
- Object – Data from a Bot can be received as JSON objects, for example, as location details defined as:
“location” : {
“lat” : 17.4374614,
“lng” : 78.4482878
}
where you can refer to the properties in a request chain or task request as location.lat, and location.lng. - Array – Users can pass a comma-separated list of values to the Bot. For example, in Google Calendar, multiple attendees with data can be passed as:
“attendees”: [“user1”, “user2”, “user3”]
When selected, specify the Type for the array of end-user input as one of:- String
- Number
- Boolean
- Array
- Date
- Date – Users can type a complete date or select it from a date picker.
Placeholder The text displayed below the input textbox to help the user define the field. This field is only displayed for some Field Types. Visibility Specify if the task input field should be visible or hidden from the end-user.
The Visibility field can also be set to Custom field where data is captured from the user but not used as a query parameter or payload field. For example, with a JIRA bot, posting a comment on a ticket using an @mention tag as shown below:
“@Mike, please look into this issue”
The JIRA API to Post a comment requires one query field and one payload field as:- Issue ID
- Comment
With the Visibility field set to Custom, you can capture the user information for the user mentioned as
@Mikeusing the JIRA API to fetch data to append to thecommentfield value, but not to use as payload field or query field.
The default Visibility field setting is Visible.Mandatory Select if the end-user must define this setting to save the task settings configuration. Untranspose the Key Select to disable key transposition by Kore.ai. By default, Kore.ai transposes a key/value pair, for example, "parameter":"value"is transposed by Kore.ai to"parameter:{value:"actualValue"}. When selected, keys are not transposed by Kore.ai and passed in the response as received.Click Add & Continue to save the alert task field for the API request and create another alert task field, or click Add & Exit to save the alert task field for the API request and close the dialog.
- Access Using a connector – Specify if your Bots Platform is installed on-premises and you want to user the Kore.ai Connector agent.
Access Using a Connector
To get started with defining access using a connector for a task, follow these steps:- On the API Request tab, expand the Access using a connector section.
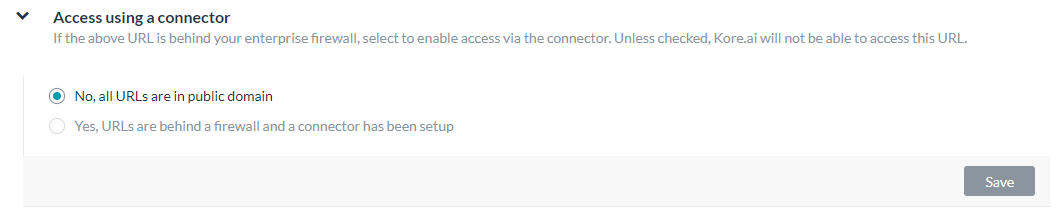
- In the Access Using A Connector field, select Yes to enable access for Kore.ai Bots using the Kore.ai Connector agent. This option is only visible if a Kore.ai Connector agent is configured and enabled in your enterprise on-premises network. For more information, see Using the Kore.ai Connector.
- On the API Request tab, expand the Access using a connector section.
- Response Sample – Define key/value pairs that you expect to receive in the task payload. The keys that you provide are available as drop-down choices for handling the data to display to the end-user.
Adding the Response Sample to an Alert Task
In the Response Sample section, you can enter or paste examples of the key-value pairs that you expect to receive in the task payload. When you define the response sample, the keys specified in the Response Sample section are available as drop-down choices for handling the output data.Adding the Sample Response
- On the API Request tab, Expand the Sample Response section.
- Enter your Response Sample that contains the key-value pairs from your JSON response payload. Do one of the following:
- To format the view of the response as a JSON structure with indentation as shown in the following illustration, click the Formatted icon.
- To format the view of the response in serialized compact form as shown in the following illustration, click the Unformatted icon.
- To format the view of the response as a JSON structure with indentation as shown in the following illustration, click the Formatted
- Preview Website Link Content in Post – The website preview content displayed in the task notification message.
Customizing the Website Preview Content
Some web services send links to preview media as part of the payload response. In this section, you can enable or disable preview links, and define the path to the links in the payload. By default, website preview links are disabled. The following illustration is an example of the Preview Website Link Content in Post section, when Yes is selected.When enabled, define the path to the preview links in the payload in the Path to the Link(toPreview) field, if the path is not in the root of the payload. For example, in the following code example from an RSS payload, the path to the preview is
...
"item": [
    {
        "title": "U.S. to Boost Refugee Intake by 30,000 by 2017",
        "guid": {
            "-isPermaLink": "false",
            "#text": "SB12418904751422433479504581245034032986752"
        },
        "link": "http://www.wsj.com/articles/john-kerry-says-u-s-to-admit-30-000-more-refugees-in-next-2-years-1442768498?mod=fox_australian",
        ...
When Preview website link content in Post is enabled, select preview objects such as:
- Preview Title – Displays the title of the website content.
- Preview Description – Displays the description of the website content.
- Preview Media(Video) – Enables display of video links from the website content.
- Preview Media(Image) – Enables display of image links from the website content.
Click Save to save the API request settings.
Bot Response
After you describe your Bot alert task General tab settings and then configure the alert task API request chain, you are ready to define how the alert task results are displayed to the end-user. This section describes how to configure an alert task response.
To define the response object for an alert task, there are two sections:
- Report Template Definition – For some tasks, you may want to display report data to the end-user as a link that can display the payload response using a template, such as a table, contact card, or formatted for a specific message type such as a weather report.
Note: This section is not used for webhook alert tasks, action tasks, or RSS alert tasks.
Configuring the Report Template Definition
To add a link to a task to provide more information or a report, you can define a link and information to display for the report as a table, weather report, or contact card in the end-user application.
To get started with defining the Report Template Definition for a task, on the Bot Response tab, click the Expand icon in the (Optional) Report Template Definition section as shown in the following illustration.
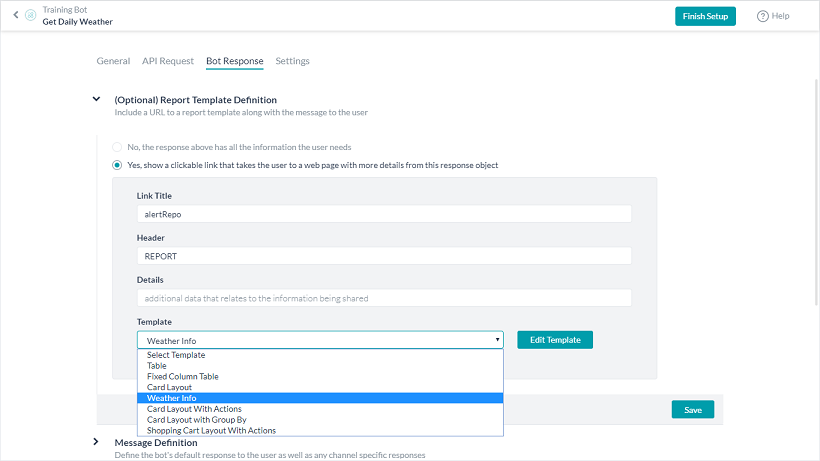
To enable a report link for the task, select Yes to display the Report Template Definition section shown in the previous illustration.
When you add a link to a task response message, the end-user for the Bot has the ability to select the link and get more details, such as a table of values for Closed Sales Opportunities in the SalesForce Bot.
Define the following parameters to create a link in a task response message for the end-user to request a report for additional information from the initial task response message:- Link Title – The link text displayed to the end-user in the task post, for example, View Shopping Cart.
- Header – The title displayed when the report is displayed to the end-user, for example, These are the items in your Shopping Cart.
- Details – End-user help information displayed directly below the Header in the report that describes the content of the report, for example, Review your Shopping Cart, and then click Continue when you are ready to place your order.
- Template – Select one of the following format templates to display the data from the task response. For each type, define the Column Name, Key Mapping, Data Type, and template-specific options.
- Table – Data is presented in a table format with defined columns. Each mapping for the Table template can be set to Is Sortable, Display as an image, and Display it as a link. For more information, see Defining a Table Report.
- Fixed Column Table – Data is presented in a table format with the one or more columns fixed. Each mapping for the Fixed Column Table template can be set to Is Sortable, Column in fixed, Display as an image and Display it as a link. For more information, see Defining a Fixed-Column Table Report.
- Card Layout – Data is presented in a contact card format. Each mapping for the Card Layout template can be set to Is Sortable, Display as an image, and Display it as a link. For more information, see Defining a Card Layout Report.
- Weather Info – Date for a weather service response payload can be defined. Each mapping for the Weather Info template can be set to Is Sortable, Display as an image, and Display it as a link. For more information, see Defining a Weather Info Report.
- Card Layout with Actions – Displays a list of items with a mapped task link for each item. For more information, see Define a Card Layout with Actions Report.
- Card Layout with Group By – Displays a list of items grouped by a specific field. For more information, see Define a Card Layout with Group By Report.
- Shopping Cart Layout with Actions – Displays a list of items with a mapped task link for each item. For more information, see Define a Shopping Cart Layout with Actions Report.
- Message Definition – In this section, you define the look and feel of the data presented to the end-user when the alert is displayed based on the payload delivered by the webhook.
Defining the Message Definition
You can define two kinds of bot responses for a task:- The default for all channels: Author the default title and message response for all channels based on the payload response from the API request and any processors defined. You can create a mixture of data from the response object along with your own inputs, a set of Variable Keys derived from the Kore.ai system, custom variables, and the response sample. The message is displayed as a message, usually as a well-formed HTML message that contains one or more variables, such as the ID number or subject, from the request object data.
- Channel-specific response: You can also customize a Bot response message for specific channels, for example, Facebook Messenger, Skype, SMS, or Web/Mobile SDK, along with applying predefined message templates (tables, lists, graphs, etc.) for selected channels.
Message Definition Editor Features
To open the editor for your Action task, go to Bot Response > Message Definition. The Message Definition editor uses three tabs to offer the following features:
- Standard Text: Use basic editor controls and HTML markup, and variable keys to define and format the response. Enter text, and then format it using buttons for bold, italics, header styles, hyperlinks, ordered and unordered lists, and inserting lines.
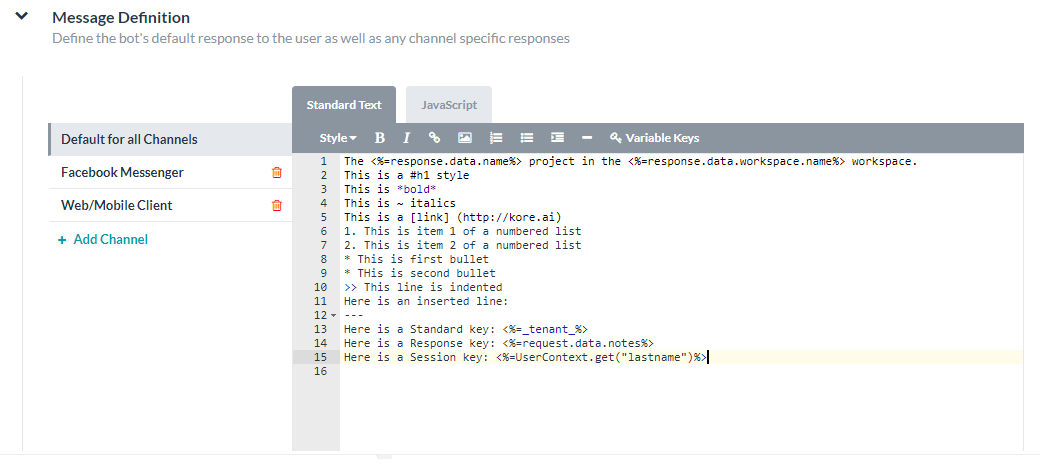
- JavaScript: Add custom code to handle the end-user task response message, declare variables, use variable keys, and interact with third-party applications.
- Preview: View a sample of the rendered output message, with markup, as the bot users see it.
Adding Variable Keys
Follow these steps to add variable keys:
- Whether you are using Standard Text or JavaScript mode, to add a variable key, place the cursor where you want to add the variable and then click Variable Keys.
- In the Request/Response Keys dialog, expand the type of key node that contains the variable you want to insert.
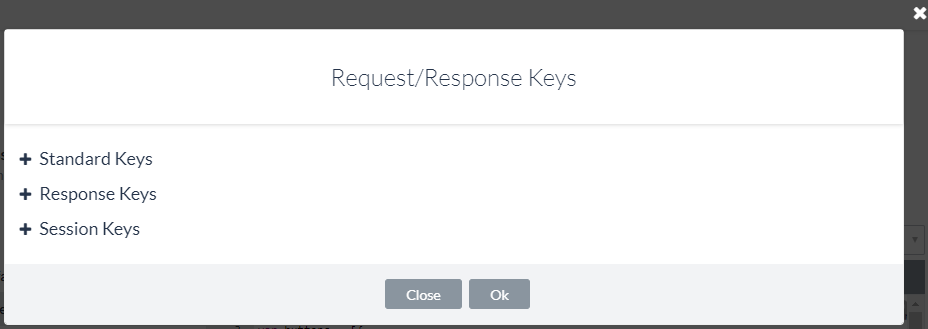
- Select the variable that you want to add, for example,
response.data.idand then click Ok,
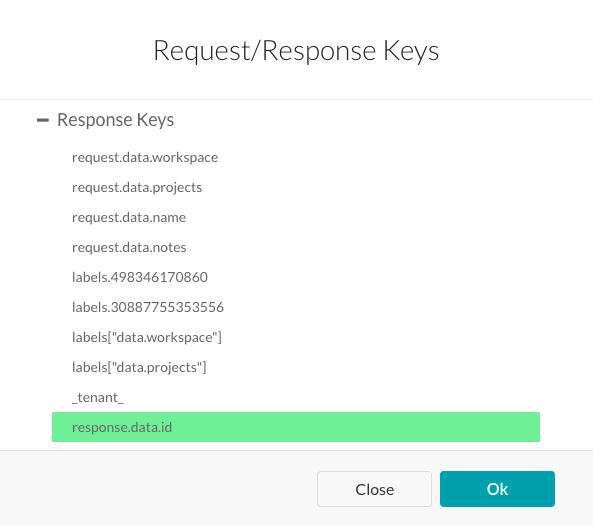
Standard Keys
Standard Keys are the following Kore.ai variable placeholders for reusable data.
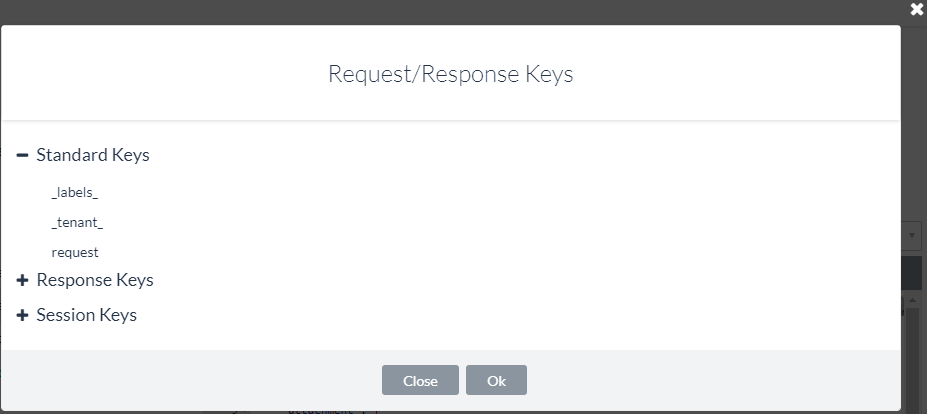
- _labels _: Returns the friendly label in place of a GUID. For example, when user data is requested from a web service API, the ID of a project or workspace returned is a GUID. You can use the
_labels_key to show the user-friendly name of the GUID to the end-user instead of the GUID. In Kore.ai, a drop-down control stores the response for the_labels_key as, for example:{ "_labels_": { "15379386734832": "roadlabs.com", "26377329985341": "Test Project", "workspace": "roadlabs.com", "project": "Test Project" }, "_fields_": { "workspace": "15379386734832", "project": "26377329985341" } }To use the
_labels_key in a response:print('<a href="https://app.asana.com/0/' + workspace.id + '+_labels_[workspace.id]); - _tenant_ – Returns the tenant for the enterprise when defined. For example, JIRA requires a tenant for URLs, such as koreteam, in https://koreteam.atlassian.net/browse/BBF-3265. You can use the
_tenant_key to build a link in a task response such as:var title = request.fields.issuetype.name + ' <a href ="https://' + _tenant_ + '/browse/' + response.key + '" target = "_blank">' + request.fields.summary + '</a> has been created.';
- _fields_ – Used to return a task field input provided by the end-user that is not part of a payload response. For example, in a JIRA task, the end-user is prompted to enter a workspace name. You can use the
_fields_key to store the end-user input as:_fields_["workspace"]
- _last_run – Used to return the UTC date timestamp of a web service poll using ISO 8601 format, for example, 2016-03-05T12:44:38+00:00. For example, if a web service request returns all activity in a payload response, you can use the
_last_runkey to filter results displayed before or after the value for_last_run
Session Keys
Session Keys are Kore.ai variable placeholders for user data specific to a single session instance.

- UserContext.get(“_id”) – The Kore.ai userId.
- UserContext.get(“emailId”) – The email address associated with the userId.
- UserContext.get(“lastName”) – The last name of the user.
- UserContext.get(“firstName”) – The first name of the user.
- UserContext.get(“profImage”) – The image or avatar filename of the user.
- UserContext.get(“profColor”) – The account color for the user.
- UserContext.get(“activationStatus”) – The account status of the user.
- UserContext.get(“jTitle”) – The title of the user, if defined.
- UserContext.get(“orgId”) – The organizational ID of the user account, if defined.
- UserContext.get(“customData”) – A developer defined custom key.
- UserContext.get(“identities”) – Alternate user IDs, if defined.
Additional session keys may be available depending on how the Bot task is defined and the context of keys available for that task. For more information about session and context keys, see Using Session and Context Variables in Tasks.
Response Keys
Response Keys are parsed directly from your Response Sample text in the API Response tab. Response Keys vary depending on the Response Sample defined.
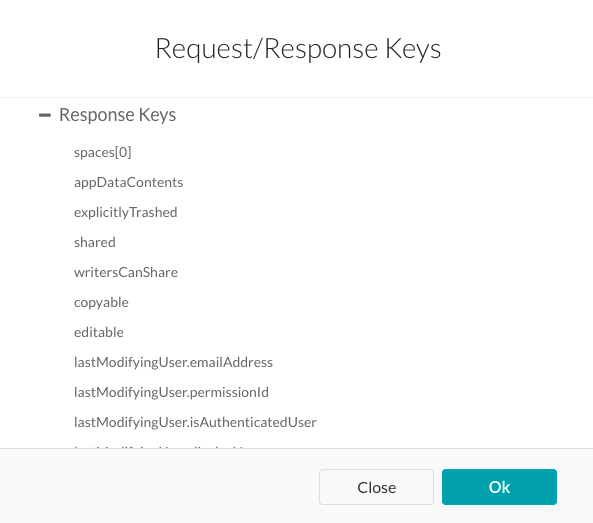
The following list is an example of Response Keys available for an Asana task.request.data.workspace request.data.projects request.data.name request.data.notes labels.498346170860 labels.30887755353556 labels["data.workspace"] labels["data.projects"] _tenant_ response.data.id response.data.created_at response.data.modified_at response.data.name response.data.notes response.data.completed response.data.assignee_status response.data.completed_at response.data.due_on response.data.due_at response.data.workspace.id response.data.workspace.name response.data.num_hearts response.data.parent response.data.followers[0].id response.data.followers[0].name response.data.hearted response.data.assignee response.data.projects[0].id response.data.projects[0].name response.data.memberships[0].project.id response.data.memberships[0].project.name response.data.memberships[0].section
Report Keys
Report Keys are Kore.ai variable placeholders that you can use in Report Template Definitions and Bot Responses to show links for additional information in a message that a user can click.
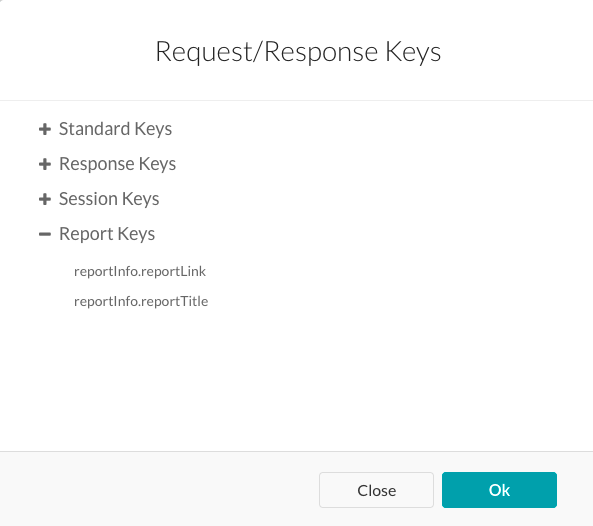
- reportInfo.reportLink – The link defined in the Report Template Definition section for this task.
- reportInfo.reportTitle – The title defined in the Report Template Definition for this task.
Previewing the Response
On the message editor, click Preview to generate a preview of your response using one of the following options:
- Test & Preview – Opens the task setup page for your Bot to define the task settings, authenticate, and then shows a preview of your response generated through your third-party web service, for example, Asana.
- Preview with sample response – Generates the preview using the sample data provided with the key-value pairs defined in the Response Sample section on the API Request tab for the task.
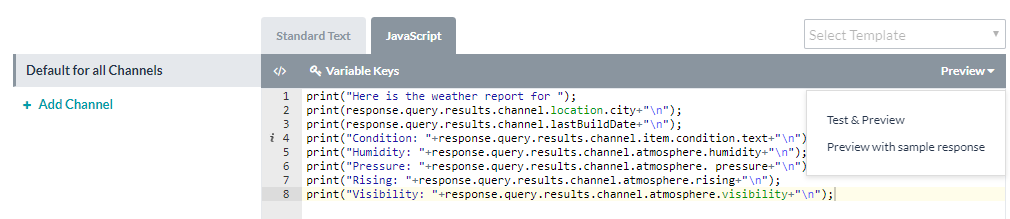
Examples of Custom JavaScript Response
The following examples show response objects using JavaScript to define the Post Title and Post Description sections that display output messages to the end-user when the task response message is sent.
In the following example, the variable labeled desc is only displayed if the value for the caption is defined in the JSON response.var desc = (caption !== "undefined" ? caption : "")
In the next example, a clickable URL using the task title is displayed in the task response message.
var tasklink = '' + title + '';
In this last example, the link variable depends on the type, either video or photo. Based on the type, the proper link is displayed.
var link = "";
switch (type) {
    case "video":
        var video = (typeof(video_url) != "undefined") ? video_url : permalink_url;
        link = '<video controls><source src ="' + video + '" type="video/mp4"></video>';
        break;
    case "photo":
        link = '<img src="' + image_permalink + '"></img>';
        break;
}
You can create custom JavaScript to handle task-specific requirements on the JavaScript tab based on the payload response for the task.
Channel-Specific Bot Response
A task response message may be dependent on the channel that the response message is displayed in, for example, in the Kore.ai Messenger client, an email, or in a text message. By default, the response message that you configure for Default for all Channels is sent to all channels. However, you can define a specific response for one or more or the 20+ supported channels to display to the end-user in that channel instead of the default response.
- To define the response message for a specific channel, click + Add Channel to display the Choose a Channel drop-down list.
- Select a channel, for example, Kore.ai, and then configure the response for that channel on the JavaScript tab.
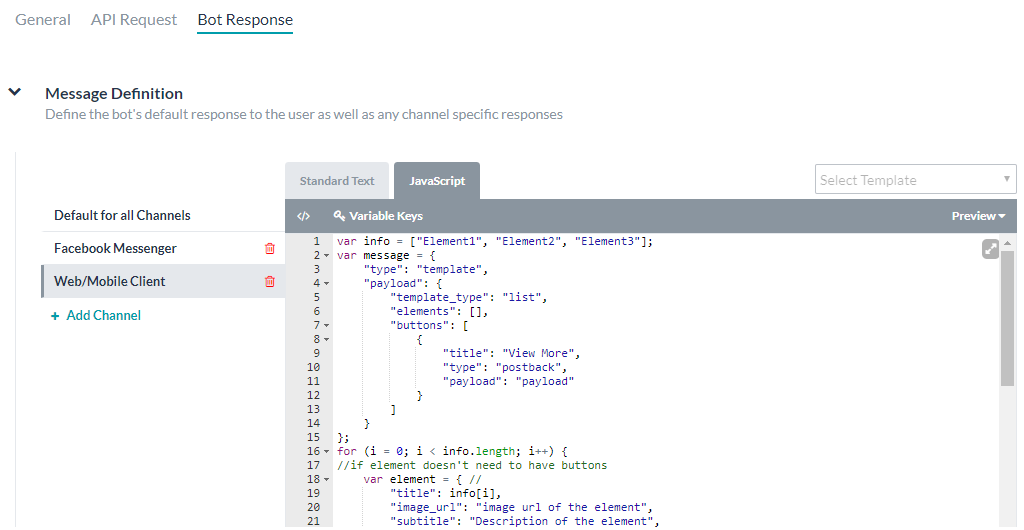
Only one response can be defined for each channel. The following JavaScript examples show how you can override the Kore.ai default formatting template by channel.Note: Use the following keys to return default values for:
response.message – Returns the default message as a string.
response.message.choices – Returns the options choice or confirmation message types as an array.- Slack Channel Override Example
var message = {}; var attachments = []; var attachment = { 'text': "Exception occurred during API execution", 'color': '#FFCC00', 'attachment_type': 'default' }; attachments.push(attachment); message.attachments = attachments; print(JSON.stringify(message)); - FaceBook Channel Override Example
var message = { text: response.message }; var buttons = []; for (var i = 0; i < response.choices.length; i++) { var choiceItem = response.choices[i]; if (choiceItem.length > 20) { choiceItem = choiceItem.substring( 0, 18) + '..'; } var element = { content_type: 'text', title: choiceItem, payload: choiceItem }; buttons.push(element); } message.quick_replies = buttons; print(JSON.stringify(message)); - Email Channel Override Example
var message = {}; var text = response.message + ' <br> '; for (var i = 0; i < response.choices.length; i++) { text = text.concat( '<u> + response.choices[i] + ' < /u> <br>'); } message.text = text; print(JSON.stringify(message)); - SMS Channel Override Example
var message = {};
    var indexArray = ['a', 'b', 'c',
        'd', 'e',
        'f', 'g', 'h', 'i', 'j',
        'k', 'l', 'm', 'n', 'o',
        'p', 'q', 'r', 's', 't',
        'u', 'v', 'w', 'x', 'y',
        'z'
    ];
    var text = response.message + '\\n';
    for (var i = 0; i < response.choices
        .length; i++) {
        text = text.concat(indexArray[i] +
            ') ' + response.choices[
                i] + '\\n');
    }
    message.text = text;
    print(JSON.stringify(message));
Alert Settings
Define the schedule or filter settings for the alert. schedule alerts to trigger according to the days, times, and frequencies they specify, whereas filtered alerts rigger when certain thresholds are met such as amounts, dates, text matches, and more.
After you define the General tab settings for your Bot task, configure the API request chain, define the Bot response message, then you are ready to define the settings for the task, such as filters, when the alert task runs, and other advanced options. This section describes how to define the parameters on the Settings tab for an alert task.
Note: This section does not apply to webhook alert tasks.
What Do I Need to Do?
For an alert task, other than a webhook alert task, you will need to define:
- Filters – You can define filters for end-users to limits the results of an alert task to the results an end-user needs. For example, you can define a filter for the name, or account, or business. When the alert is set up by the end-user, and the filter applied, only alert messages that meet the filter specifications are displayed to the end-user. For more information, see Defining Filters for a Task.
- Schedule – Alert tasks only reach out to a web service for data when the Bot makes a request. For each task, you need to define when, and how often the web service is queried for data for an alert message. You can define the scheduling options presented to the end-user when the task is set up, as well as the default schedule for the task. For more information, see Configuring the Schedule for a Task.
- Advanced Settings – In the Advanced Settings section, you can define alert task settings for enabling and limiting the initial set of alert messages displayed to the end-user when the task is set up, define alert message reminders, and if required, prevent duplicate messages sent to the user. For more information, see Define Advanced Settings.
Defining Filters for a Task
To get started with defining filters for a task, on the Settings tab, click the Expand icon in the Filters section, and then click Add as shown in the following illustration.
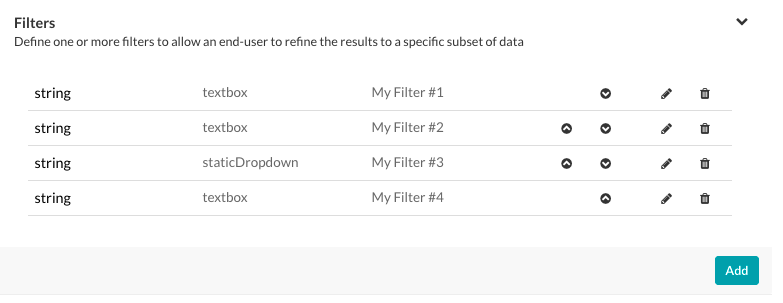
When you click Add, the Alert Task Filter dialog is displayed as shown in the following illustration.
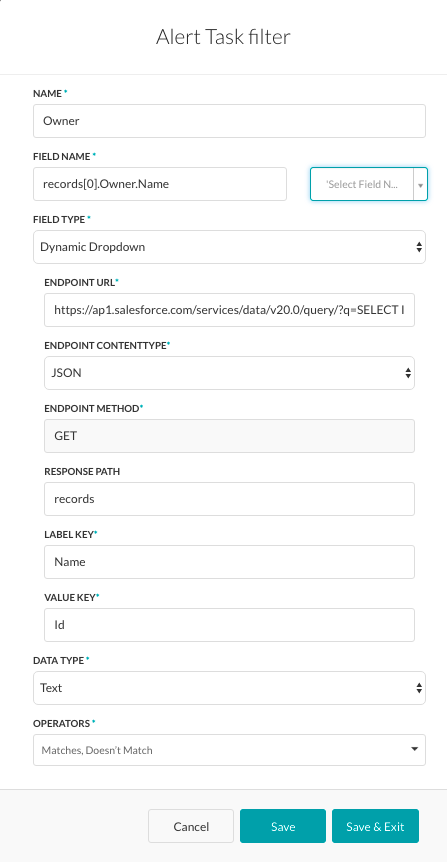
The Filter defined in the previous illustration is displayed to the end-user as a filter labeled Owner, with the Field Type set to Dynamic Dropdown to enable the end-user to select a name from a dynamically populated list of owners defined in the response payload.
Define the fields described in the following table to create a new filter for a task.
| PARAMETER NAME | DESCRIPTION |
| Name | Specify the name of the Filter displayed to the end-user in Filters section when configuring the task, for example, Notify me only when the below user tweets. |
| Field Name | Enter the name of the field to filter the task on, or click Select Field to display a drop-down list of field names parsed from the Response Sample defined on the task API Request tab. |
| Field Type | Select the type of input field to collect the user input.
|
| Data Type | The data type for the content received from the endpoint URL. One of:
|
| Operators | Select one or more filter operations that the end-user can select to apply to the filter. Depending on the Data Type selected, one or more of the following options are available to select to display to the end-user in the filter.
|
For multiple filters, you can order the filters in an order the end-user expects, shown in numerical order in the following illustration.
Use the Move Up ![]() icon and the Move Down
icon and the Move Down ![]() icon in the Actions column in the Filters section to reorder the filters if needed.
icon in the Actions column in the Filters section to reorder the filters if needed.
Click the Edit ![]() icon to modify the settings for an existing filter.
icon to modify the settings for an existing filter.
Click the Delete ![]() icon to delete an existing filter.
icon to delete an existing filter.
Warning: This operation is permanent and cannot be undone.
Configuring the Schedule for a Task
You need to configure the default settings for how often the task runs to request data from your web service. This topic describes how to configure the recurrence for a task.
To get started with defining the schedule to run a task, on the Settings tab, click the Expand icon in the Schedule section as shown in the following illustration.
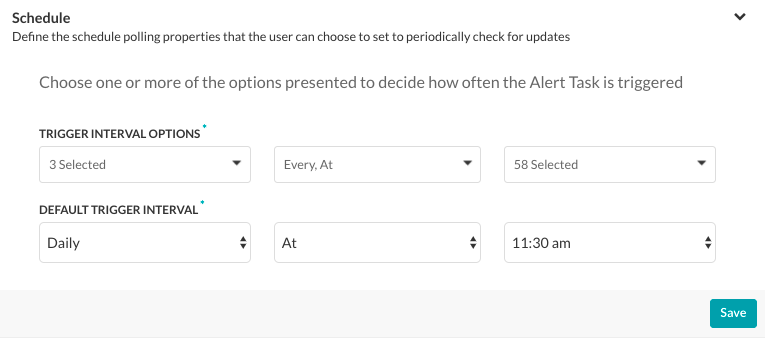
To configure the schedule for your task, you must define the Trigger Interval Options, and then the Default Trigger Interval. The Default Trigger Interval is the elapsed time between the last task request and the next automated task request.
To set the options displayed to the end-user, in the Trigger Interval Options section:
- In the first field, select one or more of Daily, Weekday, Weekend, or Select All, and then click OK.
- In the second field, select one or more of Daily, Weekday, Weekend, or Select All, and then click OK.
- In the third field, select one or more of the available 30-minute intervals, or Select All, and then click OK.
In the following illustration, the end-user and Default Trigger Interval settings can be set to Daily, Weekend, or Weekday At < any 30-minute interval >.

Defined Advanced Settings
In the Advanced Settings section, you can define the initial polling results for a task, define an alert reminder, and specify keys the Bots Platform should use to prevent duplicate alert messages, for example, in a Twitter or Facebook feed.
To define advanced settings for a task, on the Settings tab, click the Expand
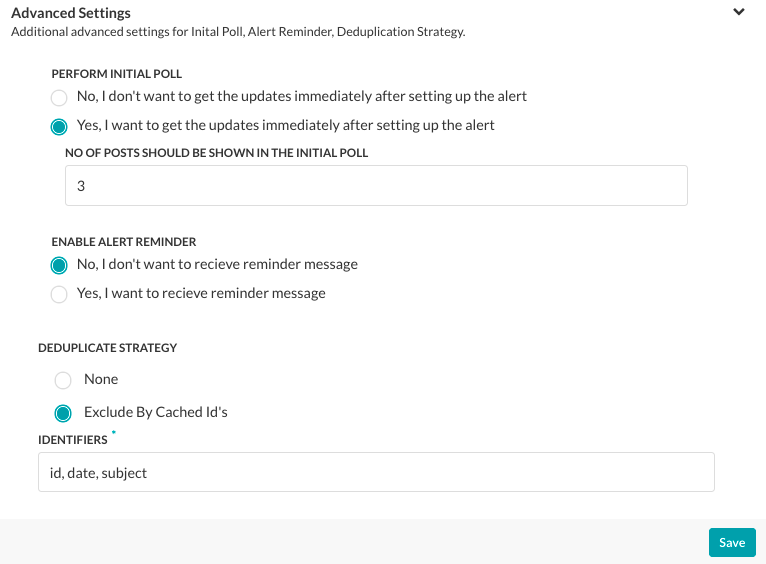
Initial Polling Setup
Initial polling is an option you can define to enable display of events to end-users immediately after they set up the task. For example, for a CNN News Bots, you can enable initial polling to show the last 10 news posts immediately after the end-user adds the task to their application. If initial polling is not defined, the task polling begins after the specified Trigger Interval has elapsed.
To enable and configure initial polling, in the Perform Initial Poll section, select Yes. In the No of posts field, enter the number of previous posts that should be posted immediately in the end-user application, as shown in the following illustration.
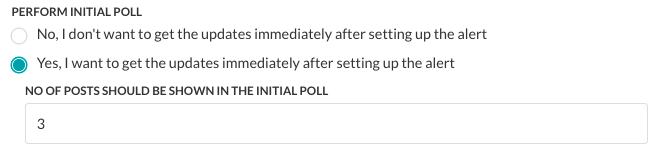
Setting Up Alert Reminders
For some tasks, for example, Google Calendar Event Updates task, you may want to add a reminder to the task. The reminder sends a reminder message to the end-user after receipt of the original task message. For example, the end-user may want to set up a 30-minute and 15-minute reminder before an event with the task message.
To enable and configure reminders, in the Enable Alert Reminder section, click Yes. The reminder configuration section is displayed as shown in the following illustration.
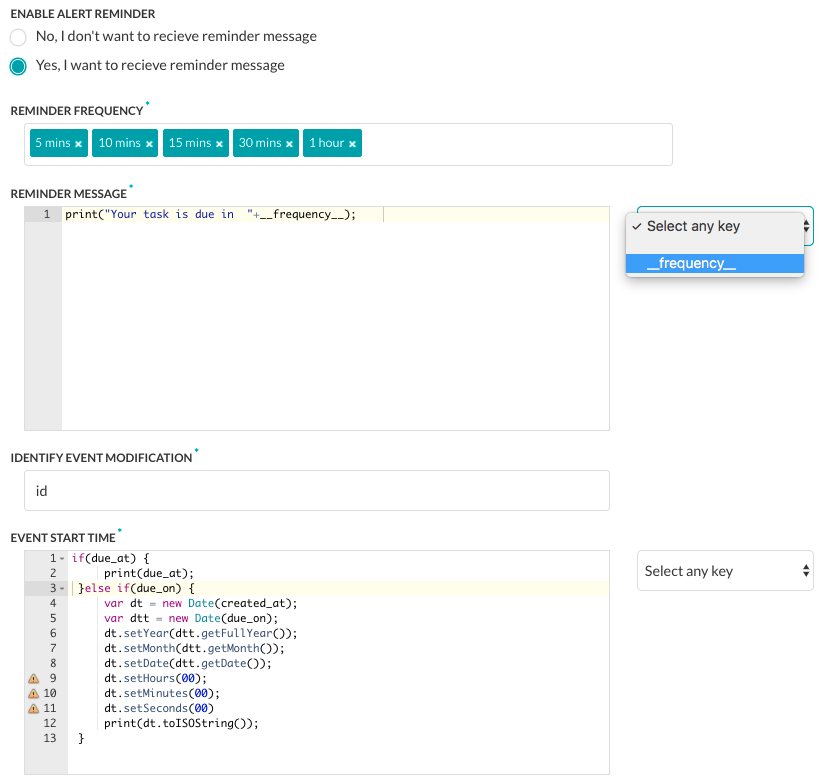
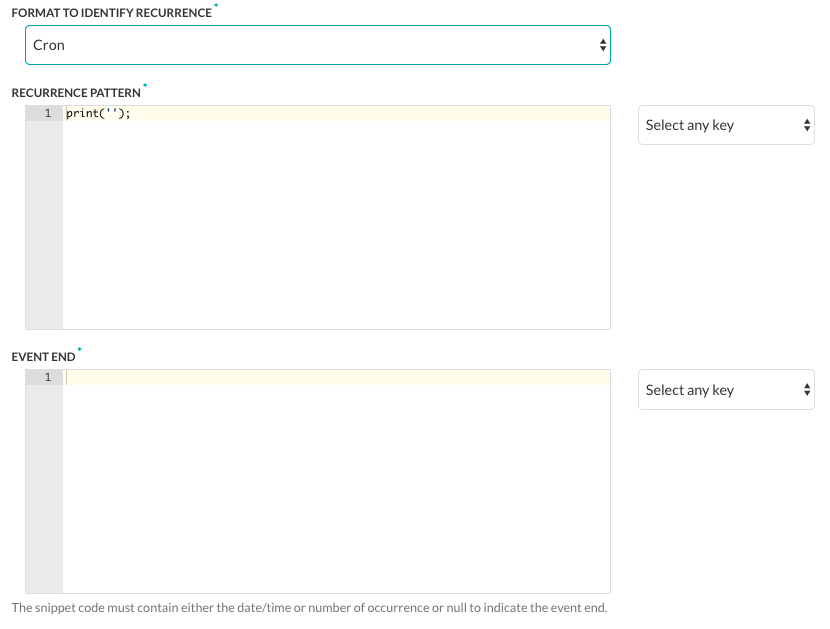
To configure an alert reminder
- In the Enable Alert Reminder section, click Yes to display the alert reminder settings.
- In the Reminder Frequency section, click in the text box to display and select one or more intervals for the frequency of the reminder ranging from 5 mins to 7 days.
- In the Reminder Message text area, enter the message to display to the end-user for the event reminder. For example,
print('Event starts in '+__frequency__);
To use system generated keys, click Select any key and choose a key from the dropdown list. - In the Identity Event Modification section, enter one or more keys in a comma-separated list used to identify new events. For example, id, LastModifiedDateTime, subject.
- In the Event Start Time section, enter the message to display to the end-user for the start date and time of the event using the alert task payload field that contains the event start time. For example,
if (due_at) { print(due_at); } else if (due_on) { var dt = new Date(created_at); var dtt = new Date(due_on); dt.setYear(dtt.getFullYear()); dt.setMonth(dtt.getMonth()); dt.setDate(dtt.getDate()); dt.setHours(00); dt.setMinutes(00); dt.setSeconds(00) print(dt.toISOString()); } - In the Format to Identify Recurrence section, select the type of recurrence pattern format used in the payload as one of RRule or Cron.
- RRule – A JavaScript library for working with recurrence rules for calendar dates. Use this for iCalendar events. For more information, see Recurrence Rule.
- Cron – Used for scheduling tasks in the future. For more information, see Cron Expressions.
- In the Recurrence Pattern section, define the string displayed to the end-user to show the frequency of a repeating event, such as a recurring weekly meeting. For example,
if (typeof(Recurrence) !== 'undefined' && Recurrence) { var map = new Object(); map['Daily'] = "DAILY"; map['Weekly'] = "WEEKLY"; map['AbsoluteMonthly'] = "MONTHLY"; map['RelativeMonthly'] = "MONTHLY"; map['AbsoluteYearly'] = "YEARLY"; map['AbsoluteYearly'] = "YEARLY"; map['First'] = 1 map['Second'] = 2 map['Third'] = 3 map['Fourth'] = 4 map['Last'] = -1 map['Sunday'] = 'SU' map['Monday'] = 'MO' map['Tuesday'] = 'TU' map['Wednesday'] = 'WE' map['Thursday'] = 'TH' map['Friday'] = 'FR' map['Saturday'] = 'SA' var rrule = ''; if (typeof(Recurrence.Pattern.Type) !== 'undefined') { var freq = map[Recurrence.Pattern.Type]; rrule = rrule + 'FREQ=' + freq + ';'; } if (typeof(Recurrence.Range.StartDate) !== 'undefined') { var stDate = new Date(Recurrence.Range.StartDate).toISOString(); rrule = rrule + 'DTSTART=' + stDate + ';'; } if (typeof(Recurrence.Pattern.Interval) !== 'undefined') { var interval = Recurrence.Pattern.Interval rrule = rrule + 'INTERVAL=' + interval + ';'; } if (typeof(Recurrence.Range.EndDate) !== 'undefined' && Recurrence.Range.Type !== 'NoEnd') { var edDate = new Date(Recurrence.Range.EndDate).toISOString(); rrule = rrule + 'UNTIL=' + edDate + ';'; } if (typeof(Recurrence.Pattern.Month) !== 'undefined' && Recurrence.Pattern.Month !== 0) { rrule = rrule + 'BYMONTH=' + Recurrence.Pattern.Month + ';'; } if (typeof(Recurrence.Pattern.DayOfMonth) !== 'undefined' && Recurrence.Pattern.DayOfMonth !== 0) { rrule = rrule + 'BYMONTHDAY=' + Recurrence.Pattern.DayOfMonth + ';'; } if (typeof(Recurrence.Pattern.Index) !== 'undefined') { var wno = map[Recurrence.Pattern.Index]; rrule = rrule + 'BYSETPOS=' + wno + ';'; } if (typeof(Recurrence.Pattern.DaysOfWeek) !== 'undefined') { var arr = []; for (var i = 0; i < Recurrence.Pattern.DaysOfWeek.length; i++) { arr.push(map[Recurrence.Pattern.DaysOfWeek[i]]) } rrule = rrule + 'BYDAY=' + arr.join(',') + ';'; } print(rrule); } - If the Format to Identify Recurrence field is set to Cron, then define the Event End section to define the string displayed to the end-user to show the date and time of the last recurring event.
Click Save to save the settings.
Preventing Duplicate Message Alerts
After you add your filters for the response object, you should determine if you need to apply a strategy to prevent the display of duplicate messages to the end-user. For example, if you set up an RSS task, you may want to prevent duplicate messages for the same subject, or for Facebook, prevent duplicate messages each time a comment is added to a post.
In Kore.ai, you can choose one of two options for Deduplicate Strategy:
- None – This is the default method to prevent duplicate alert messages. Each incoming task payload is hashed and the latest 500 task hash values are persisted. Each new task payload is compared against the list to prevent duplicate task alert messages. This option works for most tasks.
- ExcludeByCachedIds – Select to enter one or more response identifier keys in a comma-separated list used to filter Kore.ai task alert messages and prevent duplication based on the cached hash value of the key for up to 500 hash values. If any of the key hash values match the response object, then the alert message is filtered and not displayed.For RSS Alert Types, RSS XML payloads are parsed as JSON. To filter by RSS item, enter
$..guid[0]._to prevent duplicate messages using the XML < GUID > tag parsed to JSON as:{ "guid": [ "_": "some link" ] }
To define settings to prevent duplication messages for a task, on the Settings tab, click the Expand ![]() icon in the Advanced Settings section to display the Deduplicate Strategy section as shown in the following illustration.
icon in the Advanced Settings section to display the Deduplicate Strategy section as shown in the following illustration.

Version History
You may need to troubleshoot alert tasks that have been upgraded. In the Kore.ai Bot Builder tool, you can view version changes of each alert task to determine if, and how many times an alert task was upgraded.
In the Alert Tasks section, click the Settings ![]() icon for the task to view versions for, and then click Version History.
icon for the task to view versions for, and then click Version History.

The Version History page contains the following columns:
- Version Number – The version number of the upgrade as a minor upgrade, using X.X syntax, for example, 1.3 where 1 is the major version upgrade number, and 3 is the minor version upgrade number.
- Changed By – The username of the developer of the bot that made the upgrade changes.
- Changed Date – The date that the bot was approved and published by the Enterprise Admin.
- Comments – The Upgrade Comments provided by the developer that made the changes to the bot for an upgrade.
The following illustration is an example of the Version History page for a bot with three minor upgrades, and one major upgrade to version 2.
View Logs
You may need to troubleshoot alert tasks. In the Kore.ai Bot Builder tool, you can view logged events for configured and published alert tasks that interact with the Kore.ai Bots Platform and third-party applications. The View Logs command displays archived log events for each alert task instance that you can use to view the alert task request and the application response.
In the Alert Tasks section, click the Settings ![]() icon for the task to view logs for, and then click View Logs. The Logs page for the bot alert task opens.
icon for the task to view logs for, and then click View Logs. The Logs page for the bot alert task opens.

You can refresh the entries on the Logs page when needed.
Each log entry represents the results of the alert task as a JSON response.
{
"requestLogs": [{
"name": "Request 1",
"request": {
"endpoint": "http://www.moneycontrol.com/rss/{channel}.xml",
"pathFields": {
"channel": "latestnews",
"lastRun": "2016-12-02T16:50:45Z",
"now": "2016-12-02T16:56:37Z",
"today": "2016-12-02"
},
"payloadFields": {},
"headerFields": {
"If-Modified-Since": "Fri, 02 Dec 2016 16:30:28 GMT",
"If-None-Match": "\"525734-3a49-5426bfa6dff80\""
}
},
"response": {
"status": 200,
"headers": {
"server": "Kore.aiOps",
"last-modified": "Fri, 02 Dec 2016 16:50:10 GMT",
"accept-ranges": "bytes",
"content-encoding": "gzip",
"pragma": "no-cache",
"content-length": "3554",
"content-type": "application/xml",
"vary": "Accept-Encoding",
"expires": "Wed, 11 Jan 1984 05:00:00 GMT",
"cache-control": "max-age=0, no-cache, no-store, must-revalidate",
"age": "0",
"connection": "keep-alive"
},
"body": " \n\t \n\t \n\t\t\t\n\t\t\t\tMoneycontrol Latest News\n\t\t\t\tLatest News from Moneycontrol.com\n\t\t\t\thttp://www.moneycontrol.com\n\t\t\t\tFri, 02 Dec 2016 22:20:01 +0530\n\t\t\t\tMoneycontrol.com\n\t\t\t\t\n\t\t\t\t\thttp://img1.moneycontrol.com/images/top2010/moneycontrol_logo.jpg\n\t\t\t\t\tMoneycontrol Logo\n\t\t\t\t\thttp://www.moneycontrol.com\n\t\t\t\tFeed provided by Moneycontrol.\n\t\t\t\t\n\t\tPradhan proposes Rs 900 crore 2G Ethanol Plant in Odisha\n\t\thttp://www.moneycontrol.com/news/wire-news/pradhan-proposes-rs-900-crore-2g-ethanol-plantodisha_8058641.html\n\t\t<img src="http://www.moneycontrol.com/news_image_files/default/200x200_default_img_grey.jpg" alt="Pradhan proposes Rs 900 crore 2G Ethanol Plant in Odisha" title="Pradhan proposes Rs 900 crore 2G Ethanol Plant in Odisha" border="0" width="75" height="75" align=" left" hspace="5"/> Union Minister Dharmendra Pradhan\ntoday proposed a 2G Ethanol Plant in Bargarh district at an\ninvestment of Rs 900 crore and suggested the Odisha government\nto develop Paradip on the lines of Jurong island of Singapore.\n\t\tFri, 02 Dec 2016 22:16:04 +0530\n\t\thttp://www.moneycontrol.com/news/wire-news/pradhan-proposes-rs-900-crore-2g-ethanol-plantodisha_8058641.html\n\t\t\n\t\t\n\t\tNote ban impact: How Vidisha farmers are coping\n\t\thttp://www.moneycontrol.com/news/cnbc-tv18-comments/note-ban-impact-how-vidisha-farmerscoping_8058621.html\n\t\t<img src="http://www.moneycontrol.com/news_image_files/2014/a/ARCHANA4_200_0102.jpg" alt="Archana Shukla" title="Archana Shukla" border="0" width="75" height="75" align=" left" hspace="5"/> The government's decision to ban old Rs 500 and Rs 1000 notes has made life difficult for small famers. Trading is a hassle and life in the Madhya Pradesh town is almost at a standstill.\n\t\tFri, 02 Dec 2016 22:14:01 +0530\n\t\thttp://www.moneycontrol.com/news/cnbc-tv18-comments/note-ban-impact-how-vidisha-farmerscoping_8058621.html\n\t\t\n\t\t\n\t\tCash crunch not a worry for grocery e-tailer BigBasket\n\t\thttp://www.moneycontrol.com/news/business/cash-crunch-notworry-for-grocery-e-tailer-bigbasket_8058601.html\n\t\t<img src="http://www.moneycontrol.com/news_image_files/2016/b/bigbasket.jpg" alt="Cash crunch not a worry for grocery e-tailer BigBasket" title="Cash crunch not a worry for grocery e-tailer BigBasket" border="0" width="75" height="75" align=" left" hspace="5"/> While the demonetisation scheme is acting as a hurdle for many sectors, for BigBasket it is a blessing in disguise. The company has upped its revenue projection by 20 percent in the financial year 2017. \n\t\tFri, 02 Dec 2016 22:13:12 +0530\n\t\thttp://www.moneycontrol.com/news/business/cash-crunch-notworry-for-grocery-e-tailer-bigbasket_8058601.html\n\t\t\n\t\t\n\t\tMallya PMLA case: Court confirms Rs 1,411 attachment order\n\t\thttp://www.moneycontrol.com/news/business/mallya-pmla-case-court-confirms-rs-1411-attachment-order_8058581.html\n\t\t<img src="http://www.moneycontrol.com/news_image_files/2016/v/Vijay_Mallya_Kingfisher_Mallya_london_200x200.jpg" alt="Mallya PMLA case: Court confirms Rs 1,411 attachment order" title="Mallya PMLA case: Court confirms Rs 1,411 attachment order" border="0" width="75" height="75" align=" left" hspace="5"/> A special anti-money laundering\r\ncourt here has confirmed an attachment of assets order worth\r\nRs 1,411 crore issued by the ED against UBHL and others in\r\nconnection with its money laundering probe against liquor\r\nbaron Vijay Mallya and others.\n\t\tFri, 02 Dec 2016 22:00:03 +0530\n\t\thttp://www.moneycontrol.com/news/business/mallya-pmla-case-court-confirms-rs-1411-attachment-order_8058581.html\n\t\t\n\t\t\n\t\tRussian central bank said it was victim of attempted cyber heist\n\t\thttp://www.moneycontrol.com/news/world-news/russian-central-bank-said-it-was-victimattempted-cyber-heist_8058321.html\n\t\t<img src="http://www.moneycontrol.com/news_image_files/2016/2/2016-12-02T151033Z_1_LYNXMPECB114Y_RTROPTP_2_RUSSIA-CENBANK-LIQUIDITY-RATES_200.JPG" alt="Russian central bank said it was victim of attempted cyber heist" title="Russian central bank said it was victim of attempted cyber heist" border="0" width="75" height="75" align=" left" hspace="5"/> The bank said it managed to recover some of that amount - USD26 million -- but it did not say if that meant the rest had been stolen.\n\t\tFri, 02 Dec 2016 21:46:45 +0530\n\t\thttp://www.moneycontrol.com/news/world-news/russian-central-bank-said-it-was-victimattempted-cyber-heist_8058321.html\n\t\t\n\t\t\n\t\tBank of England's Haldane warns against hasty rate hike\n\t\thttp://www.moneycontrol.com/news/world-news/bankenglands-haldane-warns-against-hasty-rate-hike_8058361.html\n\t\t<img src="http://www.moneycontrol.com/news_image_files/2016/2/2016-12-02T125207Z_1_LYNXMPECB10TS_RTROPTP_2_BRITAIN-BOE_200.JPG" alt="Bank of England's Haldane warns against hasty rate hike" title="Bank of England's Haldane warns against hasty rate hike" border="0" width="75" height="75" align=" left" hspace="5"/> The Bank of England's chief economist, Andrew Haldane, said on Friday it would be risky to raise interest rates too hastily and that he was comfortable with the BoE's recent shift to a neutral stance on what its next monetary policy move should be.\n\t\tFri, 02 Dec 2016 21:44:54 +0530\n\t\thttp://www.moneycontrol.com/news/world-news/bankenglands-haldane-warns-against-hasty-rate-hike_8058361.html\n\t\t\n\t\t\n\t\tTourists begin to feel the pinch of cash crunch\n\t\thttp://www.moneycontrol.com/news/current-affairs/tourists-begin-to-feelpinchcash-crunch_8057981.html\n\t\t<img src="http://www.moneycontrol.com/news_image_files/ai/foreign_tourists_190.jpg" alt="Tourists begin to feel the pinch of cash crunch" title="Tourists begin to feel the pinch of cash crunch" border="0" width="75" height="75" align=" left" hspace="5"/> The demonetisation move is impacting various segments of the society. The tourists coming to India are also feeling the pinch of the cash crunch. \n\t\tFri, 02 Dec 2016 21:33:53 +0530\n\t\thttp://www.moneycontrol.com/news/current-affairs/tourists-begin-to-feelpinchcash-crunch_8057981.html\n\t\t\n\t\t\n\t\tPolitical funding audits key to success of demonetisation: Pros\n\t\thttp://www.moneycontrol.com/news/economy/political-funding-audits-key-to-successdemonetisation-pros_8058301.html\n\t\t<img src="http://www.moneycontrol.com/news_image_files/2016/a/Ashok_Lahiri_200.jpg" alt="Ashok Lahiri" title="Ashok Lahiri" border="0" width="75" height="75" align=" left" hspace="5"/> The political parties must be open to audits, believe both Govinda Rao, former member, PMEA and Ashok Lahiri, former chief economic advisor. \n\t\tFri, 02 Dec 2016 21:33:32 +0530\n\t\thttp://www.moneycontrol.com/news/economy/political-funding-audits-key-to-successdemonetisation-pros_8058301.html\n\t\t\n\t\t\n\t\tCore Diagnostics gets $12mn funding from investors\n\t\thttp://www.moneycontrol.com/news/business/core-diagnostics-gets-3612mn-fundinginvestors_8058561.html\n\t\t<img src="http://www.moneycontrol.com/news_image_files/2016/d/Dollar_rupee_ip_down_200x200.jpg" alt="Core Diagnostics gets $12mn funding from investors" title="Core Diagnostics gets $12mn funding from investors" border="0" width="75" height="75" align=" left" hspace="5"/> Core Diagnostics has received USD 12 million (around Rs 82 crore) funding from various investors including US-based F-Prime Capital Partners.\n\t\tFri, 02 Dec 2016 21:24:15 +0530\n\t\thttp://www.moneycontrol.com/news/business/core-diagnostics-gets-3612mn-fundinginvestors_8058561.html\n\t\t\n\t\t\n\t\tItzCash ties up with 100 cos for pre-paid cards\n\t\thttp://www.moneycontrol.com/news/business/itzcash-ties-up100-cos-for-pre-paid-cards_8058541.html\n\t\t<img src="http://www.moneycontrol.com/news_image_files/2015/c/creditcardrewardpoints200X200.jpg" alt="ItzCash ties up with 100 cos for pre-paid cards" title="ItzCash ties up with 100 cos for pre-paid cards" border="0" width="75" height="75" align=" left" hspace="5"/&
amp;
gt; Digital payments facilitator ItzCash has signed up with 100 small- and large-sized companies to offer pre-loaded salary cards for their employees in the wake of cash withdrawal limits from banks post ban on Rs 500/1000 notes.\n\t\tFri, 02 Dec 2016 21:24:13 +0530\n\t\thttp://www.moneycontrol.com/news/business/itzcash-ties-up100-cos-for-pre-paid-cards_8058541.html\n\t\t\n\t\t\n\t\tAmul to launch camel milk in next 3 months\n\t\thttp://www.moneycontrol.com/news/business/amul-to-launch-camel-milknext-3-months_8058521.html\n\t\t<img src="http://www.moneycontrol.com/news_image_files/2014/p/pro_amul_taaza_full_cream_milk_200_5901.jpg" alt="Amul to launch camel milk in next 3 months" title="Amul to launch camel milk in next 3 months" border="0" width="75" height="75" align=" left" hspace="5"/> With food safety regulator FSSAI setting new standards for camel milk, dairy major GCMMF, which sells products under the Amul brand, today said it will launch camel milk in the next three months.\n\t\tFri, 02 Dec 2016 21:24:12 +0530\n\t\thttp://www.moneycontrol.com/news/business/amul-to-launch-camel-milknext-3-months_8058521.html\n\t\t\n\t\t\n\t\tPar Panel asks coal PSUs to recover dues worth Rs 13,745 cr\n\t\thttp://www.moneycontrol.com/news/current-affairs/par-panel-asks-coal-psus-to-recover-dues-worth-rs-13745-cr_8058501.html\n\t\t<img src="http://www.moneycontrol.com/news_image_files/2012/c/coalindia.jpg" alt="Par Panel asks coal PSUs to recover dues worth Rs 13,745 cr" title="Par Panel asks coal PSUs to recover dues worth Rs 13,745 cr" border="0" width="75" height="75" align=" left" hspace="5"/> A Parliamentary panel has raised concerns over Rs 13,745 crore in dues to coal PSUs - CIL, SCCL and NLC - and asked them to recover the amount, which can adversely impact their financial position.\n\t\tFri, 02 Dec 2016 21:24:11 +0530\n\t\thttp://www.moneycontrol.com/news/current-affairs/par-panel-asks-coal-psus-to-recover-dues-worth-rs-13745-cr_8058501.html\n\t\t\n\t\t\n\t\tRuPay card usage jumps 118% in 1st week of demonetisation\n\t\thttp://www.moneycontrol.com/news/business/rupay-card-usage-jumps-1181st-weekdemonetisation_8058481.html\n\t\t<img src="http://www.moneycontrol.com/news_image_files/2015/r/rupay_200x200.jpg" alt="RuPay card usage jumps 118% in 1st week of demonetisation" title="RuPay card usage jumps 118% in 1st week of demonetisation" border="0" width="75" height="75" align=" left" hspace="5"/> RuPay card usage jumped by over 118.6 per cent in the week following demonetisation that took effect from November 8 mid-night while the overall debit and credit card transactions recorded an increase of 70.5 per cent.\n\t\tFri, 02 Dec 2016 21:24:10 +0530\n\t\thttp://www.moneycontrol.com/news/business/rupay-card-usage-jumps-1181st-weekdemonetisation_8058481.html\n\t\t\n\t\t\n\t\tBoB raises Rs 1,000 cr; SB of Travancore eyes Rs 600 cr\n\t\thttp://www.moneycontrol.com/news/business/bob-raises-rs-1000-cr-sbtravancore-eyes-rs-600-cr_8058461.html\n\t\t<img src="http://www.moneycontrol.com/news_image_files/2016/b/Banks_Queue_Bank_of_Baroda_200x200.jpg" alt="BoB raises Rs 1,000 cr; SB of Travancore eyes Rs 600 cr" title="BoB raises Rs 1,000 cr; SB of Travancore eyes Rs 600 cr" border="0" width="75" height="75" align=" left" hspace="5"/> Public sector player Bank of Baroda has raised Rs 1,000 crore by issuing bonds that are compliant with global capital adequacy norms or Basel III.\n\t\tFri, 02 Dec 2016 21:24:09 +0530\n\t\thttp://www.moneycontrol.com/news/business/bob-raises-rs-1000-cr-sbtravancore-eyes-rs-600-cr_8058461.html\n\t\t\n\t\t\n\t\tDCB Bank launches Cippy Wallet app for 'cash free' payments\n\t\thttp://www.moneycontrol.com/news/business/dcb-bank-launches-cippy-wallet-app-for-cash-free-payments_8058441.html\n\t\t<img src="http://www.moneycontrol.com/news_image_files/2014/d/dcb_200.jpg" alt="DCB Bank launches Cippy Wallet app for 'cash free' payments" title="DCB Bank launches Cippy Wallet app for 'cash free' payments" border="0" width="75" height="75" align=" left" hspace="5"/> Hopping on to the cashless drive, new generation private lender DCB Bank today launched Cippy Wallet app for digital payments.\n\t\tFri, 02 Dec 2016 21:24:08 +0530\n\t\thttp://www.moneycontrol.com/news/business/dcb-bank-launches-cippy-wallet-app-for-cash-free-payments_8058441.html\n\t\t\n\t\t"
},
"executionTime": "4917 ms"
}],
"alertsData": [{
"uxmap": {
"channel": "default",
"body": "<% var newLink = '' + title + '';\n print(newLink); %><%print(\"
\");%><% %>"
},
"payload": "{\"title\":[\"Pradhan proposes Rs 900 crore 2G Ethanol Plant in Odisha\"],\"link\":[\"http://www.moneycontrol.com/news/wire-news/pradhan-proposes-rs-900-crore-2g-ethanol-plantodisha_8058641.html\"],\"description\":[\" Union Minister Dharmendra Pradhan\\ntoday proposed a 2G Ethanol Plant in Bargarh district at an\\ninvestment of Rs 900 crore and suggested the Odisha government\\nto develop Paradip on the lines of Jurong island of Singapore.\"],\"pubDate\":[\"Fri, 02 Dec 2016 22:16:04 +0530\"],\"guid\":[\"http://www.moneycontrol.com/news/wire-news/pradhan-proposes-rs-900-crore-2g-ethanol-plantodisha_8058641.html\"],\"hash\":\"f7dbaed7ebe3d9cb5f265779bd969da6\",\"_fields_\":{\"channel\":\"latestnews\"},\"_labels_\":{\"channel\":\"Latest News\"},\"secretKey\":\"n-5bd95008-81be-56d1-9030-0eafbf36a10d\",\"contentType\":\"application/xml\",\"_last_run\":\"2016-12-02T16:50:45.363Z\"}",
"response": {
"channel": "default",
"body": "Pradhan proposes Rs 900 crore 2G Ethanol Plant in Odisha
",
"updatedSessionStore": {
"EnterpriseContext": {},
"BotContext": {},
"UserContext": {},
"UserSession": {},
"BotUserSession": {}
}
}
}, {
"uxmap": {
"channel": "default",
"body": "<% var newLink = '' + title + '';\n print(newLink); %><%print(\"
\");%><% %>"
},
"payload": "{\"title\":[\"Note ban impact: How Vidisha farmers are coping\"],\"link\":[\"http://www.moneycontrol.com/news/cnbc-tv18-comments/note-ban-impact-how-vidisha-farmerscoping_8058621.html\"],\"description\":[\" The government's decision to ban old Rs 500 and Rs 1000 notes has made life difficult for small famers. Trading is a hassle and life in the Madhya Pradesh town is almost at a standstill.\"],\"pubDate\":[\"Fri, 02 Dec 2016 22:14:01 +0530\"],\"guid\":[\"http://www.moneycontrol.com/news/cnbc-tv18-comments/note-ban-impact-how-vidisha-farmerscoping_8058621.html\"],\"hash\":\"ef03827acaf965207c72d21905ecc804\",\"_fields_\":{\"channel\":\"latestnews\"},\"_labels_\":{\"channel\":\"Latest News\"},\"secretKey\":\"n-5bd95008-81be-56d1-9030-0eafbf36a10d\",\"contentType\":\"application/xml\",\"_last_run\":\"2016-12-02T16:50:45.363Z\"}",
"response": {
"channel": "default",
"body": "Note ban impact: How Vidisha farmers are coping
",
"updatedSessionStore": {
"EnterpriseContext": {},
"BotContext": {},
"UserContext": {},
"UserSession": {},
"BotUserSession": {}
}
}
}, {
"uxmap": {
"channel": "default",
"body": "<% var newLink = '' + title + '';\n print(newLink); %><%print(\"
\");%><% %>"
},
"payload": "{\"title\":[\"Mallya PMLA case: Court confirms Rs 1,411 attachment order\"],\"link\":[\"http://www.moneycontrol.com/news/business/mallya-pmla-case-court-confirms-rs-1411-attachment-order_8058581.html\"],\"description\":[\"
Union Minister Dharmendra Pradhan\\ntoday proposed a 2G Ethanol Plant in Bargarh district at an\\ninvestment of Rs 900 crore and suggested the Odisha government\\nto develop Paradip on the lines of Jurong island of Singapore.\"],\"pubDate\":[\"Fri, 02 Dec 2016 22:16:04 +0530\"],\"guid\":[\"http://www.moneycontrol.com/news/wire-news/pradhan-proposes-rs-900-crore-2g-ethanol-plantodisha_8058641.html\"],\"hash\":\"f7dbaed7ebe3d9cb5f265779bd969da6\",\"_fields_\":{\"channel\":\"latestnews\"},\"_labels_\":{\"channel\":\"Latest News\"},\"secretKey\":\"n-5bd95008-81be-56d1-9030-0eafbf36a10d\",\"contentType\":\"application/xml\",\"_last_run\":\"2016-12-02T16:50:45.363Z\"}",
"response": {
"channel": "default",
"body": "Pradhan proposes Rs 900 crore 2G Ethanol Plant in Odisha
",
"updatedSessionStore": {
"EnterpriseContext": {},
"BotContext": {},
"UserContext": {},
"UserSession": {},
"BotUserSession": {}
}
}
}, {
"uxmap": {
"channel": "default",
"body": "<% var newLink = '' + title + '';\n print(newLink); %><%print(\"
\");%><% %>"
},
"payload": "{\"title\":[\"Note ban impact: How Vidisha farmers are coping\"],\"link\":[\"http://www.moneycontrol.com/news/cnbc-tv18-comments/note-ban-impact-how-vidisha-farmerscoping_8058621.html\"],\"description\":[\" The government's decision to ban old Rs 500 and Rs 1000 notes has made life difficult for small famers. Trading is a hassle and life in the Madhya Pradesh town is almost at a standstill.\"],\"pubDate\":[\"Fri, 02 Dec 2016 22:14:01 +0530\"],\"guid\":[\"http://www.moneycontrol.com/news/cnbc-tv18-comments/note-ban-impact-how-vidisha-farmerscoping_8058621.html\"],\"hash\":\"ef03827acaf965207c72d21905ecc804\",\"_fields_\":{\"channel\":\"latestnews\"},\"_labels_\":{\"channel\":\"Latest News\"},\"secretKey\":\"n-5bd95008-81be-56d1-9030-0eafbf36a10d\",\"contentType\":\"application/xml\",\"_last_run\":\"2016-12-02T16:50:45.363Z\"}",
"response": {
"channel": "default",
"body": "Note ban impact: How Vidisha farmers are coping
",
"updatedSessionStore": {
"EnterpriseContext": {},
"BotContext": {},
"UserContext": {},
"UserSession": {},
"BotUserSession": {}
}
}
}, {
"uxmap": {
"channel": "default",
"body": "<% var newLink = '' + title + '';\n print(newLink); %><%print(\"
\");%><% %>"
},
"payload": "{\"title\":[\"Mallya PMLA case: Court confirms Rs 1,411 attachment order\"],\"link\":[\"http://www.moneycontrol.com/news/business/mallya-pmla-case-court-confirms-rs-1411-attachment-order_8058581.html\"],\"description\":[\" A special anti-money laundering\\r\\ncourt here has confirmed an attachment of assets order worth\\r\\nRs 1,411 crore issued by the ED against UBHL and others in\\r\\nconnection with its money laundering probe against liquor\\r\\nbaron Vijay Mallya and others.\"],\"pubDate\":[\"Fri, 02 Dec 2016 22:00:03 +0530\"],\"guid\":[\"http://www.moneycontrol.com/news/business/mallya-pmla-case-court-confirms-rs-1411-attachment-order_8058581.html\"],\"hash\":\"ca41e9749166e2c0b47191460289b6b3\",\"_fields_\":{\"channel\":\"latestnews\"},\"_labels_\":{\"channel\":\"Latest News\"},\"secretKey\":\"n-5bd95008-81be-56d1-9030-0eafbf36a10d\",\"contentType\":\"application/xml\",\"_last_run\":\"2016-12-02T16:50:45.363Z\"}",
"response": {
"channel": "default",
"body": "Mallya PMLA case: Court confirms Rs 1,411 attachment order
",
"updatedSessionStore": {
"EnterpriseContext": {},
"BotContext": {},
"UserContext": {},
"UserSession": {},
"BotUserSession": {}
}
}
}, {
"uxmap": {
"channel": "default",
"body": "<% var newLink = '' + title + '';\n print(newLink); %><%print(\"
\");%><% %>"
},
"payload": "{\"title\":[\"Cash crunch not a worry for grocery e-tailer BigBasket\"],\"link\":[\"http://www.moneycontrol.com/news/business/cash-crunch-notworry-for-grocery-e-tailer-bigbasket_8058601.html\"],\"description\":[\" While the demonetisation scheme is acting as a hurdle for many sectors, for BigBasket it is a blessing in disguise. The company has upped its revenue projection by 20 percent in the financial year 2017. \"],\"pubDate\":[\"Fri, 02 Dec 2016 22:13:12 +0530\"],\"guid\":[\"http://www.moneycontrol.com/news/business/cash-crunch-notworry-for-grocery-e-tailer-bigbasket_8058601.html\"],\"hash\":\"6f5635c0d5e19f73f8690859a4bd4f1d\",\"_fields_\":{\"channel\":\"latestnews\"},\"_labels_\":{\"channel\":\"Latest News\"},\"secretKey\":\"n-5bd95008-81be-56d1-9030-0eafbf36a10d\",\"contentType\":\"application/xml\",\"_last_run\":\"2016-12-02T16:50:45.363Z\"}",
"response": {
"channel": "default",
"body": "Cash crunch not a worry for grocery e-tailer BigBasket
",
"updatedSessionStore": {
"EnterpriseContext": {},
"BotContext": {},
"UserContext": {},
"UserSession": {},
"BotUserSession": {}
}
}
}]
}
A special anti-money laundering\\r\\ncourt here has confirmed an attachment of assets order worth\\r\\nRs 1,411 crore issued by the ED against UBHL and others in\\r\\nconnection with its money laundering probe against liquor\\r\\nbaron Vijay Mallya and others.\"],\"pubDate\":[\"Fri, 02 Dec 2016 22:00:03 +0530\"],\"guid\":[\"http://www.moneycontrol.com/news/business/mallya-pmla-case-court-confirms-rs-1411-attachment-order_8058581.html\"],\"hash\":\"ca41e9749166e2c0b47191460289b6b3\",\"_fields_\":{\"channel\":\"latestnews\"},\"_labels_\":{\"channel\":\"Latest News\"},\"secretKey\":\"n-5bd95008-81be-56d1-9030-0eafbf36a10d\",\"contentType\":\"application/xml\",\"_last_run\":\"2016-12-02T16:50:45.363Z\"}",
"response": {
"channel": "default",
"body": "Mallya PMLA case: Court confirms Rs 1,411 attachment order
",
"updatedSessionStore": {
"EnterpriseContext": {},
"BotContext": {},
"UserContext": {},
"UserSession": {},
"BotUserSession": {}
}
}
}, {
"uxmap": {
"channel": "default",
"body": "<% var newLink = '' + title + '';\n print(newLink); %><%print(\"
\");%><% %>"
},
"payload": "{\"title\":[\"Cash crunch not a worry for grocery e-tailer BigBasket\"],\"link\":[\"http://www.moneycontrol.com/news/business/cash-crunch-notworry-for-grocery-e-tailer-bigbasket_8058601.html\"],\"description\":[\" While the demonetisation scheme is acting as a hurdle for many sectors, for BigBasket it is a blessing in disguise. The company has upped its revenue projection by 20 percent in the financial year 2017. \"],\"pubDate\":[\"Fri, 02 Dec 2016 22:13:12 +0530\"],\"guid\":[\"http://www.moneycontrol.com/news/business/cash-crunch-notworry-for-grocery-e-tailer-bigbasket_8058601.html\"],\"hash\":\"6f5635c0d5e19f73f8690859a4bd4f1d\",\"_fields_\":{\"channel\":\"latestnews\"},\"_labels_\":{\"channel\":\"Latest News\"},\"secretKey\":\"n-5bd95008-81be-56d1-9030-0eafbf36a10d\",\"contentType\":\"application/xml\",\"_last_run\":\"2016-12-02T16:50:45.363Z\"}",
"response": {
"channel": "default",
"body": "Cash crunch not a worry for grocery e-tailer BigBasket
",
"updatedSessionStore": {
"EnterpriseContext": {},
"BotContext": {},
"UserContext": {},
"UserSession": {},
"BotUserSession": {}
}
}
}]
}
 Union Minister Dharmendra Pradhan\\ntoday proposed a 2G Ethanol Plant in Bargarh district at an\\ninvestment of Rs 900 crore and suggested the Odisha government\\nto develop Paradip on the lines of Jurong island of Singapore.\"],\"pubDate\":[\"Fri, 02 Dec 2016 22:16:04 +0530\"],\"guid\":[\"http://www.moneycontrol.com/news/wire-news/pradhan-proposes-rs-900-crore-2g-ethanol-plantodisha_8058641.html\"],\"hash\":\"f7dbaed7ebe3d9cb5f265779bd969da6\",\"_fields_\":{\"channel\":\"latestnews\"},\"_labels_\":{\"channel\":\"Latest News\"},\"secretKey\":\"n-5bd95008-81be-56d1-9030-0eafbf36a10d\",\"contentType\":\"application/xml\",\"_last_run\":\"2016-12-02T16:50:45.363Z\"}",
"response": {
"channel": "default",
"body": "Pradhan proposes Rs 900 crore 2G Ethanol Plant in Odisha
",
"updatedSessionStore": {
"EnterpriseContext": {},
"BotContext": {},
"UserContext": {},
"UserSession": {},
"BotUserSession": {}
}
}
}, {
"uxmap": {
"channel": "default",
"body": "<% var newLink = '' + title + '';\n print(newLink); %><%print(\"
\");%><% %>"
},
"payload": "{\"title\":[\"Note ban impact: How Vidisha farmers are coping\"],\"link\":[\"http://www.moneycontrol.com/news/cnbc-tv18-comments/note-ban-impact-how-vidisha-farmerscoping_8058621.html\"],\"description\":[\" The government's decision to ban old Rs 500 and Rs 1000 notes has made life difficult for small famers. Trading is a hassle and life in the Madhya Pradesh town is almost at a standstill.\"],\"pubDate\":[\"Fri, 02 Dec 2016 22:14:01 +0530\"],\"guid\":[\"http://www.moneycontrol.com/news/cnbc-tv18-comments/note-ban-impact-how-vidisha-farmerscoping_8058621.html\"],\"hash\":\"ef03827acaf965207c72d21905ecc804\",\"_fields_\":{\"channel\":\"latestnews\"},\"_labels_\":{\"channel\":\"Latest News\"},\"secretKey\":\"n-5bd95008-81be-56d1-9030-0eafbf36a10d\",\"contentType\":\"application/xml\",\"_last_run\":\"2016-12-02T16:50:45.363Z\"}",
"response": {
"channel": "default",
"body": "Note ban impact: How Vidisha farmers are coping
",
"updatedSessionStore": {
"EnterpriseContext": {},
"BotContext": {},
"UserContext": {},
"UserSession": {},
"BotUserSession": {}
}
}
}, {
"uxmap": {
"channel": "default",
"body": "<% var newLink = '
Union Minister Dharmendra Pradhan\\ntoday proposed a 2G Ethanol Plant in Bargarh district at an\\ninvestment of Rs 900 crore and suggested the Odisha government\\nto develop Paradip on the lines of Jurong island of Singapore.\"],\"pubDate\":[\"Fri, 02 Dec 2016 22:16:04 +0530\"],\"guid\":[\"http://www.moneycontrol.com/news/wire-news/pradhan-proposes-rs-900-crore-2g-ethanol-plantodisha_8058641.html\"],\"hash\":\"f7dbaed7ebe3d9cb5f265779bd969da6\",\"_fields_\":{\"channel\":\"latestnews\"},\"_labels_\":{\"channel\":\"Latest News\"},\"secretKey\":\"n-5bd95008-81be-56d1-9030-0eafbf36a10d\",\"contentType\":\"application/xml\",\"_last_run\":\"2016-12-02T16:50:45.363Z\"}",
"response": {
"channel": "default",
"body": "Pradhan proposes Rs 900 crore 2G Ethanol Plant in Odisha
",
"updatedSessionStore": {
"EnterpriseContext": {},
"BotContext": {},
"UserContext": {},
"UserSession": {},
"BotUserSession": {}
}
}
}, {
"uxmap": {
"channel": "default",
"body": "<% var newLink = '' + title + '';\n print(newLink); %><%print(\"
\");%><% %>"
},
"payload": "{\"title\":[\"Note ban impact: How Vidisha farmers are coping\"],\"link\":[\"http://www.moneycontrol.com/news/cnbc-tv18-comments/note-ban-impact-how-vidisha-farmerscoping_8058621.html\"],\"description\":[\" The government's decision to ban old Rs 500 and Rs 1000 notes has made life difficult for small famers. Trading is a hassle and life in the Madhya Pradesh town is almost at a standstill.\"],\"pubDate\":[\"Fri, 02 Dec 2016 22:14:01 +0530\"],\"guid\":[\"http://www.moneycontrol.com/news/cnbc-tv18-comments/note-ban-impact-how-vidisha-farmerscoping_8058621.html\"],\"hash\":\"ef03827acaf965207c72d21905ecc804\",\"_fields_\":{\"channel\":\"latestnews\"},\"_labels_\":{\"channel\":\"Latest News\"},\"secretKey\":\"n-5bd95008-81be-56d1-9030-0eafbf36a10d\",\"contentType\":\"application/xml\",\"_last_run\":\"2016-12-02T16:50:45.363Z\"}",
"response": {
"channel": "default",
"body": "Note ban impact: How Vidisha farmers are coping
",
"updatedSessionStore": {
"EnterpriseContext": {},
"BotContext": {},
"UserContext": {},
"UserSession": {},
"BotUserSession": {}
}
}
}, {
"uxmap": {
"channel": "default",
"body": "<% var newLink = ' A special anti-money laundering\\r\\ncourt here has confirmed an attachment of assets order worth\\r\\nRs 1,411 crore issued by the ED against UBHL and others in\\r\\nconnection with its money laundering probe against liquor\\r\\nbaron Vijay Mallya and others.\"],\"pubDate\":[\"Fri, 02 Dec 2016 22:00:03 +0530\"],\"guid\":[\"http://www.moneycontrol.com/news/business/mallya-pmla-case-court-confirms-rs-1411-attachment-order_8058581.html\"],\"hash\":\"ca41e9749166e2c0b47191460289b6b3\",\"_fields_\":{\"channel\":\"latestnews\"},\"_labels_\":{\"channel\":\"Latest News\"},\"secretKey\":\"n-5bd95008-81be-56d1-9030-0eafbf36a10d\",\"contentType\":\"application/xml\",\"_last_run\":\"2016-12-02T16:50:45.363Z\"}",
"response": {
"channel": "default",
"body": "Mallya PMLA case: Court confirms Rs 1,411 attachment order
",
"updatedSessionStore": {
"EnterpriseContext": {},
"BotContext": {},
"UserContext": {},
"UserSession": {},
"BotUserSession": {}
}
}
}, {
"uxmap": {
"channel": "default",
"body": "<% var newLink = '' + title + '';\n print(newLink); %><%print(\"
\");%><% %>"
},
"payload": "{\"title\":[\"Cash crunch not a worry for grocery e-tailer BigBasket\"],\"link\":[\"http://www.moneycontrol.com/news/business/cash-crunch-notworry-for-grocery-e-tailer-bigbasket_8058601.html\"],\"description\":[\" While the demonetisation scheme is acting as a hurdle for many sectors, for BigBasket it is a blessing in disguise. The company has upped its revenue projection by 20 percent in the financial year 2017. \"],\"pubDate\":[\"Fri, 02 Dec 2016 22:13:12 +0530\"],\"guid\":[\"http://www.moneycontrol.com/news/business/cash-crunch-notworry-for-grocery-e-tailer-bigbasket_8058601.html\"],\"hash\":\"6f5635c0d5e19f73f8690859a4bd4f1d\",\"_fields_\":{\"channel\":\"latestnews\"},\"_labels_\":{\"channel\":\"Latest News\"},\"secretKey\":\"n-5bd95008-81be-56d1-9030-0eafbf36a10d\",\"contentType\":\"application/xml\",\"_last_run\":\"2016-12-02T16:50:45.363Z\"}",
"response": {
"channel": "default",
"body": "Cash crunch not a worry for grocery e-tailer BigBasket
",
"updatedSessionStore": {
"EnterpriseContext": {},
"BotContext": {},
"UserContext": {},
"UserSession": {},
"BotUserSession": {}
}
}
}]
}
A special anti-money laundering\\r\\ncourt here has confirmed an attachment of assets order worth\\r\\nRs 1,411 crore issued by the ED against UBHL and others in\\r\\nconnection with its money laundering probe against liquor\\r\\nbaron Vijay Mallya and others.\"],\"pubDate\":[\"Fri, 02 Dec 2016 22:00:03 +0530\"],\"guid\":[\"http://www.moneycontrol.com/news/business/mallya-pmla-case-court-confirms-rs-1411-attachment-order_8058581.html\"],\"hash\":\"ca41e9749166e2c0b47191460289b6b3\",\"_fields_\":{\"channel\":\"latestnews\"},\"_labels_\":{\"channel\":\"Latest News\"},\"secretKey\":\"n-5bd95008-81be-56d1-9030-0eafbf36a10d\",\"contentType\":\"application/xml\",\"_last_run\":\"2016-12-02T16:50:45.363Z\"}",
"response": {
"channel": "default",
"body": "Mallya PMLA case: Court confirms Rs 1,411 attachment order
",
"updatedSessionStore": {
"EnterpriseContext": {},
"BotContext": {},
"UserContext": {},
"UserSession": {},
"BotUserSession": {}
}
}
}, {
"uxmap": {
"channel": "default",
"body": "<% var newLink = '' + title + '';\n print(newLink); %><%print(\"
\");%><% %>"
},
"payload": "{\"title\":[\"Cash crunch not a worry for grocery e-tailer BigBasket\"],\"link\":[\"http://www.moneycontrol.com/news/business/cash-crunch-notworry-for-grocery-e-tailer-bigbasket_8058601.html\"],\"description\":[\" While the demonetisation scheme is acting as a hurdle for many sectors, for BigBasket it is a blessing in disguise. The company has upped its revenue projection by 20 percent in the financial year 2017. \"],\"pubDate\":[\"Fri, 02 Dec 2016 22:13:12 +0530\"],\"guid\":[\"http://www.moneycontrol.com/news/business/cash-crunch-notworry-for-grocery-e-tailer-bigbasket_8058601.html\"],\"hash\":\"6f5635c0d5e19f73f8690859a4bd4f1d\",\"_fields_\":{\"channel\":\"latestnews\"},\"_labels_\":{\"channel\":\"Latest News\"},\"secretKey\":\"n-5bd95008-81be-56d1-9030-0eafbf36a10d\",\"contentType\":\"application/xml\",\"_last_run\":\"2016-12-02T16:50:45.363Z\"}",
"response": {
"channel": "default",
"body": "Cash crunch not a worry for grocery e-tailer BigBasket
",
"updatedSessionStore": {
"EnterpriseContext": {},
"BotContext": {},
"UserContext": {},
"UserSession": {},
"BotUserSession": {}
}
}
}]
}