
One of the frequently asked questions is how to transfer a chat to a human agent from the Bot. This is especially necessary if your bot is in the space of customer service. Chatbots are not meant to completely replace humans. Many times chatbot will fail to answer satisfactorily or user would just want to talk/chat to a human from the beginning. When this happens the chatbot should transfer the chats to a human agent or a customer care representative. But how to achieve that?
In this article, we will give an overview of how we can integrate a live chat into our bot using Kore.ai Agent Transfer. The source code for the Agent Transfer is available at Kore.ai github repo: https://github.com/Koredotcom/BotKit
Overview
Our Bot would be the central piece to the entire solution. Apart from performing all its normal functionality, our bot would also act as a proxy between user and agent.
- Bot: Chat Bot that the Users interact.
- Users: Users are the customers who would be using this Bot.
- Agent: Agents are humans who would chat with the users. Agent will also need a chat window. For this we will use liveperson/livechat software.
Prerequisites
- A fully functional Bot (we will be using a Banking Bot).
- Download BotKit SDK from Kore’s github
- Download and Install the Node.js. The BotKit SDK requires node.js to run on the same server where the SDK is installed.
- Go to
https://nodejs.org/en/download/and select your OS as a .pkg file type for Mac and .msi file type for Windows. - In a Terminal window, run the
node -vcommand to verify installation and version, for example, v6.10.2.
- Go to
- A test callback server application. We will be using NGROK from https://dl.equinox.io/ngrok/ngrok/stable to simulate the callback server application. Following are the steps to install NGROK:
- Open https://dl.equinox.io/ngrok/ngrok/stable.
- Download and install the ngrok file for your operating system.
- Downloading NGROK on Windows:
- Download the zip file for your Windows machine 32-bit or 64-bit
- Unzip and run the
ngrok.exefile to install ngrok.
- Downloading NGROK on mac:
- Press
Command+Spaceand type Terminal and press enter/return key. - Run in Terminal app:
ruby -e "$(curl -fsSL https://raw.githubusercontent.com/Homebrew/install/master/install)" < /dev/null 2> /dev/nulland press enter/return key.
If the screen prompts you to enter a password, please enter your Mac’s user password to continue. When you type the password, it won’t be displayed on the screen, but the system would accept it. So just type your password and press ENTER/RETURN key. Then wait for the command to finish. - Run
brew cask install ngrok
- Press
- Downloading NGROK on Windows:
- A live agent software. We will be using LiveChatInc.com. You can use your own LiveChat subscription or set up a free 30-day trial account at LiveChatInc.com by entering your business email in the Start using LiveChat now!. Sign up and create an account.
Design and Configuration
- As a Bot developer, open Kore.ai Bot Builder – https://bots.kore.ai/botbuilder
- Select the Bot for which Agent Transfer needs to be configured.
- Open or create a dialog task (Support Call Back) and add an Agent transfer node.
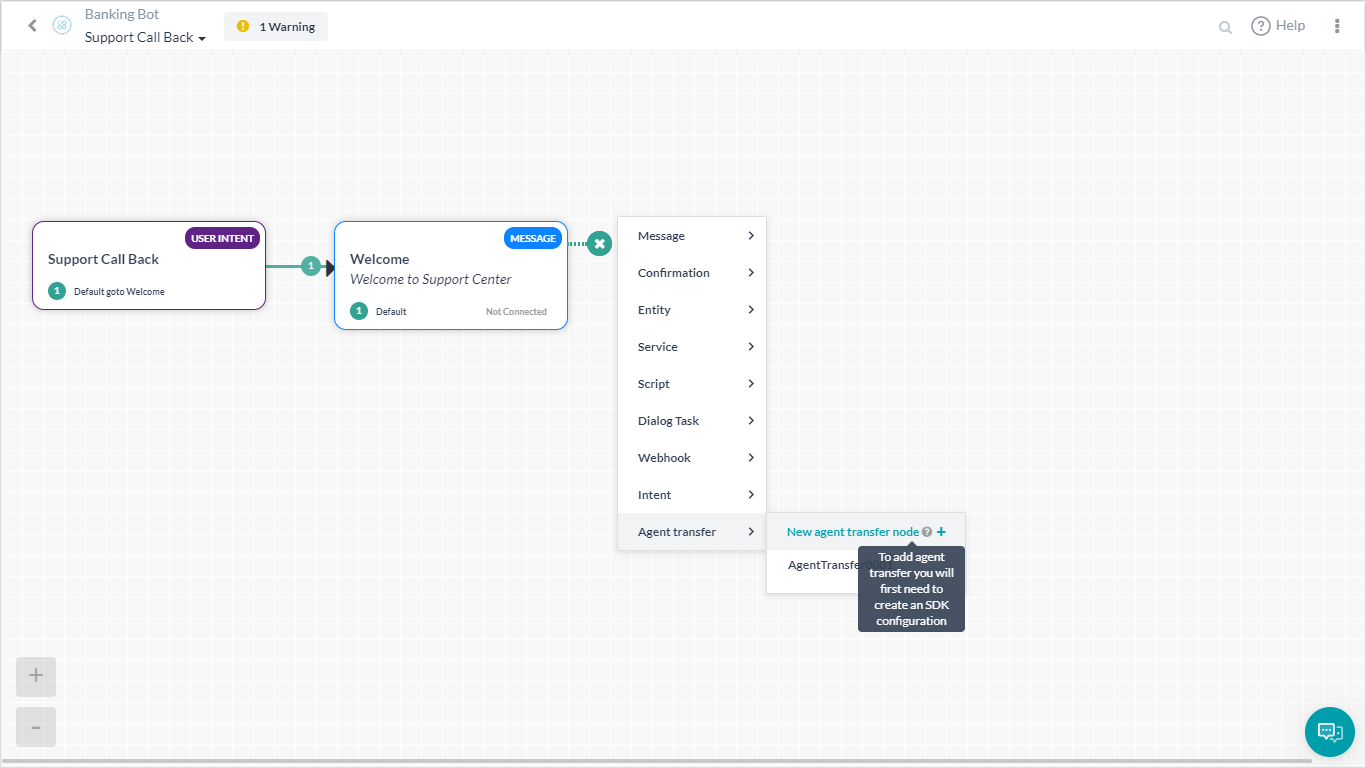
- Enter a Name (LiveChat) and Description and Save.
- You will see a message ‘SDK is not currently configured/Subscribed. Please go to API Extensions to configure the SDK.’. For now ignore this message as we will be showing how to configure SDK, later in this article.
- From the Bot Builder screen traverse to API Extensions -> Agent Transfer
- In the App Name section, select an existing app from the list or use the Create App option to create a new app.
- Make a note of the Bot ID, Client ID and Client Secret keys.
- Enter the Callback URL of your application, to be invoked by BotKIt SDK events. Since we are using NGROK, we will show how to obtain the callback URL:
- In a Terminal Window, start ngrok to monitor port 8003 using the following command:
ngrok http 8003. - Copy ngrok forwarding URL. It will be in the format –
http://XXXXXXaa.ngrok.io

- Use this forwarding URL as the call back URL and save.
Note: The forwarding URL changes whenever the ngrok is restarted. Make sure you make the changes to the callback URL every time ngrok is restarted.
- In a Terminal Window, start ngrok to monitor port 8003 using the following command:
- The agent transfer is configured at the dialog level. You can open the dialog task, and open agent transfer node to see that the configuration is saved as shown below. You can select the Events required (see below for details)

- Install any live agent software eg Livechat, Liveperson, Concentrix, Vayusphere etc depending on your enterprise requirement and license availability. Since we are using LiveChat, we will should you how to obtain the license details needed for Agent Transfer:
- Sign in to your LiveChat account.
- Go to Settings from the left navigation and select chat link.
- Copy the URL and note the license code. If the URL is
https://lc.chat/now/104xx297/and then the license code is104xx297
- Open the downloaded BotKit SDK folder and do the following:
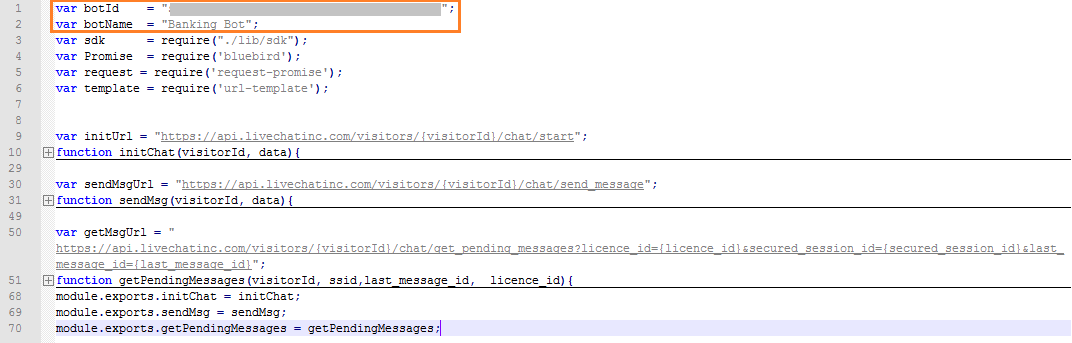
- Edit
livechatapi.js:- Give the respective botId and botName of your bot, which you have copied earlier.
- This JS file contains 3 API’s of Kore – Initialization, Send Message, Get Message. If required, any new API’s written for human agent transfer should be put in here.
Example: If closing connection is required, then close connection api written needs to go into livechatapi.js
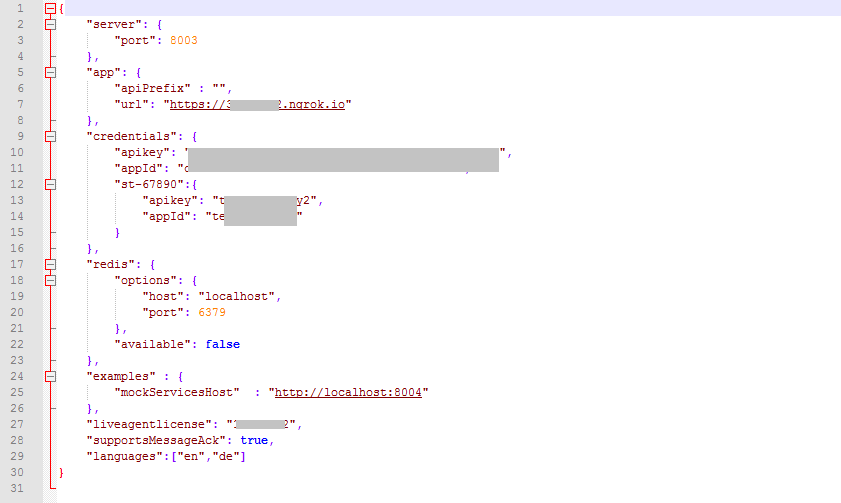
- Edit
config.json- Client ID, Client Secret key, respective server ports running and liveagent license of the third-party server goes here.
- Client Id, Client Secret can be copied from Events and Extensions – Agent Transfer.
- ngrok forwarding url can be copied from ngrok running instance. It is the call back url. This should be the URL entry.
- Liveagentlicense is the code given in the chatlink of livechat
- Edit
LiveChat.js- Give the respective botId and botName of your bot, which you have copied earlier and save
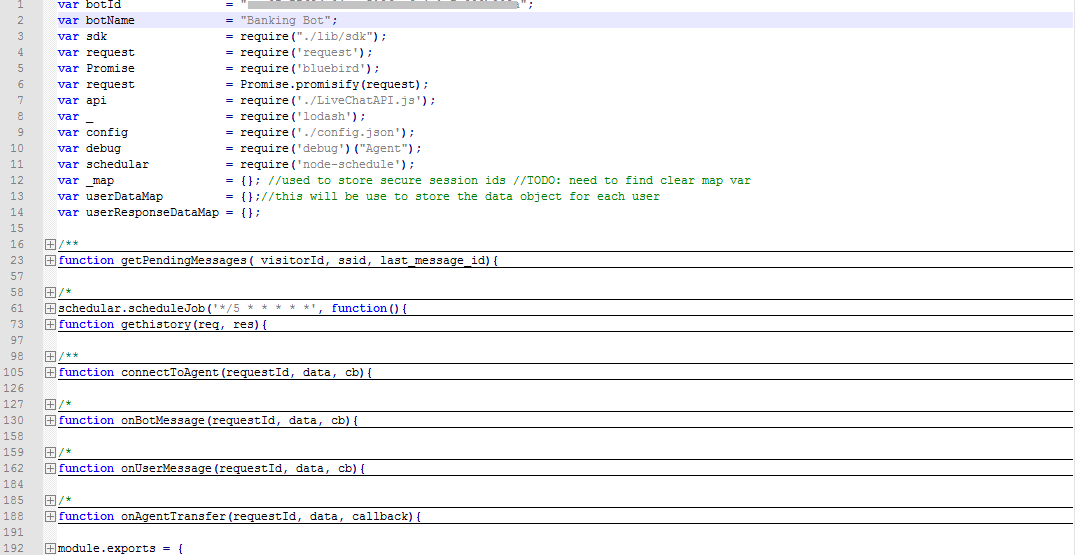
- Give the respective botId and botName of your bot, which you have copied earlier and save
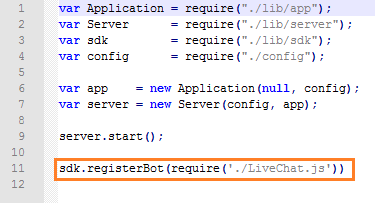
- Edit app.js
- Add the following line
sdk.registerBot(require('./LiveChat.js')) - Delete any existing sdk.registerBot statements, if not needed
- Add the following line
- Edit
Execution
- Open a terminal window and run the BotKit SDK by entering the command:
node app.js - Please make sure to install all the missing modules for running the server successfully without any errors as shown below.
Example, if error “method url-template, node-schedule are missing” is shown, then install the above modules using command
npm install <module-name>for windows,sudo npm install <module-name>for mac - ngrok and node.js server will be running in different terminals.
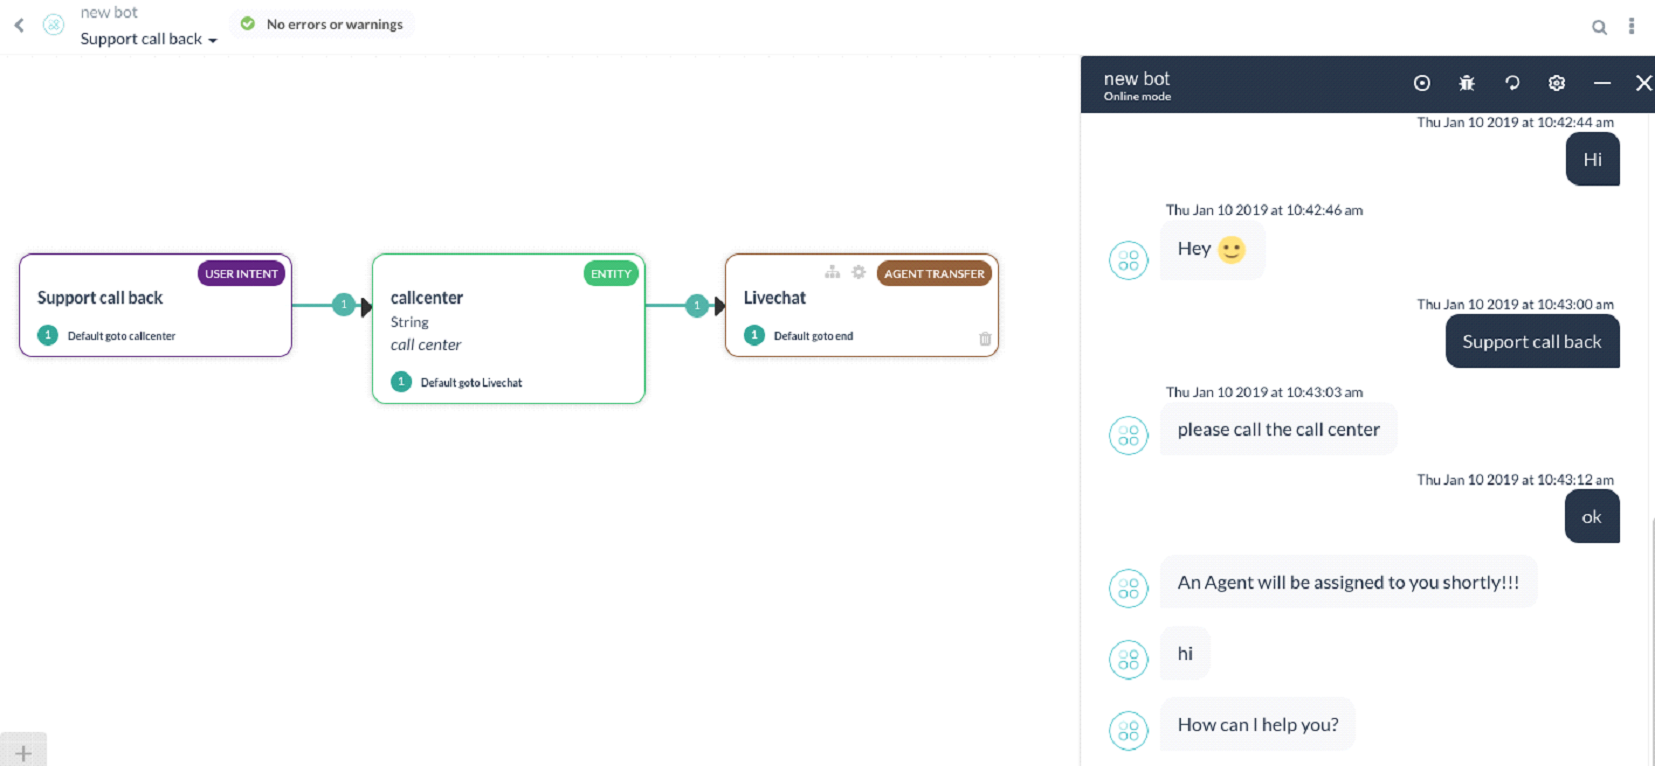
- When user initiates the chat from the bot, bot transfers the call to an agent and sends a message to the user
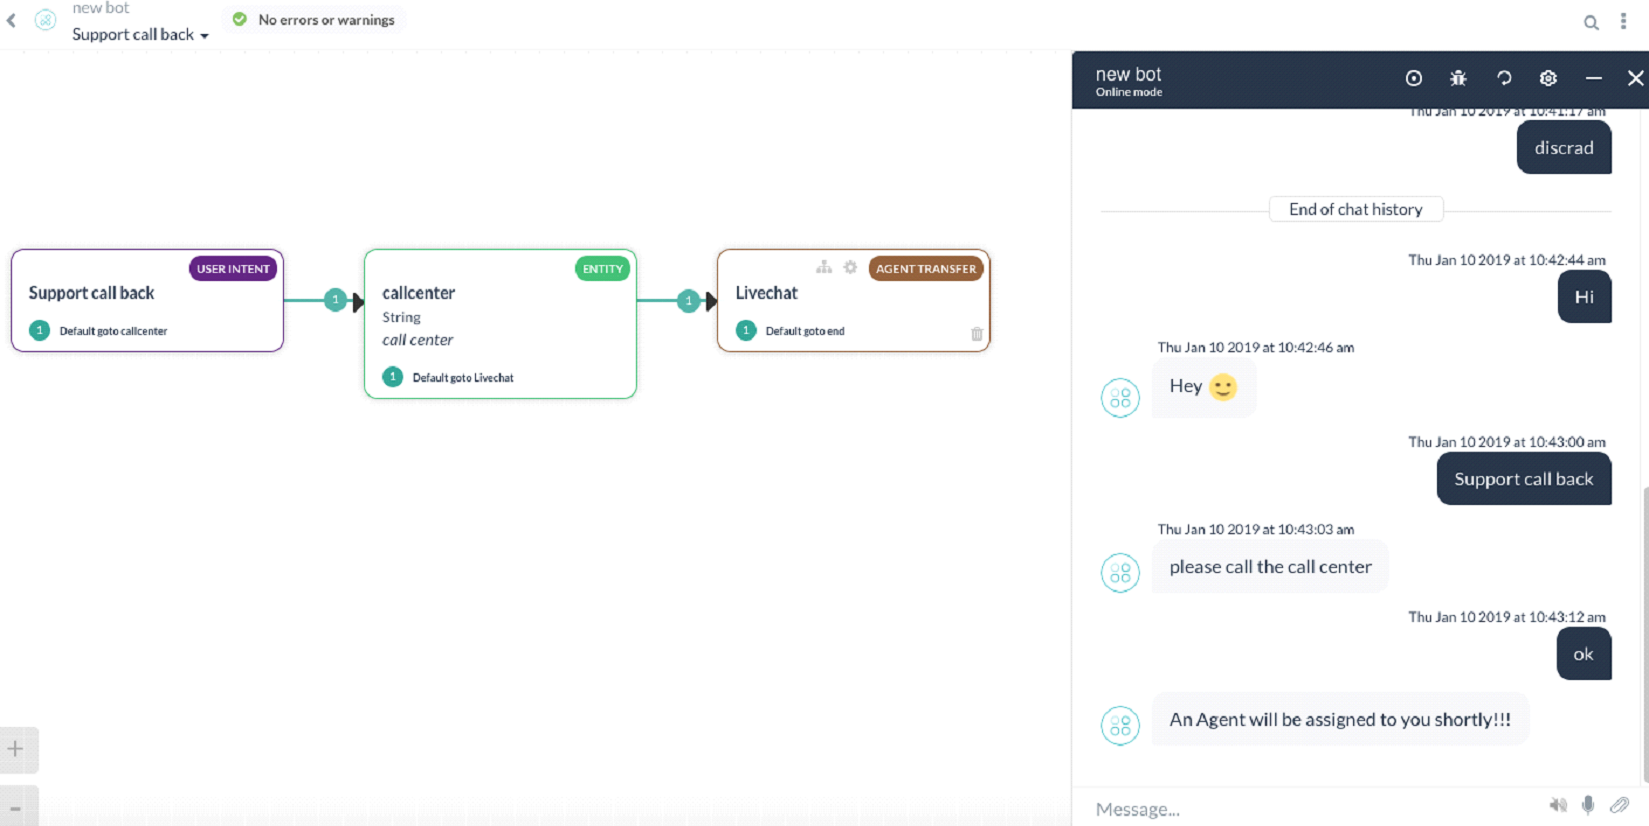
- Agent receives a notification about this on the livechat
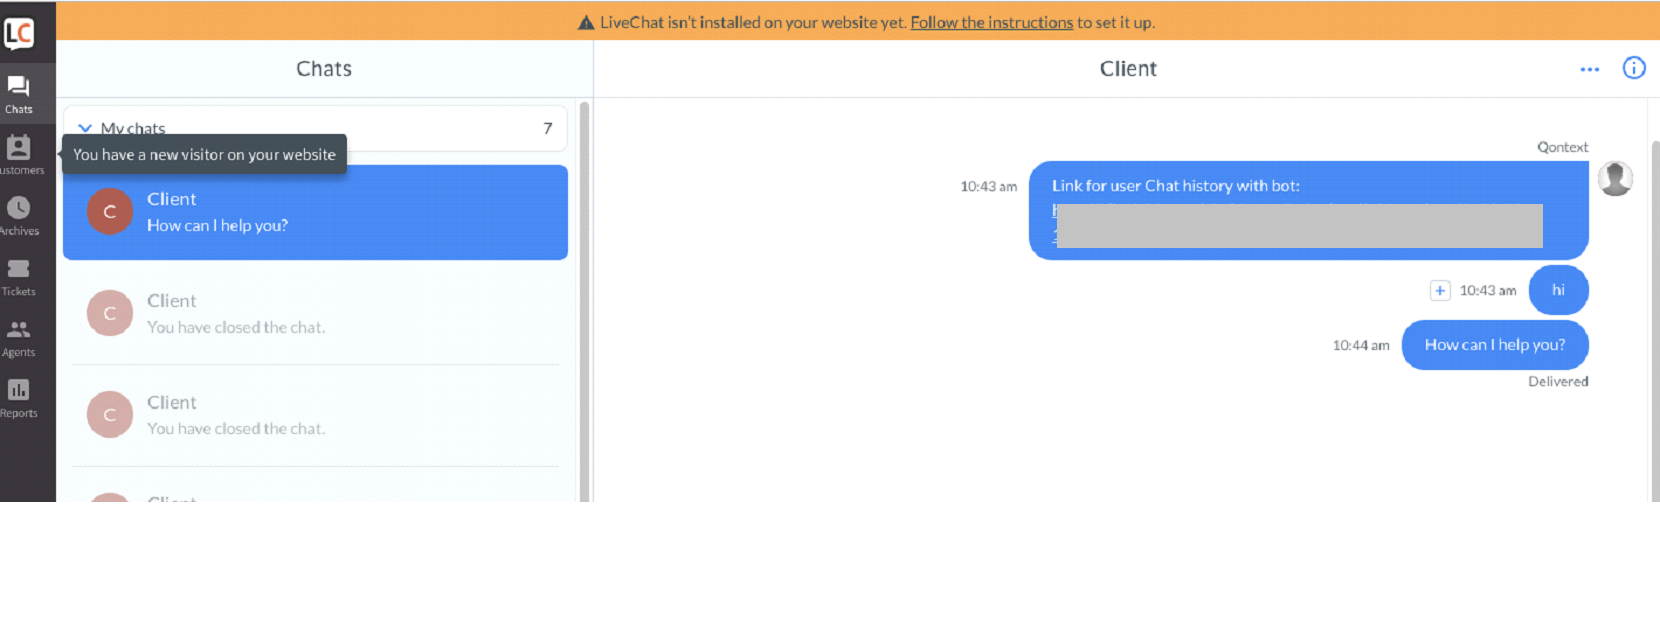
- Now connection between agent and the user has been established and the conversation continues.
Events
Note: The events and methods required for sending messages from User, bot and transferring to Agent are outlined in LiveChat.JS
- on_user_message event is triggered when a user sends a message and this message is sent to the bot using sendBotMessage method.
- on_bot_message is triggered when bot sends a message and this message is sent to the user using SendUserMessage method.
- on_agent_transfer event is triggered when the service agentTransfer node is triggered in bot. And this event connects to the agent using connectToAgent method, which internally calls initChat API
- gethistory method, gives the chat history of the user with the bot to the transferred agent
- scheduleJob is run for every 5 secs and it polls for the pending messages from the Agent, which internally calls getPendingMessages
- getPendingMessages gets all the pending messages from Agent and delivers it to the User
- chat_closed gets triggered when the agent closes the chat with the user.