Chatbot Overview
Conversational Bots
Intents & Entities
Intelligent Bots
Kore.ai's Approach
Kore.ai Conversational Platform
Bot Concepts and Terminology
Natural Language Processing (NLP)
Bot Types
Bot Tasks
Starting with Kore.ai Platform
How to Access Bot Builder
Working with Kore.ai Bot Builder
Building your first Bot
Getting Started with Building Bots
Using the Dialog Builder Tool
Creating a Simple Bot
Release Notes
Latest Updates
Older Releases
Bot Builder
Creating a Bot
Design
Develop
Storyboard
Dialog Task
User Intent Node
Dialog Node
Entity Node
Supported Entity Types
Composite Entities
Supported Time Zones
Supported Colors
Supported Company Names
Message Nodes
Confirmation Nodes
Service Node
Custom Authentication
2-way SSL for Service nodes
Script Node
Agent Transfer Node
WebHook Node
Connections & Transitions
Managing Dialogs
Prompt Editor
Alert Tasks
Alert Tasks
Ignore Words and Field Memory
Digital Views
Knowledge Graph
Terminology
Building
Generation
Importing and Exporting
Analysis
Knowledge Extraction
Small Talk
Action & Information Task
Action Tasks
Information Tasks
Establishing Flows
Natural Language
Overview
Machine Learning
ML Model
Fundamental Meaning
NLP Settings and Guidelines
Knowledge Graph Training
Traits
Ranking and Resolver
NLP Detection
Bot Intelligence
Overview
Context Management
Session and Context Variables
Context Object
Dialog Management
Sub-Intents
Amend Entity
Multi-Intent Detection
Sentiment Management
Tone Analysis
Sentiment Management
Default Conversations
Default Standard Responses
Channel Enablement
Test & Debug
Talk to Bot
Utterance Testing
Batch Testing
Record Conversations
Publishing your Bot
Analyzing your Bot
Overview
Dashboard
Custom Dashboard
Conversation Flows
Bot Metrics
Advanced Topics
Bot Authorization
Language Management
Collaborative Development
IVR Integration
koreUtil Libraries
Universal Bots
Defining
Creating
Customizing
Enabling Languages
Smart Bots
Defining
Sample Bots
Github
Asana
Travel Planning
Flight Search
Event Based Bot Actions
Bot Settings
Bot Functions
General Settings
PII Settings
Customizing Error Messages
Bot Management
Using Bot Variables
API Guide
API Overview
API List
API Collection
SDKs
SDK Overview
SDK Security
SDK App Registration
Web SDK Tutorial
Message Formatting and Templates
Mobile SDK Push Notification
Widget SDK Tutorial
Widget SDK – Message Formatting and Templates
Web Socket Connect & RTM
Using the BotKit SDK
Installing
Configuring
Events
Functions
BotKit SDK Tutorial – Agent Transfer
BotKit SDK Tutorial – Flight Search Sample Bot
Using an External NLP Engine
Bot Administration
Bots Admin Console
Dashboard
User Management
Managing Users
Managing Groups
Managing Role
Bots Management
Enrollment
Inviting Users
Bulk Invites
Importing Users
Synchronizing Users from AD
Security & Compliance
Using Single Sign-On
Security Settings
Cloud Connector
Analytics
Billing
How Tos
Creating a Simple Bot
Creating a Banking Bot
Transfer Funds Task
Update Balance Task
Context Switching
Using Traits
Schedule a Smart Alert
Configuring Digital Views
Custom Dashboard
Custom Tags to filter Bot Metrics
Patterns for Intents & Entities
Build Knowledge Graph
Global Variables
Content Variables
Using Bot Functions
Configure Agent Transfer
  1. Home
  2. Docs
  3. Bots
  4. Bot Building
  5. Dialog Task
  6. Working with the Agent Transfer Node

Working with the Agent Transfer Node

The Agent Transfer node transfers the communications from the bot to a live agent. You can use Agent Transfer node in a conditional dialog flow to move a user to a conversation with a live agent when, for example, the Bot cannot identify the user intent, or when tone analysis indicates the user is not satisfied with the bot communication, or on manual request by a user.
When a user is transferred using the Agent Transfer node, the Dialog task ends and the agent controls the remaining portion of the conversation. The Bots Platform supports integration with FreshDesk using the Agent Transfer node.

Before you Begin: Registering the App

To configure an Agent Transfer node in your Dialog task, you need to create an app and generate registration credentials using the Kore.ai SDK. These credentials are required to exchange messages between your application and the Kore.ai Bots Platform.

Follow these steps to do so:

  1. Hover over the side-navigation panel of the bot, and click API Extensions. The BotKit SDK tab opens by default.
  2. Click Agent Transfer.
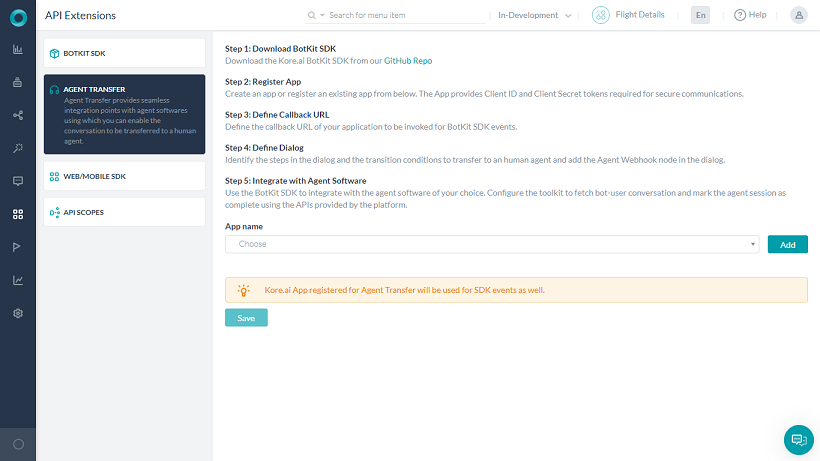
  3. On the Agent Transfer page, click the Add button next to the App Name drop-down list. The Create App dialog opens.
  4. In the App Name field, enter the name of the app registration, for example, SDK App, and then click Next.
  5. The Client ID and Client Secret are generated along with the App Created Successfully message.
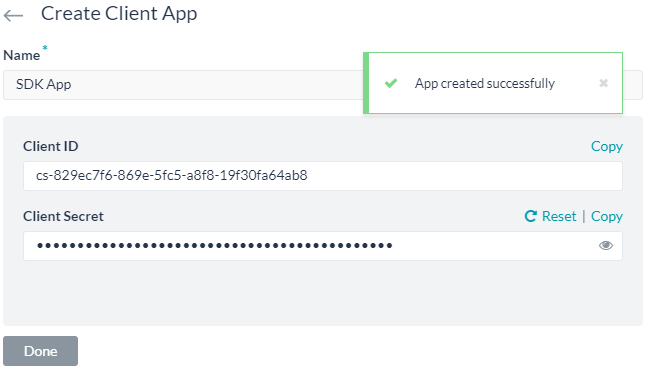
  6. Click Done. Additional configuration fields appear.
  7. In the Callback URL field displayed, enter the URL for your application that you want Kore.ai to push data to, for example, https://koremessenger.com/postURL.
  8. Define how sensitive information should be handled. If there is a need to share unmasked data when an Agent session is in progress, even when PII redaction is enabled, select the “Do not mask and send original data to Agent BotKit“. Else go with the default setting of “Mask and send sensitive data to Agent BotKit
  9. Indicate if your URL is behind a firewall and a Connector has to be used.

Setting up the Agent Transfer Node

Setting up an Agent Transfer node in a Dialog task involves the following steps:

  1. Open the Dialog task in which you want to add the Agent Transfer node.
  2. Hover over a node next to which you want to add the node, and click the plus icon on it.
  3. Click the Plus icon that appears after the node, and then select Agent Transfer > New agent transfer node.
  4. The Component Properties panel for the entity opens.
  5. Enter a name for the node, for example, LiveAgent.
  6. The other settings are auto-filled based on your Agent Transfer SDK configuration. Got to  API Extensions for modifying any settings.
Menu