A Script Node allows you to write JavaScript code in a dialog task.
You can use the Script node to perform the following actions:
- Manipulate user input parameters before executing an API call.
- Manipulate the parameters from an API response payload before continuing with the dialog.
- Display custom error messages to the user.
- Make decisions based on complex business rules.
When you test a dialog in the Kore.ai XO Platform, Script node errors are displayed in the Error in Script Node dialog with the line number and column number, along with the associated Context object. You can update and test the script directly in the Error in Script Node dialog as shown in the following illustration.
Set up a Script Node
Setting up a Script node in a dialog task involves the following steps:
Set-Up
Setting up a script node in a dialog task involves the following steps:
Note: Post v9.0 of the platform, the Script node is categorized under the VA Action node. For details on the VA Action node, click here.
Add Node
- Open the dialog task to add the Script node.
- Add the script node in the designated place. For steps in adding nodes, refer here.
- The Script window is displayed with the Component Properties tab selected by default.
- You can configure the Connection Properties, refer here for details.
Configure Node
Component Properties
Note: The configurations you set up or edit in these sections reflect in all other dialog tasks that use this node.
- On the Component Properties tab, under the General Settings section, enter a Name and Display Name for the script node. Node names cannot have spaces.
- Under the Script Definition section, click Define Script to add JavaScript.
- On the Add Script dialog box, enter your JavaScript; then click Save. See below for JavaScript code examples.
- In the Variable Namespaces section, associate the variable namespaces to execute this node and its transitions. This option is visible only when the variable namespace is enabled for the VA. You can go with the task level settings or customize it for this node. For more information, refer to Managing Namespace.
JavaScript Examples
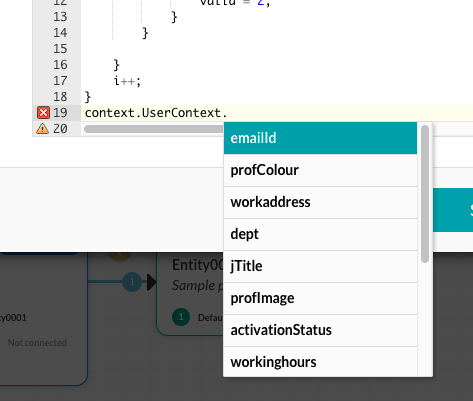
Using JavaScript, you can customize your dialog task by processing data before or after an API call. For example, directing the dialog task flow. You can use the Context object type-ahead feature to identify and select dynamic variables as shown in the following illustration. For more information, refer to Context Object.
Manipulating Data
In JavaScript, you can fetch data from the session data using session variables. For example, you can GET the user ID using context.session.UserContext.identities, and then PUT the data into context as shown in the following example.
var x = context.session.UserContext.identities;
var isEmailFound = false;
for (var i = 0; i < x.length; i++) {
    if (x[i].type === "mapped") {
        var identity = x[i].val;
        var arr = identity.split("/");
        var pattern = /^cs/i;
        var result = arr[0].match(pattern);
        if (result) {
            isEmailFound = true;
            context.UserSession.put("rtmEmail", arr[1], '20000');
        }
    }
}
...
For more information, refer to Using Session and Context Variables in Tasks.
Handling Conditions
The following code example returns the customer ID using a Context object variable from the Service node response body when the ID is not provided in the data.results
var data = context.getcontactsService.response.body;
if (data & amp; & amp; typeof(data.results) != 'undefined') {
 context.customerID = data.results.customerId;
} else {
 context.customerID = context.Usersession.customerID;
}
Handling Flow
The next Script node code example validates the bank transfer amount that does not exceed limits for the type of account selected using Context object variables.
var valid = 0;
var i = 0;
while (context.accdata.length - i) {
 if (context.accdata[i].accountType == context.entities.FromAccountName) {
  if ((context.accdata[i].amount - context.entities.Amount) < 0) { valid = 3; } else { if (context.entities.Amount > context.accdata[i].transferLimit) {
    valid = 0;
   } else {
    valid = 2;
   }
  }
 }
 i++;
}
context.canProceed = valid;