Bot variables help you capture values that are commonly used by different tasks, nodes, and other bot elements. You can configure a bot variable as a key-value pair once in the bot settings and substitute key with value at runtime during the conversation flow.
By capturing frequently used values in a single place, bot variables provide the advantages of reusability and consistency.
For example, let’s say you are testing a flight booking bot using a staging endpoint. If you configure the endpoint as a variable, it helps you to call the API from several places quickly. When you want to change the staging endpoint to production while publishing the bot, it is easy.
Similarly, variables can be used to externalize content for messages and prompts from the dialog flow definition.
Kore.ai platform allows bot developers to define two types of variables – Environment and Content.
Environment Variables
(Previously called Global Variables)
Environment variables are a primary type of bot variables where you define a key-value pair and use the variable across the bot. As the variables are declared globally, they can be used at any point in the bot configuration.
Some of the typical use-cases where a developer can use environment variables are:
- To manage the bot across environments having different endpoint URLs. The bot can be exported and imported based on the environment, and the infrastructure team will need to modify only the variable configuration file.
- To define and manage the bot response that is repeated within the bot configuration as variables.
- Authorization Token
- Channel-related tokens and URLs
Post the release of v8.1 of the platform, for on-prem installations, multiple value sets can be stored for these environment variables using Collections, refer here for more.
Content Variables
Bot building essentially requires extensive content management efforts. When it comes to multi-language bots, it also involves tedious coordination efforts between the developers and globally-distributed content authors or copyright team.
Content variables enable you to overcome that by abstracting bot flow development efforts from authoring or editing the content. Using Content Variables, programmers can avoid hard-coding the bot content, such as prompts, messages, or any data presented to the user, into bot components, and instead point to specific variables in centrally managed Content Variables files for each bot language.
You can export the language-specific content variable files to content editors, without exposing any bot configurations. The writers can author the content in the exported file, which you can import back into the bot.
Defining Bot Variables
Follow these steps to add or edit bot variables:
- Open the bot for which you want to add the variables
- Select the Build top menu
- From the left menu, under Configurations, select either Environment Variables or Content Variables
- On the Variables page, click Add Variable and enter the following details:
- Variable Name: Enter a name without any special characters, for example, Bots Environment.
- Value: Add a String expression. This string replaces the variable everywhere it is invoked.
Note: For content variables, you need to enter different values for each bot language. Refer to the next section to learn how.
- Enter developer notes in the Notes field. While this is an optional field, entering useful notes can help the developer working on the target bot to understand and provide relevant values.
- Group can be used to categorize the variable.
- Assign a Namespace if enabled (refer here for more).
- Click Save.

- Repeat steps 3-5 to add or edit more variables.
Entering Language-Specific Values
To add language-specific values for content variables, you first need to switch the bot language. You can switch the language by clicking the name of the currently-enabled language from the top-right corner of the bot’s page and then selecting another language as follows:

After switching the language, go to Build > Configurations > Content Variables page and click the edit icon next to the relevant variable. Replace the text in the Value field in the enabled language.
Using Environment Variables
You can invoke an environment variable in plain text mode (Standard editor) using the following syntax:
{{env.variableName}}
If you are using it in JavaScript mode, it is env.variableName
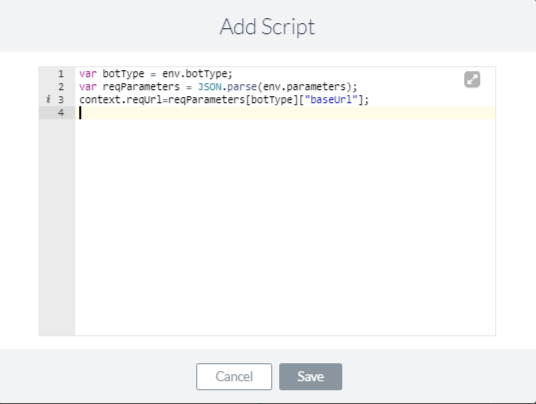
Here’s an example from a bot that uses two environment variables called botType and parameters to determine different bot environments such as development, testing, and production. The following script node in one of the bot’s tasks captures the base URL of the bot, depending on the current bot environment.
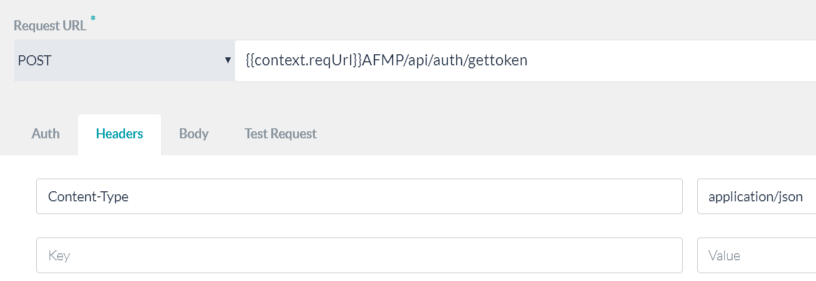
The URL in the following service node changes based on the captured URL
Using Content Variables
You can invoke a content variable in plain text mode (Standard editor) using the following syntax.
{{content.variableName}}
If you are using it in JavaScript mode, it is content.variableName
Here’s an entity node of a multi-language flight booking bot that captures the source airport of the users. It uses a content variable instead of a hard-coded user prompt.

When the bot reaches this node as a part of the user interaction, the user prompt changes depending on the language of the interaction (provided you entered the respective variable values for all the enabled languages).
Importing and Exporting
You can import and export bot variables between bots.
- On any of the Bot Variables page accessible from Build > Configurations -> (Environment/Content) Variables,
- Click the ellipses next to Add Variables
- To Import: Select Import to import variables from a JSON or CSV file
- Since the import will replace the existing variables, you are advised to take a backup of the same.
- After taking a Backup, Proceed with the Import
- Select a JSON or CSV file to import (see below for the file format)
- To Export: From Export select the preferred format for the export file:
- Bot variables are exported in the form of a JSON, CSV file based upon your selection.
- This file includes both environment and content variables.

The Bot Variable file contains the following information, the same needs to be present in your Import file. CSV files need a header row. You are advised to refer to the Export (or backup) file and use the same format for the Import file.
- key (mandatory) – name of the variable
- scope – the scope of the variable corresponds to the Setup Option at the time of variable declaration (if not provided will be set to prePopulated) and can be
- prePopulated,
- askOnInstall, or
- hidden
- value – the value of the variables
- variableType (if not set will default to env)-
- env for Environment and
- locale for Content Variable
- audioTag -for the player details in case IVR enabled
- group – group name
- hint – description of the variable
Sample CSV file:
![]()
Sample JSON file:
[
  {"key":"hosturl",
   "value":"https://bots.kore.ai",
   "hint":"This is the URL of environment which can be used across the endpoints configured in the bot",
   "audioTag":"",
   "variableType":"env",
   "scope":"prePopulated",
   "group":"URLS"}
]