Roles and Permissions help in organizing the developer community based on the scope of their work.
- By default the roles of Master Admin, Bot Owner, Bot Developer and Bot Tester are created by the system.
- Each role has set of permissions allowed.
- You can edit the permission settings for Bot Developer and Bot Tester but not for Master Admin and Bot Owner roles.
- Users can be assigned to these roles, except Bot Owner which gets assigned when a User creates a Bot.
Apart from these the role of Primary Master Admin is created and assigned to the creator of the account.
These roles can be classified into:
- Admin Roles which help in account management, and
- Bot Roles which help in the bot development.
Admin Roles
An admin role is a set of pre-defined permissions for managing the user community. In this section, we talk about Admin roles, the permissions associated with them, how to create and assign these admin roles to users.
Built-in Admin Role
By default, a Master Admin role is created and this role can be assigned to any user for admin access. The various permissions granted to the Master Admin role are listed below:
| Permission | Master Admin |
|---|---|
| Invite | Yes |
| Import Users / Sync | Yes |
| Directory Sync | Edit |
| Manage Users | Edit |
| Manage User Settings | Edit |
| Manage Groups | Edit |
| Manage Custom Admin Roles | Yes |
| Manage Built-In Admin Roles | Yes |
| Manage Bot Roles | Yes |
| Manage Deployment | Yes |
| Enterprise Bots | Yes |
| Consumer Bots | Yes |
| Smart Bots | Yes |
| Preferences | Yes |
| Single Sign On | Yes |
| Kore.ai Connector | Yes |
| Enterprise Key | Yes |
| API Scopes | Yes |
| View and Run Audit Reports | Yes |
| View and Run Bot Chat History | Yes |
Note: The creator of the account is assigned the role of Primary Master Admin. This role cannot be removed and cannot be assigned to any other users. It is visible only from the profile tab of the Primary Master Admin.
Custom Admin Role
The Master Admin can create custom Admin roles and assign the same to users. The following permissions can be granted to an Admin role.
| Permission | Access Levels | Description |
| Invite | Yes, No | Invite Users via email; Invite users already imported |
| Import Users / Sync | Yes, No | Bulk Import users via files |
| Directory Sync | Yes, No | Enroll users via Directory Sync |
| Manage Users | Yes, No | Manage user profile, user status, and role assignments |
| Manage Groups | Yes, No | Create a local group; manage user membership, view distribution lists (DLs) |
| Manage Custom Admin Roles | Yes, No | Set up and manage Custom Admin Roles. Assign/Revoke users |
| Manage Built-In Admin Roles | Yes, No | Assign users to / revoke users from built-in admin roles |
| Manage Bot Roles | Yes, No | Set up and manage bot roles. assign/revoke users |
| Manage Deployment | Yes, No | Approve & publish bot (tasks) deployment requests |
| Enterprise Bots | Yes, No | Assign approved Enterprise bot tasks to managed users |
| Consumer Bots | Yes, No | Manage consumer bots, tasks, and channels |
| Smart Bots | Yes, No | Manage smart bots, tasks, and channels |
| Preferences | Yes, No | Manage auto deployments and assignments |
| Single Sign On | Yes, No | Configure and manage Single Sign On |
| Kore.ai Connector | Yes, No | Initiate, enable & disable Kore.ai connector |
| Enterprise Key | Yes, No | View key used for encrypting enterprise data |
| API Scopes | Yes, No | Setup API scopes to manage all users, roles, and bots in your account |
| View and Run Audit Reports | Yes, No | Access Audit Reports; Ability to run reports; filter criteria, etc |
| View and Run Bot Chat History | Yes, No | View chat history from all bots of your account |
Creating an Admin role
- Open the Bots Admin Console.
- On the Admin menu, select User Management > Role Management.
- On the top right corner of the Role Management window, click New Role.
- Enter Role Name and Role Description.
- Under Select Role Type, select Admin Role and select the necessary permissions for the role.
- You can retain the default permission settings or modify them as per your requirements.
- Click Save.
Once created, you can assign roles to individual users or to user groups. You can edit the roles from the Bot Admin Console.
Assigning Admin role
- Open the Bots Admin Console.
- On the Admin menu, select User Management > Users.
- Click a user’s record for which you want to add a bot role. The user’s profile slides open.
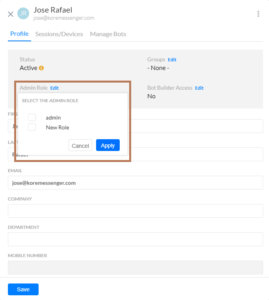
- Under the Profile tab, edit Admin Role.
- Select the appropriate Admin role from the dropdown with the available roles.
- You can assign multiple admin roles to the selected user.
Assigning Admin Role to a User Group
- Open the Bots Admin Console.
- On the Admin menu, select User Management > Role Management.
- Hover over a role record from the list and then click the Edit icon. The Manage Role window slides open.
- Click the Assignments > Assign Role.
- Open the Select Groups drop-down list and select all the groups for which you want to assign the bot role, one after another.
- You can assign users also from this dialog from the Select Users type ahead input box.
- Click Save.
Note the default Master Admin role can be assigned to users (not groups) by the Primary Master Admin.
Bot Roles
This section illustrates various Bot Roles, their permissions, steps to create custom Bot role and assign users to the same.
Bot Roles can be used to define permissions for accessing various components of a bot. These permissions include the ability to create tasks, train the bot, enable channels, enable extensions via SDKs, publish the bot and view usage analytics.
Bot Owner, Bot Developer, and Bot Tester are the three in-built bot roles that are available for all accounts. Creators of bots are automatically assigned to the Bot Owner role.
You may create additional custom bot roles to meet your specific requirements. You can assign bot roles to bot developers either from Bot Builder or from the Bot Admin Console.
Following is the list of permissions that can be assigned to a Bot role:
| Permission | Access Levels | Description |
| Tasks | Full, View, No | Ability to add, modify, upgrade and delete dialog, action, alert and info tasks. |
| Natural Language | Full, View, No | Ability to add, modify, and delete utterances, synonyms, patterns and standard responses. Ability to manage Default Dialog, Ignore Words, Field Memory, and Advanced Settings.
Note: The Natural Language settings that can be modified from inside Dialog Tasks and Bot Analytics pages also adhere to these permissions.
|
| Knowledge Graph | Full, View, No | Ability to add and modify Knowledge Collection |
| Batch Testing | Full, View, No | Ability to add and manage test suites. In ‘view’ mode, users can only review the results and not be able to run test suites |
| Bot Developers | Full, View, No | Ability to invite users to the bot and assign them roles |
| Bot Settings | Full, View, No | Ability to manage General Settings, Language Management, Authorization Profiles, PII Settings, IVR Settings, Bot Variables, Bot Export, Advanced Settings, ChangeLogs, Delete Bot |
| Bot Import | Yes, No | Ability to upgrade a bot by importing a new bot definition file |
| Extensions | Yes, No | Ability to associate apps for BotKit, WebSDK, Agent Transfer, and Events.
Note: App creation and management are allowed for all bot developers. However, the association of app against an extension is controlled via this permission.
|
| API Scopes | Yes, No | Ability to manage API Scopes |
| Publish Bot | Yes, No | Ability to publish bot |
| Channels | Yes, No | Ability to enable and manage channel configurations |
| Dashboard | Yes, No | View dashboard data |
| Bot Analytics | Yes, No | View bot analytics. |
Built-in Bot Roles
The following Bot roles are created by default. These roles are applicable for standard bots, sample, and smart bots. For universal bots, the tasks access control will be applied to the Linked Bots.
| Permission | Bot Owner | Bot Developer | Bot Tester |
|---|---|---|---|
| Tasks | Edit | Edit | View |
| Natural Language | Edit | Edit | View |
| Knowledge Graph | Edit | Edit | View |
| Batch Testing | Edit | Edit | View |
| Bot Developers | Edit | View | View |
| Bot Settings | Edit | Edit | No Access |
| Bot Import | Yes | Yes | No |
| Extensions | Yes | Yes | No |
| API Scopes | Yes | Yes | No |
| Publish Bot | Yes | Yes | No |
| Channels | Yes | Yes | No |
| Dashboard | Yes | Yes | Yes |
| Bot Analytics | Yes | Yes | Yes |
Custom Bot Roles
Admin can create custom Bot roles and set the bot permissions to these roles.
Creating custom Bot role
- Open the Bots Admin Console.
- On the Admin menu, select User Management > Role Management.
- On the top right corner of the Role Management window, click New Role.
- Enter Role Name and Role Description.
- Under Select Role Type, select Bot Role and select the necessary permissions for the role.
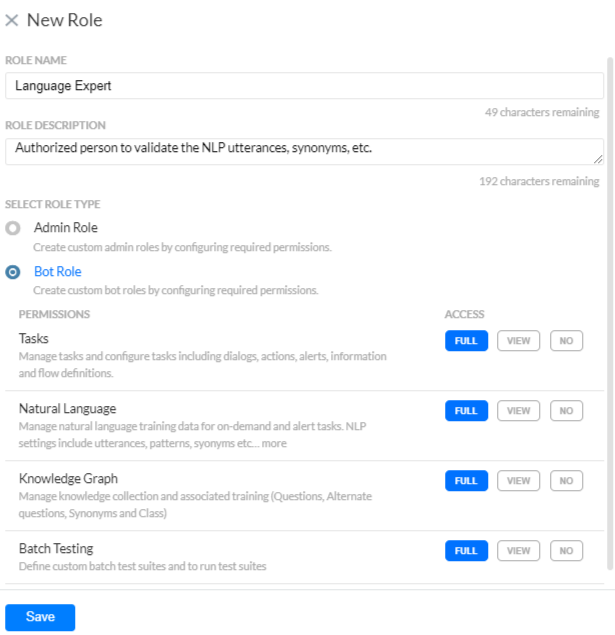
- You can retain the default permission settings or modify them as per your requirements.
- Click Save.
After creating a custom role, you can access more information about that role, change its name and description, add permissions to it, or assign this role to specific users.
Assigning Bot Role
You can assign roles to individual users or to user groups. You can add and edit the roles from the Bot Admin Console. Also, you can assign a bot role to a user while sharing the bot with them from the Bots Platform.
Assign Bot Role to a User from the Bots Admin Console
- Open the Bots Admin Console.
- On the Admin menu, select User Management > Users.
- Click a user’s record for which you want to add a bot role. The user’s profile slides open.
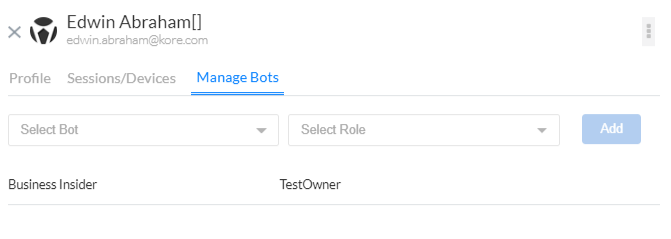
- Click Manage Bots and do the following:
- From the first drop-down list select a bot.
- From the second drop-down list, select the bot role you want to assign the user for the selected bot.
- Click Add. The bot name and bot role appear below the drop-down list as a row. You can edit the bot assignment anytime later by hovering over the record and clicking the Edit icon.
Assign Bot Role to a User Group
- Open the Bots Admin Console.
- On the Admin menu, select User Management > Role Management.
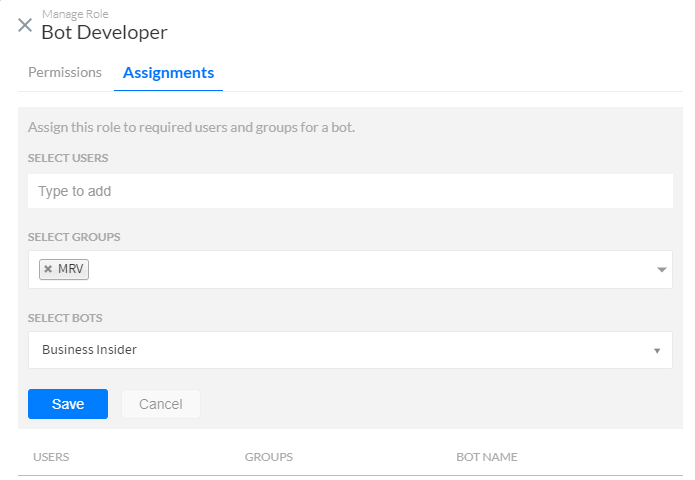
- Hover over a role record from the list and then click the Edit icon. The Manage Role window slides open.
- Click the Assignments > Assign Role.
- Open the Select Groups drop-down list and select all the groups for which you want to assign the bot role, one after another.
- You can also add users from the Select User type ahead box.
- Click Save.
Assign Bot Role from the Bot Builder
- On the Bot Builder top menu, select Manage tab
- From the left menu, select Team
- On the top-right corner of the Team page, click Invite.
- Do one of the following:
- To assign the role to a user, type the name of the user in the Users text box and select the user’s name from the suggestion list.
-or- - To assign the role to a group, select the name of the group from the Select Groups drop-down list.
- Select a role from the Role drop-down list.
- To assign the role to a user, type the name of the user in the Users text box and select the user’s name from the suggestion list.
- Click Save.