
To add the LINE channel to your Kore.ai bot you will need to setup a webhook integration to configure connection between LINE and Kore.ai. Adding the LINE channel to your Kore.ai Bot allows end users for your bot to interact with your bot using their LINE accounts. To add the LINE channel to your Bot, you will need to:
- Create a Provider- To setup LINE channel, login to your LINE developer account where you need to create a ‘New Provider’ or select a Provider that you would like to use for this bot and then proceed to add the channel. To enable LINE channel, you must create and register for a developer account in the LINE Developers portal.
- Enter Channel Information – Enter channel information for Messaging API like App Icon, App Name, Plan, Category, subcategory, email address.
- Setup Webhook Integration- To enable LINE integration to your Kore.ai Bot, enable webhook integration by copying the Webhook URL provided on the configurations tab of the LINE Channel page in the Bot builder.
- Enable Channel – After completing integration setup and entering the configuration details in the Bot builder, you need to enable the channel.
Create Line Provider
- Login to your LINE Developer account portal.
- If you already have a ‘Provider’ that you would like to use for this bot, then choose the Provider from ‘Provider List’ option and click on ‘Create Channel’ under Messaging API.
- Or, if you wish to add a new provider, use the ‘CreateAdd new provider’ to create a new Provider.

- Enter the Provider name and proceed to create a new provider. After you have created the Provider, select ‘Create Channel’ under ‘Messaging API’ option to continue with the addition of Channel.
Add LINE channel
- In the Bots section of the Bot Builder, click the Bot for which the LINE channel needs to be added.
- On the Channels tab, click the LINE icon. The LINE Channel page gets displayed.
- In the Enter channel information field, provide the required details and create the Channel like App Icon, App Name, Plan, Category, Sub-category. Click on Confirm to review and proceed with channel creation.
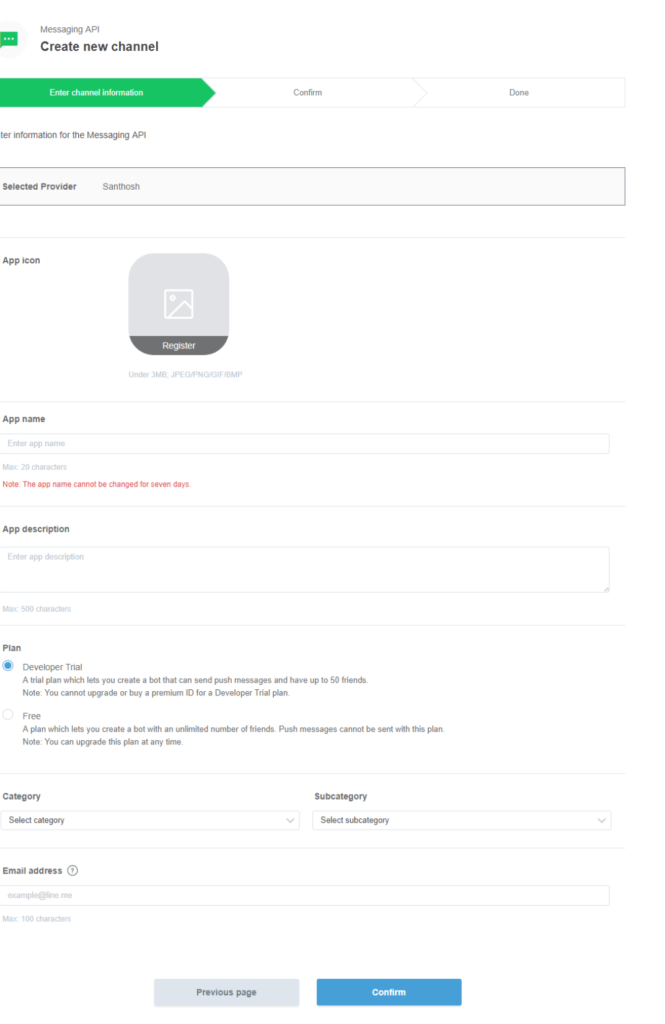
Note: Kore.ai platform uses ‘PUSH_MESSAGE’ APIs to deliver alert notifications to the end-users of the bot. Please review the LINE plan options carefully and select the appropriate plan that suits your needs.
Capture Channel Details
- After the channel is created, you will be redirected to the Provider dashboard with a list of channels available.
- Select the channel you have created above to continue with channel configurations.
- Capture the Channel ID and Channel secret of your LINE channel and provide them in the Configurations tab of this page.
Enable Webhook Integration
- To setup webhook integration, navigate to ‘Messaging settings’ section, and enable the Use Webhooks option.
- Copy the Webhook URL provided in the Configurations tab of the Channels page and enter in the ‘Webhook URL’ field and click Update.

- After saving the webhook URL, click on Verify option to ensure that webhook call from LINE is acknowledged by Kore.ai platform.
Review Additional Options
- Review additional options available for your LINE channel like group behavior, auto-replies, and greetings messages.
- Navigate to Configurations tab of this page and complete the setup.
- WEBHOOK URL: Provide URL without ‘https://’ as LINE already includes that part.
- CHANNEL ID: Capture Channel ID of your LINE channel and provide it here
- CHANNEL SECRET: Capture channel secret from your LINE channel and provide it here
Editing the LINE Channel
To edit the LINE channel, hover your mouse over the channel and click to modify. You can make necessary updates to your channel configurations and save them. You may also disable or delete the channel information by clicking the Settings icon.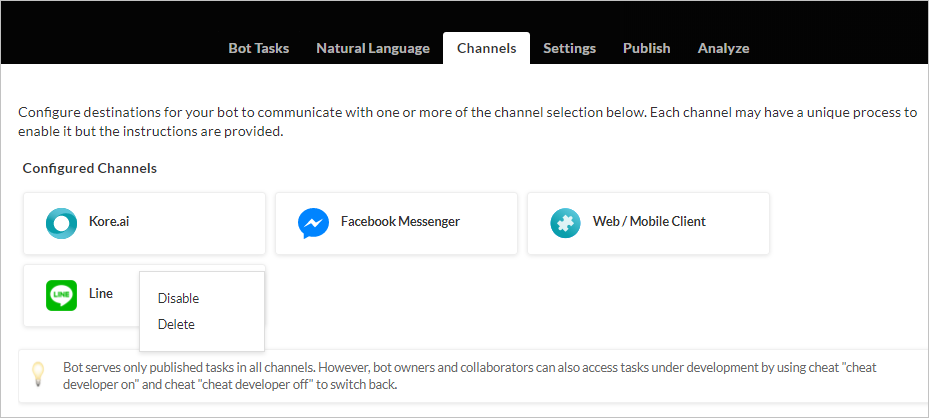
Select one of the following commands to modify the channel:
- Disable/Enable – Click Disable to temporarily disable use of the LINE channel for your Bot.To enable use of the LINE channel, Click Enable.
- Delete – Click Delete, and then click OK in the Delete Confirmation dialog to permanently delete the Bot channel configuration.